
GilesWoodward
-
Posts
30 -
Joined
-
Last visited
About GilesWoodward

Recent Profile Visitors
1,503 profile views


-
Giles First Build - Anovos 2018 Stunt
GilesWoodward replied to GilesWoodward's topic in ANH Build Threads
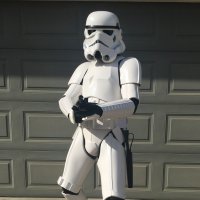
My first time wearing all the completed armour! Well... the right thigh wasn't finished but I couldn't wait any longer! Not too bad of the first fitting! Now it's time for a walk outside... -
Giles First Build - Anovos 2018 Stunt
GilesWoodward replied to GilesWoodward's topic in ANH Build Threads
Since my last post on February 2018 much has happened — I was just approved at L3 Centurion. My apologies for not completing this build thread while I was building. However I thought that I should go back and complete my build thread in case it can help be of help to another Anovos builder out there somewhere in the galaxy! Forearm: The first cover strip being glued in place! A very satisfying feeling—I can do this. Use a lot of glue and make sure it comes out a little at the edges. It's super easy to clean up once its dry. I left all my freshly glued armour for at least 24 hours before even touching it. Excess glue almost peels off with the addition of a little rub of the fingers. Biceps: Cover strips cut to length, edges sanded and ends rounded. Each one marked to stop any mix ups! as little of the protective plastic covering was left on to stop any unwanted scratches. Biceps—Front: Magnets and clamps used to secure one cover strip at a time. Notice the glue squeezing out a little. These puppies are not coming undone! Biceps—Back: Inside shot of the second set of bicep cover strips. Notice doubled up magnets & tape to hold in pace! Thigh—Right Front Outside: Inside View I will glue the cover strip on one side at a time. The curvature on this thigh armour was crazy. I finished the cover strip but left it long at the top to trim down afterwards. Notice a print out of Tony's Anovos build thread! My bible! Thigh—Right Front Outside: Outside View Notice the magnets at at the outside edge of the cover strip to ensure firm glueing. Notice also excess glue squeezed out! Thigh—Right Front Complete: Outside View Time to glue the cover strip onto the other half of the right front thigh. The arrow were drawn as I tested the fit and alignment before glueing. I then used the marked locations for the magnets. Painters tape to ensure good attachment. Left Thigh Outside— Outside View: I used more clamps than magnets on the left thigh. But notice I am only glueing the cover strip to the outside half of the thigh one side at a time to ensure a firm connection and strong bonding. Again the cover strip is left a little long on the top. I will trim this back once the other side is glued in place. Left Thigh Inside—Outside View: More magnets than clamps this time. magnets at the outside edge of the cover strip to ensure a good glue connection! Left Thigh complete—Outside Top View: The blue tape was critical ensure the cover strip was firmly secured to two thigh pieces. Left Lower Leg - Connecting the Sniper knee: Glueing the centre of the sniper knee in place first! Notice the small clamp at the bottom, that's to keep the knee in place as well. No images of the front cover strips being glued in place I'm afraid! Remember the backs are left open! A little look at the position of the sniper plate on the inside of the lower leg. No trimming required! Outside of the sniper plate: I trimmed off this much to ensure a better fit onto the left lower leg. Outside of the sniper plate: This is how it looks when trimmed and glued in place Split Rivet Painting: I pushed the rivets through the lid of an old cardboard box and painted them with these tiny cotton bud looking sticks I found at a model store. Much better than messing around with a brush! Inside View of the left thigh: I found a crack - time to cut a scrap piece of abs to fit. Glued in place - no clamp though! Inside view of the cod: Time to figure out where to drill my first holes I couldn't wait to try on all the pieces of armour once most of the glueing was finished! The armour looks a little big right now! Maybe i should loose the tape! What a good looking guy thanks to a lot of duct tape!!! I received these flexible hand guards in the mail thanks to Joseph!!! Now time to glue them on the rubber gloves! Flexible Hand Guards on rubber Gloves: Stuffed some winter socks inside the gloves to mimic my hands. Cleaned both the glove backs and the hand guards with rubbing alcohol. Trusty e6000 at the ready and ... Finish holding them in place with strips of duct tape. These baby's are never coming off!!! Hopefully The Finished Product: Finished! I wasn't sure that e6000 would hold but it did! Much easier than I had anticipated. Making Snap Plates: 1 Inch belting (nylon strapping) was cut into 2" ish lengths. I made a template from a piece of cardboard. Then I used a soldering iron to burn (punch) a hole in the centre. The template was then along with a soldering iron to make the plates. The snaps themselves: I had read that some people were experiencing some unusual effects from glueing their snap plates onto the inside of their armour. So as a consequence I decided to wrap the bases of the plates with painters tape. Glue would then not come into contact with any of the metal/plastic. A similar process was used to make the strapping. The finishes snap plates and strapping. No double snaps were used!! After 4 troops some over 4 hours - I have not had a single snap fail - Yet! Sewing the elastic for the shoulder/chest connections - thanks wifey! Sewing the thigh elastic around a garter belt - thanks wifey! Garter belt for the thigh minus the snaps! Time to test snaps, strapping and shoulder elastic - looking good! I just need some legs and a belt please : ) Trying to determine the length of the thigh elastic that connects to snaps on the inside of he upper thighs. Getting all the holes in the right places was tricky - patience ! I did't like how the bottom of the left thigh was finished so I made an extra piece of moulding out of scrap abs! The abs moulding patch glued in place. It now needs sanding to blend into the existing armour. Time to paint a Rubies blaster. I hung it from the garage door mechanism with a wire coat hanger I made into a hook. Black primer & spray paint from Home Depot and we're looking in ok shape! The finished forearms showing the position of the elastics in place. -
Hello Troopers, Oops - I appear to have missed this introduction way back at the beginning of summer when my amor passed basic approval. So I thought I’d wait to post until I was approved for Centurion! I’m very pleased to be part of this community. If Only You knew: Build to Centurion L3 straight out of the box. Each of our bodies is unique, the armour fits everybody differently. Be patient with yourself. Don’t set yourself an unrealistic deadline. This will cause you to make panic mistakes. You will hopefully have this armour for life. Build it right the first time! If you don’t feel 100% comfortable making that cut today, then wait a day. It will be so much easier tomorrow. There are no shortcuts! They will come back to bite you hard. Trust that it will all come together perfectly in the end. Strapping will be the most satisfying part of the process. OCD will be your biggest enemy! Nobody will notice that small blemish or sight imperfection. All they see is a very cool Stormtrooper Oops! A small crack appeared in the bottom return edge of one of my shoulder bells. The plastic bucked very easily here even when merely picking the bells up! I read in the forums about various fixes but decided to go it alone! BIG MISTAKE, Big Mistake! Coincidentally, I had just made up some ABS Paste to test out the process and look at the results. So smartypants here thought it would be a great idea to reinforce the inside return edges of the shoulder bells with ABS Paste. They would then have firm support and not crack again! Well… after applying the paste a little at a time over about 15 mins I packed up for the night. In the morning TO MY HORROR I found that the outside walls of the bells had buckled and were no longer a flat smooth surface! Devastation, my jaw dropped! New bells!! Or… I then begin the tedious process of using my freshly made ABS paste to very slowly build up the outside shape of the shoulder bells one small application at a time. Once I had "over-built" the shape of the bells I proceeded to sand back the shape and blend into the existing armour surface! OMG what a process. I CANNOT recommend this. But the result was awesome and hardly noticeable as the colour and texture matched nearly perfectly once sanded smooth with 800 grit and polished. Shout outs: Tony’s build threads are amazing. Always trust that it will work out if you follow what he’s done - even if you don’t really understand them : ) I can’t thank Tony (Ukswrath) enough. His Anovos build thread was my bible! I literally printed it out and followed every single page carefully. Slightly adapting as I built, to match what I was seeing right in front of me with my armour. My wife has the patience of an angel and knows nearly as much as me when it comes to dressing and adjusting armour. She’s one awesome photographer and handler. A big thank you to Greg (Wook1138). After acting as his handler on May 4th and seeing Stormtrooper armour in person for the first time it gave me a huge boost of confidence. My build after that point went much more smoothly! Thanks for reading — See you all out there!
-
Thank You Very Much!!! You’ve just made my day : ) Can’t wait to do my next Troop
-
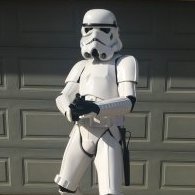
I've made adjustments to the Dropbox / Belt alignment. Here are some updated photos: Left and Right Sides with Arms Raised – Revised Photos
-
Name = Giles Woodward TK ID = TK-16818 Forum name = GilesWoodward Garrison = Badlands Garrison (Canada) Armour = Anovos Helmet = Anovos Blaster = HFX Elite Height = 5’11” Boots = TK Boots Canvas belt = Kittle Hand Plates = Joseph Electronics = Aker Amp & Mic + Trooper Talk Neck Seal = Geeky Pinks Gaskets Holster = Anovos EIB link: https://www.whitearmor.net/forum/topic/45779-tk-16818-requesting-anh-stunt-eib-status-anovos-863/?tab=comments#comment-630709 Fixes mentioned during EIB submission have been completed: 1. Opening on the top inside of the eyes trimmed 2. Hovi-mic tips painted white on inside and rims 3. Undersuit not peeking out. 4. Strapping on back/kidney connection tightened. 5. Lower ear screws replaced for flathead countersunk style. 6. Strapping shortened at bottom of right kidney/ab connection Full Body ——————–––––– Front & Back – Arms at Side Left & Right sides with arms raised Amor Details ——————–––––––– Ab Button Details Hand Plates Shoulder Bridge – Back Shoulder bridge – Front Back/Chest Connection Thigh Pack attachment Knee Plate – Left Knee Plate – Right Knee Plate – Front Drop Box –Backs Cod & Butt Plate – Attachment Interior Strapping Strapping – Arms Kidney Plate – Notch Wrist Side of Forearms Single Male Snap on Right Side of Ab Plate Helmet Details ——————––––– Helmet – Front Helmet – Left Helmet – Right Helmet – Back Hovi-Tip Mic – Detail Lens – Colour S – Trim Blaster Details ——————––––––– Blaster – Right Blaster – Left Accessories Details ——————––––––––––– Neckseal Thermal Detonator - Back Holster – Attachment TK – Boots Thank You for your Consideration!
-
Hi Joseph, Thank you for your time and diligence sir! I very much appreciate the feedback on my build and look forward to starting those finishing touches. I am delighted to reach level 2 EIB! Thank you! Giles
-
Hi Joseph, Here you go Sir! FYI the gloves are black rubber with flexible hand guards courtesy of yourself : ) Thank you very much
-
Name = Giles Woodward TK ID = TK-16818 Forum name = GilesWoodward Garrison = Badlands Garrison (Canada) Armour = Anovos Helmet = Anovos Blaster = HFX Elite Height = 5’10” Weight = 175 lbs Boots = TK Boots Canvas belt = Kittle Hand Plates = Joseph Electronics = Aker Amp & Mic + Trooper Talk Neck Seal = Geeky Pink's Phantastic Gaskets Holster = Anovos Full Body ——————————————————————— Front - Arms at side Back - Arms at side Left - Arm raised Right - Arm raised Left Side Detail - Arm raised Right Side Detail - Arm raised Amor Details ——————————————————————— Abdomen Details Action Shot Cod and Butt Plate Attachment Interior Strapping Helmet Details ——————————————————————— Helmet - Front Helmet - Right Side Helmet - Left Side Helmet - Back Hovi Tip Detail Helmet - Lens Colour Blaster Details ——————————————————————— Blaster - Left Blaster - Right Accessory Details ——————————————————————— Neck Seal - Geeky Pink's Phantastic Gaskets Thermal Detonator - Top Thermal Detonator - Back Holster Attachment
-
GilesWoodward changed their profile photo
-
TK 16818 Requesting Trooper status? Here's my record page on the 501st: http://501st.com/members/displaymemberdetails.php?userID=28476 Many Thanks
-
Thank You! I'm looking forward to these next few steps!
-
Thanks for taking the time to provide some amazing advice and fix tips Joseph!!! Most appreciated : )
-
Thanks for the tips David. What's the best (least intrusive) way to move the belt up 1/4"? Cheers!
-
Thanks for the feedback Tino! Yeah, I wasn't that happy with the white spaces between the teeth either.
-
Great eyes! Yes I think they had slipped a little - Time to get those biceps hooks glued in place I think. Thanks Jordan.
