Leaderboard


Popular Content
Showing content with the highest reputation on 05/12/2018 in all areas
-
So much to post and so little time. I've been plugging along with strapping and plan to provide details of all of that soon. In the meantime however I have a troop next weekend that I'm cramming to finish this by so you only get a couple of teaser photos from my test fitting earlier today. Upper half is mostly done and I'm working on the bottom half now. The little Yoke discrepancy has already been corrected. See you folks on the other side!2 points
-
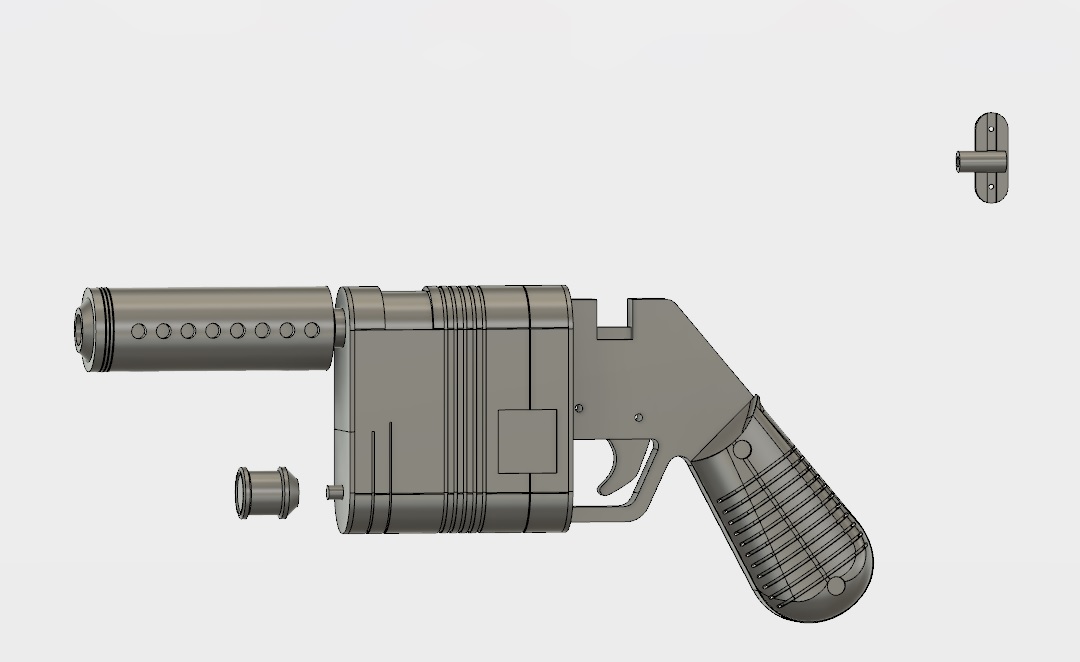
Greetings all! I know this isn't exactly a stormtrooper blaster, but it's still a nice looking blaster, so I thought it would be ok to share the build? Started off by drawing it up on Autodesk... took a while as I had to learn how to use the program first lol
 1 point
 -
I have no Idea for SWAT but....what a beauty1 point
-
here's the final product with the barrel greeblies.....Good for SWAT level once I get the sling on her?1 point
-
Made the all the containers for the one part molds today. The main body, hammer, and part that sits down from the barrel I'm gonna do in 2 part molds tomorrow, as they're an awkward shape. PunishedProps have some great videos and resources for Reys blaster, there s a free vector diagram which I used to help on the 3d drawing (though I've edited the grips a little on mine so they're closer to reference pics), so credit owed to punished props there! They also have vids on one and two part molds, they really inspired me to try this route, so worth of watch if anyone's interested.. Sent from my SM-G925F using Tapatalk1 point
-
No argument here Sent from my SM-N950F using Tapatalk1 point
-
Nice work, Carl. [emoji106] Just a couple of little things that might be flagged during your application. It looks like the paint may have rubbed off of your side rivets. Ideally, your drop boxes would be lined up with the outer edge of your ammo belt. Best of luck with your app. Nice to see an ESB trooper in the ranks. Best wishes, Dan Sent from my iPad using Tapatalk1 point
-
I used slightly bigger cover strips inside for added stability. And again let it dry for a while it’ll hold. Sent from my iPhone using Tapatalk1 point
-
Awesome thanks! - How's this :]?1 point
-
Gotcha....I put strips on both the inside and outside of the shins... Allowed the e6000 to cure for three days and they were rock solid after that Sent from my Pixel XL using Tapatalk1 point
-
Bit more done today: after a coat of regular primer, I've set sanded everything to get it silky smooth As my sister is gonna cosplay Rey, I'm gonna make 2 blasters so we have one each So, I'm gonna make some molds and cast a couple in resin. Never done this before so should be fun! Sent from my SM-G925F using Tapatalk1 point
-
Hey Sean we'll be with you shortly. While you're waiting please post photos of the green helmet lens and back of the waist belt (armor side) Thank you1 point
-
Jim For the thighs I would suggest you get a garter belt system so thighs are seperate from armor so when you walk it wont pull down on armor Garter belt system ideal for thighs https://www.whitearmor.net/forum/topic/29991-thigh-garter-system/ Mark (AP)1 point
-
I got mine on Amazon. Tandy Line 24 snaps are super high quality. I also echo others that you might want to try splitting the ab and cod and shimming the space in between - it will be hidden by the belt.1 point
-
Good luck, Sean! Thanks for the shout-out, it was a pleasure helping you build this kit!1 point
-
Congrats on achieving Centurion!1 point
-
As others already mentioned, scrab ABS/Hands/Get a ladies nail to start peeling, and the excess should come right off no problem.1 point
-
Drill the holes for the brackets in the crease of the return edge. Don't be too particular as the original brackets were placed in the creases or even on the face of the armour if the return edge had been trimmed too much.1 point