

MFJ
-
Posts
95 -
Joined
-
Last visited
Content Type
Profiles
Forums
Gallery
Articles
Everything posted by MFJ
-
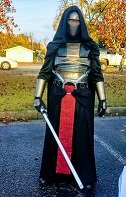
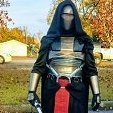
Ok. So it feels way better without the elastic on the middle of the chest piece. I couldn't get my snaps on the shoes and shins by myself and I know the color looks weird, but this definitely gave me room to breathe and I could walk around comfortable for the first time. I did make a bigger piece of elastic mid chest to "pull" the chest piece down. Patiently still waiting on Mark to send my buttons and strips.
-
I've taken the middle elastic off and temporarily used Velcro to pull it down and see if I can get it to work. If it does I'll make it out of snaps and 1" elastic. Without me in the clamshell it seems to work. Now whether it works while I'm in it I'll find out tonight. I'm riding around looking for the glue for my gloves. Full attempt again tonight.
-
Also, that's Mark Hamill on the right which is 5'6" and his chest plate was cut down. This is from the scene where Luke and Han are going to rescue Leia
-
This is impossible being 6'2". But I'm still going to put better elastic in the front. But it'll never be that low.
-
I'll give that a try first.
-
Hopefully this will help the biceps and shoulder bells. All in all it's a decently nice fit with very little gap anywhere.
-
So I did my best to suit up by myself. Lord I'm in pain now. It took forever. Everytime I'd get one shoulder bell and bicep right the other would pop out from stretching to get the other one in. I also found out the shins ride up. So I snapped them . (Now that I can do that) Gonna try again later tonight. Can't get my latex hand guards to stick on my gloves, so I'm making straps. Another question. Can I cut more neck relief so I'm not feeling like I'm being choked all the time?
-
I plan to do just that next time I suit up. I didn't want to glue them not on the armor. I've spent this much time to get it right, I didn't want to make them be out of place. BTW, remember my question on the back of the AP thigh armor? I did what you said and trimmed a little bit at a time and finally they stated looking correct. I appreciate the help with that. The thighs never looked right in the back but now they do.
-
The drop boxes do align with the ammo belt. They do slide.
-
Installing the blaster holster Using the leather strap as a guide, this is the distance away from the ammo belt. Using a ruler I measured 15 mm from the bottom of the belt and made my mark for the first hole. I then did the same for the second strap. Both holes marked since this is a stunt build. I then measured 25 mm up and made a mark. This is the underhang of the holster and is seen. From there I measured 15mm from that, made a mark in the middle of both holster straps Using a leather punch I made the 2 holes in the belt and the holster. I used #8 1/4" Chicago screws to attach it to the belt. The finished belt ( minus the belt buttons I'm waiting on.
-
Found a better one. Looks a lot better. I'll be installing all the electronics in the helmet while I'm waiting on my belt buttons and cover strips from Mark.
-
The one I bought from someone here is too short. I'll try to find one local.
-
Do you guys think this s seal is too thick?
-
AM Armor 2.0 ANH Build (1st time TK Builder)
MFJ replied to Darth Atlast's topic in ANH Build Threads
I'm right down the road if you want some help Phillip -
First time suiting up the top. I definitely need to cut some relief in the neck. It's harder to put this on by yourself than I thought. Getting all the parts on and snapped is kinda uncomfortable. Didn't want to ruin my neck seal. Just kinda a first fit. I wish the shoulder bells were a bit bigger but all in all. I'm happy with it. Back to building!
-
That's what I was going to have to do. I completely understand everything you said. 10-4. Measure 10 times, cut once. Lol
-
Just a question. We're your thigh pieces easy to identify where to cut the back on your AP armor? My right thigh is pretty clear where to cut but my left isn't. I've looked at some reference pics of the originals but, they all look like a 3 year old did them. I even looked at other pics from the movie and I saw a sniper plate on the left shin at about a 45* angle instead of straight. Lol
-
Got hold of Mark. He has strips but I need to send a piece of my kit to him to match up the white. In the meantime I'm just waiting on the belt.
-
That looks really comfortable. I probably have enough scrap to do that. Ill definitely do that to make it tougher. What I don't have are the cover strips for my thighs and shins. I did manage to find my lost drop box back but now I'm trying to locate abs so I can finish the legs.
-
Arms connected. Inside connected Shoulder bell snaps in. Plus I'm putting this little"guide" piece on the side of the ab. It'll never be seen but it helps to align everything until my belt gets here.
-
I wish I had more material to work with. I'm waiting on my belt from Trooperbay and my replacement belt boxes from Mark so I'm trying to get the fit I want just using tape for now. I need to do the thighs and shins attachment and also connect my bicep and forearms today and I can't find my under armor so I'll go get another pair today. I'll have tentative fit pictures later. It's coming together now.
-
I CAN SET SNAPS!!!!!!!! I know, I know, it's not a real huge accomplishment BUT it's been holding up a ton of work on this build. So maybe add more ABS under the ABS shoulder strips?
-
Cleaning up the drop boxes. I lost one of the back boxes but I've contacted Mark at AP and he's getting me new back boxes and belt buttons. E6000 on the shims so I can attach them to the chest which needs a bit more sanding on the edges. But, it's some progress. Snaps should be here today.
-
Ok now that looks easier than I'm doing it. I also think my snaps were wrong. It's like the post wasn't long enough. I just ordered Tandy 24 leather line snaps. The return edge also is a lot more comfortable now. I just removed a bit from the sides to keep it from digging in. I'm trying to keep 0 gap in the armor. Tonight is going to be more sanding of all the edges to make it look better
