
Leaderboard


Popular Content
Showing content with the highest reputation on 03/11/2018 in Posts
-
Until we have better sources, please use the below as the paint guide.2 points
-
Just a suggestion, but you may want to consider reinforcing the shoulder straps before installing them. The shoulder straps are subjected to a lot of stress and can be prone to breakage on their own. https://www.whitearmor.net/forum/topic/38416-crickets-rs-stunt-build-for-the-vertically-challenged/?do=findComment&comment=530228 Not a requirement, but may save you repairs down the road!2 points
-
Yup, it would *maybe* start out at L3 only when we see it being avail on helmets. FWIW, we don't require the swoop on OT helmets, when it is clearly there, or say the OT helmet has to be symmetrical. Honestly, the best way to get the change is to ask Jimmi - the only maker for this bucket really - to add it in.2 points
-
I added "doesn't wear a FOTK / OT TK" as an option for us who don't have both costumes.2 points
-
I would say wait for the helmets to get out there first before making it a L2/3 requirement. I’d guess L3, we’ll see soon enough. Shouldn’t be basic.2 points
-
The reveal mask, now pretty much done. I just need to finish the greeblies on the neck seal, add the clasps to join the two, then complete the repainting of the rest of the mask (I decided it needed a new paint job). Sewing machine this week so that I can continue with the quilted leather suit and robes. Scratch built the vocoder unit and microphones with found parts and collecting bits from visits to the hardware store; and Lego! Any Lego enthusiasts might recognise some pieces. It's fun hunting around for parts to replicate this piece. It's inspired by the ROTS version, as it's more colourful than the ROTJ one. I ditched the pepakura neck seal and decided to build a better one with craft foam instead. Best find of all - that chin mesh, it's guttering grating, found at Bunnings. That stuff will also go on the mouth piece grill. Supanova (in April) awaits!!2 points
-
Hi all, After posting on other threads, I’ve had a few PMs regarding what I used to line the interior of my RWA TK lid. So, here we go... [emoji4] I take no credit for the idea - I saw a fellow UK Garrison member (CTID here on FISD) using this method and really liked the results. So, the main lining is Black A4 Size Eva Self Adhesive Foam Sheets. They can be easily cut to size, easy to adhere and give a really nice finish. Another thing I really like about this method is that you can use existing or additions strips of this foam to conceal internal wiring. From the outside, especially lower angles (child view), there is no internal white on show. The fan system is self built. The 5v blower fans are powered by a cylindrical Anker powerbank which fits nicely in the “cheek/tube”. Individual switches allow for flexibility. Any questions, do let me know. Best wishes, Dan1 point
-
So (after what seems like ages), you finally received your official 501st I.D. number and signed up for your first Troop. Now what? Depending on the event, there may be a few differences in protocol. For instance, a "Canon" event (usually one authorized by LFL or Disney) may be more serious in nature and regimented, while other times we are there to make the occasion a lot more fun, (parades, movie premiers, etc.). Here are a few basics to think about in regards of what (and what not) to do on your inaugural appearance with your local Garrison. Of course, all events are different.. some will be indoors, some will be outdoors, or a combination of the two.. some will have just a few members, others may have over a hundred, but the basics stay the same. This list is by no means meant to be complete, so all Troopers are welcome to add their own ideas, tips and fun things to do! 1. Before you leave- If you have not had the chance to wear your armor for any length of time, put it on (including your bucket) and wear it while walking around the house and maybe in your yard for a while. This will give you an idea of your range of vision, movement limitations, and let you know what you are in for. Walking up and down stairs will help. 2. Be prepared- Double (and triple) check your armor to make sure you have all your accessories and all your connections are secure before leaving your house. I would suggest carrying a small repair kit in your bin as well. I have a thread here which will help: https://www.whitearmor.net/forum/topic/48390-emergency-trooping-kit/?tab=comments#comment-674403 2. BE ON TIME- I cannot stress this enough. When you sign up for a troop, they will have an arrival time, (usually an hour or so before), and a "step off" time when you should be completely suited up and ready. The hour gives you the chance to get your armor on, and make any adjustments. There should be "handlers", but any fellow Trooper will be glad to help you out. The POC (point of contact) person for the troop or event coordinator will give you any details you might need beforehand, (directions, special notes). Feel free to ask them any specific questions. If you have any concerns, let your handler or the person in charge know about these. They are there to help. 3. Be aware of you surroundings- Due to the limited visibility in a bucket, watch out for curbs, steps, obstacles, etc. Small children will often run up to you and stand close, so be aware that they may be right below you and cannot be seen. When raising or lowering your weapon, take it slowly as not to clock anyone in the head. 4. Photos- You will be asked (sometimes hundreds of times) "Can I take a picture with you"? Be patient, and get used to it! But be aware of where your arms are to avoid touching anyone inappropriately by accident. Often, people will ask "Can I hold your gun"? That is entirely up to you. A lot of us have spent a great deal of time building our weapons, and they (especially the resin cast) can be damaged if dropped. Many of us carry Hyperfirms for this reason. If you don't want to let someone hold it, you can say something to the effect of "The Emperor forbids it" or "It's against Imperial regulations". Side note: Never, EVER point your blaster at a child for any reason. This is just in really bad taste. UPDATE: In this day and age it's not a good idea to point your blaster at ANYONE. This includes those trooping with you (even Rebel types) and anyone taking the photo. 5. Hydration- Another item that is VERY important, especially in warmer areas and extended troops. FISD legend Steve (gazmosis) wrote a great post on this subject, and it is used here (with permission): "Big troops, big crowds, lots of kids, lots of chances to show off your hard work. With the hot weather, there are also lots of chances to be become quickly dehydrated and sick. Don't let this happen!! There is no greater cooling system than hydration. But drinking a ton of water is not the solution....it's how and when you drink it that is. Let's be clear here!!! We are talking about WATER! Not soda, not energy drinks, not juice. WATER...H2O. Leave the Gatorade in the cooler for after the troop. Proper hydration should begin a full day prior to a hot troop. Steady intake of water (8-16 oz. an hour) is fine. Too much water at one time can actually be harmful but a slow and steady intake will allow the body to properly absorb and distribute it until you are hydrated down to a CELLULAR level. Yes, you will be in the bathroom a lot. But when the pee is clear...you are there! Continue this until just before bedtime. On the day of your troop, avoid coffee and other caffeinated drinks that can dehydrate you. Your bathroom trips will have evened out overnight. Have one more bottle or serving of water before suiting up. Once in your suit, you will sweat. No matter what fans you have in your lid....you will sweat. THIS is your cooling system. If you are properly hydrated, you will have the fluids so that your body will adjust to the rise in temperature and cool itself properly. If not, your body will use the water in it twice as fast and without the proper reserves, you will risk not only dehydration but elevated internal temps, dizziness, and possible heat stroke. The long and short of it is be safe and smart. We need out troopers vertical!!!!!" On that subject, if you do feel dizzy or need a break, tell your handler immediately. It's nothing to be ashamed of... safety first! 6. Changing areas- Most events will have a secure and private changing area, but some may not, so ask ahead of time. If it happens to be an outside area, you can wear your under suit to the event underneath your clothes. 7. Armor bin storage- Again, most troops will have a secure area designated to store your armor bin, away from the public. If this is the case, you are fine. Some have asked "Do I need to keep it locked during the troop"? That's up to you. We tend to be a very honest bunch, treat each other's belongings like our own and keep an eye out for one another. (I have never felt the need to lock mine). If it is a parking lot suit up and your bin will be visible to the public while you are away from your vehicle, that's a different story. 8. Conduct- Have a blast on your troop, but keep it civil. Some Troopers clown around a bit occasionally (myself included) depending on the circumstances, but remember, you are a representative of the 501st Legion, the FISD and your Garrison/Squad, so act accordingly. When in doubt, ask someone who has done that event before. Side note: If you happen to be a smoker or vaper, please do not do it in public view while in armor. 9. Handlers- Handlers are an absolutely integral part of a troop, and make our lives much easier. They take photos for the public, warn us of obstacles, escort us to the restrooms/break areas, pick up fallen armor pieces, protect us from kids smacking us with toy lightsabers, guard our stuff, bring us water, keep us informed, and a myriad of other things. After your troop, be sure to thank them for all they do to make an event possible and allow those in costume to have a better time. 10. Trooping in other Garrisons/Squads- Once you have your official TK #, you are welcome to troop with any 501st unit in the world. You may need to sign up at that Garrison, as many do not list their upcoming events for the general public to see. Once you have access to their site, you will need to sign up for the particular troop that you want. Most importantly of all....... HAVE FUN!!!!! UPDATE! The thread below was posted by Caleb (Thrawndike bar), and contains some awesome responses/TK chatter while in public. https://www.whitearmor.net/forum/topic/47603-howto-talk-like-a-stormtrooper/1 point
-
First spray down with some automotive primer. Most likely going to get another can and throw a second coat on. https://imgur.com/gallery/4LCLC1 point
-
I also used a blow dryer to heat up the decals when I placed them to help prevent bubbles.1 point
-
Thanks! Mark was kind enough to include instructions with the armor letting me know to leave 1/8” aroundthe larger button plate. After cutting to size and sanding the edges and glue surfaces I placed them and used painters tape to hold them in place. I also used a scrap of ABS behind the larger button plate since there was a void space just to give the glue more surface area.1 point
-
Oh that looks really nice! You seem to always come up with such great tricks and inventions! Is a lot of people doing that? (first time I've heard of it) I might like to try it - just gotta try to get the required materials! Thanks for sharing!1 point
-
Yup, some were known or suspect, but at least for me the blaster detail was not. I'm trying to get all of it in once place, at least for consideration. For the TLJ at least, it's been harder to get a gallery of close-up shots. Figured now was as good a time as any to evaluate changes since I'll be doing a mass amount of OTTK CRL updates soon...1 point
-
You know, that's a fantastic idea and would make great data. We can also take the time it was done and plot it out over time too. Let me see how much time I have today, though perhaps one of the DO's @Sly11 or @ukswrath may have it in their spreadsheet, or @Locitus can pull it faster than I can.1 point
-
Your Ab buttons look perfect. Any special trick you used?1 point
-
Good catch! Thanks1 point
-
Welcome back1 point
-
Thanks, Tino. I promise I’ll stop posting “I’ve finished my blaster” posts now. The ABS arms are quite smooth at the top so it shouldn’t present an issue if placed carefully. If I’m honest, I only really made the stand for taking photos. Not sure if I’ll display it between troops or not as yet. Good thinking, though. Thank you, as always, for your feedback.1 point
-
Hey Dan, congrats (again ) on finishing this superb blaster. That replacement magazine adds so much more realism to it. I wish the guys from DoopyDoo's would spend some time over here at FISD, to see what people do with their kits and recognize the need to finally make a better mould for this resin part. Who knows, maybe someday... Oh, and the "Master Replica E-11 Stand" looks good, too. Don't you fear to damage your paintjob with the blaster sitting straight on the support arms?1 point
-
Same as regular First Order boots, these are pretty much the only accurate ones for now: http://www.imperialboots.com/product/trooper7-first-order-stormtrooper/1 point
-
Well, time to dust off this thread and get my build back on track. It has been way too long. I spent the weekend fixing countless broken Photobucket image links here, Carolinagarrison.net and Bikerscout.net for both mine and my son's threads. What a mess, fortunately I had backups of everything. I created an account on imgur and moved everything there. Anyway, I am really hoping to get both mine and my son's builds done by Dragoncon this year. I am looking forward to getting back into the build and I am sure I will have lots of questions over the next 6 months1 point
-
A sneak peek of what's next...1 point
-
Right? I just sent photos to GML. A lot of work to build around a saber! Sent from my LGMS631 using Tapatalk1 point
-
Ya, I think you'll end up wanting to cut some ABS pieces to size in order to re-fill the gap above the ridge and mix some ABS paste to act as glue and to hide the seams. Don't use epoxy glue, as it will be visible to the not-so-casual observer and will end up being harder to work with in this situation. ABS paste is the way to go because it is literally made from the same stuff as your armor, so it will blend in much better. Once you've sanded it back down (and I'm thinking wet-sanding with 1400 grit paper, then polishing), it shouldn't be all that noticeable. It's going to take some good sanding, and the back of your thighs might end up being more delicate than they otherwise would have, but your thighs are definitely salvageable. Don't lose heart, it will take some more work, but you could still make centurion! See here for more info on ABS paste:1 point
-
Ok, I can see a little clearer, kind of. My question still stands though: why would this crl include such an obscure detail when there is no precedent with other very similar costumes?1 point
-
Mine are just (possibly) slightly higher in the front but not much. I hot bathed the front so that it conforms to the shape of the chest but plenty of E6000 and good clamp will also work. Sent from my iPhone using Tapatalk1 point
-
Hi all, Well, the new mag is finished. In a nut shell; -finished sanding the top -corrected arrow (“OFF ->”) -prep for primer -metallic silver -hammer black on top/end plate only -Matt black top coat -cut down mag -shaved off some of mag to avoid modifying the mag well (allowing me to switch between mags, should I need to). -added magnets -weathered And, for now, that’s all she wrote. I think this blaster is finally finished. :-) Sent from my iPhone using Tapatalk1 point
-
Still in the works guys - as you can see we've got a lot of $$$$ tied up with racing shirts, FOTK coin, Phasma coin, Silver coin, etc, none of which are cheap. Plus, having to re-order attache patches which no one is buying. So, we need to let a few runs conclude first but this is next on the list for patches & shirts, for sure.1 point
-
Ha ha. Aren’t you a little tall for an elf?1 point
-
I have added some images taken from promo shots and from the maninthesuitcase flickr stream. https://imgur.com/a/3OLRI1 point
-
Found one so far.
 1 point
 -
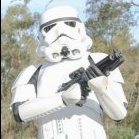
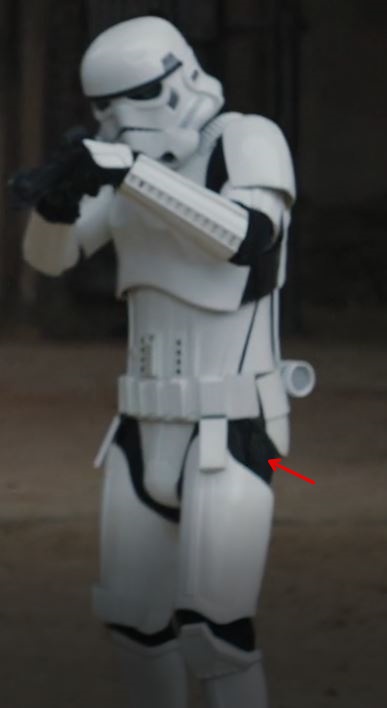
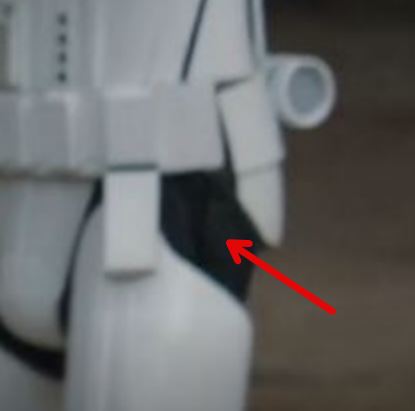
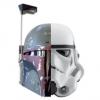
Does anyone have pics of the buckles on the R1TK's that would be even similar to the FOTK's? Specifically the thigh areas. From what I've seen, I haven't seen a buckle stick out of the R1TK thigh/pelvis area. Also in regards to the "hump" on the eye I noticed, that is very reminesent of the OTTK's, below is a diagram I drew of outlines of the eye shapes themselves. Here's the original pic. Below is the edited pic outlining the eye shape. Notice I flipped the image backwards to create a mirror effect, because in my experience asymmetry is better viewed in a backwards reflection. Below is the correct diagram. The true eye with the slight hump at the bottom is the left one in the pic. Here are some other examples, showing the "convexed" shape of the eye to prove there's a hump. Not only does it rise, it also protudes. Compared to the OTTK's. I'm more incline to say that it's similar to the ROTJ below. Very subtle, but existent none the less. Notice the ROTJ has a similar level of curvature to the shape of the eye, though it doesn't really protrude into a convex shape. My stance is that the hump on the eye should be for Level 3. While it is super subtle, I've learned that it's what gives the helmet it's character. The Black Series just looks...... wrong. Granted the Hot Toys looks great without it, but something is lacking. Even at certain angles it looks like the Black Series eye when looking upward at it.1 point
-
Yeah, we can put it in L3 first. Feel free to put this in the March CRL update thread and put in some photo support and we'll go from there!1 point
-
Actually this is a good question. The FOTK uses two buckles on each thigh to connect them to a inner supporting harness. Both buckles can be seen in multiple photos yet it's not in the CRL. Myself and maybe a couple others have this implemented in our builds. If the same buckles exists in the R1TK should we add it to the CRL? And if so will we need to change the FOTK CRL? Paul1 point
-
Anything on the inside of the suit is not part of the CRL, is that what you mean?1 point
-
Sure, after looking at some close screen grabs the colors very close if not exactly like that of the OTTK so might as well.1 point
-
I think this can be a sticky in the R1 area, and may help new builds. What do you think?1 point
-
Alright everyone I need some help. I think I goofed up pretty bad and am hoping you can give me some advice on how best to proceed, or at the very least console me and talk me off the proverbial ledge haha. In short, I think I have backed myself into a corner with my thigh trimming. After doing my initial rough trimming I somehow got it into my head (no clue how) that the front ridges on the thighs, shins, etc. should not be trimmed any further and began trimming substantial sections away from the back of my right thigh to give me a good fit. While I do have it trimmed down to where it fits nicely now, I have realized that I was supposed to remove more from the front ridges in order to have the proper size cover strip for my butt join. However, I can't trim anymore from the front because of how much I have already trimmed from the back. Here are some pictures. Would this front cover strip work? I know it is pretty wide (about 1.5" or 40mm). I guess I could make it a thinner cover strip but then a pretty significant portion of the ridges would stick out and I have heard that is discouraged. I was going for centurion, and still hope to if there is a way to salvage this. If you have any suggestions I would love to hear them! In other news, I have placed my ab buttons and I think they turned out pretty well.1 point
-
More progress and new developments.... Trying on the chest armour and helmet pieces today, and there was a big gap between the top of the chest armour and the mask. I tried to bring the chest armour up higher over his shoulders, but it creates fitting issues and puts other parts out. So at first I decided to discard the mask I made and start a new one, with a longer neck. Then I took a risk. I had the lower jaw and neck seal parts of a new Vader pepakura build I was making, all done. This was, however, from another pepakura plan; not the same as the existing helmet & mask I'm using now. This new build was to enable the kids to upgrade to a bigger bucket as they grow, however, by eyeballing the newly started jaw/neck assembly with the existing mask, they SEEMED to fit pretty closely. I had the idea to cut the existing mask pretty much as per the reveal mask in ROTJ, and add the new pepajura pieces - because these new parts have a neck that goes much lower than that on the existing (which I'd cut shorter to mimic ANH). So, after umming and ahhing for a few minutes, I took the plunge. I removed the mouth and chin grills, then cut the Vader mask along the jaw line using my dremel and a cutting wheel, and HOPED that the new pieces would fit.....which they DID! So I promptly added some fibreglass resin to the new parts while attached to the face mask, to give the new piece the best chance to harden to the shape of the existing, and to start the process of bondo/filling/sanding/painting. Pics of this below: Now I don't know yet how I will have these parts clasp together, I'll work this out at that time. I'm just relieved that this has worked. It also fixes the gap issue between chest armour and mask. So mission accomplished. Other news.... The chest part of the leather undersuit is a bib, that attaches to the inside of the chest armour using one snap. The reason I've done it this way is to allow the inner robes to be laid over the chest leather, but under the chest armour; so ANH or ESB/ROTJ style depending on whim. Perhaps some pics will help...imaging that dirty old rag is the inner robe... The chest box is hot glued to the bottom of the chest armour via two leather straps... One arm is done, hand sewn as I don't have a sewing machine, and pictured next to the gloves which I sourced and bought on Ebay. I'm thinking that I need a sewing machine. Happy with these gloves, although I may, if I really feel like it, attach my quilted pattern over the top to match even better... Cod and belt assembly and strapping. The cod is attached via hot glue to the belt assembly - there's two small strips of nylon either side of the buckle that join the two. The inner robe is then threaded behind the belt, and over the cod to drape down. both cod and belt are fastened individually via snaps at the back of the wearer... Lenses at this point are simply spare bits of TK lens...good enough for this build. I'd like to source some tinted reddish lenses at some point. And there we go, till next time...1 point
-
Some more progress pics... Mock up of the materials....robed as ANH and ESB. The below pics were before I started the stitching of the leather quilted undersuit, as seen above under the chest box. ...and later, after some more work on the undersuit...1 point
-
So the hard armour is almost done, here's where it's at right now. Applied some clear gloss to the parts today. I still need to attach the tusks to Vader's mask properly (as they are too easy to snap off just glued straight on) and paint details on his chest box. After that, it's strapping for these parts, then moving onto making the leather suit, robe and cape. The helmet separates from the mask, it is attached using magnets, with some foam padding inside the helmet to keep it on place.1 point
-
Don't forget that 99% of the people don't notice the difference between a Rubies, FX or RS. So imagine telling them there is a difference in the Stormtroopers in the movies. Sent from my iPhone using Tapatalk1 point


.thumb.jpg.8eadc48331a3df147c8d5e71dd9b8a00.jpg)


