Leaderboard


Popular Content
Showing content with the highest reputation on 01/04/2018 in Posts
-
Haha, thanks man Yeah I tell her Sandtrooper is completely different and besides that, having only one, that Trooper gets lonely and tend to suffer stess related cracks in armor - and we can`t have that3 points
-
Hi all , Yet another update installment coming your way. Magazine housing ejector is upgraded one last time; it bothered me that it was without the 'fin' on the lower end so I J-B Welded a thin aluminum sheet to keep it in place. Also had quick wins when it came to adding realism to my grip. Installed two screws that came with Tino's Completion Set. I am quite happy with the results. I'm really loving my workbench around now as it has enabled me to get working quickly to get these MODs down; an investment I am entirely happy to have done. Back end of ejector now sufficiently detailed following SMG references - little triangle piece, which was knocked off before, is now reinforced with a thin aluminum sheet glued using J-B Weld. Installed Upgraded ejector fin in magazine housing Grip lower screw - study for replacement strategy Using drill bit to take out resin screw top - round file to clean With bolt head accommodated for, measure and use drill bit to make way for the screw installation Allan wrench used to get screw into place - grip bottom screw installed Comparison of resin and accurate screw installation. Right side of grip and trigger housing Grip lock and Tino completion set screw shortened as other side of grip lock will be used for BlastFX mode switch install Dremeled away resin screw and drill bit applied to length of shortened screw, step drill used to recess to accommodate screw head Grip lock installed with screw driver Installed grip lock screw Before and after pictures of screw to lock grip Wish you all a fabulous rest of the week! cheers!! Jesse3 points
-
Hey Lou, Thanks! Just noticed that we're practially neighbors! Are you a GA Garrison member? It's been a slow start to the new year with a flu bug, but I'm managing. My white plastic is staring at me, begging me to get back to assembling it. Once I kick this bug, I'll be full steam ahead on the Hero build. Woo! Here's a taste of the other build that I finished late in 2017. Can you find me? (answer below) Hee hee... I'm the jawa on the left. Being a jawa is fun and very comfy. But it's nothing like being a TK!!! And this is for my own reference, but other Short Builders might find it helpful, too (I refer back to my own threads, is that so wrong?). This is my trim guide for sizing down a TK.2 points
-
Finally! Sent from my iPhone using Tapatalk2 points
-
Here's a link to a good series on building, just watching it for the first time myself2 points
-
E11 mage well complete!!!! and fully functioning2 points
-
Reinforcing the insides! Cheap for sale sign. Sent from my iPhone using Tapatalk1 point
-
Yep, drilled and no reinforcment, I got the TM 1,5mm ABS (just like the screen used ones) and haven`t been "trooping for years" but not worried about the plastic not holding up, for instance, did a 4 1/2h troop on TLJ and no issues...if they would tear it`s easy enough to repair with ABS-paste and just drill a new hole or use scrap ABS, don`t have to be pretty since it`s hidden by the cover strip1 point
-
Some assembly required. Lol. Paint and assemble WIP1 point
-
I don't know Daniel... Looks a little too good. Nicely done. Great looking TK. Please tell my wife it is good for me to have more than one awesome suit.1 point
-
Removed a bit more return from the thighs, mostly inner half which got them a wee bit higher and also rotated them slightly = less black showing Before After1 point
-
I saw you quoted me, Lou, and my first thought was, "Did I write that?" haha... it's been a while since I've taken a look through my own threads. Anyhow, yeah, you don't need to be millimeter precise with the cover strips, just as close as you can to canon. I don't think Tony or Andrew would pull out calipers for EIB or Centurion! And I can't imagine why anyone would want a huge cover strip anyhow- that would just look odd to me!1 point
-
I am in the GA garrison. Went to my first armor party a month ago, just didn't have the time to return yet with the holidays and work. Trying to get some done so I can have a more meaningful build session instead of "trim this and come back" for the next party. My wife and daughter are signed up in the great jawa build so we can troop together, so later this year you will see us out representing the empire. Was searching the WTF FB group on the shins, I see the jury is still out on the correct pairing. Anyways, glad you are doing better despite the flu bug, will keep my eye on this build1 point
-
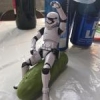
Trooper on the left has tape to keep his in check (learned this on my second build)1 point
-
Hope all is well and you are able to return to everything else first. Then restart this great build thread.1 point
-
Troopers helping Troopers Dana and...the bicep clips originate from the trash compactor scene, Han did have trouble keeping his biceps up in the previous scenes but here they stay put1 point
-
Very nice work. Good luck trooper!1 point
-
Not entirely true, although the main goal is to keep the cover strip to canon size it`s not always possible thus the need to go bigger even on the front - so your size does matter, personally I wouldn`t go bigger than 25 in the front or back regardless and shim if that doesen`t "cut it" size wise1 point
-
That is a really good tip. I have ridiculous callouses on my fingers from cleaning E6000.1 point
-
I use the bra-hook shin closure and it works great, didn`t go with his turtorial though but it`s basicly the same procedure, you need to fit the shins reasonable tight to your calfs othewise there`s a good chance the hooks come loose, they need tension to stay in there...done right it`s a great system and..it`s screen accurate RS suit ----------- And mine1 point
-
Looking amazing!!1 point
-
Lovely work, Jesse. What’s left on your to-do list? :-) Sent from my iPhone using Tapatalk1 point
-
nice work ... your E-11 is looking good.1 point
-
Personally I would cut to where your finger is pointing, as the shoulder bell should have a smooth curve there, not any sort of ridge. But TheSwede is right that you can always trim off more. I went with the measurements that Cricket listed in her build - I believe it's 5" from the edge of the ridge to the edge of the bell, and 12" from top to bottom, but you should check in her thread to confirm.1 point
-
Another alternative, check your local libraries. The Long Beach library here in SoCal has 5 of them in their media lab that anybody can come and drop off files to print FOR FREE. I printed half a F-11D blaster at mine. Since then I've bought a MonoPrice Select Mini for under $200 and am doing my own printing now. There are a handful of basic 3D printers for under $300 that print just fine if you're even slightly interested in doing it yourself.1 point
-
Jeff, Doing the same build and having some of the same issues as you. Check out my build thread for pictures and comments others made to help me out.1 point
-
No hate here However I would suggest fitting your armor with an undersuit on (unless you do and the pic was just for laughs) and...having return edges is not a requirement but they ad to the illision of thickness to the armor, inside of the thighs benefits from removing a good portion (but not all) of it, more comfortable and makes walking a bit easier, same goes for inside of forearms (comfort wise) but having returns is all about personal preference (you already know that for Centurion there can`t be any on the wrist ends). If you want to recreate the returns (I think having returns looks better) then check out this thread - https://www.whitearmor.net/forum/topic/38416-crickets-rs-stunt-build-for-the-vertically-challenged/1 point
-
Thanks! I decided to only heat it a few seconds, and it seems to fit better too after a test fit. After a “little heat” and @Kredal messaging me to stop! Thanks brother! LOL Test fit tonight, still have more to trim, but planning to wait until strapping and other parts are attached. I will trim the sides last. Removed the glue on both shins and rebuilding with proper amount of glue. Sent from my iPhone using Tapatalk1 point
-
Not to worry, that`s just how the armor is, ones the strapping is in it will come together nicely (assuming the girth of the midsection isn`t an issue, then there`s shimming required for higher levels).1 point
-
Cutting up the ab went well. I took off 3/4 of the very middle to push it closer together. Trying to see if I can reuse some of the parts1 point
-
And approved! Happy to be apart of FISD finally, TK-61636 reporting for duty! Sent from my Pixel XL using Tapatalk1 point
-
Will do and there are a few out there but how to build is in a sense universal, meaning that you can look at any build for suggestions, some things are armor-specific but they are easy to count, the infamous misslabeling of the Anovos shins is one example....the pinned threads in the build section are all great sources for knowledge/tips/how to’s, the CRL costume reference gallery provide info on what’s required for basic, L2 Expert Infantry and L3 Centurion AND the most important of all is to do what you already done - start a build thread and ask questions because we are ALL here to help - there can’t be to many Stormtroopers in the world1 point
-
There’s a separate build community for those that have purchased BlastFX on Facebook with a total of 200 members to date. Here is a link to the Facebook group; I believe it is set to public for everyone to browse : https://m.facebook.com/groups/1246759182092517 Hope the link works - perhaps an answer can be found there. I noticed also, as of Nov. 28, an ‘ancillary kit’ is available for purchase on shapeways, with trigger switch housing, and of great interest, a hollow hengstler counter - only thing is, no eagle logo but instead ‘blastfx’ on the side of it. Sent from my iPhone using Tapatalk1 point
-
Another option would be https://www.3dhubs.com/ I've worked with some great providers I've found through there, and since you can connect to people that have machines locally, shipping has never been bad. I doubt you'll find someone on it who will trade for SW swag, so this thread still has value... but there's another good option if you want Good luck!1 point
-
Hi Tino, Not sure if this video from Paul will give you your answers. :-)1 point
-
Nothing beats the classics my first kit was a sandtrooper and it will always be my favorite. Good luck on your build Sent from my iPhone using Tapatalk1 point
-
Just testing tapatalk Sent from my iPhone using Tapatalk1 point
-
Awesome job, as a fellow sandy I too am in the air with another TK but with all the indentation and detail the Armor looks amazing. Maybe I’ll go the other direction and do a R1 Deathtrooper another favorite of mine. Sent from my iPhone using Tapatalk1 point
-
I am going to modify my chest to be like this! Keep it up bro! Sent from my iPhone using Tapatalk1 point
-
I'd say still go for the strap. Sent from my VK815 using Tapatalk1 point
-
I do ,,, the one i scanned and copied had full knurl.... Probably for screen accuracy some of the knurl needs to be wore or sanded off..... The tab and hole on the bottom is for mounting. I have put a notch in my tube so it can be screw into the back of my front part.. Its really hard to blaze that piece on because its on the edge...1 point
-
Drilled through the face, so now I get to see if I can make ABS paste and polish the heck out of it... I still have to finish painting, sanding and install the mesh1 point
-
OK, lets hope that this looks better.1 point
-
After more reading last night, learned quite a bit more about AP silicon hand covers, and gluing them down to rubber gloves using Locktite Plastics Bonding Sys. Also learned need to fill my shoulder covers with material before I glue them down for a better glue to contact ratio. Thanks Sean!! Working on a few things this morning! Filling shoulders: Inside strip to reinforce thighs: Sent from my iPhone using Tapatalk1 point
-
Hi all, Quick update here - Super excited to have received my BlastFX - Essentially my electronic module that will enable sound, lights and rumble action to my Blaster! I am a proud owner of one as it is compact and meets my every need. Paul is a great guy to deal with and always at the ready to answer any questions you may have. I actually received it a while back but did a terrible blunder; I short circuited the module and likely burnt out the speaker rendering the module without sound. As he provides battery hook-up instructions, I recommend heeding to the direction provided closely. I ended up commissioning him for my battery and switch install as I proved myself a novice blundering the way I did. Paul was very accommodating and got me on my way with a fully operational BlastFX in record speed! Furthermore, it comes standard with a good amount of wiring which comes in handy during the installation stage; I don't forsee any significant challenges when I get to this step. As for my battery source; I chose the recommended Li-Po type and choose out at 3.7 volts. It is recharged via USB charger and attaches / detaches via JST 2 Connector. Mine will take upwards of 2 to 2-1/2 hours to fully charge from zero. As for what I think if it; superb. It's compact, loaded with features, lights are bright enough(red for blaster bolt/ blue for stun), and sound quality is good. The Stun mode is very vivid sounding; likely to give you goosebumps as it gave me. Rifling through options in blaster types and displays gives you control over how you particularly want to operate it - great fun! Oh, there's also a 'soon to run out of ammo' sound and a 'out of ammo' sound as well during operation, which plays to kind of the realism of the whole thing. Oh yeah, and there's a mute operation as well which reveals lights only at trigger pull, which may come in handy based on the scope of a given troop. Apart from a slight electrical hum when the module is turned on, I give it two thumbs up! I did attempt to channel the possible electronic hobbyist in me over the course of three months by doing a ton of research into Arduino Boards / Sound Boards and electrical know-how on experimenting with bread boards etc. but honestly concluded it was too much time/energy/money overhead for me for even to get anything working so I went with the quick and easy route of getting this ready-to-install module and I am not regretting it one bit. Again, given that it's compact and loaded with features, it's one of my treasured components for my e-11 build. TRamp BlastFX enabling light, sound and rumble for install into doopydoos resin e-11 blaster BlastFX main processor (arduino / sound board) with micro SD card at 128 MB. JST 2 battery connector of choice shown Display, LED light, speaker and rumble motor On / Off switch and trigger along with mode button Battery of choice - Li-Po at 3.7 volts 1200 mAh current capacity Operational instructions My test set-up before installation cheers, Jesse Sent from my iPhone using Tapatalk1 point
-
Test fitting legs, trimming, more taping..and some glue! More to come[emoji4] Sent from my iPhone using Tapatalk1 point
-
Thanks for the feedback Mike. With all the negative that Anovos gets hammered with this is refreshing. Not that I'm a huge fan of Anovos but there's hundreds if not thousands of individuals that bought this armor in hopes it will stand the test of time. As for life expectancy it doesn't matter if it's Anovos, RS, TM, ATA or other, different strokes for different folks. What may work for some may not for all and there's no life expectancy with any armor mfg that I'm aware of. I will say if you assemble it correctly and maintain it regularly most armor will (should) last you a few years. That said, we've had a few more mfgs pop in the last couple years. It will be interesting to see how they hold up compared to vetted versions.1 point
-
Something I learned from building my ATA lid is that it’s really handy to have some ABS paste on hand to use at a moment’s notice. And I never did. I’m avoiding this hassle by being proactive and making the stuff NOW. A few weeks ago, I had some minor surgery on my jaw, which left me in a state where I couldn’t eat anything solid. I ended up eating my share of baby food (lost a lot of weight, too), and I saved the jars. Empty cleaned glass baby food jars have a gazillion uses! One way to use them is to store ABS paste. Keeping the paste in an air-tight glass jar ensures that it will last for a very long time. I first did some minor trimming on different areas of the armor in order to gather some scraps, making sure to not use any ABS that had pencil marks on it. Don’t want to alter the color in any way at all. I cut the ABS into tiny pieces with some tin snips (easier than using Lexan scissors), and put them into the jar. I labeled the jar with the armor maker, because I expect to have an ATA kit here in a few months. I don’t want to mix or confuse which ABS paste to use on what armor. I happen to have a bottle of Pure Acetone on hand from Sally Beauty, but any kind of pure acetone will work just fine. I poured some in, and stirred it all up with a coffee stirrer. How much to pour? Good question! I poured enough in to not quite entirely cover up the pieces. I sealed it up, gave it a good shake, and left it alone. A few hours later, the acetone has melted a good part of the ABS, but it’s still too thin. I stirred it again, sealed it, shook it up, and left it for a few more hours. And voila, ABS paste! It should be completely smooth. If it’s not, leave it, and give it some more time to cook. If it’s too thin (I prefer mine to be the consistency of play-dough), leave the lid open and stir. Acetone evaporates quickly, and your ABS paste will thicken up in no time at all. Too thick? Add more acetone, stir, and wait. Running low on ABS paste? Dump more ABS scraps and some more acetone into the jar and repeat the process above. Too much ABS paste? What’s wrong with you? You can never have too much ABS paste around. You never know when you’ll need it!1 point