Leaderboard


Popular Content
Showing content with the highest reputation on 07/25/2017 in Posts
-
Another delivery today *wohaa* Inspection-time! What do you mean it´s not mine??!! This was great but somehow I´m more excited over another big box delivery in the near future3 points
-
Had to stop and make a few mags,,,2 points
-
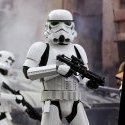
Hey all! Daniel from Norway here. After participating in 2 troops with my garrison as a handler, I was so close to pulling the plug. Then this guy let me try his stupid TB and now i'm broke Been reading FISD and Facebook-groups like an absolute madman the past few months doing my research. This will be my first costume of any kind, I have zero experience in any type of prop-making so this'll definitely be a journey. I want to make a build-thread because: 1. It helps push me to continue and document everything 2. I can get GREAT help from all you people 3. It will help future builders People said the FOTK would be a tall order for a first costume, so I guess it'll be my First Order No? I'll show myself out.. I'm 177cm (5'10"), 79kg (175lbs), mesomorph. TABLE OF CONTENTS Shipment of various parts, testfit of undersuit Big Brown Box day Gasket trimming, chest vent cutting, ab/thigh/bicep downsizing, first snaps Filling downsizing seam thighs/biceps, cod/shoulder/yoke/chest snaps, downsizing forearms, joining forearms together again, yoke to chest velcro connection, boots/gloves, knee gasket trimming, thigh buckles Ab harness, greeblie gluing, weapon/holster screws, forearm/TD tidy up, shin box gluing, paint match picture Pinhole filling/surface imperfections, strengthening thigh (fibreglass mats/polyester resin), bicep step details, test fit Pinhole filling/sanding yoke, priming, painting, paint match, belt assembly 1, belt box painting, belt box attachments HOLSTER: Broke it, fixed it, screw installation/types, painting, assembly, belt assembly 2, wobbly belt box elastic string mod, TD complete, TD right-side circle accuracy update, tape backing on all holes, AB done, polishing pad padding mod, forearm seam accuracy update. ARMOR DONE, laid out, test-fit APPROVAL PHOTOS Post approval mods 1: Kneeplates, clearcoating, removal of orange peel, high gloss! Night-time painting, abdomen crack and fibreglass mat/resin fix, painting spreadsheet Paint failure on abs, whining Fibreglass and paint failure on abs, ABS plastic shoulder support system Blacking out inside of helmet, armorcase pimping PARTS Helmet: ANOVOS Standard Line (Arrived, from eBay-seller, because ANOVOS doesn't ship to Norway and if they did i'd probably have it in 2028) Helmet Padding: eBay (Arrived)[Combat/Airsoft/Tactical Style] Neckseal: Stormtrooperundersuit (Arrived) [Medium] Armor: Jimmiroquai FOTK v4 (Arrived) [Flexible Fibreglass] Undersuit: Stormtrooperundersuit (Arrived) [Large, order this a size or so above your regular size!] Belt: JAFO's Belts Of The First Order (Arrived) Belt to suspend thighs: eBay (Arrived) [Airsoft style combat belt] Pouches: Jimmiroquai (Arrived) Boots: ImperialBoots (Arrived) [42EU/9US] Gloves: ImperialBoots (Arrived) [Medium] Gaskets: Jimmiroquai (Arrived) Decals: Trooperbay (Arrived) [You can also just buy some matte black car vinyl wrap and make your own, way cheaper. I had to remove my decals so now it's only vinyl wrap.] F-11D Blaster: ("Shipped" 3 months and counting.. NOT happy) (3D-Printed Kit) SE-44C Pistol: ("Shipped" 3 months and counting.. NOT happy) (3D-Printed Kit) HESTON BLASTER AND PISTOL IS ON ITS WAY THOUGH I MEAN SERIOUSLY IT'LL GET HERE BEFORE ONE FROM A COUNTRY A STONE'S THROW AWAY GETS HERE Hardware screws for F-11D and SE-44C: MaxSW [LINK] (Arrived) F-11D Decals: MaxSW [LINK] (Arrived) Torx Anti-Tamper/Security screws for the holster + bearings and some washers: eBay (Arrived) Fan system: Making my own USB-powered system. Voice system: (Ordered) TRamp Hearing assist: Looking at ukswrath's kit, but it'll have to come at a later stage. Webbing, elastic, hook/loop tape, clamps, magnets, snaps, leds (blaster), wiring, fans etc: All from eBay, super cheap. Because buying it locally would literally cost 5 times the amount. EDIT: DONT BUY EBAY SNAPS THEY ARE SUPER BAD. E6000 from Trooperbay eventually with the decals, planning to use this for most of the armor as it's forgiving. Still need to get some tools/misc (Dremel, sanding equipment, PPE etc.) from work. Now for the painting i'll have to do some experimenting. What I have in mind right now is to get a plastic primer, white paint, and clearcoat. Then do a test on scrap and hope it matches the helmet. If not i'll have to get custom spraycans, and according to my research RAL 9016 should match the ANOVOS bucket pretty well, also heard FIAT 249. What do you all think about adding clear on top of already glossy paint? Is it neccessary? FOTK's are pretty shiny. Picture so first post isn't pictureless: Peace!1 point
-
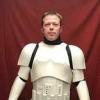
Name: Ross Walmsley 501st ID: TK5509 501st Profile: https://www.501st.com/forum/memberlist.php?mode=viewprofile&u=5659 FISD Forum Name: Ross8008 Garrison: UK Garrison Armour: RWA Helmet: RWA Blaster: Sheartech rubber Height: 5' 10" Weight: 12 stone 6 lb Boots: ISD Canvas Belt: RWA Hand Plates: ISD rubber Gloves: ISD Latex hand guards Neck Seal: RWA Holster: ISD Undersuit: Extreme 2 part Electronics: trAMP Hi. its about time i got round to getting myself sorted with you guys please see the following pics of my 1mm ABS RWA ANH Stunt TK. The kit has had a bit of a battering as im always on the deck or sat in vehicles etc. Please advise on any extra pictures needed or any mods you require. This is the Standard i require kits to be built to for basic clearance on the UKG so will be interesting to see your system and standards . Hoping to get Centurion after i have sorted the EIB. cheers Ross, RWA.1 point
-
Pretty much everything unfortunately. In the end you'll spend more time and money getting the kit up to spec than your wife spent on the kit itself. Better to start over with one of the vetted armorers. Your wife seems like a real keeper for her to surprise you with a set of stormtrooper armor for your birthday. But to be honest, a Rubies Supreme kit (assuming that is what you have) isn't good for much more than a Halloween or con costume, or for a mannequin display. Your best option is to sell it and use the cash to get something legitimate. The way you figure that last part out is to spend as much time here as possible reading the threads here, especially in the Getting Started - Read This First section. Also, you'll want to join your local garrison's forum and/or Facebook group so that you can meet up with them, attend troops as a handler, attend armor parties, and generally get a hands-on feel for this stuff. As for the what to do with the Rubies Supreme kit, think of it as that Christmas present that while is was purchased out a place of love and caring, is still totally wrong for you and needs to be returned to the store for something more appropriate.1 point
-
No return edge on the inner forearm scoops or wrist and minimal edge on the outer forearm near the elbow.1 point
-
Excellent thank you1 point
-
As WTF is a somewhat newer maker, there aren't too many build threads yet. MoSc0ut is the only WTF kit I know of to reach higher levels of approval, and I see you've found his thread already. Rob is shooting for EIB and Centurion as well, although he hasn't applied yet. (There's also a discussion on his thread about the proper pairing of the shins in a WTF kit.) If you're smaller, I'd highly recommend Diana and Cricket's builds for advice on fitting a kit to a smaller person. They both have RS, but the same general principles apply. In looking at build threads, the arm pieces of WTF seem very similar to ATA kits, so I've been looking at those build threads as well.1 point
-
Looking great trooper. Good luck!1 point
-
The TD photos look good thank you. We're looking for the thigh armor to ammo belt connections, but thank you for providing the waist belt connections. Nice work.1 point
-
A small update. No closer to actually turning this into a build thread as time is still against me but ordered another set of t-tracks from Roy which arrived today. These will go on the sterling. I have the feeling the sterling conversion is going to be the first thing I tackle to get my blaster mojo burning again. Not going to post a picture of these as they are exactly the same as the first pictured above somewhere Hope to have more to post soon and hopefully it will be a bit more interesting. Cheers for now. Brian1 point
-
Yeah work from the shoulder down. Once you have where the biceps will be then check the forearms. This will give you the proper size for your arm.1 point
-
General Information Name: Frank Fraga FISD Name: fragarock 501st I.D.: 92111 Garrison: Great Lakes Garrison EIB Approval http://www.501st.com...hp?userID=24440 Mandatory Information Armor Maker: RS Prop Masters Helmet Maker: RS Prop Masters Blaster Type: Hyperfirm E-11 Additional Information Height: 5'-5" Weight: 150lbs. Boots: TK Boots Canvas Belt: RS Prop Masters Hand Plates: RS Prop Masters Electronics: Ukswrath hearing assist & cooling fans, ICOMM Neck Seal: Darman Holster: Darman Full Body Armor Photos (Photo below is from my EIB application and is included for reference) (This photo shows corrections made for Centurion application including right thigh alignment, reduced shoulder bell gap slightly, also fixed gap between ab and chest) (this photo is from EIB application and is included for reference) (this photo shows corrections made for Centurion application including tightened left side gap and rolled TD down to be lower on belt) Armor Detail Photos (this photo is from Centurion application and shows correction to ab button panel. side buttons couldn't be removed without breaking) (this photo is from EIB application and is included for reference) (this photo is from Centurion application and shows trimming of material above and below ammo boxes) Helmet Photos Blaster Photos Accessory Photos Thank you for reviewing my application.1 point
-
Absolutely, my suggestion was only meant to apply for basic approval.1 point
-
I don't have any issue with that. However for the higher levels I think it should be that the E-11 is based off the commercial replica and not a real sterling. The scope is different from the OT version as is the Counter. As well as the other small details. And I am even for having to use the Element surefire clone for level 3. There are some really great write ups on the R1 E-11 blasters subforum and I think it would be a shame to not take from those resources.1 point
-
Ok so substitute the last line?1 point
-
You're killin' it! Great work Daniel1 point
-
Thanks For the scraps idea!!! Definitely works1 point
-
No at this time,,, it would be hard to do this way... In the future i may mold individual pieces ...1 point
-
Hey Frederic, Andrew or myself will be with you shortly. While you wait please post the following additional photos. Thigh ammo belt connections and close up of the Thermal Detonator to clip connections. Thank you1 point
-
The build continues! This build is a lot of work, but I have no reference to other costumes so awesome! This is how the ab section turned out, I just glued the nylon webbing in the back with E6000 Attached all the greeblies. Now this one was a bit of a nut to crack for me. My initial plan was to try to heat-bend the greeblies to shape, then epoxy or E6K them into place. Being super cautious I tried heat-bending a piece of scrap with a heat gun and the flexible fibreglass did not like it. It started cracking almost immediately, maybe I heated it too much, but I just think the material doesn't like being heated and bent. Ok Ensi, how about superglue? Well superglue would be easy to do, as I could just apply and bend the greeblie until it cured, but I don't like the fact that it's hard and brittle. After talking to JAFO and him recommending the Loctite 60sec Universal Glue for his belt kit (it's a great kit), I researched a bit into it and we also carry it where I work. This stuff is a CA (Cyanoacrylate = Superglue) based glue, but with some kind of added flex agent. It also sets in 60 seconds and not 2. Prep consisted of roughing up both surfaces with 60 grit sandpaper, etched some cross patterns with a file, and cleaned the mating surfaces with some Isopropanol (Rubbing Alcohol). I then put on gloves, applied the glue to the greeblie, and held/bent it into place for 60ish seconds. How durable this is only time will tell but they are really on there, in theory it should be perfect. I didn't use E6000 here because my clamps couldn't reach most of them and i'm not pressing them in place for 24 hours with my hands, 60 seconds was enough I also had to sand off quite a bit of material to make them sit flush with the designated holes. In other news, my hardware screw kit + decals for the F-11D and SE-44C from user MaxSW arrived, woo! Screws for my holster also arrived, eBay: For the 2 big screws I used M5 Anti-Tamper/Security Torx screws. These 2 are threaded in but sloppily. To countersink the holster, use a drill-bit as large or just a bit larger as the screw head, and turn gently by hand. For the smaller screws I used M3 ones. I didn't have a small enough drill bit to thread these, so they just sit kinda loosely in there. I plan to just epoxy these into place. With the plate on, this I also cleaned up with the sanding drum attachment on my Dremel. Note that the middle screw (the lonely one without a buddy on the side), will actually be a pan-head anti-tamper torx screw (yet to arrive), with a bearing or some washers in between it and the holster. Went outside again and cut off the ABS strips used to join the 2 parts of the forearms, cleaned them up with a sanding drum and some sandpaper. Also sanded off the filler on the TD, the walls on the TD where I filled were pretty thin, so some of it just popped out, I epoxied this shut and plan to sand it down again when it cures. Attached the shin boxes, using the Loctite 4 hour Power Epoxy. Prep was same as greeblies: 60 grit, etch cross patterns with a file, clean with IPA, apply. I tried to use enough epoxy so that it squished out on all sides. I spent a lot of time on this and cleaning up in the hopes that I don't have to do a lot of filling on them later (they are to be seamless). Also tried out the paint we carry at work on the handplates. Super worried about the color not matching up to the helmet but I think it looks pretty darn close, what do you think? This is without clear. Man this S8 takes some great pictures! Next up is attaching the holster to the thigh, sewing some more velcro onto gaskets, applying velcro to thigh, shins, and forearms. Then.. ? Man, paint and decals. This build has flown by!! Oh yeah and I also have to make the bicep step details.1 point
-
Rather than reinvent the wheel why not use the same wording as on the Shoretrooper CRL? E-11B Blaster For 501st approval: Based on a real or replica Sterling sub-machine gun, scratch-built, or a modified commercial toy Stormtrooper blaster. Tactical flashlight (Surefire scout M300 or replica) mounted on right side of barrel. Magazine shall be full length.1 point
-
Your first priority is fixing the cracks. Use ABS paste or the superglue and t-shirt method, then trim the return edges to a minimum. To make your bells wider, you need to heat them up with a heat gun. I would wedge something inside to open them up (wooden stick or similar) and gently heat them up until they stay the shape you want them. This may take a while to do so be patient and take your time. Wedging a stick longer than you need inside the bells will make it easier to get them the size you need, since the plastic will want to go back to it's original shape when you remove the stick. If all else fails, my bells are much wider than the RS bells and my ABS is a good match too, but try and work with your bells first.1 point
-
The cracks are easy fixes with abs-paste and som sanding....and the lesser return edge the more flex of the shoulders.1 point
-
I'll second what Christian said. No recoil spring is no problem. You can even get some proper size aluminum wire and make a coil out of it to look like a spring. It's been done before.1 point
-
This is what I see. --------------1 point
-
Going to have two numbers availible for the display1 point
-
My replica Hengstler is coming along nicely1 point
-
Hey Frank welcome back and thank your Centurion application, let's do this. CRL and Centurion Application Requirements: All required submission photos are present. Thank you for making the corrections suggested on your EIP app. We are happy to say your armor displays all the elements as set out in the Centurion CRL. Sly and myself would like to congratulate and welcome you to the L3 rank brother. Great job Other-Armor Fit/Assembly: In this section we may mention any additional adjustments needed to enhance the overall armor appearance, of course we have nothing to add . Excellent job, troop on Frank1 point
-
What's the consensus here on picture heavy? I like my posts to be picture heavy, please tell if I should tone it down haha. If replying please don't quote the large posts or you can snip the picture URL's from the quote Had a friend over for 2 weeks, so build slowed down but things are starting up again now. First up was connecting the shoulder and elbow gaskets as well as trimming them down. Doing knee gaskets soon. Didn't cut off the excess material in case I want to change it in the future. Before: After: Cut out the chest vent with a blade: Also cut out the chest and bicep pill holes, as well as the forearm doodly-doo and 2 squares, contemplating cutting out the shin ovals as well as the forearm square up where the hand sticks out (com pad?). [EDIT SEPTEMBER: I did not cut out the shin ovals as cutting them would eat into the overlapping and probably weaken it structurally, decided to just use decals here.] Decided I wanted this kit to fit right from the start and made some dreaded cuts: As you can see here I already trimmed down the thigh-shape. I may have gone overboard here, so if you're thinking about downsizing your thighs, downsize them first THEN do the shaping. Hopefully it won't turn out too bad. Excess material from biceps and thighs. Wasn't that scientifically measured so I decided to cut too little rather than too much. Got some ABS material from TK-50501 (thanks!) to make inner cover strips for the joints on the thighs and biceps. Gluing the strips with Loctite 5min Epoxy. Areas that were to be glued I roughed up with 60 grit sandpaper beforehand, washed, and (if I remembered to) went over with a little Isopropanol (rubbing alcohol). Also got my Trooperbay package with the decals and a buttload of E6000, decided to glue on some snaps to the ab. LESSON LEARNED: Do NOT get cheap ebay snaps, they absolutely suck. Go for some heavy duty quality ones. Plan now is to fill the cracks on the thighs, biceps, and TD with some Gelcoat Filler (2-part filler for boats) and sand down. Then on to some strapping/rigging. Also decided to try velcroing both sides of the shins together, has anyone done this before? I tried it with some small dots and it sat really well. Preventing some flex while kitting up/down is my main concern here. It seems doable as long as you are careful with the greeblies and only glue them on one side.1 point
-
Guys - this thread is for LGBT troopers to express support for each other, and as 501st members they have the right to do so. If you want to discuss politics, go somewhere else, or your posts will be deleted.1 point
-
Good luck Frank , your armour is looking amazing1 point
-
Done! If i were taller i would probably pull off a kneeling shot and be a lot more mobile. I can sit down though:1 point
-
Thanks! I've read so much i've started to grow return edges and sweat E6000. Will be sure to ask questions if I need to This community is pretty great. Thanks! Hey Darren! Looking forward to working on it, your build thread will be of great help. Expect an order for a belt kit in the near future.. Hux's speech scene in TFA just won me over. First Order TK's are so darn cool! Will be plenty motivation I think. Building a TD was also on my wishlist but I think i'll tackle this one first.. So not really any "progress" just yet, but I have been getting 2-4 packages a day in the mail and it feels like christmas. Various electronics I plan to use in my helmet and also in my blaster kits I have yet to order. TotallyVelcroBrandVelcro©®™, webbing, elastic, magnets, clamps, wires, buckles Stormtrooperundersuit's FO-Neckseal. It has these nice magnetic fasteners that are really easy to get on and off. 2 balaclavas because they were so cheap, why not have a backup? Will definitely be Plastidip™ing the inside of the bucket. But i'm gonna wait until I get it padded and the fan system up and running. Stormtrooperundersuit's FO-Undersuit. This one is pretty kinky. So glad I ordered a large, it fits snug. Is the image sizes ok? Let me know Now i'm gonna wait until BBB-day, then get some PPE and sanding equipment.1 point
-
Hmmm. That's interesting. I guess just a clear coat would work, especially if you're going for a weathered version. This material yellows over time though so best option might still be primer, paint, and a clear coat Here's the unpainted kit all rigged up! Some notes: I'm 5'9 and a bit on the wider spectrum in the pics. So for taller folks, there will be more of the abs backplate cod and butt exposed. Lots of built in allowance for height and girth all over too. Back plate and TD is on a bit crooked (dressed myself) I can probably lower the cod and butt a bit more. Movement is awesome. If i were a bit taller i would be able to sit, kneel, get kicked around by Chirrut Imwe. Material is flexible fiberglass Not sure if you can see it in the pics but i'm also wearing the correct undersuit.1 point
-
Seeing as it's soon going to be time for me to start trooping again I'm fixing some of the niggles from last year. This evening I finally trimmed down the helmet ear screws. I used M3.5 brass screws that only come in 25mm long, and when I put the bucket on would jab me in the head. To fix this I used a sharpie to mark all the screws after the nut and then 1 at a time removed them and trimmed them down with a hacksaw. Amount of screw removed by Christopher Pearson, on Flickr I didn't need to remove much but it's made a huge difference and I no longer catch on them when putting on the helmet. If I could have got them 20mm long would have been about perfect. Trimmed screws holding visor by Christopher Pearson, on Flickr Looks much tidier too. The good thing about the brass screws is they cut and filed smooth easily and also leave a nice uniform finish.1 point
-
I have been in the process of updating molds to a more screen accurate shoulder gasket. I am also creating a full polyurethane mother mold so I do not have to build mold boxes and bases any more. This will speed up my mold production time when they wear out or get broke. Molds are like working with fine china in a bull pen. FOTK belt kits are in stock and ready to ship with no wait time. Pauldrons are on hold until new gasket molds are complete and up and running. White pauldrons are on hold until I solve the problem that I'm having with the color. Cloth gaskets are still in production by Mrs. tk4205. She answers all of your emails, handles invoicing, printing, labeling shipping and book keeping. She also does all of the material scouting, sourcing and ordering too. I don't know how she finds the time to sew for us. She cares about us troopers, so It makes her sad when members rant and rave and drop F-bombs on her because they are tired of waiting. Our order list is "first come, first served" and I don't care who you are. Unless of course, you're the president;) If you are on our list and get an invoice, please don't ignore it; we have lots of people waiting and I wont take it personal if you no longer wish to buy. Just don't hold up the line. Imperial Gaskets (rubber) are the premium gaskets for accuracy, durability and comfort. You can reach Centurion level in only two brands of gaskets, but only one you can actually move in . Email [email protected] to reserve your spot today. Cheers to all and thank you for your business.1 point
-
Well, I hear that the next generation of FO TKs from them are coming with latex gaskets so who knows, but compared to the v1 / v2 gaskets, Wyatt's are amazingly more flexible and far thinner. Much easier to move in and also last longer as a lot of the ANOVOS ones cracked and shredded in a short amount of time. No brainer! I used Wyatt's for the flametrooper as well.1 point
-
More repairs today On my 2nd troop (I know, I know only 2 but child care is an issue) I cracked my right shin at the top at some point. Poormans fibre glass to the rescue! Same as I did on the bucket but now with added Billgram: I of course forgot to T the crack with a knife (again) but only after 2 layers of T-shirt and glue. This is a very thick reenforcement and the crack isn't moving at all any more. I also have glue covered fingers so am struggling to unlock my iPhone I'll leave this to go off completely and then sand back the repair as the little bits of fabric rise up and make little spikes that won't do the under suit any favours. My CO also recommended I trim down some of my returns so I'll be doing that before my next troop too.1 point
-
Someone on the FB group was asking how I wired my fans so I drew a schematic:1 point