


justjoseph63
-
Posts
12,745 -
Joined
-
Last visited
-
Days Won
326
Content Type
Profiles
Forums
Gallery
Articles
Everything posted by justjoseph63
-
 CHEST/BACK PLATE (Including shoulder connections) ANH Stunt/Hero ESB Note: While some troopers like to keep a significant amount of the return edges on the arm opening areas of the back and chest plates, as seen in the reference images below they were actually minimal for the most part, but leaving them on will not affect approval at levels 2 or 3. Chest and back shall be connected with a white fabric or preferably elastic strap at the shoulders. As seen in the images from screen used armor below, this ideally must be approximately 2 inches (48 mm) wide. Shoulder bridges For Level 2, no visible rivets are present. For Level 3, they shall free float in the back, be glued in the front and need to be held down in the back via a white elastic band to the white fabric/elastic chest/back connection. Ideally this strap should be 1/4 inch (5 mm) wide, and connect over the tab at the top of the back armor. The bridge should also lay flush against the back. NOTE: As seen in the photos below, there are no large tabs on the rear of the shoulder bridges. This is not specifically mentioned in the CRL, but removing them is highly recommended if possible. ROTJ CRLs will be changing soon, but for the time being we will using screen captures/screen used armor as references for submissions for Level 3. Please be aware of the following: 1. Shoulder bridges have no flat tabs on the front or rear. Ridges extend from back to front. 2. Shoulder bridges are affixed to the chest tabs using one single "pop" style rivet on each side, painted white and set back approximately 3-4 ridges from the front. 3. Rear of bridge is held down with Velcro mounted to the rear tabs, and not by elastic as seen in ANH/ESB.
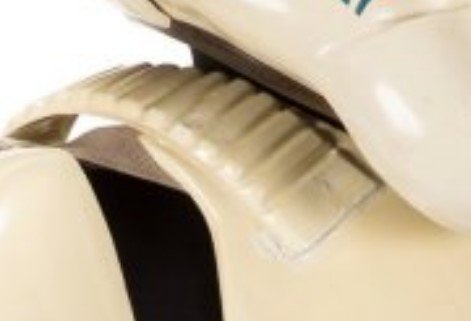
-
VOCODER ANH STUNT, HERO, ESB Vocoder should ideally be painted black using a gloss or satin finish. Lines should be crisp, clean, not extend beyond the ridges and be symmetrical on both sides. For Level 3, lines MUST be clean, crisp and symmetrical. ROTJ Unlike ANH Stunt, Hero and ESB, the paint on the vocoders (and frowns) had more of a matte/flat finish. For Level 3, the vocoder must be integrated (molded) into the helmet. Some helmets such as SDS Battle Spec MK3 come with a separate vocoder (shown below), which is not acceptable for Centurion level approval.
-
HOVI MIX TIPS ANH Stunt, ESB For Level 2 and above correct Hovi Mix tips are required. "Correct" is defined as: 1. Hovi tip rims and insides must be white or painted white on the insides. 2. Screen must be a wide mesh. 3. Screen should be attached toward the tip and not recessed. Note: These are also known as Hovi-mic tips. That name derives from the originals, which had HOVI MIX PA2 embossed on them. The interior also contained a plastic "nipple" on the bottom of the inside. ANH Hero Although the same type of tips were used on the Hero helmets, the sides of the interiors were black, not white as seen on the Stunt version. The "nipple" in the rear was white, though, and in most cases the screen was painted black. Having the interior sides painted black is optional for Basic and Level 2, for Level 3 this is a requirement. ROTJ Although very similar to the ANH/ESB type, the tips for ROTJ were not the HOVI MIX type and not made of plastic. They were made of aluminum with no embossing of any sort. Also note the lack of ridges on the side, the more tapered front and no holes in the recessed part. Unlike ANH/ESB, they were attached to the helmet using wooden plugs that were painted white, with the interior sides being black. NOTE: Screens may be painted black, and due to limited suppliers of the correct type ones made from resin/plastic are 100% acceptable at all levels and do NOT require the wooden plug. Screen-used tip images courtesy of MARK (sskunky)
-
TUBE STRIPES ANH Stunt/Hero Ideally at Level 2 tube stripes are approximately 1 cm (5/16ths) away from the cheek, and should lean toward the front. The thickness may vary, but the number of stripes must be between 9 and 16. These may be hand painted or decals for all levels, but should not extend under the ear. ROTJ / ESB For Level 2 and above tube stripes must be "...decals, not hand painted or decals that represent hand painted". Ideally there should be 13 stripes, but any number between 9 and 16 are acceptable. Tube stripes should not extend under the ear.
-
FROWN ANH Stunt For Basic approval and above, Frown is painted gray and does not leave the teeth area. Eight total teeth on the frown are cut out. Please also note the extended taper on the ends of the frown. Image by Rogue Trooper ANH Hero For Basic approval and above, Frown is painted gray and does not leave the teeth area. Six total teeth are cut out and frown is tapered at both ends. Note: Taper at ends is shorter as compared to ANH Stunt. Image by Rogue Trooper ESB For Basic approval and above, Frown shall be painted black and does not leave the teeth area. 6 or 8 total teeth are cut out. ROTJ For Basic approval and above Frown shall be painted black, overlap the teeth area with 8 teeth cut out. For Level 2 , they are rounded and not tapered to points or squared. NOTE: Unlike ANH/ESB, the paint on the ROTJ frown had more of a matte/flat finish.
-
TEARS/TRAPS ANH Stunt/Hero For Level 3 Tears/traps (trapezoids) shall be hand painted or use decals that emulate hand painted (with correct ANH details). Note: Lines inside tears as well as borders should ideally be on the thin side as seen below. Tears Side Traps Rear traps ESB / ROTJ For Level 2 and above, tears and traps must be "...decals, not hand painted or decals that replicate hand painted". ---- Images below enlarged to show texture ---- Tears Side traps Rear
-
EAR BARS ANH Stunt / ESB / ROTJ For Level 2 and above, ear bars must have 4 bumps. Ideally the outline is fairly thin as seen in the reference photos below. The black "rank stripe" is optional at Basic and Level 2, but is required at Level 3 and may only have one*** ***ROTJ and ESB may have 2-3 bumps painted black ANH Hero For Level 2 and above ear bar must have 3 bumps, not 4, and have no more than one painted black.
-
EAR SCREWS ANH Stunt, Hero and ESB For Level 3, all ear screws must be "..slotted, flat-topped, countersunk and painted white". Although not listed in the CRL specifically, for Level 3 the head must be a V-shape as seen below. Note: The recommended screw head size is #6/32 (7mm), with a length between 3/4" to 1" (17 to 25mm). ANH Hero For Level 2 and above, Ears shall be attached with 2 screws, one above the ear bump and one at the base of the helmet. ROTJ For Level 2 and above, the ears have no visible screws.
-
EAR PLACEMENT The "ideal" ear placement is as seen below (first photo below). Because some armorers design their helmets differently or send them pre-assembled this is not always possible to achieve, but it is suggested that you try to get as close as you can. Notes: 1. Top of the ear (round part) should be closely centered directly below the rear trap line and cover the cap/faceplate seam completely. 2. Bottoms should be angled back, with the bottom screw following that angle. In a perfect scenario the top 2 screws should line up as well. 3. In the case of ROTJ ears, there are no screws present but note that the angles are the same as seen in ANH and ESB. 4. Don't worry if the ears don't fit tight (flush) all the way around. There were gaps in the originals, so some is expected. 5. For Level 3, all ear screws must be the countersunk (V-shaped) flat head slotted type as seen below. 6. For Level 3, bottoms must be angled back, cap/faceplate seam covered and top closely centered below rear trap line ANH Stunt (3 screws) ANH Hero (2 screws) ESB (3 screws) ROTJ (NO screws)
-
BROW TRIM In looking at the images below, notice that the ANH-Stunt brow generally sits higher above the eye openings, while the Hero brow typically tends to sit lower. ANH Stunt ANH Hero ESB ROTJ Note: Overall the brows seem to ride even lower (especially the center) than the those seen on the ANH Hero bucket.
-
Quick reference guide for armor used in ******** Otherwise known as the OT (Original Trilogy) ******** Whether you are aiming toward Basic 501st approval, Expert Infantry or Centurion level, the FISD Gallery section is an invaluable resource for information containing hundreds of images of screen captures and film used armor. However, searching for the exact reference you are looking for can take a lot of time, especially for those seeking higher levels of accuracy or approval. This thread contains edited versions of those images and is designed to be a quick reference. It also contains notes and CRL (Costume Reference Library) requirements as applicable, but does not contain them all. For complete info. you can view the various costumes here: CRL IMPORTANT! Please be aware when applying for higher levels that the Deployment Officers do not depend solely on the CRLs when reviewing submissions. Screen caps and reference images are also taken into consideration. When in doubt, always feel free to contact any member of the D.O. Staff for assistance... we are here to help! The costume categories are shown as ANH (A New Hope) Stunt, ANH Hero, the Empire Strikes Back (ESB) and Return of the Jedi (ROTJ). Items for Basic 501st approval will be listed as Basic Items for Expert Infantry approval will be listed as Level 2 Items for Centurion approval will be listed as Level 3 Requirements from the various CRLs will be shown like this: bold, italicized in white, and may be paraphrased for brevity. Comments will be listed as Notes: or Important: TO SEE A PARTICULAR AREA, JUST SCROLL OVER IT BELOW AND LEFT CLICK ON IT! HELMET ARMOR BOOTS/HOLSTER Brow Trim Chest/Back Plate Boots Ear Placement AB/Kidney/Posterior plates (including strapping Holster Ear Screws Belt (ABS-Canvas) and Drop Boxes Ear Bars Shoulder Bells Tears/Traps Biceps/Forearms Frown Thighs/Lower Leg Armor Tube Stripes Thermal Detonator (TD) Hovi Tips Gloves/Hand Guards Vocoder DOWNLOADABLE PDF for PRINTING: Courtesy of Caleb (MaskedVengance) https://drive.google.com/file/d/1BbwWkC8nwLgH-jvU634IUcrO2mf4Yovb/view This will be an ongoing project and more photos will be added. I have locked the topic, but if you have any reference images you would like to see added, please feel free to PM me. Thanks for looking, and I hope this helps! SHOUT OUT to Mark (sskunky) of CFO for providing me with some great photos of his screen used ROTJ armor. THANKS!
- 22 replies
-
- 10
-

-
The forearms came out GREAT! The only issue I can see is that even with your arm slightly bent it looks like the "scoop" is looking as if it will end up cutting into you (red arrow). This can be safely opened up a bit like the right one is (if needed). For the thighs, remember that the cover strip should only go down as far as the top of the raised ridge. If you have a gap between the thigh ridge connection this should ideally be filled with ABS paste or a small piece of ABS can be glued behind it. You want to avoid this look: Fronts Backs Also, when you get to this part, the back edges of the thigh ammo pack need to be an equal distance from the "corners" of the ridge at the rear.
-
That should work just fine and dandy, Chris!
-
Types of elastic for inner strapping
justjoseph63 replied to Shinyarmour1's topic in Boots, Soft Parts, and other Accessories
Whichever type you find works best, be sure to double over the ends before setting the snaps in the elastic to provide strength in that area.. Constant snapping and unsnapping can cause them to pull through the elastic after a lot of use. Here is a thread that may help: https://www.whitearmor.net/forum/topic/44617-snap-setting-101/ -
Amen.
-
I like the idea of a built in coffee dispenser, though.
-
????
-
new r1tk kit on etsy
justjoseph63 replied to delcid23456's topic in Build Threads Requireing Maintenance
As Daniel mentioned, it is a re-cast. Here is a copy of some info. posted about that subject from the "Getting Started" section: RE-CASTING What exactly is re-casting? Re-casting/caster is a term used for an unscrupulous person who uses a quality set of armor to make copies in order to sell them at a discounted price. The original armorers spend hundreds of hours and in many cases thousands of dollars to sculpt quality molds, known as "bucks". Re-casters simply use the completed pieces to make counterfeit molds. These are more often than not inferior products that do not have the clean, crisp details required for 501st approval and for that reason we discourage you from purchasing them. Other reasons why not to consider re-cast armor: 1. First, the quality and customer service are not there. It may look like you are getting a great deal because of the price and/or possibly faster delivery time frame and you are eager to get started on your TK build as soon as possible, but this is often not the case.2. 99% of the time, the product will be made out of sub-standard material that will not withstand trooping or may even arrive at your door step with problems to begin with. Then that "good deal" turns into a money pit. You will end up spending even more hard earned cash and time trying to fix or this now "not so good deal" than if you had taken the money that you spent on the re-cast trying to get it up to 501st approval level and applied it to a product from a reputable vendor.3. Re-casting is basically stealing. I would hope that no one here condones stealing. -
The shape and style are fine, and you should have no issues getting them approved, Mark (if dyed of course). If the uppers are constructed from a man-made material you may want to think twice, though. Vinyl/pleather does not "breathe" like leather does, and they may get mighty uncomfortable and retain odors.
-
452, sir.
-
Looking really nice, Jonas! I noticed that you have a bit of E-6000 seepage under the cover strip. Not to worry, this is to be expected. This is super easy to remove, just carefully cut along the cover strip edge with a razor and them rub off the excess dried glue with your thumb.
-
Massive sale at PAULDRONS-R-US is all I can figure.
-
Way to go, Andrew.. welcome to the rank of Centurion!! Certificate issued!
-
ANOVOS TK in progress
justjoseph63 replied to Hesikaya's topic in Build Threads Requireing Maintenance
Looks a lot better, Scott! If I could make a few more suggestions (mostly strapping issues), they would be as follows: 1. It looks like you trimmed all the return edge off the bottoms of your shoulder bells (AWESOME), but the left one seems a bit pinched at the bottom, causing it to ride out from the bicep. This is what is causing the gap between the bell and the chest plate. The right gap (and the ones in the back) are PERFECT! 2. If you look at the outside bottoms of the biceps, (top blue line) you can see that they are uneven. I would lower the right one (or raise the left one) to even them out. 3. That lower bicep is also causing the forearm to sit higher. Same deal. You should have a closer symmetry on both sides. 4. Although certainly passable at Basic approval, your ABS belt should ideally sit just a little higher. 5. The posterior plate looks good from a rear view, but it still juts out a bit in the back... you should try tightening the strapping. 6. Unless they are bothering you or making a clicking noise when you walk, the backs of the thigh tops look good.. 7. When suiting up, check the alignment on the backs of the calves. The left one is ideal but the right is off a hair and that point can snag your under suit. Now for some positive things!! 1. Your cover strip alignment (forearms/biceps-thighs/calves) is among the best I've seen! 2. Same goes for the back/kidney/posterior plate. 3. One of the most common items we see are drop boxes not positioned correctly, but you nailed it! Just a few tweaks here and there, Scott and you will have one fine set of armor, and once you receive your official 501st TK I.D.#, I would like to see you apply for your Expert Infantry badge! Hope this helps, and always feel free to hit us up with any questions. -
I kinda' figured that!!