


TK bondservnt
-
Posts
7,196 -
Joined
-
Last visited
-
Days Won
5
Content Type
Profiles
Forums
Gallery
Articles
Everything posted by TK bondservnt
-
when I look at that style of line, I see that you've done it on your lid, but I don't see scratch patterns on your line and I don't see the angle that you have in the screen caps? I've noticed that your face line has an angle, while when I look at the photo mine looks a little better to me I'll take photos from the angle as the screencaps to show why I've done it this way. also your line is idealized quite a bit, it has no uneven edges like it should. and the pattern of paint on yours seems to be a little too clean... look at the weathering on the paint in the chest. again while your build is very very nice there mason, I'd have to say that adding the scratch patterning would really help the look. I think your line is too pointed at the rear, and is not wide enough at the base of the tube. I personally think that your line could also use some modifications, and I'm grateful for your version of the paint guide! without these screencaps we would not have such an excellent resource to discuss!
-
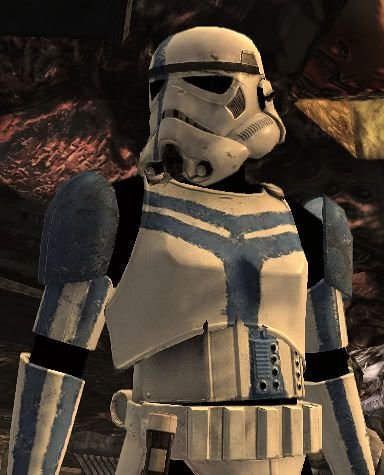
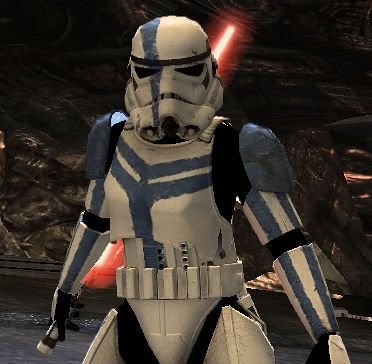
that's exactly what I did to get the above effect. with more color added over the top. this is just mapping out the scratch pattern then the lighter blue and darker blues will fill in the edges, make the color more even and varied. next set of photos will have darker blue, more hdpe chips, and some black paint for dirt.
-
thanks for the input guys. I'm trying for the scratch pattern first, then I'll be using more color to define it more. more input?!!! this is by no means a finished build! so a little wider, and a bit darker is the plan... this is just the "base coat" so far.
-
I take a piece of plywood cut in a long strip 6" wide by 3 feet long. put a C clamp on one end with some aluminum flat bar under the clamp. flat bar dimensions 3/4" x 3 feet long. place your sheet of cover strip material under the flat bar, clamp down on both ends of the plywood. run your blade 2x down your line. remove from clamps and bend carefully with pliars. strip should carefully come apart directly on your score line. be careful not to mark your strip with the pliars. most finishing strips come with a dull side (inside) and a shiny side (outside) just cut from the dull side and you should have a perfect cut, nice and shiny!
-
you can always polish up ABS with some 1200g wetsand paper for those glue spots.
-
to create the butt join, you need to use the other method described in the tutorial. the method you have shown in your diagram from the academy shows the overlap method. this is the diagram you should follow. the front area where the cover strip sits should be 20-22 mm wide with the strip 20mm wide for each front. at the rear area where you mount the overlaping strip should be 25mm with 1/2 (12mm) extending past the mid point at the rear of the thigh. the cover strips on the back of the thighs are mounted to the outside part of the leg and should overlap the inside part of the leg by 12mm. this covers the velcro join at the back of the thigh. or is glued in place according to your leg size. 20 at the front (butt joined) and 25 at the rear (outside overlaps inside)
-
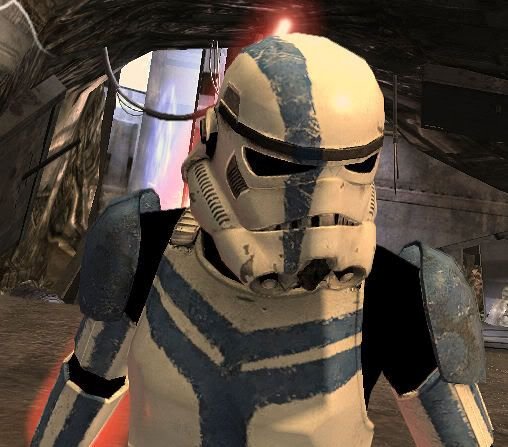
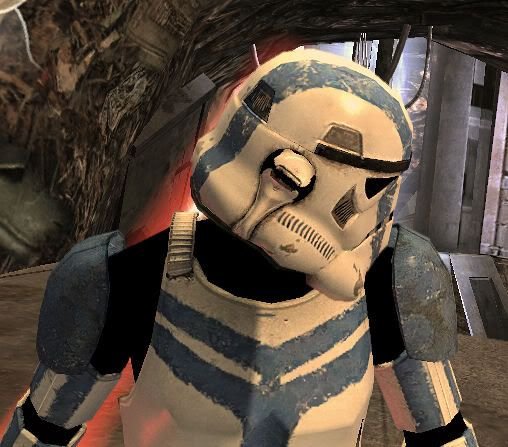
my latest addition to my collection. the stormtrooper commander lid. S trim, sskunky's hovie tips, SA green gel acetate lenses. ( will be swapped out with dark welders lens. weathering and ear pinstripe tape is all that's left to do. also am going to add the HDPE chips and some grime... I wanted to compare it to the scratch pattern from the game references. what do you guys think? thanks for looking!~
-

weather stripping for edge
TK bondservnt replied to that954trooper's topic in Build Threads Requireing Maintenance
how does the fenix props trim stand up to your standards there TM/ (paul)?? sskunky pointed me to that... -
you should be able to sand the paint off, add your return, sand off again to smooth, then I'd wetsand the entire part with 1200g- 1000g wet paper and re-paint the entire part. wetsand again and clear coat. if it's HIPS take care with the modeling iron, it will get hot quick!
-
LF E-11 aluminum parts...help!
TK bondservnt replied to 2155TK's topic in General Weapons Discussion
while those are plans, they have many problem areas. first, they make blasters that are too long at the rear portion, by about 3/4" or more. the BBC plans were developed many years ago and while interesting, are not right. billhag has some nice diagram posts for sight rails and hengstler counter brackets and there have been some nice aluminum builds here on the FISD. --------- -
Confused a bit what kit
TK bondservnt replied to Darth Tater's topic in Getting Started - Read this First!
I would say kits from these makers work quite well. ATA abs. AP abs TM 2mm ABS RT a little large for you... will require more work AM a little large for you.. w.r.m.w. -
Almost scratch-built pipe E11
TK bondservnt replied to Skiffy's topic in Build Threads Requireing Maintenance
you've done a really nice job! only aspect is that the folding stock actually should have a lower mounting point on the tube, and the arms actually have a slight curve on the originals. this would have eliminated the need for a "cutout" on the folding stock arm. nice use of custom skills! -
Doopydoo's Full Resin E-11 Blaster
TK bondservnt replied to 1mpulseS0D's topic in General Weapons Discussion
I would say that resin is actually very durable. the way the new doopy kit is built with a pipe INSIDE the resin cast the new version should be very very strong indeed. a hyperfirm, from sci fire may be durable, but it's way too light, and has a large seam all across it. and I'd have to say that if you've made armor, you know how brittle and prone to crack or cut it can be. don't be afraid of the new doopy... it will serve you quite well!! -
I've used the ear screws on one bucket, tape on another, and the original AP lenses with mirror lens material behind that. you can use many different ways.
-
TK 4510 sells your TK number in aurebesh. trooperbay is what you're looking for.
-
Leather for Holster
TK bondservnt replied to Kevin Myhre's topic in Boots, Soft Parts, and other Accessories
interesting holster. I'm wondering why it has been sewn all around the top? it's usually just one piece, dyed though, and folded over... tan straps look really nice! -
nice job john! if you tie the tracks down with a rope you should be able to heat them flush.
-
I had to use my old AOL browser to post here. the firefox browser notice said: "the website is not properly redirecting, and will most likely never complete. this problem can usually be solved by refusing cookies" url redirects to: www.whitearmor.net/home/404.html
-
Finshing strip question
TK bondservnt replied to Sonnenschein's topic in Assembly, Mods, and Painting
well leave enough extra armor and make the strip the right size, but trim the armor large enough to fit. -
Let's finalize this! Counter wires where do they attach?
TK bondservnt replied to gazmosis's topic in ANH BlasTech E11
it will really be nice when we have the blu ray. perhaps that will clear up the discussion. I think that the fact that some hengstlers don't even have wires, and some blasters also don't have power cells. there is a lot of variation on the props, and the large coils of shaver wires look really cool. the photos usually shown of the wires on the top are really hard to see. there is a photo that comes from out of a book on the weapons of star wars and it shows several views of an E-11. the wires are really small. a fairly clear photo from the leia confronts vader blaster. see how the wires are connected to silver solder under the pins? you can barely see that they are very thin and connect to the rear of the power cells. to me they look like they're drooping, and not coiled at all! all these images are in the advanced costume section for the e-11 -
those are all nice wires... but they are wrong. here's a screencap. the wires attach BELOW the pins on the hengstler with silver solder to the front of the brass metal case. one wire is red, and the other is green actually! they are insulated small connection wires like you'd see inside a PC board. too bad the screencap is in black and white. the inboard wire is connected in series with the outboard wire. left to right. see how the left wire bends around to the right rear?
-
a lot of the viewpoint for a helmet is it's angle. looking down looks mean, while looking slightly up, or sitting on a table it can look a lot different! TM shows clearly how a helmet looks while on a pole. take the same helmet and photograph it and you'll get a different aspect. it also depends upon how you paint your vocoder and the tips of the frown. ie 4th tooth... ect.
-
contact tk 4510 he has the correct type you need ANH style helmets have individual stripes and ALL ESB helmets have the single strip decal.
-
Correct wire for brackets
TK bondservnt replied to Sonnenschein's topic in Build Threads Requireing Maintenance
just search google and shop on the web. done! thanks paul for all the great info! -
did you use latex rubber for the chipping element? so that it just rubbed off?