


gmrhodes13
-
Posts
31,219 -
Joined
-
Last visited
-
Days Won
1,070
Content Type
Profiles
Forums
Gallery
Articles
Everything posted by gmrhodes13
-
Looks like a great locations, some colored lighting and fog would have been amazing to add.
-
 Nice work trooper, didn't see a photo of your "Han" snap, right side upper ab corner, no doubt the DO's will like to see that
 -
TK-23011 reporting for duty!
gmrhodes13 replied to TookBreaker's topic in Newly Approved Members - Sound Off!
Congratulations trooper and welcome to the ranks, hope you will look at he higher level approvals -
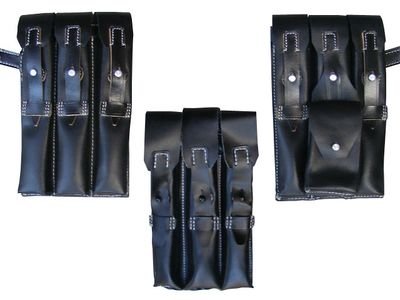
I've not seen issues with the popper colors before, normally they are silver although the CRL image shows them darker. Both versions of the pouches have been approved at centurion, although the second pouches do match the CRL images. https://www.whitearmor.net/forum/topic/49428-tk-61490-requesting-hwt-centurion-status-anovos-approved-2nd/ https://www.whitearmor.net/forum/topic/42345-tk-20466-requesting-heavy-weapon-trooper-centurion-status-ap-approved-2nd/ If you go off the references the first type should be find (and are easier to assemble ) Hopefully one of our DO's will chime in @TKSpartan @justjoseph63 @Chemi
-
Nice work, just with the teeth looks as if you may have a little paint on the gums on the bottom. CRL: Frown is painted gray and does not leave the teeth area.
-
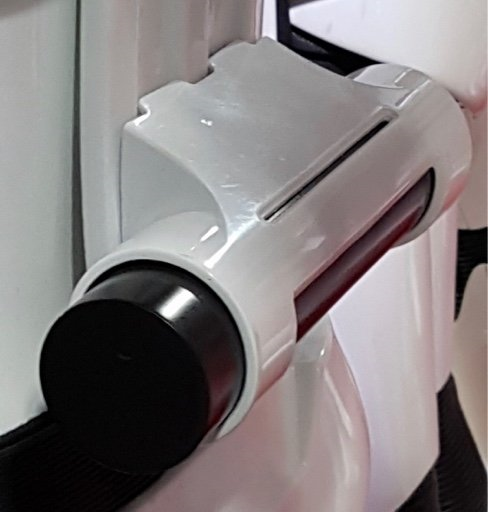
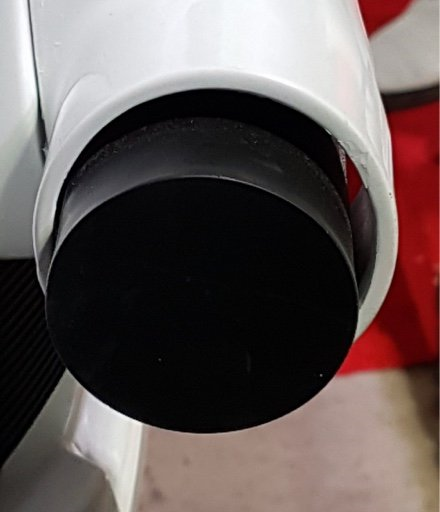
TLJ and TROS do inf fact have a gap between the housing and back plate. The endcap is a full tube which goes into the housing and the top slot and back panel are cut out showing the tube insided. A coupe of references

-
WHY BE HARD ON NEWBIES (ARMOR)
gmrhodes13 replied to Tallguy's topic in Getting Started - Read this First!
If you wish to find out more about a Vader costume head to the Sith Lord Detachment https://www.501stsithlords.com/ -
TK 19632 Requesting ANH Stunt Centurion status [504]
gmrhodes13 replied to Goggytalks's topic in Request Centurion Status
Nice work good luck with approval -
WHY BE HARD ON NEWBIES (ARMOR)
gmrhodes13 replied to Tallguy's topic in Getting Started - Read this First!
Well really depends on your garrison and how many events you attend, some are so busy they can't fulfill all request and several of the same charators are needed, others like my own are small and we find the Vader's have to either share an event and swap over or one will do a specific event one year then the other will do the same event the following year. Check out your garrison and see how many Vaders they have already -
TLJ / TROS CRL Update Work Flow
gmrhodes13 replied to ukswrath's topic in Hard Armor (General Discussion)
Just with the helmet should we also include Helmet The clip greeblies must be the correct TLJ version and do not completely fill the recess areas (as they are shorter than TFA) Not sure how far you want to go with blaster details, there are a few differences, cocking lever either side, also slot, end cap has a slightly different tapper. F-11D Blaster Blaster may be scratch-built, or a modified commercial toy Stormtrooper blaster. · Details to be painted black, white and silver per reference photos. Blaster may have a picatinny rail on right side of barrel Blaster may have a sling attached OPTIONAL Level two certification (if applicable): Rear sight is painted black D-Ring shall be present on the rear end cap and painted white 3-D printed blasters can not contain visible print lines, and must be sanded smooth for a more realistic appearance. OPTIONAL Level three certification (if applicable): Working lights and working front torch are required. Front handle must be movable Blaster must have a picatinny rail on front side of barrel (majority have this detail) F-11D Blaster Rifle (Heavy) Blaster may be scratch-built, or a modified commercial toy Stormtrooper blaster. Similar to standard F-11D Blaster with extended stock attached. Details to be painted black, white and silver per reference photos. Blaster may have a picatinny rail on right side of barrel OPTIONAL Level two certification (if applicable): Rear sight is painted white 3-D printed blasters can not contain visible print lines, and must be sanded smooth for a more realistic appearance. OPTIONAL Level three certification (if applicable): Working lights and working front torch are required. Front handle must be movable Blaster must have a picatinny rail on front side of barrel Riot Baton The baton has a white base with two black triangles on both sides, a silver pommel, black side grips, and a silver handle perpendicular to the base. The end of the base has an extension roughly 1 foot long with 5 silver bands equally spaced apart. There is a black strip running down the center of both sides of the extension. At the end of the extension, there are two white half cylinder arms each with 5 silver bands equally spaced apart. The end of the half-cylinders are angled at roughly 45 degrees. OPTIONAL Level two certification (if applicable): 3-D printed riot baton can not contain visible print lines, and must be sanded smooth for a more realistic appearance. OPTIONAL Level three certification (if applicable): Riot shield and riot baton must both be present. Pauldron, backpack, ammo pouches and ammo vest shall not be worn with riot baton/riot shield combination. Baton should have working lights, down length of the both sides of the barrel and top of rear housing, center of the black triangle area Electroprod Blaster may be scratch-built or 3D printed. Details to be painted black, white and silver per reference photos. OPTIONAL Level two certification (if applicable): There is a small tube which runs from halfway of the shaft to head. 3-D printed electroprods can not contain visible print lines, and must be sanded smooth for a more realistic appearance. OPTIONAL Level three certification (if applicable): Electroprod must have working lights, rows of red in top silver housing and blue in end prongs.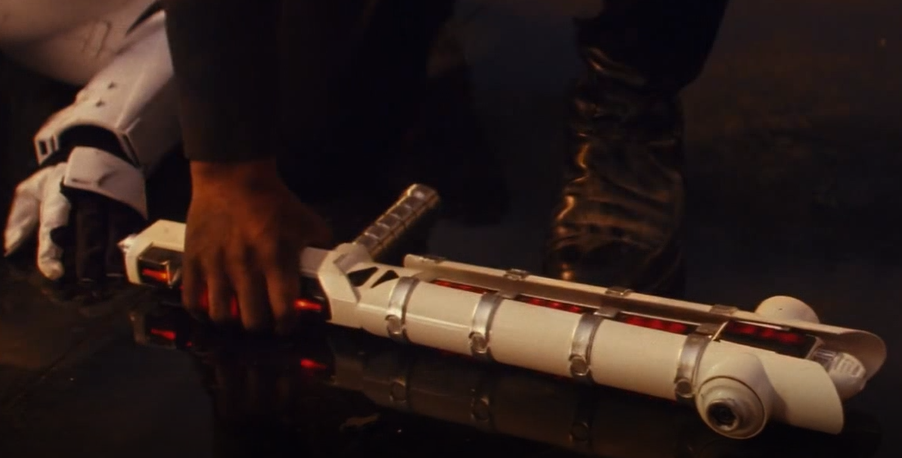
-
TLJ / TROS CRL Update Work Flow
gmrhodes13 replied to ukswrath's topic in Hard Armor (General Discussion)
There is a link to the image for the support tab in the L3 text, it's the same with the TFA support tab -
Most of us use a free online image host, load your photos there then post the links into you thread. Here is a great tutorial for Imgur Make sure you use the "direct link" option
-
WHY BE HARD ON NEWBIES (ARMOR)
gmrhodes13 replied to Tallguy's topic in Getting Started - Read this First!
Very hard at this stage with covid, next to no armor workshops or events, just know there are plenty here on the forum happy to lend an eye or guidance, some posts may get missed from time to time but we do try. As I tell everyone having a build thread is one of the best ways to get online help with a build, it's just a shame we can't be hands on to help. -
WHY BE HARD ON NEWBIES (ARMOR)
gmrhodes13 replied to Tallguy's topic in Getting Started - Read this First!
Have you looked at some of the info or builds for the taller troopers, you will find info, heights and makers info Here's just a few from using the search function and entering "taller" Or even this thread in the Getting Started area -
You already have Stormtrooper access so there's nothing to update
-
If you need to add a few photos most of us use a free online image host as you are limited to size and quantity here on the forums, I use Imgur there is a great tutorial here
-
Sorry to hear you weren't able to continue with the build. There are always people wanting to purchase armor and helmets just depends on price, you could post in our For Sale area BUT you must have a minimum of 5 forum posts to do so
-
Good to hear all is well, looking forward to seeing some photos soon
-
Allow me to reintroduce myself...
gmrhodes13 replied to Waya Chetan's topic in New Member Introductions
Hello and welcome looking forward to seeing some photos soon -
Luckily I save the full How To from his website, I've just posed the thread here
-
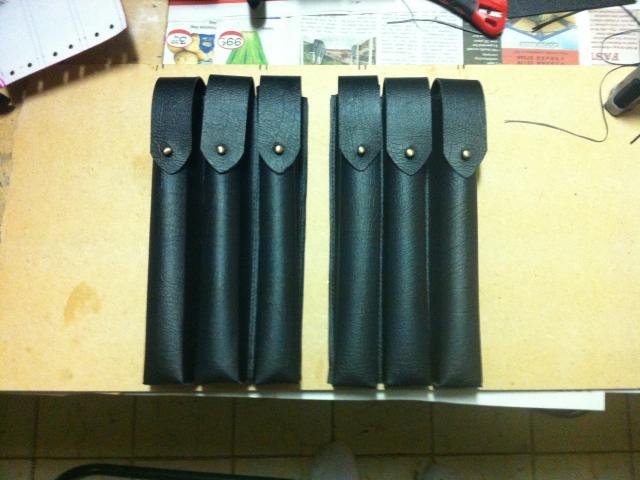
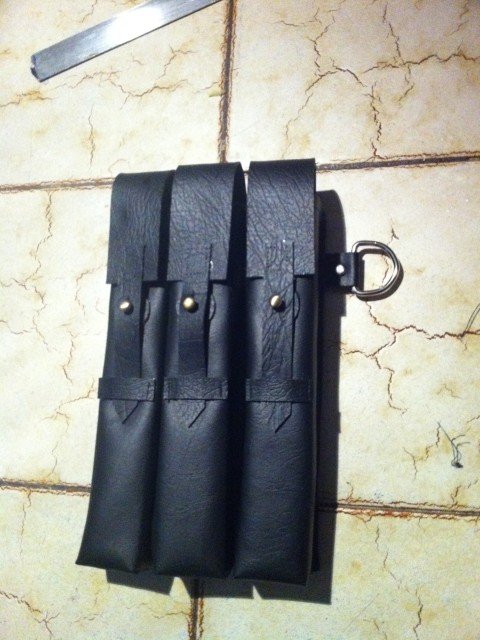
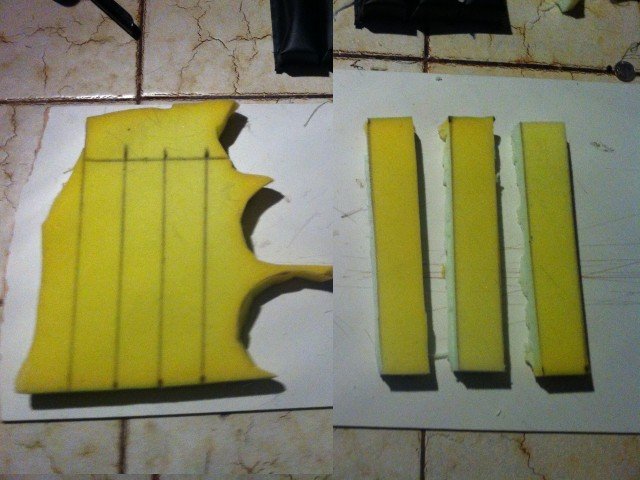
This used to be my go to for pouch templates but unfortunately the website was no longer active, but I saved a backup up to my computer so thought I would share here, thank you again for all of your hard work TK1336. Please note I did not use all the special tools because I used faux leather (vinyl) works out a lot cheaper and much easier to use. For any of the back pieces I did glue two pieces of vinyl together so they have some stiffness to them. Just coat both sides with glue, wait to get tacky, then apply together, add a heavy weight on top and leave overnight to dry. I also found with using vinyl you can sew most of the areas with a sewing machine. Some of my pouches You can use some foam for the insides so they keep their shape. How To Make Sandtrooper Ammo Pouch To Make your Own SandTrooper 3 Pocket Shoulder Or Belt Ammo Pouch First off the Leather thickness needed is up to you. You Can use 5/6oz. or 4/5oz.or the heavy stuff like 7/8oz leather Note: For the Back/ Bottom I use a thicker leather say the 5/6oz and for the front use a 4/5oz. But a 5/6oz will work good too. Also for the securing straps I use the thicker leather. To Make 1 pouch 1 each - 12" x 12" PREMIUM Tooling Leather 4/5 oz or 5/6 oz ( For The Front ) 1 each - 8" x 8" PREMIUM Tooling Leather 4/5 oz (For The Flaps ) 1 each - 18" x 8" PREMIUM Tooling Leather 6/7 oz ( Best is a 7/8 Oz ) ( For The Back ) 1 each - Tandy Leather Craft Tool Spacer Set System with 3 Wheels 3 each - Tandy Leather Sam Browne Button / Washer Solid Brass 1 each - Tandy Leather Craft Tool Sam Browne Button Stud Anvil 1 each - Tandy Leather Craft Waxed Nylon Black Thread 25 Yard 1 each pack - Tandy Leather Medium Antique Nickel Rapid Rivets 100 count 1 each - X-Acto / Ex-Acto Craft Knife with Blades 1 each - 4oz. Bottle of Tandy Leather Craft Fiebings Leather Dye U.S.M.C. Black ( Or 8oz, 32oz Bottle) 1 each 2oz. tube of Barge All Purpose Cement ( For Leather) 1 each - Tandy Leather Craft Stitching Needle (Note : Best to get an assortment) 1 - each Tandy Leather Craft Tool punch 4 tooth #8066 ************************************************* You can find all of the stuff you need at : www.RowensWorld.com OR Just Contact Nina & David Walker at: [email protected] OR Call at (812) 334-8289 ********************************************** Once you have all you need to make one now we need to use the Templates Below Sorry Scanner Broken and have to Clean them up a Bit. NOTE: This is Not 100% Accurate you can adjust this Template to fit your needs I need to adjusted these two templates (v1.0 Front and Back). On the over all width and the width of each pocket smaller. I made this how to using another template so it will not turn out like my pictures it should turn out better though if you use this new updated template. NOTE: Not 100% sure the measurements are the same as the ones used in the movies or a real MP-40 Pouch. (Updated) Template v1.0 Front (Below) The Rivets Holes are 10mm from each side and 10mm from the Fold. The Holes for the studs that secure the flaps are measured down from top edge 60mm x 18 mm Template v1.0 Back & v1.01 Back (Below) This you can make it with Flaps attached or attach them your self, you make your own mind up how you want to do it. I will put the measurements on it soon. Mark and cut the Back of the pouch from the rough side and punch all rivet holes for the straps and flaps see picture below Now we cut out all 3 of the flaps and mark and punch out all holes use template above. I Cut these out of the 5/6oz leather The Above Belt loops I did some at 20 mm to 25 mm wide. Do Them at 25 mm it is better. Draw and Cut The Leather from the Bottom side Like Below From the Bottom side I also scored the area along the line to fold it so I can stitch easier It will also be glued with Barge Cement. This is good if you are using the thicker leather Note: Just don't cut too deep . Also I use a V shaped carving tool to score the areas to fold see picture below. It should look like this. You can see how much I scored it just a real thin line, but when it is folded ....... As you can see when it is folded and secured it should look fine. Now Before you start doing more . We need to cut the stitching lines or holes. So Now we make a line in the center of the are we will be stitching Use A Pencil or Pen here, I just put two small ink marks and used the ruler as my guide. I used this tool the Tandy Leather Craft Tool Spacer Set System with the small tooth wheel I held down the ruler and used the tool. This is what it should look like, and started it at same point on both parts Now I used a Leather Hole punch and made a hole for the rapid rivet and secure the 2 flaps together, try and make them centered, also see the flap and a line that is the fold punch a hole in the fold and secure it with a rivet All 3 should look like the one in the picture above. Or Now we use the Barge Cement to Glue folds over Use on Both sections to Glue Flap over the end with Barge Cement (See Below) Use Claps to hold in place for at least 30 min. All three should look like this picture below. Like this on the other side, See how it is taking Shape. Now for the back side, Finished side up use the Rivets like so to line up holes the straps should be unfinished side up. Apply Barge cement to both parts and hold down and let Dry, keep it strait. (See Picture Below) Then install and secure it with rivets see picture below Then fold strap over and repeat process, Remember keep it strait and when securing the rivet don't hammer the strap it may damage it. The Belt loop is a little over 3" Now it should look like this on the inside with the rapid rivets installed. Back to the Front Now Before you Glue all sides down Cut a Small square 10mm x 10 mm and glue it on the inside to reinforce the holes where the buttons will be installed . You will have to punch the hole out again to install them. Now Install the Tandy Leather Sam Browne Button / Washer Solid Brass using the Tandy Leather Craft Tool Sam Browne Button Stud Anvil and a hammer The Buttons I distressed them with sandpaper to get the shine off them at the end but I now think I should have done that before I installed them. It should look like this. Next Take Front Half and back half and here use the barge cement glue both parts together using rivets to line the holes up. A clamp will work to hold them together. Once it dries about 15 min install the rivet heads on the finished side Do the center one 1st and then the other 2 one at a time. Now all 3 are secured and you finished installing the rivet heads on the other side it should look like this below. Next we now Glue all sides one at a time a long the marks you made inside. Done one side 1st the move to the next one right to left , glue both parts and clamp them together let set for 30 min each time. It should look like this once you have all of them Glued Now We use the Craft Punch 4 tooth tool # 8066 Now punch the pre marked line from the spacer wheel tool. It should look like this Below (note if using vinyl you can just sew by sewing machine) Next we lace the pouch always start from the back and from the lower end and go up then back down. Yes I was off a little on the holes but the lace will hold just fine and you will not see it once it is dyed black. Now we cut the shape of thr flaps out and make a 20mm mark (Line) from the very bottom that is our guide. .Now we punch out the holes and cut the corners off and semi- round the tip. See Picture below Now we use the rivets as a guide and apply the Barge cement to both parts and clamp in place. See Picture below. Once done should look like this on the back side (Ya, holes and lacing off a little ) ( "nag! nag! nag!" ) From the Front side. Now it is time to use the Fiebings Leather Dye U.S.M.C. Black (or use black vinyl from the start) You may need to put several coats on it. While it is still wet I put some wood I cut to size inside the pouches to give it shape and let it dry Once Dyed let it set over night to dry. Picture of My Finished MP40 from the Template Above. Back View Just make sure you get every part that is seen. I did a little of the inside that you can see if the flaps are open. After it Dries check it all over you may find spots that look less black just apply more Dye and then let it dry again. Now after the Dye is Dry use a soft cloth and Buff the whole pouch it will give it a shine and removes all excess dye residue. Now if you want to Protect it after you install the lacing use the Eco Flo Super Shene. Note: Now If you think a SandTrooper had a REAL Shinny Ammo Pouch after being in the Desert for more than a Day You Have Not Been In A Desert. I will Tell you I have and There is NO Shine at All. So Do your self some Good Dirty It Up, after you buff it up. I will post some pictures Of a distressed Ammo Pouch. These 2 Ammo Pouches were made from my 1st template that is not shown and I have sence replaced it with the new one above, so your pouches will look better than mine "Should". I am making 2 more with that new template and Yes these are for sale. This is my MP40 Ammo Pouch #1 Next you can use Tandy Eco Flo Super Shene and apply with a brush after it dry's over night again, it should look like this. Only If You Want To..... "Be a Pretty Little SandTrooper" I did this only For Show and yes I will have to remove it....... Not bad for my 1st try and just using pictures and guessing at the measurements. This is my MP40 Ammo Pouch #2 (No Eco Flo Super Shene on it either.) Back side, remember the flaps and back are one piece My 2 MP- 40 Ammo pouches front view and back view Back View. Now For Any Guys Looking At This and saying "I can't Do It" COME ON !!! Yes You Can ! Also It May Not Be 100% Accurate But It Sure Does Look Good!!!! NOTE: Any Guys From The MEPD & Other 501st Forums Just Say Thanks. Let me know this has helped you build your own. I will Post your Comments Positive Only. " Troopers Helping Troopers" ******************************************************************* If you want a Ammo Pouch made Contact Tim another member of the 501st will make them using the Above Template. His email is : [email protected] ************************************************************************************** MP40 Shoulder Ammo Pouch This is The MP40 Shoulder Ammo Pouch I will Be Making Next Yes Just about finished with this one and will post a step by step on it "how to make your own", The One On the Left side. On this Shoulder Pouch you will see several parts or Templates to make the one Shoulder Pouch. I am making this as accurate as I can. What is needed to make one Shoulder pouch and small tool pouch. 1 each - 12" x 12" PREMIUM Tooling Leather 5/6 oz 2 each - 18" x 8" PREMIUM Tooling Leather 5/6 oz 1 each - 12'" x 12" PREMIUM Tooling Leather 4/5 oz 1 each - Tandy Leather Craft Tool Spacer Set System with 3 Wheels 4 each - Tandy Leather Sam Browne Button / Washer Solid Brass 1 each - Tandy Leather Craft Tool Sam Browne Button Stud Anvil 1 each - Tandy Leather Craft Waxed Thread white or tan 25 Yard 1 each - X-Acto / Ex-Acto Craft Knife with Blades 1 each - 4oz. Bottle of Tandy Leather Craft Fiebings Leather Dye U.S.M.C. Black ( Or 8oz, 32oz Bottle) 1 each 2oz. tube of Barge All Purpose Cement ( For Leather) 1 each - Tandy Leather Craft Stitching Needle (Note : Best to get an assortment) 1 - each Tandy Leather Craft Tool punch 4 tooth #8066 1- each Tandy Leather Craft Multi hole punch tool ************************************************* You can find all of the stuff you need at : www.RowensWorld.com OR Just Contact Nina & David Walker at: [email protected] OR Call at (812) 334-8289 ********************************************** Shoulder Pouch Template v1.0 Front When Punching the Holes for the Buttons, now that I have finished one (CHANGE) measure down to 75 mm instead of 65 mm. Also the small rectangles that hold the flaps down drop them 10 mm too.(CHANGE) was at 93 mm make it 103 mm The one I just finished is a little too high on the bottoms and flap securing rectangles Also the 26mm folds on the end I trimmed off 1 mm on each side so it would fold better And cut it down from 25 mm to 15 mm so it would glue better when you fold and glue it under to the 36 mm part Shoulder Pouch Template v1.0 Center Shoulder Pouch Template v1.0 Back If you re-adjust where your mark on the Buttons punch hole on the flap by adding 10 mm so it should be 55 mm Score the folded area up just so it can be folded to have a square appearance The Back and the straps cut out at the right length Flip it over to the finished side using a pencil mark where the straps go. Then Glue one end of the place . Due the upper part of strap 1st only glue a small part about 10 mm area Then use the punch tool l Then use the white or tan waxed thread and sew them down then use the punch again on the lower part of the strap. Now sew it down with the white or tan waxed thread. Once done it should look like this. Side View Now the hard part Glue the strap/Back onto the finished side of the Flap part both should be the same size make sure you cover both parts all over that is how this glue works. Then it should look like this (Below) Rough side up with the Flaps and smooth side down with the straps Also best do if you want the side strap with D-ring that is 20mm wide and you deside how long it is you have to fold it in half to install the D-ring (Glue together with D-ring in center) Then ponch hole for the rapid rivet and install it Now we cut out of 5/6 oz leather the thin straps the rectangles out of 4/5oz leather The Rectangles are 33 mm long and 18 mm wide, The Flaps are 135 mm long and 18 mm wide Attach them center and 20 mm from the edge like picture Above. Once Glued it should look like this Below Next we use the punch tool again, strait at the end like this picture then do the sides. It should look like this (Below) Next use the white or tan waxed tread again. Now Flip it over we want to install a strip of leather between the folded area and glue in place. Like Picture Below Now we move to the front part after it is all cut out and holes punched mark were the stitching will be on sides and in between the pockets. Also mark in pencil where the rectangles will go. Use the Tandy Leather Craft Tool Spacer Set tool. Now Use the punch and do all 3 rectangles Next I cut out 3 Circles that go on or around the Buttons ( See Below) Then install the Buttons like in this picture Nest sew the rectangles with the waxed thread again. I used a small nail and punched holes around the circles the sewed them down with the waxed thread Next we glue the 26mm flaps over you can see the marks I made It should look like this (Below) Once that dry's about an hour to 2 we glue the back half to the front half. (See Below) Now from the inside make a line from one side to the other at the end this will be a like to use for the punch make it about 3 mm to 4 mm from the edge Then used the Punch, turn it over it should look like this (See Below) Then use the waxed thread and sew the end. Now we use the glue and due one side put glue on both parts you can see the marks I made the 5 mm area only gets the glue. Then I clamped it down let it set for an hour this time, (Just needed a Break) Then Punched holes and sew it only one side this helps hold it in place while you glue the rest. Once it is all glued go back punch all the holes and use the waxed tread again and sew all sides. Also not shown but you have to punch holes and sew this area to. The top area from the start of the pouch opening across the top again 3 mm from edge. (See The Finished Picture Side View Very Bottom Of this page) Once it is all done with the sewing it should look like this (Below) End View. Side View Now Apply the Tandy Leather Craft Fiebings Leather Dye U.S.M.C. Black You may need to do it 2 times. All over and some inside too. Yes the dye is still wet, now it needs to dry 24 hrs then Buff it up with a soft cloth. Small Tool Pouch Template #4 The Small Tool pouch is next and it is secured to this pouch. It also has 3 parts to it. The one on theLeft use a 4/5 oz leather. The Center one I used a 3/4 oz leather The one on the Right I used a 4/5 oz leather After making one I re-adjusted the template this may look a little better. I am making a new on with this template you can see the 1st one below. After you sew it with the waxed thread now at this point you need to install the button. The Finished Tool Pouch. The Finished Shoulder Ammo Pouch My 1st Try. Well I Think it is Not a Bad Job for a guy who only has pictures of a Real MP40 Pouch Back View I went and installed the side strap with D-ring but Best to install that when you install the straps on the Back Cool Love this one. Now this one was a little harder than the last one. But I think anyone can do it. Now when I put the 2 side by side well see for your self. Like I said above the Buttons need to be lower and the three rectangles that hold the flaps down need to be lower. But the Over all height and width looks good same for the tool pouch
-
That one is an older design, would be entirely up to the DO's for higher level approval. You can see the differences to the reference image
-
I doubt you would get to same appearance using canvas as the base. I've made them.in the past but unfortunately not able to do sewing at the moment. Here was my FOTK pouch which is similar A couple of good how to threads There was an awesome website from TK1336 with templates bit unfortunately it's no longer active, I'm pretty sure I have a copy of the templates, I'll have a look on computer in the morning. With his design they are mostly glued and it uses vinyl.
-
WHY BE HARD ON NEWBIES (ARMOR)
gmrhodes13 replied to Tallguy's topic in Getting Started - Read this First!
You can find a list of garrison's here https://www.501st.com/members/displayUnits.php#garrisons Or search the map, bottom left of the page https://www.501st.com/ -
I would presume they should be the same width top to bottom otherwise it would push away from your butt
