

Toddo
-
Posts
598 -
Joined
-
Last visited
-
Days Won
2
Content Type
Profiles
Forums
Gallery
Articles
Everything posted by Toddo
-
I couldn't click it either. Try contacting Mike via the CONTACT button at Trooperbay.
-
TK-18113 Requesting ANH Stunt EIB Status [ATA][357]
Toddo replied to Luis.J.Trevino's topic in Request Expert Infantry Status
Lookin' good! -
What works for Adhesive Removal
Toddo replied to Cantina Security's topic in Hard Armor (General Discussion)
I tend to take a strip of industrial strength velcro and use its own adhesive to pull excess adhesive off. Then I hit it with Goo Gone to clean up the remainder. It works a treat and is kind of fun to yank all the sticky off. -
According to the Deathtrooper CRL, you will need to convert to TK in regards to shoulder straps, ab buttons, and knee plate.
-
TK-50175 Requesting ANH Stunt EIB Status [TM][356]
Toddo replied to TK-50175's topic in Request Expert Infantry Status
Congratulations! You look great. -
There's worse things. I think you can make a really solid deathtrooper with this should you choose to. Good luck!
-
Way to go FISD!
-
Great newsletter. Thanks to the staff of FISD for consistently maintaining a great detachment and newsletters that reflect it's quality.
-
Thanks for making and sharing those videos Mike. They would have been amazingly helpful to me when I was starting out, and I am confident that they will be helpful to many a new trooper in the future.
-
TK-51508 Requesting ANH Stunt Centurion Status [TMC*] [107]
Toddo replied to McDNet's topic in Request Centurion Status
Congratulations and welcome to the club! -
TK-42194 Requesting ANH Stunt EIB Status[AP][354]
Toddo replied to Tesla Kinetic's topic in Request Expert Infantry Status
Way to go. -
TK-6647 Requesting ROTJ EIB Status[RUB] [APPROVED] 5th
Toddo replied to Toddo's topic in Request Expert Infantry Status
Thank-you everyone. Special thanks to Paul for his constant encouragement. This is quite an honor. -
TK-6647 Requesting ROTJ EIB Status[RUB] [APPROVED] 5th
Toddo replied to Toddo's topic in Request Expert Infantry Status
Thanks Steve. I appreciate it. -
TK-6647 Requesting ROTJ EIB Status[RUB] [APPROVED] 5th
Toddo replied to Toddo's topic in Request Expert Infantry Status
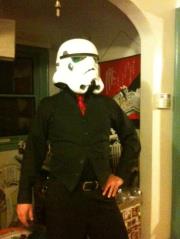
Happy New Year Steve, and congratulations on landing the DO job. I took some more pics to illustrate things better. I already have strapping between the forearm and bicep, but the Rubies armor thickness (it's much thicker than any of my other armor) makes it awkward to size the forearms snugly even with heat applied. I added some foam on the interior of the forearms in hopes that it helps that issue. I also rounded-off the frown on the helmet. Hopefully the new photos show the 1/4 strap on the bells. Thanks for your feedback. Todd -
As far as I can tell, nobody has submitted a Rubies costume for EI status, or held five Expert Infantry Badges, so here goes nothing. I modified the heck out of a cheap Rubies costume. The list of modifications includes Replaced helmet with CFO bucket Trimmed biceps, forearms (including removal of return edges), thighs, and shins. The shins were giant not just for my skinny legs, but in proportion to the entire suit. Drilled out the rivets on both ends of the shoulder bridges. Trimmed the bridges to a reasonable length and re-attached using Velcro. I then added nylon load-bearing straps under the shoulder bridges. Trimmed the oversized hand guards to better fit my hands. Cut out the ab button plate and inverted ROTJ-style. Painted all of the abdomen buttons with Testor's to match the screen-used pattern. Drilled-out the rivets connecting the belt to the abdomen. Trashed the ABS belt strap and replaced it with fire hose. Tried to add a pair of Kev's inner drop boxes the existing drop boxes, but they don't fit. Instead I modified Kev's boxes to work inside the smaller Rubies' drop boxes. Riveted the new belt assembly and drop boxes to the abdomen plate. Re-strapped the entire suit ROTJ style. The existing straps were way too long for anybody really. Drilled out the rivets connecting the thigh ammo belt as Rubies installs this upside down for some reason. Reattached with rivets to the correct orientation. Removed the arm straps from the shoulder bells and added padding for that ROTJ linebacker look. Painted the soles of a pair of TK boots white. Weathered the whole suit with inspiration from sskunky. Instead of wood stain (and because I'm a scaredy-cat) I used acrylic paints. Now the suit looks like it has spent a little time on Endor. Replaced the ears on the helmet with a pair from Scootch as the exiting ears had visible screws attaching them. Scootch also made some bubble lenses for the bucket. Built a holster with longer straps from one of Darman's kits and attached to the belt. Replaced the weird undersuit with my usual Under Armour stuff. Armor: Rubies Helmet: CFO with CAP-W bubble lenses and ears Blaster: Hyperfirm TK6647 Height: 5'9" Weight: 165 lbs Boots: TKBoots Neck Seal: TK409 Holster: Darman Gloves: rubber chemical gloves TD: T/MC Front Back Left Right Left Arms Raised Right Arms Raised Shoulder Bridge attached with Veclro at front and back with nylon strap beneath Inner Drop Box Longer Holster Straps on Right Side Film Reference Thanks for taking a look.
-
I apologize for not having documented this in progress. As a retail manager in December with three kids and house guests, I had to work quickly in tiny windows of opportunity. Anyway, Daetrin is always encouraging me to challenge myself, so I found a discounted Rubies suit and wanted to see what I could do with it. The suit was discounted because the helmet was cracked in a number of spots, but we all know the helmet isn't salvageable anyway, so I replaced that with a second-hand CFO helmet I had laying around and decided to convert the Rubies disaster into a quality ROTJ suit. My modifications include the following: Replaced helmet with CFO bucket Trimmed biceps, forearms (including removal of return edges), thighs, and shins. The shins were giant not just for my skinny legs, but in proportion to the entire suit. Drilled out the rivets on both ends of the shoulder bridges. Trimmed the bridges to a reasonable length and re-attached using Velcro. I then added nylon load-bearing straps under the shoulder bridges. Trimmed the oversized hand guards to better fit my hands. Cut out the ab button plate and inverted ROTJ-style. Painted all of the abdomen buttons with Testor's to match the screen-used pattern. Drilled-out the rivets connecting the belt to the abdomen. Trashed the ABS belt strap and replaced it with fire hose. Tried to add a pair of Kev's inner drop boxes the existing drop boxes, but they don't fit. Instead I modified Kev's boxes to work inside the smaller Rubies' drop boxes. Riveted the new belt assembly and drop boxes to the abdomen plate. Re-strapped the entire suit ROTJ style. The existing straps were way too long for anybody really. Drilled out the rivets connecting the thigh ammo belt as Rubies installs this upside down for some reason. Reattached with rivets to the correct orientation. Removed the arm straps from the shoulder bells and added padding for that ROTJ linebacker look. Painted the soles of a pair of TK boots white. Weathered the whole suit with inspiration from sskunky. Instead of wood stain (and because I'm a scaredy-cat) I used acrylic paints. Now the suit looks like it has spent a little time on Endor. Replaced the ears on the helmet with a pair from Scootch as the exiting ears had visible screws attaching them. Scootch also made some bubble lenses for the bucket. Built a holster with longer straps from one of Darman's kits and attached to the belt. Replaced the weird undersuit with my usual Under Armour stuff. I didn't even both to take photos of this thing before the mods as I could hardly even wear it. Zvask has some good shots of what it looks like before modding in his thread from 2009 though. Here's the result of my mods: So I now have TK versions from ANH, ESB, Incinerator, and ROTJ.
-
Thanks everyone! This was a really fun build. Eric, I have had the same exact thoughts about the back of the helmet paint. I've wondered if it is a weird action-figure thing or if it is intentional. If I need to fix it, I certainly will. It would be impossible to undo if we determine that it shouldn't be that way.
-
TK11702 Requesting ANH Stunt EIB Status[RS] [351]
Toddo replied to Onyx's topic in Request Expert Infantry Status
Nice job. Good luck! -
Thanks! The material Targ supplies for the tubes is really flexible overall. Having said that, it does limit the movement a tad left to right, but even more so up or down.
-
Standing by...
-
looks terrific.
-
With all the drone paranoia, I worry about being shot down. Seriously though, I admit I can only fly for 27 seconds.
-
morbidly gorgeous.
-
This looks exactly like the book jacket illustration to me in terms of weathering. Amazing work!
-
CAP/CAP-West From the Horse's Mouth
Toddo replied to Scootch's topic in Hard Armor (General Discussion)
That's a great idea. Will be cool to see.