gazmosis
-
Posts
4,043 -
Joined
-
Last visited
-
Days Won
23
Content Type
Profiles
Forums
Gallery
Articles
Everything posted by gazmosis
-
This is strictly up to you. The 1.5 MM ABS is a slight tad thinner so you will get greater detail yet still have durability. The 2 mm is shiny as heck but a little less sharp on the detail. The main difference, however, is the 1.5 is a slight off white compared to the super white 2 mm. Paul has long supported that the slight off white color is closer to the original suits. Many troopers over by you have chosen the 1.5mm.
-

Are these boots ok
gazmosis replied to spacebrew's topic in Boots, Soft Parts, and other Accessories
Aside from them being black...........yes -
Insidi0us1's First Build (ATA TK armor)
gazmosis replied to VGTrooper's topic in Build Threads Requireing Maintenance
as you are looking at the face, hold off trimming the bumpy stuff on the left side of the face. The left side (again while looking at the helmet) is a little scarce on overlap near the bottom. You need that overlap to rivet to. the wrinkly stuff on the face will be hidden. -
I just can't stop looking at it! Just incredible!
-
http://www.tandyleatherfactory.com/en-usd/home/department/hardware/snaps/1263-15.aspx
-
It is mentioned in the CRL under Centurion requirements (red lettering)
-
Helping a little girl that was bullied for liking Star Wars
gazmosis replied to RogueTrooper's topic in Announcements
I guess there are two threads going regarding this. As I stated in the other thread, the LCO still indeed is in possession of the armor. It is ready to be deployed to anyone, anywhere. If people don;t know where this is, it is just outside Chicago, Ill. I contacted the family and the armor is still in its glory and ready to go! -
TK-12111 Requesting ESB EIB Status [TM][438]
gazmosis replied to zebedee's topic in Request Expert Infantry Status
Hey there Mr. Rowan! Thank you for giving us another chance to swoon over another great set of TM armor. Let's look at it! CRL and EIB Application Requirements: All required submission photos have been posted. Nice looking application. Thank you! Your armor contains all required elements for Expert Infantry. With that, I would like to congratulate and welcome you to EIB!!! Other-Armor Fit/Assembly: This is the section normally reserved to summarize suggestions from your fellow troopers and myself. But.........I got nothin. But I know I am supposed to say something. If I was to comment about anything, it would be that the strap loops of your holster are a little long. Although loops, there should still roughly be the same 1 inch between the holster and the belt. Many shots show even less. Anyway, nice overall build. Centurion Suggestions: Make sure you post your pics in the format of the photo checklist for Centurion. Include all necessary photos. Your Garrison should be proud! Congratulations again! -
TK-69770 Requesting ANH Stunt EIB Status [ATA][437]
gazmosis replied to DarkOrder66's topic in Request Expert Infantry Status
Would you mind measuring the width of your canvas belt top to bottom? As for the fixes, right on!! Just take your time and do things right. We'll be here! -
TK-69770 Requesting ANH Stunt EIB Status [ATA][437]
gazmosis replied to DarkOrder66's topic in Request Expert Infantry Status
Hey there Chris!! Thank you so much for your application for Expert infantry!! Let's have a look at your armor!! CRL and EIB Application Requirements: All required pics are posted. Although I can see the holster attachments in several pics, I really should have a close-up. Your armor, however, contains all required elements for Expert infantry. Congratulations and welcome to EIB!! Other-Armor Fit/Assembly: In this section, I summarize cemments from other trooprs as well as add my own. These are suggestions that won;t affect any application unless specifically noted. Nice overall job on the armor. Good clean build. I REALLY wish ATA would get a new right forearm. I know there is not way to bring this down. Perhaps have you ever thought of replacing the pop rivets in your thermal detonator with screws?? Slot head in specific?? The T-Tracks on DLT-19s had a thin, black wire around each end. If you wanted to, this wire is available at hobby stores that have model train supplies. The elastic on your boots looks good. Centurion Suggestions: It looks like you are well on your way towards your goal of Centurion. There are a couple things you will need to update before you can apply. First, I would like you to send me a close up of the ends of your belt where the plastic meets the canvas with a measuring tape showing the width. Where are these wide belts coming from???? The canvas belt should in no way exceed 3 1/4 inches wide. That is too wide in my opinion but has long been accepted. Yours just seems wide to me. Next is the brow trim on your helmet. I understand that you replaced it after a mishap, but it needs to be the correct shaped trim Lastly is the 4 button plate on your abdomen. The plate itself should be exactly that....a plate. It should be trimmed to not exceed the edges of the stage it sits on. With these minor adjustments, Centurion should be yours. Just make sure to follow the photo checklist when you apply! Congrats on EIB again!!!

-
The armor IS currently in the care of the LCO. And it is for the same reason that it was built in the first place; a little girl that was being bullied to the point where she was missing more school than she was attending. Carrie Goldman, Mother of Katie the original recipient, was contacted. Not only was Katie happy see the armor being used for what helped her out in so many ways, but she got together with friends to draw many inspiring pictures for the LCO's daughter. Something needs to kept straight here....although myself nor the FISD was consulted before this move was made, this had nothing to do with nor did the LCO have prior knowledge that this was being arranged. This was about a little girl in the same situation as Katie was. It served its purpose and is ready to serve again.. I agree that we need to start a thread that is dedicated to the location and availability of this wonderful gift that the FISD pooled together to build. It is understood that if need be, this armor will be sent off to yet another little trooper that needs it...anywhere.
-
TK-69323 Requesting ANH Stunt EIB Status(ATA) [456]
gazmosis replied to sylverbard's topic in Request Expert Infantry Status
Hey there Mark! Thank you for your application for Expert Infantry! From the suggestions and input of your fellow troopers, you have had yourself a bit of a ride. We will support you and see you through this. I commend you on your trooping in that kind of cold. Wow!!! Please be careful!!! Armor can get brittle and crack at those low temps. Anyway, Let's take a look at your armor!! CRL and EIB Application Requirements: The only photo submission I see missing is a shot of the back of your helmet. There are other pics that allow me to see the detail that I need to, though. There really should be one, though As for the details of your armor that are required for ANH Stunt EIB, there are a few things that will need to be updated. Many have been mentioned already but this is for the record. As mentioned, your clips that mount the thermal detonator to the belt need to be metal or metallic looking and be no less than 1 inch (25mm) in width. Upon applying your new clips as you said you have coming, I would recommend using slot head screws over rivets or other hardware only because it looks like you have built your armor in preparation for Centurion. Make sure your new clips are positioned properly like in this pic. Next, your shoulder bells are required to have a bridge strap at the bottom that will cross the bicep when worn. I saw that you mentioned have those just not when your pics were taken. They need to be present in your pictures. Lastly are your tube stripes on your helmet. Since you are representing an ANH Stunt TK, the stripes printed on a single sheet as you have them do not apply. For an ANH TK, the stripes must be individually applied either by decal or painted. Other-Armor Fit/Assembly: In this section, I will summarize observations by your fellow troopers as well as provide my own. Unless specifically mentioned, none of these suggestions will affect any application and are intended as suggestions to improve the overall look of your armor. You have a very nice base build. Good job!! Very innovative strapping system, I agree! The one thing I did not that may give you future problems are the snaps at your back that the belt attaches to. Your new thermal detonator clips are designed to fit over both halves of the belt. With the snaps in the way, I just don;t see how this is going to work. You do have the snaps in the front so these really serve no purpose. If you can make it work somehow, move along! It was mentioned regarding your ab buttons being dark but I've seen it before. It is most likely just the lighting in the picture. While we are on the subject of paint, I want to commend you on tackling the job of hand painting your details. This is not easy no matter what your experience is. These details, however are part of the crown jewel of your armor and are the first thing people look at when you are approached. I would consider moistening a brush and massaging some of the rough edges of your black outlines specifically on the trapezoids. I would also consider tweeking the trap on your right side. This is looking more like a square than a trapezoid. There were no variances of this shape. Centurion Suggestions: It is really great to see that you have already built many aspects of the details required for Centurion into your armor. Centurion is about the details. There are a few changes I will ask you to make prior to applying, though. First, I know you went back and forth regarding the painted hardware on your armor. Thank you for your patience with this. You will, however, need to remove the paint on the male snap on the upper right corner of your ab. Another bit of hardware that gets left unpainted is the single split rivet on the crotch of the ab plate. Which leads me to the next change........ The male snap you currently have in that location will need to be changed to a split rivet. You can see how this should look here: The two male snaps next it are good!! Please not one the helmet picture above the position of your cheek tubes that you painted. Yours are a little far down on the cheek tubes. They need to be positioned about a distance just as wide or slightly wider than a pencil. You will need to upgrade from the plastic to latex/flexible handplates glued directly to your gloves. Your blaster will need to be upgraded to a Sterling based blaster. I'd like to see your shoulder bells not droop away from the top. They need to be positioned to almost if not touch the ribbed shoulder bridges. You can see here how close they are: The overlap that you have of your backplate onto your kedney will need to be eliminated. They should be "stacked" with a single seam between. I would like to see MINIMAL to no gap between your drop boxes and your belt. their position is right on, though! The square indents need to be implemented into the bottom, front of your kidney as seen here: There will need to be the small, 1/4 inch white elastic mini straps on the rear of your ribbed shoulder bridges like this: This is something that will be a first for me. In first looking at your armor, I thought your belt looked "off". I went back and measured my ATA plastic waist belt at exactly 3 1/2 inches(89mm). In the films, the cloth belt was positioned in the direct center of the waist belt between the angled tapers at the corner of each side of the belt. If the belt in this shot wasn't so frayed this would be a perfect example:Your belt is considerably wider than this. To keep the look of this true, most belt makers have dropped the limit of their belt widths to 3 inches(77mm). Your belt is just too close to being the same width as the plastic belt as seen here: This needs to be closer to the way they appeared on screen. I know this may be a little overwhelming, but we are here to support you and not knock the wind out of your sails. Feel free to contact me regarding anything. Good Luck!! -
Have you made a decision in regards to which film armor you plan to make? I know your holster will be the first upgrade you'll be looking into. Keep it up and Welcome!!!
-
Michael: You have indeed made the necessary changes to your chest/back connecting strap! Before: After: Since you have made the required changes necessary, I am pleased to say congratulations on your Centurion approved Incinerator Trooper armor!!!
-
Alright ,Michael!!! Thank you for treating us to the adventure that you have had with this armor! What an inspiration this has been! And thank you for applying to for your Centurion badge! Let's take a look! CRL and Centurion Application Requirements: All required photos have been submitted. There is one thing that will need to be changed to before I can put Centurion for your armor through. I apologize for not mentioning this in the Centurion suggestions on your EIB application. The armor for this character essentially follows the base ROTJ armor format. One aspect of that armor are the straps that connect the chest and back over the shoulders. These should either not be present at all or be black. Because this detail is not specified as an EIB requirement, it didn't get filed in my tiny mind. Make this small change and Centurion is yours. Other-Armor Fit/Assembly: All I can say is........BAM!!!! You nailed the total effect of this armor by weathering the red paint! I hope you agree that this really was the frosting on this cake!! I was so excited to see that you did this! Outstanding work!! I will go on record by saying tha tI originally believed that the weathering on this armor was a tad dark. There is supposed to be scuffing but not heavy weathering like on a TD (Sandtrooper). However in discussing this with Michael, it was determined that the weathering he applied was clear coated and any attempt to remove that would probably done more harm than benefit to the overall look of the armor. Thank you again for all the effort you obviously put into this armor and its details. Get those straps changed and Centurion will be added to you!!!
-
I will never side with having someone build it for you. Half the excite from this hobby comes from wearing what YOU built. I can understand if you don;t have the time or you are so unsure of your skills that you can burn water. RS is one of the great armors. They do have a tendency to make it larger than what you order "just in case" to give you room to grow. I think this should be something that is ordered and not standard procedure. What if you CAN'T grow? What if you are really fit and WON'T grow? What if you grow, but it's 8 years from now. You are just supposed to wear armor that is too big on you until you fill it out??? If this scenario sounds OK to you, then go for it. If you don't plan on getting bigger, please tell them to follow your measurements and build it accordingly.
-
ABS "dampers" for strapping...?
gazmosis replied to justjoseph63's topic in Hard Armor (General Discussion)
You will not hurt anything by gluing elastic or webbing directly to the inside of the armor. But as Rhodie, said, if your elastic wears out and over stretches, you will need to rip it off and start again. -
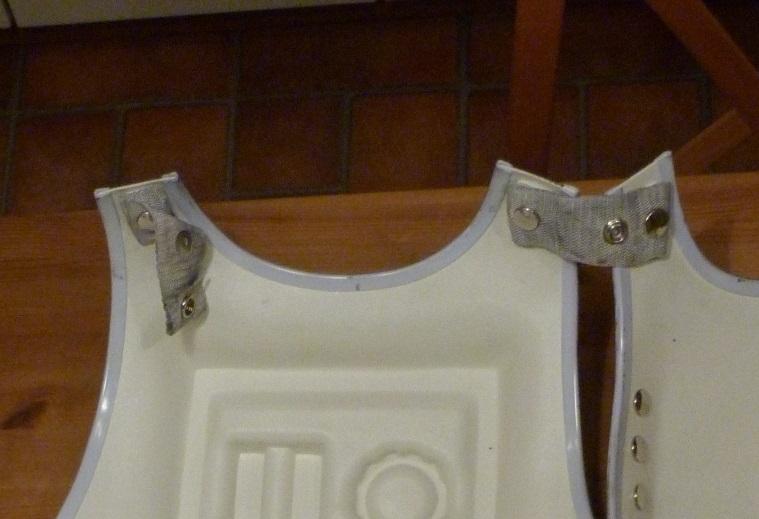
keep in mind that unless the sides of your snap plate are really wide, your snap will sit proud of your the plastic not allowing the plastic to touch the surface. Once your snap plate is done, apply gentle heat to only the metal snap until the plastic between the two snap halves softens. Then gently push out the snap just enough to recess the snap back into the plastic.
-
Pics help......a lot
-
Widths of Elastic/Webbing?
gazmosis replied to batninja's topic in Build Threads Requireing Maintenance
Chest to back connection over the shoulder can be either white elastic or webbing same width as ribbed shoulder bridges Top of shoulder bells should be 3/4 width elastic Around bicep at bottom of shoulder bell 3/4 width elastic Forearm to bicep. 1 1/2- 2 inch width elastic Belt box white 3/4 width elastic or webbing is fine Garter connections should be wider to support the thighs can be webbing or elastic. -
To make it easier, use screws similar in size to the rivets. Use the screws until you achieve the fit you want then replace them with the rivets for your final attachment
-
Jedisaber's ANH Stunt TK Build
gazmosis replied to Jedisaber's topic in Build Threads Requireing Maintenance
Use the reference pics from the "photo references" available as your guide. Draw out on the parts with pencil. Then, if you want, you can use a good quality masking tape. Trooperbay offers some templates. -
Snaps v. Velcro on shins/wrists...
gazmosis replied to justjoseph63's topic in Hard Armor (General Discussion)
First...to eliminate one concern......your forearms are glued on both upper and lower seams. For the calf closure, the most popular us the original method using a small strap and a metal hook that hoes into small holes drilled into the opposite side as seen here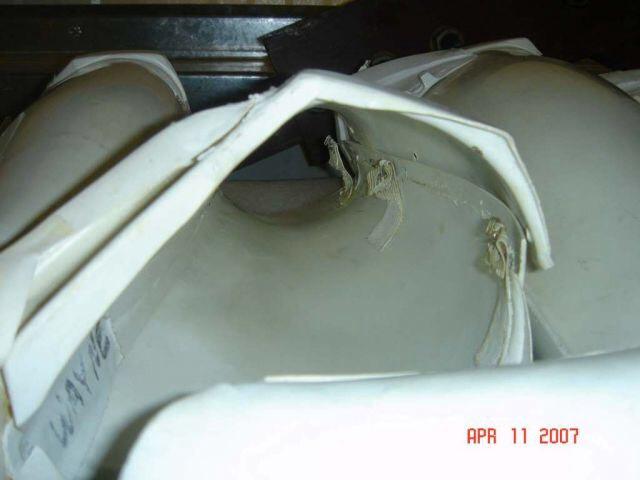
-
ANH stunt ear screw size?
gazmosis replied to justjoseph63's topic in Hard Armor (General Discussion)
Nice, Jay. Those are them -
CLARIFICATION!!!! AP is NOT bigger than ATA. Now, as long as your "around the middle at the belly button" measurement is no bigger than 34 inches, you have all sorts of awesome options open to you! AP, RS Props, Troopermaster, are the best for your your size. The last are the best from an accuracy standpoint.