gazmosis
-
Posts
4,043 -
Joined
-
Last visited
-
Days Won
23
Content Type
Profiles
Forums
Gallery
Articles
Everything posted by gazmosis
-

TK 31689 Requesting ANH Stunt EIB Status [AP][478]
gazmosis replied to JoblessPunk's topic in Request Expert Infantry Status
Thank you for your EIB application, Tim!! I got my sunglasses on to keep the glare off your armor down. WOW!! Shiny and awesome!! Let's get to it! CRL and EIB Application Requirements: I wish ALL submission pictures were as nice and clear as these. Beautiful. All pics, and some extra, have been submitted. Your armor contains all necessary elements for EIB and with that I congratulate and welcome you to Expert Infantry!! Other-Armor Fit/Assembly: In this section, I will go over observations made by myself and your fellow troopers. These observations may lead to suggestions for improvements to the final look of your armor. If any changes are required, they will be listed in the CRL or Centurion Suggestions sections. I do want to say how blown away I was with your painted details. Absolutely incredible. I almost called out decals on your tears because of the sharp edges. I was quickly corrected upon seeing the close up. This is another set of AP armor that should be showcased. Your physical build plus your armor build really shows how the two can become one. Dang...that was deep! Anyway.......Some good points for discussion have been brought up one being the extended cover strips on a couple of your parts. It just raises concern about the possibility of them getting snagged and popped off or worse, broken. I, like Vern, find no issues with your thermal detonator. It seems a tad long to me, but this might also be attributed to the smaller diameter of the AP detonator. Please upgrade, AP!!! Although gaps around the ears are accepted, It does seem like you could bring them a tad closed with few more turns of the screws. On the back of the right ear, I noted some trimming aspects that can be tried if you wish. This coupled with screw tightening might lessen this if you wish. Kudos to your sniper plate install! AP snipers have given more than one person gray hairs. Many need to clamp the daylights out just to get any surface contact for gluing. yours looks like you haven't clamped it at all. Care to share share your technique?? Centurion Suggestions: I try to see and point out all I can for this section but the ultimate responsibility of Centurion accuracy is up to the trooper. Tim, I have a great deal of concern here! I am not being dramatic either. Sometimes I must be the bearer of bad news when it comes to an adjustment but most times these won't be seen in the final product. Most times, I ask that the waist belt is positioned so that it sits directly against or SLIGHTLY overlapping the bottom edge of the button plates as seen here:. Most corrections are asked because the belt is TOO LOW. As Tony has observed and I agree with him, yours is a bit too high as it is actually covering the bottom buttons on both button plates. Normally, this wouldn't be too much of a concern because the snaps are behind the belt so a new location on the belt or the ab itself is hidden behind the belt. I drew a belt line simulation that shows your left snap location will pose a problem when it comes to relocating. I realize that some minor ABS paste work will be required here. Thank goodness the post hole is tiny so you should be able to make this repair almost invisible. Bless Hyperfirm in the security of a close to unbreakable yet attractive blaster. Midas has left his touch again on the scope. Some back acrylic paint will tone this down and keep it down. congrats again on your new EIB level armor!!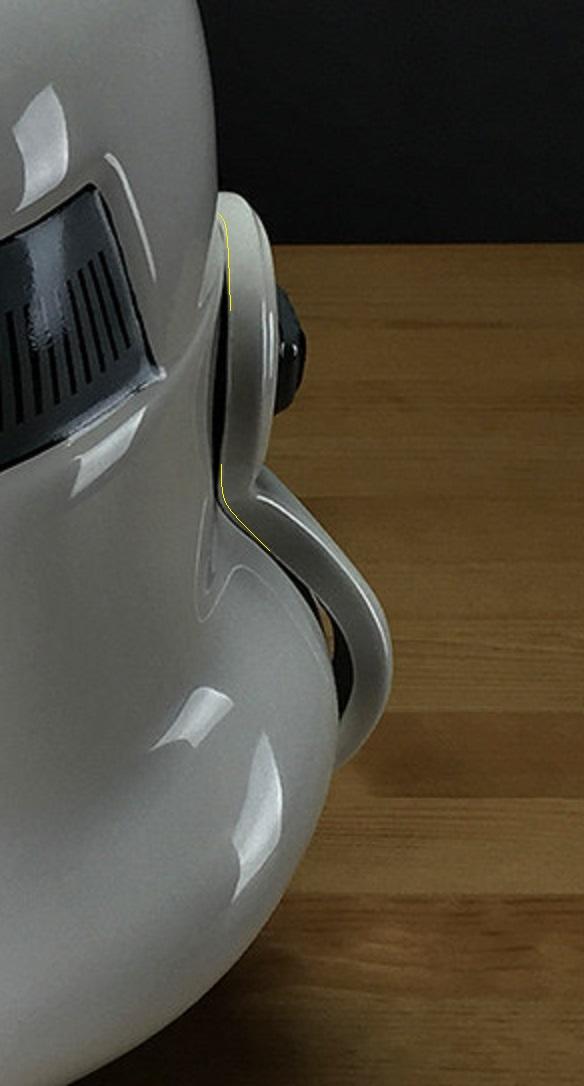

-
TK33092 Requesting Centurion Status (CAP)[171]
gazmosis replied to Stormy1992's topic in Request Centurion Status
Welcome back, Kyle!! It has been quite a while since you earned your EIB but your time has obviously been spent getting ready for the big stage! Let's have a look!!! CRL and Centurion Application Requirements: I had noted a few things in the EIB application. Raising the shoulders to eliminate the gap at the shoulder bridges, the space between the drop boxes and the belt , a Sterling based Blaster, flexible hand plates and the oversized thighs. All of these points have been addressed. In the initial submission, the gap between the back and kidney plates and the upside down thermal detonator control panel jumped out at a few people. You have successfully cured both of these ailments. Along with all the necessary pictures that were posted, your armor contains all necessary elements to earn Centurion!! Congratulations!!! Other-Armor Fit/Assembly: There is rarely too much to mention here because...it's Centurion. If you have arrived here, most everything has been perfected. These suggestions DO NOT affect your application, just making suggestions for future improvements. You have a very thin build. This can be both advantageous and not. One thing your physical build will allow you to do is thin out your armor parts for that slim look. Your thighs have already been thinned out slightly. I think you can easily do the same with your shins. There is quite a bit of room at the top. Keep in mind that that on the leg, the bottom of the thigh and top of the shin are roughly the same size with the shin being a bit smaller. Your armor should reflect this. At some point, I would consider adding a little diameter to your ab buttons. While you have your painting mojo out, hit your blaster with some gloss black on the pistol grip. Congratulations again, Sir. Thank you for your attention to your upgrades and TROOP ON!! -
TK33092 Requesting Centurion Status (CAP)[171]
gazmosis replied to Stormy1992's topic in Request Centurion Status
I can agree with your reason of why you have a gap. It would be better to have a pic of it in its correct position so there is no gap. The Thermal detonator control panel will need repair before I go on. I will check back periodically. Or PM me when the repair is made. -
Hey Marcus! Well, this build has really come full circle. TM is one of the best armors we have so when it is combined with the talents and patience you have given to it, great things like this happen. Thank you for your Centurion application! Let's look!! CRL and Centurion Application Requirements: All required photos have been taken and posted. Your armor displays all the required elements for Centurion and with that I would like to congratulate you on your Centurion armor!! Other-Armor Assembly: In summary, there just isn't too much to comment about. Incredible work!! You mention that you are no Picasso regarding your paint work and I beg to differ. This is, in my opinion, a perfect example of hand painted details. Thank you for making those vent line s a bit more prominent. It's a nice detail that I just didn't want to see lost. The trim lines surrounding the traps and tears are nice and thin and I am sure were not easy to accomplish but you did. Did you notice that your belt cam unsnapped from your ab in your side shots?? Your other shots clearly show it is mounted correctly. In regards to your belt, the fraying can become excessive. Some fraying is accurate and desired but I don;t want it to fray too much that it compromises the stitch. If you mix a little fabric glue and carefully brush it onto the edge it can tame that. Very nice work adjusting your shoulders to get them up to the ribbed bridges!!! I really like your blaster #1 and #2, I like your paint choice to go with the dark gray main body to contrast with the gloss black pistol grip. Go out and make your Garrison proud! I'm sure you already have!! Congratulations, Sir!
-
TK 14014 Requesting ANH Stunt Centurion status(AP) [169]
gazmosis replied to riddeth's topic in Request Centurion Status
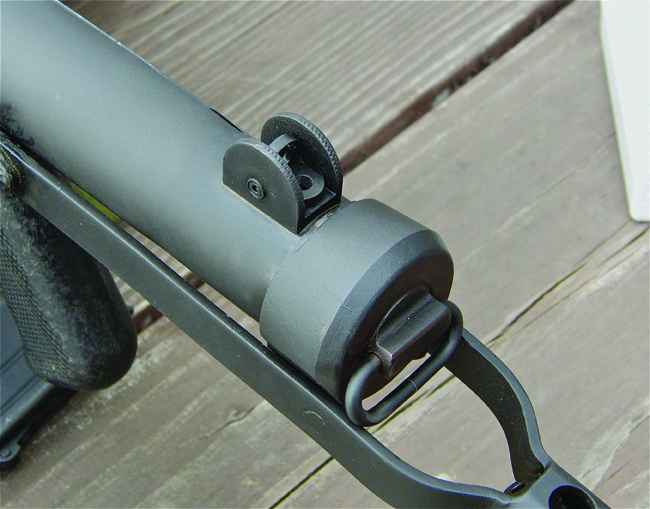
Mr. Rid!! Thank you for this incredible Centurion Application and this incredible armor. Looking at the talent within this detachment but gets me so excited and armor builds like this is yet one more example! Let's look! CRL and Centurion Application Requirements: All required submission photos have been posted. Great close-up shots, by the way!! I am pleased to congratulate and thank you for all the work you have done to achieve this Centurion level armor!! Other-Armor Assembly: In this section I will summarize observations made by myself and your fellow troopers. Sometimes these observations lead to suggestions for changes to improve the final look of your armor. If any changes are required, they would be listed in the above section. Again...bravo.I believe you were born to be a TK and this armor suits you perfect. I love the weathering and light scuffs. Adds to the authentic look. A couple notes: The flat head, slotted screws for the thermal detonator are the ultimate in accuracy but not required yet. I don;t think that will ever be a requirement, but it's a nice touch. Thank you, Rid, for making the adjustment of the male snaps in the cod area of your butt plate. For those of you following along, here is the before and after. I required a change here because the ones on the left looked too much like split rivet heads than male snap backs. The result of this change on the right is correct! Thank you also for replacing the tape you were using on the drop box backs. Another mention is of the rank bar on the ear. As long as the rank bars remain on the back to bumps for ANH, I consider this OK. I had an issue with the bars being on different bumps before, but there are more important details to concentrate on. If I was to comment on anything, it would be the tracking ridge on the bolt in the ejector port on your blaster. You have this dramatic black/silver stripe. and truthfully, it takes some realism away from the blaster. On the original bolt, the diagonal stripe was the lighter of the two colors because of its contact with inside of the receiver tube. If you mixed up silver with a drop of black, that would be the diagonal stripe, then mix silver with two or three drops to create the surrounding area. Here is a real bolt so you can see what I mean. Thank you again for this awesome set of armor that you and your Garrison should be proud of.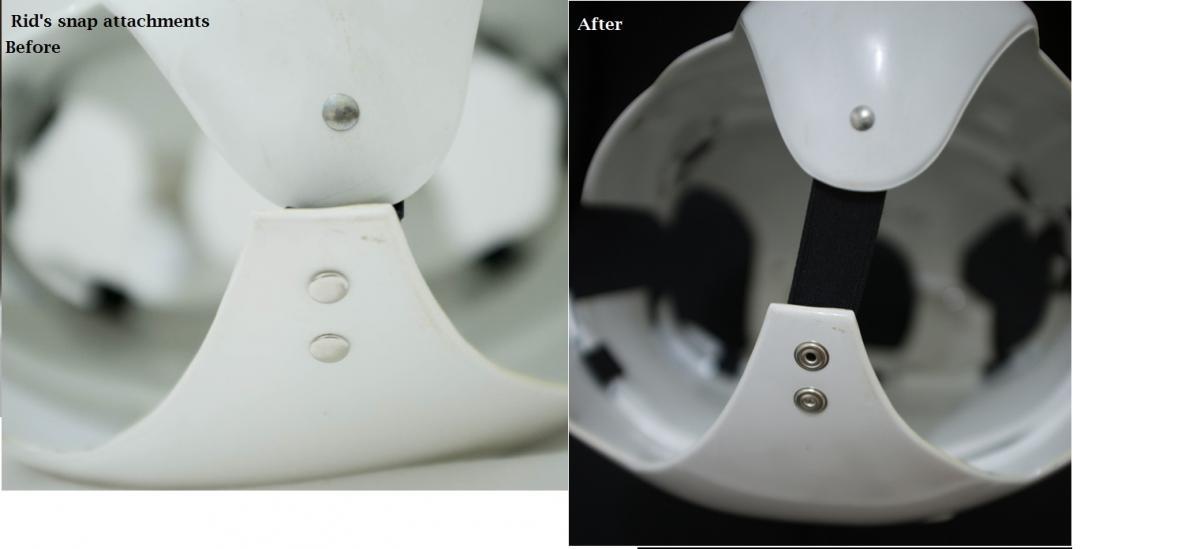
-
TK-65535 requesting ANH Stunt Centurion status [AP][168]
gazmosis replied to bearings's topic in Request Centurion Status
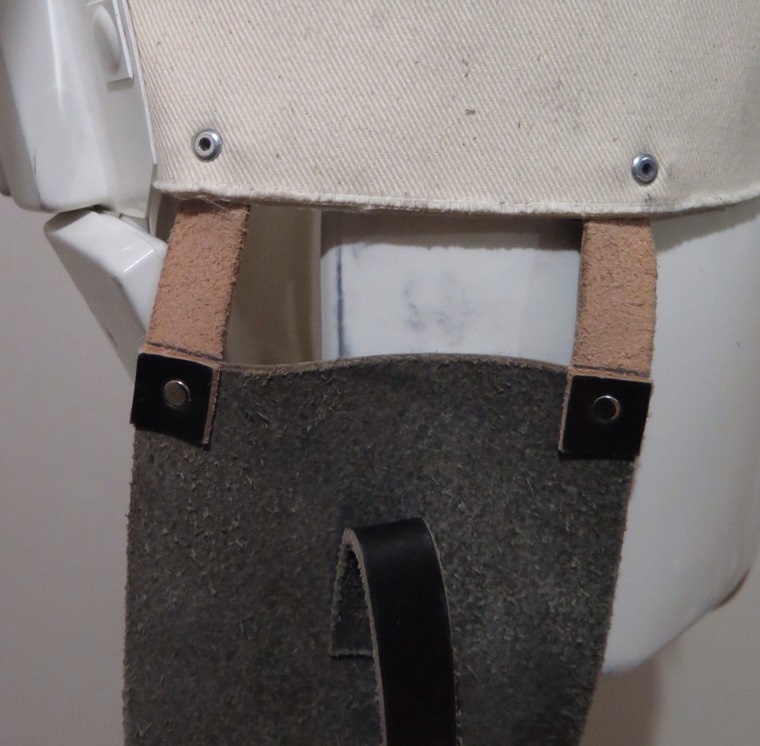
Hey Ben!! Thank you for the chance to see this incredible set of armor, and thank you for your Centurion application. This is just a pleasure. Let's take a look! CRL and Centurion Application Requirements: There is one picture missing that I need you to post. This is of the wrist openings on your forearms. In your "Arms up" side shots, I can see that all the return edge even up into the square indent ridge has been removed so I will go forward. Please post this pic anyway for the application. Thank you! Aside from that, your armor has all necessary details to to make your armor eligible for Centurion. I'd like to congratulate and welcome you!!! Other-Armor Assembly: In this section, I will summarize observations made by your fellow troopers as well as my own. Sometimes these observations lead to suggestions to improve the final look of your armor. If and changes are required, they would be listed in the above section. Like I said above, this is just a pleasure to look at. Your detail, your fit, and your upgrades all come into play here. I like your incorporation of the strapping brackets. I know you were forced to put them where you did, but I'm glad you painted the screw heads white. I like your canvas belt. Not the duckcloth that is often seen. (note the diagonal pattern in the cloth only seen with twill--as in the originals) Nice TM thermal detonator upgrade. Much better than the smaller one that typically comes with AP. I really have no criticisms. To summarize other observations, though: Ben chose to install the strapping brackets on the butt/kidney separation on the face of the armor because he really had no choice. The originals were installed on the return edge in this area as in other areas on the armor but hose of you familiar with AP armor know there IS NO RETURN edge at the butt/kidney seam. As for the mention of a particular type of snap. There are no standards ever mentioned regarding what type or brand ANY of the snaps used on our armor SHOULD be. Aside from the mention that MALE snaps need to be used in certain locations, no regulations are in place regarding snaps anywhere else. The originals were spring snaps but people use standard line 24 snaps as well. As for the belt to ab connection, snaps are not even required here. Heck, a person can rivet the belt directly to the ab as long as the belt ends up in the correct position. Is it more accurate and convenient to use snaps? Yes. Congratulations again, Ben! You have given us yet another example of how armor can look! -
I don;t ever remember them being out of stock
-
TK-22237 Requesting ANH Stunt EIB Status [TM][476]
gazmosis replied to iceman25c's topic in Request Expert Infantry Status
Well, I made a mistake. All photos were not present. Todd, I NEED you to post an action shot ASAP. I cannot enter you into the EIB database without it! -
TK-22237 Requesting ANH Stunt EIB Status [TM][476]
gazmosis replied to iceman25c's topic in Request Expert Infantry Status
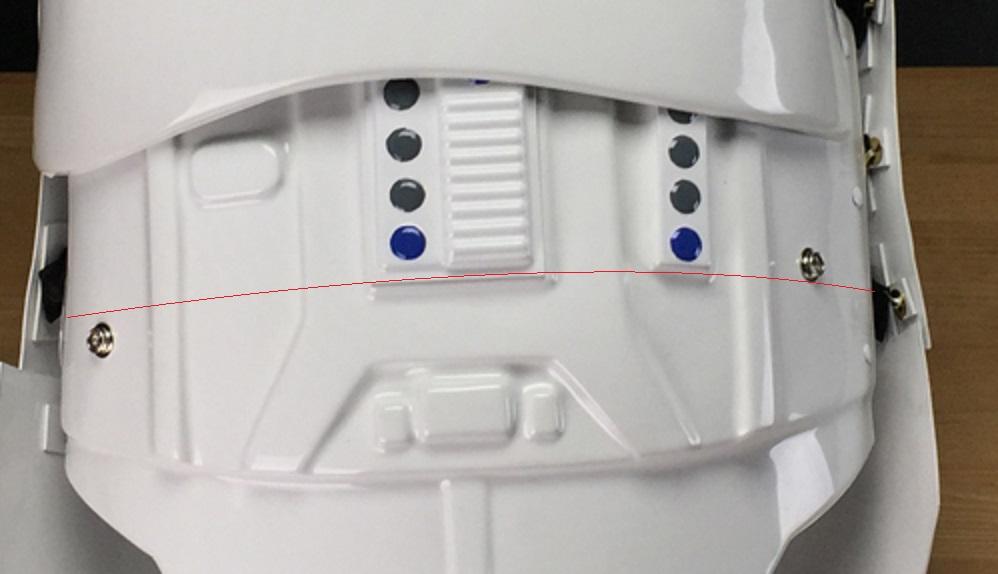
HI Todd!!! Thank you so much for your application to EIB. Let's take a look at this awesome set of TM armor! CRL and EIB Application Requirements: All required submission photos have been posted. Your work will be rewarded as your armor contains all the necessary elements to qualify for EIB. Congratulations and welcome to Expert Infantry!! Other-Armor Fit/Assembly: In this section I will summarize observations by your fellow troopers as well as my own. These observations my lead to suggestions to improve the overall final look of your armor. If any changes would be required, those would appear in the CRL or Centurion sections. I love Troopermaster armor. It is some of if not THE nicest armor in its work ability and final appearance. Your armor is no different. A very nice, solid build. And a great fit for your taller frame (Stay away from your Garrison Vaders...you might be taller!!) If I was to make any suggestions about the appearance of your armor, it would be to shorten the connecting straps between your biceps and forearms. You have a bit of a gap between them. I know you might have a little longer arms, but the wrists of your forearms are resting on your hands. It is ok to have a little glove showing if it eliminates a larger gap at the elbow. I do want to commend you on the tackling of your hand painted details. Please see the below section for a further comment. The last thing is how close you came to needing to replace your waist belt. The outer edge corners of the waist belt should be knocked off just enough so the outer, vertical edge is about the same size as the belt. Your trimming was just a bit enthusiastic. If you should assist others, which I am sure you will, keep this tidbit in mind. By the way, nice weathering and overall look to your E-11! Centurion Suggestions: As much as I try to see and point out everything, the ultimate Centurion accuracy is the responsibility of the trooper. It would SHOCK me if we didn't see an Centurion application from you. There are a couple things I would like to discuss prior to you doing so. Again, nice work on your painted helmet details. Anyone who takes this on is a hero in my book. This is not an easy task. I would like to see a bit of an adjustment to your rear traps. The vent lines on the rear traps should not be set parallel to each other all the way across. As the vents reached the sides, they tapered so the pattern takes the shape of the trapezoid itself. Lastly, Is your Thermal Detonator. Historically, I have never made too many change requirements to or commented on the clip attachment hardware. Although ultimate accuracy, if you choose that, would be to install flat, black, pan head slotted screws as Joe said, This is not a requirement for any application. However, it looks like you only have two pieces of attachment hardware. I at least would like to see 4 as appeared on the originals.If you wish to change out the hardware to match this, no one will stop you! Please feel free to contact me should you have any questions. Congratulations again!!!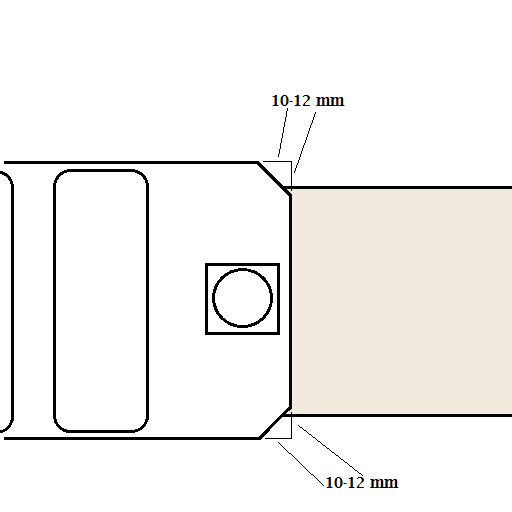
-
Nice work!
-
TK 50541 Requesting ANH Stunt EIB Status [SDS][475]
gazmosis replied to anderche's topic in Request Expert Infantry Status
AH HA!!!! Thank you, Andres!!! Now I can officially welcome you to Expert Infantry!!! -
http://www.whitearmor.net/forum/forum/19-request-expert-infantryman-status/ Go to this page and follow the directions. Your thread should be just like the others but do NOT add the number at the end. This will be done if your armor qualifies for EIB. Make sure you look at the photo requirements ans post them in the order you see on the list.
-
Soft metals..... I guess that's not gonna work on steel
-
TK 50541 Requesting ANH Stunt EIB Status [SDS][475]
gazmosis replied to anderche's topic in Request Expert Infantry Status
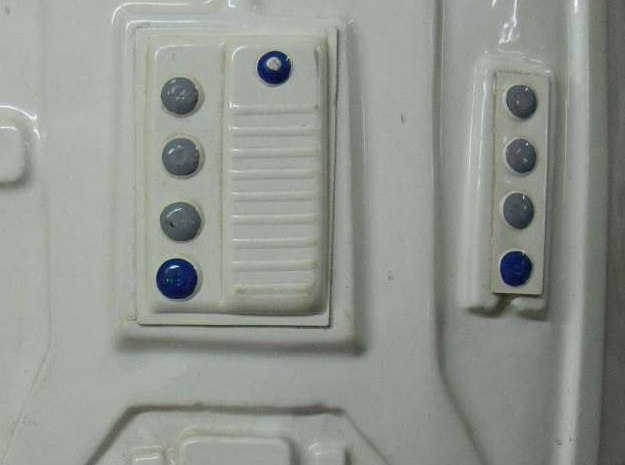
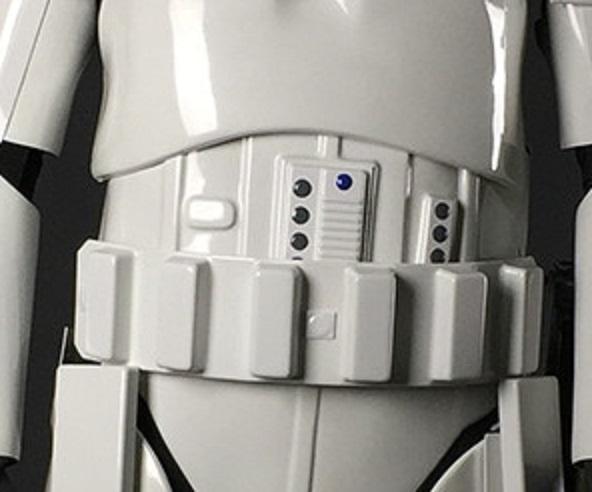
Hi Andres!! Thank you for your application to EIB!! I guess you guys from Spain got a package deal on the SDS armor????!!! Anyway, let's take a look at yours. CRL and EIB Application Requirements: The only photo not present is the one of the butt and cod attachment but this detail can be seen in your torso shot. It would be nice to see it from the OUTSIDE but........ As for your badge, The blaster is an important element in this application. Any blaster requires a "D" ring on the back of the butt cap like this:Yours is absent. You will need to install one before I can go forward with the award. Other-Armor Fit/Assembly: In this section I will go over observations by myself and your fellow troopers. These observations may lead to suggestions to improve the overall look of your armor. If any changes are REQUIRED, those will be listed in the above and below areas. Well, another great looking and great fitting set of SDS. Really impressive work here. If I would see any area of improvement, it would be to the paintwork on the rear trap area of your helmet. Since you have the decals on the front traps, the outlines should look in balance with those. With the paint dry, you could even use masking tape to crate a thinner, but straight outline of the gray areas. Centurion Suggestions: I try to mention what I see here, but every trooper is responsible for the accuracy of their own Centurion armor. I would be surprised if I didn't see a Centurion application from you. There are a couple things I need to see before you apply, however. First, SDS armor has been seen many times before with overlap constructions on many of the seams. Please take some shots of your armor connection seams specifically, forearms, biceps and thigh backs so that it can be verified to be butt joint and not overlap. Next, check the length of your holster straps below the belt. These should be right near 25 MM so if they are long they should be shortened a bit. Getting back to your rear traps. I commend you on your taking the challenge to hand paint these. The vent lines, however, need to follow the shape of the trap itself like on this screen used helmet. If you just re-did the outside 3 or 4 to angle slightly, it would work. It looks like to me, although you have painted the rear traps, that the other areas are decals. These need to be the hand painted look decals or if you are really ambitious, you can hand paint these details. I have a concern with the 4 button plate on the left side of your ab. It almost looks to me like these are separate buttons and the 4 marks on the inside of your ab are what is seen when these are drilled out and installed. Separate buttons are not allowed on Centurion armor so can you take a close up pic of these to show they are molded into the plate and are not separate buttons, please? Lastly, your blaster, as I mentioned above, is just as important as your armor and needs to be built correctly. The "D" ring on the butt cap needs to be present but also, you have the magazine installed backwards.The vertical sides of the magazine are different. One is longer than the other. The longer side faces the butt side of the blaster, the smaller side faces the front. Like this Lastlly, The front of your belt has a little droop to it. You can move the snaps on your ab plate up a little and the repair is hidden by the belt. The top should be resting against or slightly overlapping the bottom edge of the button plate. With your talents, I am sure these will be easy fixes. But get that "D" ring installed and I can get your EIB badge to you.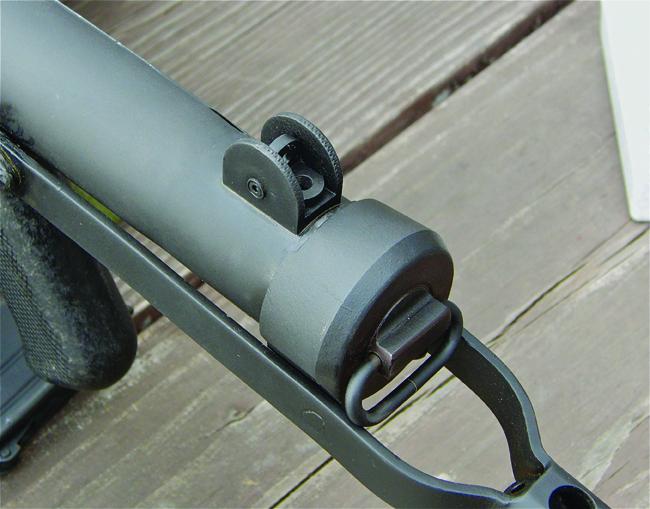

-
Watching with much interest! Can you show a pic of this spherical cutter you mentioned for your dremmel??
-
TK-61164 Requesting ANH Stunt EIB Status [SDS][474]
gazmosis replied to jariche's topic in Request Expert Infantry Status
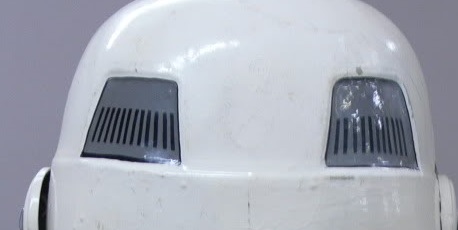
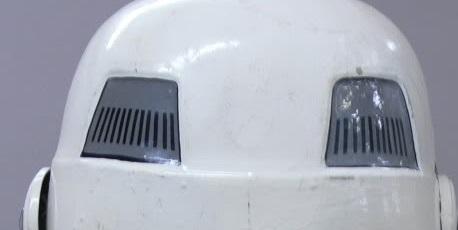
Hey there, Tomás! This is a rare treat to see a couple SDS armors in a row! Let's look at yours. CRL and EIB Application Requirements: All required photos have been posted and your armor contains all the required details to qualify for the Expert Infantry badge. Congratulations and welcome to EIB!!! Other-Armor Fit/Assembly: As Tony mentioned, another well built set of SDS armor. I did take another deep breath before viewing this, but it seems that both you and "Oskar" Suarez had the same goal. You too, accomplished it. As for suggestions or corrections, I have a few listed below but your overall build and fit are great!!! nice work! Centurion Suggestions: I try to mention everything I can see, but the final Centurion accuracy for an application is the responsibility of the trooper. I would be very surprised if you did not apply for Centurion. You already have everything in line to do so. As with Oscar's armor, Please post a few closeups of your build to ensure that your seams are indeed butt joints and not overlapping joints as we have seen on past SDS armors. Please focus on the thigh backs, forearms and biceps for these pictures. Please make sure you re-take your full body shots to show your drop boxes are aligned with the belt ends. I'd like to see you shorten your holster straps just a bit. There should only be around 25 mm of strap between the belt bottom and holster top. The last thing is also an easy fix. I'd like to see you replace your frown screen with black instead of the lighter screen you have. Mouth screen was invented by the 501st to hide the face of the trooper. Original helmets in the film didn't have them. The appearance of our helmets needs to remain true to that look. I did a side by side to show you how your frown would change if you did this: Congratulations again on this great looking set of armor. Well done, good Sir!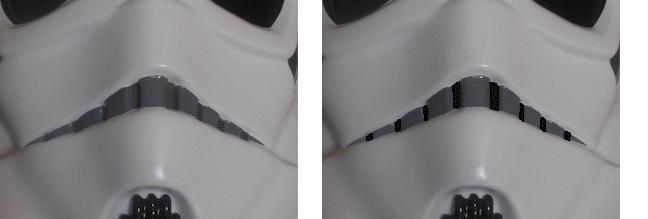
-
TK-60571 Requesting ANH Stunt EIB Status [SDS][473]
gazmosis replied to 0skar's topic in Request Expert Infantry Status
Hi there, Oscar! Thank you for your application for EIB. We haven't seen SDS armor in a while so let's get to it! CRL and EIB Application Requirements: All submission photos have been posted. Your armor represents all the required elements to qualify for Expert Infantry. With that, I would like to congratulate and welcome you to EIB! Other-Armor Fit/Assembly: In this section I will discuss observations made by your fellow troopers as well as myself. These may contain suggestions to improve the overall look of your armor. Unless stated in the above or below sections, these suggestions are not required. I am not going to lie, SDS armor has always made me take a deep breath because I usually have to inform the owner of a great deal of work that is going to be required to update the armor set. This does not seem to be the case here. You have put a lot of thought into building this armor the right way and it shows! There have already been a few cosmetic suggestions that have been made that you have followed through on like removing the paint from your cod rivet (Centurion only) and aligning your drop boxes. The one thing I do want to bring up actually has to do with your holster. You might want to inform the person who built this for you that the holster straps should be installed to line up with the ends of the holster not set in as you have it. Also, there was a small piece of square leather on the front that the rivet went through before connecting to the strap which sits in the back. Here is an example: Aside from that detail, nothing pops out at me that needs repair. Nice work with this set!!! Centurion Suggestions: I try to spot all that I can and mention it here, but the final Centurion accuracy is up to the trooper. I feel bad about doing this, but SDS armor has had a tendency to show up here with a lot of overlap construction. In your Centurion application, please provide a few close-up shots of your bicep, forearm, and thigh back seams just to show that the proper butt joint construction is on your armor. EIB requirements state that the gaps on the side cannot exceed 12 mm (1/2 inch). The gaps on your armor are very close to that but acceptable. Centurion, however, requires these gaps be removed as much as possible so there is little to NO seam gap. From looking at the way your armor fits you, this seems like this would require nothing more than a belt tightening to get rid of. If this is the case, you might want to replace the side elastic with webbing if this continues to be a problem. The only other adjustment I'd like to see you make is to your left button plate. When installed, it should not exceed the platform it is mounted on. Look at this example: You really have one of the nicer SDS sets I have seen. Your Garrison should be proud to troop beside you as it seems you have done quite a bit of already!!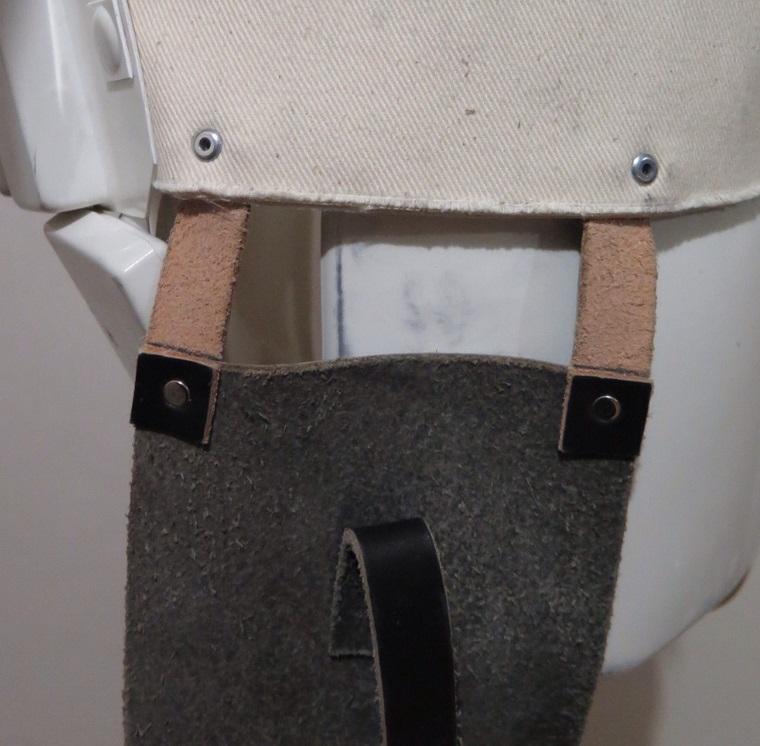
-
TK 92912 Requesting ANH Stunt EIB[ATA][472]
gazmosis replied to devilmaan's topic in Request Expert Infantry Status
Hello Todd!!! Thank you for this great looking set of ATA and a great looking application. Let's look at you!!! CRL and EIB Application Requirements: All required submission photos have been posted. Your armor contains all the elements required to obtain the Expert Infantry badge. Congratulations and welcome to EIB!! Other-Armor Fit/Assembly: Some builds and their results are just a pleasure to look at. This one is no exception. Brilliant work on your helmet's painted details and your blaster details. The weathering and silver added to your trigger group area really makes this pop! I want to bring this up because it has been a discussed issue in the past. It has to do with the proper widths of the cover strips compared to the raised ridges that are present on TE based armor like ATA. Todd nailed it here. Yes, he needed a little more room in the biceps, calves and thighs so he used the extra material made available to make them fit to his body type. Once properly fit, he capped the seams with the correct width cover strips. Some believe that the raised area, no matter how wide, should have a cover strip to match. I just could never agree with that for two reasons: #1 the size of the cover strips on the original suits. Ours should be the same unless certain circumstances require it. . #2 the raised ridges on TE based armors on the biceps, thigh and calf backs shouldn't even be there so why treat it differently because they are, Anyway, nice job, Todd!! Centurion Suggestion: I try to see everything and mention what I can here. Final Centurion accuracy is the responsibility of the trooper. I hope to see a Centurion application from you. With all the present details you have, I would be really surprised if you didn't. Usually regarding the space between the back and kidney I comment regarding too much overlap. Rarely do I see too much gap. It sounds like you are already on this so I will wait until your next application to ring it up again. Congratulations and nice work!! Troop on with pride!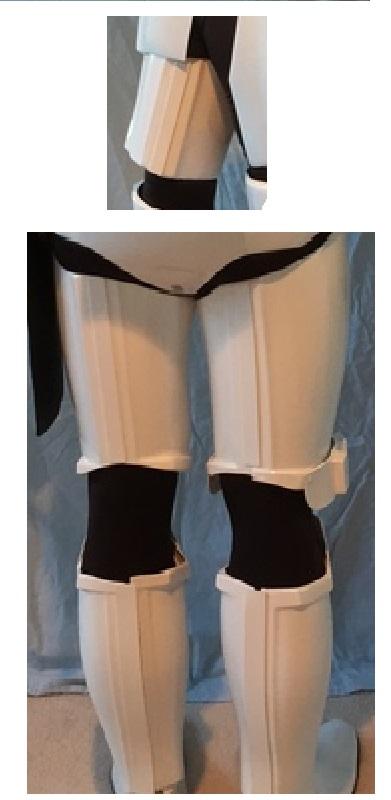
-
TK-27577 Requesting ANH Stunt EIB Status [RS][471]
gazmosis replied to Clint666's topic in Request Expert Infantry Status
Another Mathias! Hey there good Sir, and thank you for your EIB application!! CRL and EIB Application Requirements: There are two photos that are missing from your application. These do not have an effect on details required to be seen to qualify for EIB so I will continue with your application. Please post shots of your interior strapping and your cod/butt closure as soon as you can. Your armor displays all necessary elements to achieve the badge of Expert Infantry. With that, I congratulate and welcome you to EIB!!! Other-Armor Fit/Assembly: In this section I discuss observations made by myself and your fellow troopers that would go towards improvements to the final look of your armor. If any changes are required, those will be listed in the above or below sections. A very clean and well executed build, Mathias. the armor seems to fit you very well. The subject of your left thigh was brought up. The way it is twisting on you makes the look of your armor a bit wonky as Scott stated. But not only in the front, but the back. The way it's twisted almost makes your seam line look diagonal. When this is supposed to be aligned with your calf closure, it screams to be fixed. I would like to see your thighs worn a bit higher if possible. You could also use a bit of an adjustment in the way your kidney aligns with the ab. This is what I would consider more than just a "bit" out of alignment. Centurion Suggestions: I would really like your Centurion pictures to be the best they can be. Your armor fits you so well, it would be a shame to see it any other way than its best. I would re-take a few new pics for your application with the sides properly aligned and your left thigh straightened out. This would really move your armor over the top!!! Please get those missing pics posted for the application and congratulations. -
Screen Accurate Kidney/AB connection
gazmosis replied to EJGreen's topic in Hard Armor (General Discussion)
some just can't help themselves!! -
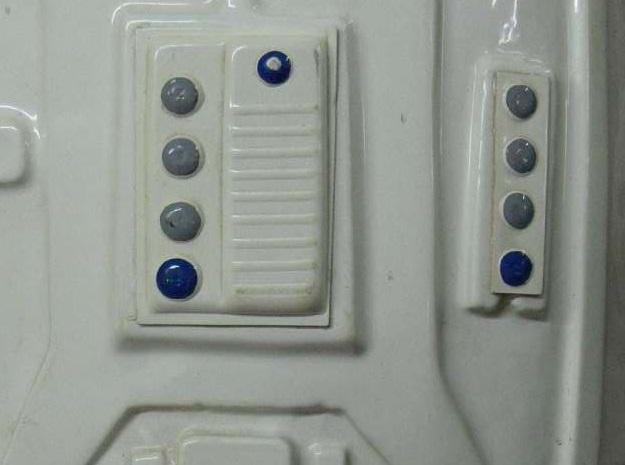
Hey Michael!! Thank you THANK YOU for this incredible Death Trooper EIB application!! Let's look! CRL and EIB Application Requirements: All required photos have been posted. Your Death Trooper Contains all necessary elements to achieve EIB. Congratulations on your second Expert Infantry level costume! Other-Armor Fit/Assembly: This section is usually used to provide comments to improve the overall look of your armor but......you're dead. Is is an oxymoron to make suggestions to make a TK look worse???? Anyway, the small details here have been nailed. I really like how innovative this design was to incorporate the circuit board into the thermal detonator and the back plate. The rotted fingers were a good touch also!! Nice! Centurion Suggestions: Everything you have within the construction of this armor as I see from what you have provided would clear it for Centurion unless something shows up in your photos. ​I would DEFINITELY take new pics with a different set of under suit parts to get rid of both the label and the gray stitching. I hope you get many chances to share this armor with people!! Congrats!
-
Hello Marcus! Thank you for your application for Expert infantry. Let's get to this!!! CRL and EIB application Requirements: All required photos have been submitted. Your armor represents all the details required to achieve EIB. With that, I would like to congratulate and welcome you to Expert Infantry!! Other-Armor Fit/Assembly: In this section, I will summarize observations made by your fellow troopers as well as provide my own. These go towards improving the final look of your armor and changes are not required unless stated in the above or below sections. The consensus was correct that there was not too much to comment on here. TM seems to never stop amazing me at how good it looks even on taller troopers as yourself, Marcus. But the look of a set of armor is only as good as it is built and you nailed it on this one. Thank you for letting us look to this as yet another example of how TM armor should look. There needs to be at least one "put a blaster to me head" comment. I applaud, as I always do, your hand painted details. If I was to comment on anything, it would be the vent lines on the tears and rear traps look a bit thin to me. These are supposed to represent vent slots. One more brush stroke and I think these would be greatly improved. That's all I got!!! Great work!! Centurion Suggestions: As I try to see everything, ultimate Centurion accuracy is the responsibility of the trooper. Not too much that can be improved on here and that is awesome!! I do need you to remove the white paint off your cod rivet, though. The second thing I am sure is adjustable for your Centurion photos. Please retake your full body shots with the bicep straps unhooked (it looks like you installed bicep hooks maybe?) I suspect this from the way the elastic is being directed downward. Your shoulder bells are being pulled down and away from the shoulder bridges a little far. You can actually see the elastic that connects them stretching straight. The shoulder bells should be resting right next to the ribbed bridges. You can re-connect your bicep elastic for trooping. Thank you again for this awesome set of armor and how well it looks on you. Your Garrison should be proud! Congrats!!
-
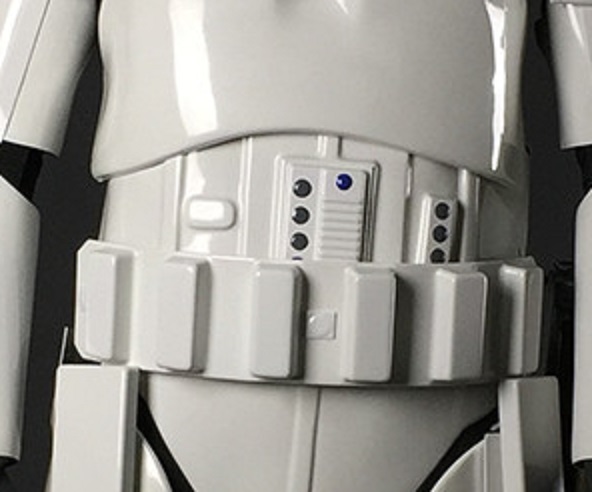
Alright Joseph! Your jorney has finally arrived! Thank you for your Centurion application and let's get to it!!! CRL and Centurion Application Requirements: All the required submission photos have been posted. Your armor now contains all necessary details to obtain Centurion. Congratulations and welcome!!! Other-Armor Fit/Assembly: With your arrival at Centurion, there isn't much to add in this section. I would like to add for those following along that the original shot near the top of the wrist openings of Joseph's forearms showed remaining return edge within the opening at the square intent ridge. ALL return edge within the opening is required to be removed which Joe has done. It is also important to note that Joe's original costume was the AM chest which has been replaced with a more accurate version and it was WELL worth it!! I like the improvements done to your Thermal Detonator as well in the overall length and the new screw hardware. If there was one other thing I would look into, it would be the correct screw hardware for the front of your scope. "X" head screws were never seen here as in this scope example Well done and congrats overall!!!
-
TK-66668 Requesting ANH Stunt Centurion Status [AP][166]
gazmosis replied to MechaPumpkin's topic in Request Centurion Status
I apologize for the delay. (I got the dog pic) I was out of state at my nephew's wedding for the past 4 days. Thank you for your Centurion application. CRL and Centurion Application Requirements: All required photos have been submitted. Thank you for taking the time to make a solid build with the attention to detail necessary to be able to apply. You armor represents the characteristics and requirements needed to qualify for Centurion. With that, I congratulate you on your Centurion accomplishment. -
TK 5156's TFA Build Thread
gazmosis replied to TK 5156's topic in Build Threads Requireing Maintenance
Since you are going to need some filler in other parts of the armor, using filler around the cut edges will get rid of the "implant" lines