Leaderboard


Popular Content
Showing content with the highest reputation on 05/17/2023 in Posts
-
Trimmed the return edges as much as my Dremel allowed me, is this trimmed enough? I could always get in there with a needle file or more sandpaper is needed.2 points
-
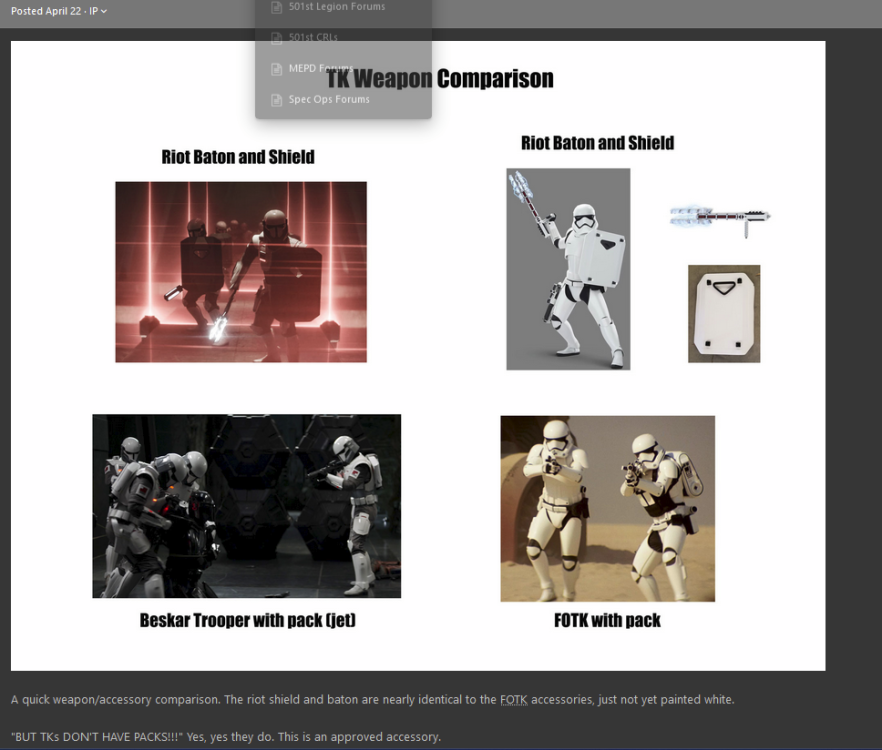
And to be perfectly open not all staff supported the case for FISD to home this costume, especially when we have had costumes with more TK lineage go to Spec Ops Being a specialised force has seen many a TK version fall under Spec Ops and at the end of the day it's really up to the DL's and LMO's other staff are not privy to those conversations. We are after all white armor, not partly white and grey or made from beskar, or have mandalorian lineage, which makes these troopers specialised2 points
-
It wasn't a vacuum. Detachments where asked to "bid" for the new CRL. We, as staff, put together our case and justification which the Detachment Leader presented to a Legion committee. I am aware of at least 1 other detachment that did the same. After going to the Legion our case was deemed better so we got the CRL. This would require both detachments to agree, and I believe all active members of that costume to agree. Which is probably unlikely. @Sly11 will be more aware of what would need to happen.2 points
-
Cool so it makes as much sense as the shoretrooper specialist trooper that went pathfinders because of the snout2 points
-
And the blaster is done printing! It needs some work but I am happy with it. Untitled by Pyro, on Flickr Untitled by Pyro, on Flickr2 points
-
As we build our support for the Imperial Commando we've comprised a list of all the Hard & Soft goods vendors to help you with your build. As this is a new costume, we will continue to monitor and update the list as more products become available. Just a reminder the FISD does not endorse any particular vendor, nor is responsible for any transaction between you and the vendor. Please do your research before purchasing. 3D files Helmets/Armor: 3D print files Galactic Armory - Facebook: Link Here Patreon Link Here Webstie Link Here Helmet and Armor 3D print files Mysterymakers - Patreon.com Link Here (This is a subscription group to gain access to available 3D files. (The maker goes by the name Mysterymakers) Helmet only at this stage. 3D print files Armor/Helmet Big Fred's Customs Website 3D print files Helmet Only Big Fred's Customs Website 3D print files Big Fred's Customs Website 3D Print Files mcflyprint3D Etsy Link , Instagram Link 3D Print Files DO3D Website Link 3D Print Files Marko Makaj Esty Link , Instagram Link Resin Sanotized Creations Facebook Link WIP 3D files UPDATED Helmets/Armor Updated Files Ab Mold 3D files Milleniummaker Website Updated Files One Piece Shins Milleniummaker Website Armor/Helmet vendors ABS kits Helmet 850 Armor Works (Web Store) Link Here ABS kits Amor 850 Armor Works (Web Store) Link Here ABS kits Ready to wear 850 Armor Works (Web Store) Link Here Helmet kits Galactic Armory (Web Store) Link Here 3D files Jet pack: Big Fred's Customs Website Milleniummaker files Website Jet pack: Big Fred's Customs Website 3D files Gauntlets: Big Fred's Customs Website Gauntlets: 850 Armor works Website Soft goods vendors/boots: Under Suit - Sheev's Emporium - Link Here (Facebook sales page) Under Suit - Keep Trooping - Link Here (Website) Ordering occurs beginning of each month Boots - Crowprops (Gio) - Link Here (Facebook sales page) Gio has just started making accurate boots for this costume. Boots - Keep Trooping - Link Here (Website) Ordering occurs beginning of each month Gloves - Crowprops (Gio) - Link Here (Facebook sales page) Gloves - Keep Trooping - Link Here (Website) Ordering occurs beginning of each month Belt/Holster - Sheev's Emporium - Link Here (Facebook sales page) Waist belt and boxes/pouches - Hardware vendors: Jet pack mounting hardware - JJ Industries machined aluminum JJ Link Holster - Sheev's Emporium - Link Here (Facebook sales page) Hand Plates - 3D print files Big Fred's Customs Website Helmet Lens - Amazon Website Commission builders: Building Guides/Thread,Tutorials & How To: Build: Frank's Imperial Commando build thread Sidearms: 3D print files RedzProps Facebook Link, Instagram Link, CULTS 3D print files Ceredir Cosplay Patreon Link, Instagram Link 3D print files STARBUG-PROPS Cults Link Resin 850 Armor Works (Web Store) Link Here https://850armorworks.com/Imperial-Super-Commando-Pistol-p566094946 Rifle Blaster - Rifle 3D files MillenniumMaker Website Riot Shield - 3D files MillenniumMaker Website Riot Baton - 3D files MillenniumMaker Website FACEBOOK BUILD GROUPS Imperial Commandos (Moff Gideon's Stormtroopers) The Mandalorian Mandalorian Stormtrooper Build Group Imperial Mandalorian Command Build Group1 point
-
So far I have 2 files for this build. I have the Helmet files from Big Freds Customs and the Pistol from DungeonsAndStarships Untitled by Pyro, on Flickr Super Commando Helmet 2 by Pyro, on Flickr Super Commando Helmet 3 by Pyro, on Flickr Super Commando Helmet 4 by Pyro, on Flickr Super Commando Helmet 5 by Pyro, on Flickr Super Commando Helmet 6 by Pyro, on Flickr Super Commando Helmet 7 by Pyro, on Flickr Super Commando Helmet 8 by Pyro, on Flickr1 point
-
Amaury Guichon has sculpted some pretty amazing artwork out of chocolate, which you may have seen on School of Chocolate, or else his YouTube channel. He's now made a stormtrooper helmet in chocolate. While maybe not screen accurate, it's pretty good considering it's 100% chocolate. Short at https://www.youtube.com/watch?v=Woj7pR9k-2Q
 1 point
 -
New section now open Happy Friday or Saturday where ever you live in this world, We have a new costume coming to FISD, which no doubt will surprise a few, but we are officially the new home for the Imperial Commando's from The Mandalorian. Currently we are building a new section of the forums for this costume which will house build threads and the usual research and discussions that surround costumes. Stay tuned as this should be open over the next couple of days1 point
-
perfect1 point
-
Gotcha! Will do! Is a little return edge fine on the back?1 point
-
For the higher levels you will need to remove all the return edge from the front of the forearms1 point
-
Did most of the trimming for the forearms I believe. Test fitted them with foam just like the biceps and they feel pretty snug. The forearms may feel a tad long, but not too bad! thanks!1 point
-
Good work this far. Sent from my iPhone using Tapatalk1 point
-
All I ever need to keep plowing forward is that sentence to be posted by you haha.1 point
-
I am going to be doing a bit of a clean up around the holes with 600 grit sandpaper to get any remaining debris. I also traced and cut my lens today. In the past 8 years I have read so many builds and tips that I can't remember where my ideas came from or if they are actually even my ideas lol. So I traced the outline of the lens holes on paper, added 1/2 inch around the whole thing, cut the paper out, taped them to the lens and cut. I always wear cutproof gloves! I work with my hands and the last thing I can afford is a stupid injury because I slipped. Which I do often lol. Ill round them off with a rotary tool later to make them cleaner.1 point
-
Nice work, looks good to me1 point
-
Hey Coach! Looks like you tackled those issues that were getting in the way of your basic approval. Great work! I can't wait to troop with ya out there. I think you should hear back on your application soon. Now, on to getting you that awesome level 3 Centurion award you're after. One of the things I am seeing that you'll need to work on for Centurion is that your belt appears to be moving or not fixed in place. The Top of the ammo section needs to be touching the bottom of or just covering the bottom edge of the ab buttons. The first image you posted looks pretty close. I'll defer to one of our fantastic DOs but looks like it isn't snapped in or the belt was getting loose and saging down a little. The other note about your belt is the ammo boxes need to be closer vertically to the ammo belt. Be sure to align them to the ends of the plastic section of the ammo belt too when you adjust them. Shoulder bells should have minimal space around them and they appear to be floating up into your ears. I think it may be that your strap got over the top of the end of the bicep and was pushing them up. The inside of the sniper knee plate looks to be attached low. The top edge should be aligned with the top edge of the shin.1 point
-
Back to you Jarred and apologies for the minor derail of your thread. Great work on the blaster, always a bit of clean up but I'm sure you will erase the print lines and have a cracking finished product.1 point
-
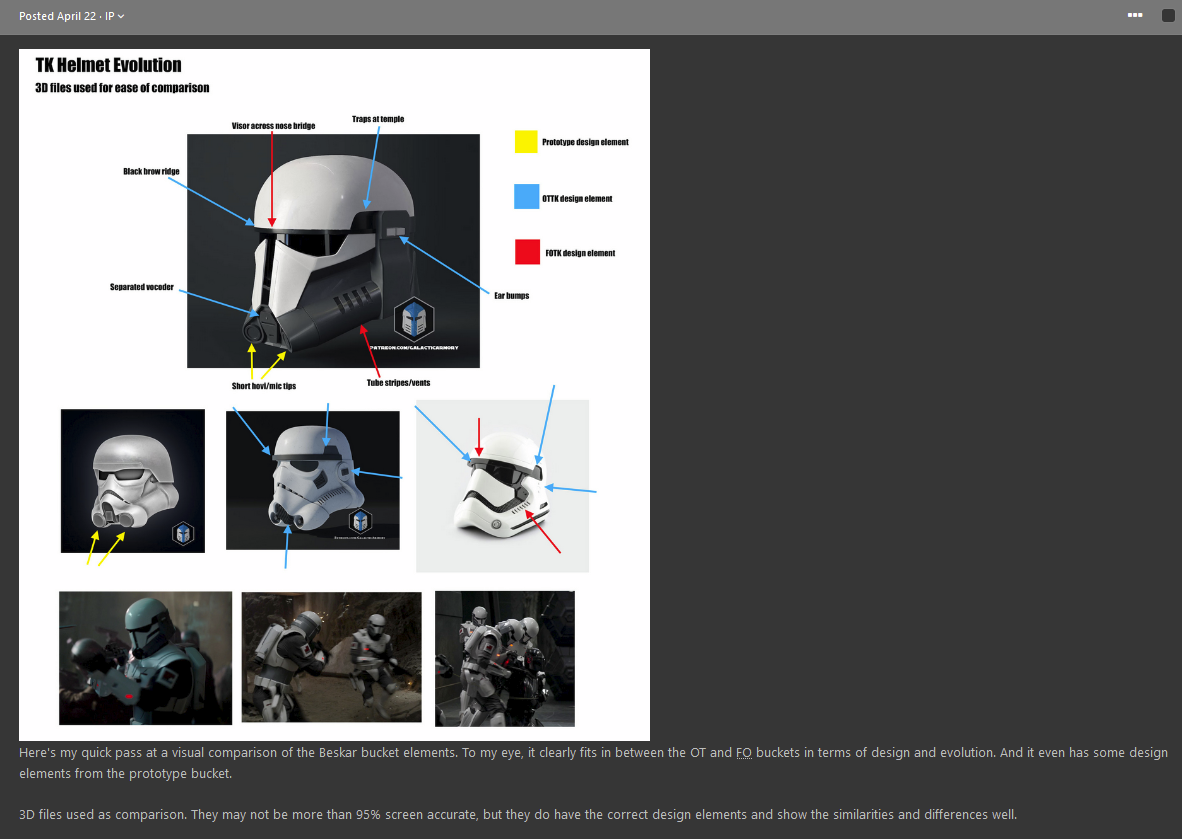
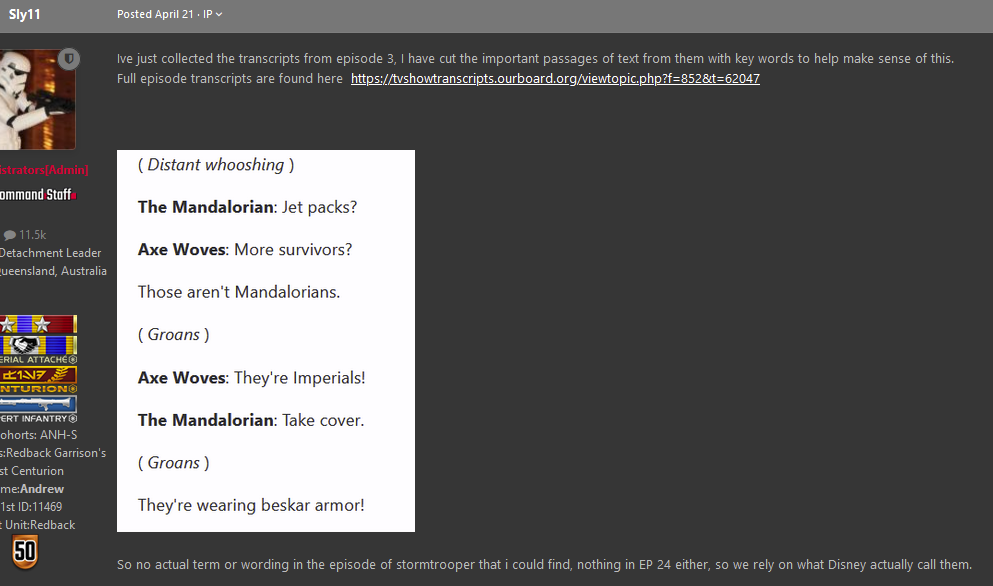
This is correct, detachments all look at new costumes for viability, an LMO asked if we were putting a case forward so clearly the LMO team are/were discussing new costumes. Alos correct on the appeal to take a costume onboard that resides in another detachment. It takes both DL's to agree along with the members who own the costume to enact a change of detachment,I wont say it doesn't happen because it has in the past. Pre my time as DL the detachment agreed to pass the Sky Trooper over to another detachment. I spoke with staff by starting a thread as I wasn't sure they were for us but did see some similarities in their action. As staff started to put hings together the story looked more reasonable so I submitted, and to be perfectly honest, didn't think we would get the votes. The LMO team vote on all things to do with costumes with majority directing their decision, not me, not other detachments, not a sole individual. One could only assume other detachments also put a proposal together, I totally assumed there would be at least a couple that would fight it out, not us in the race necessarily. For transparency, I will share what the staff put together, the images they gathered, and the written information they provided. These are screen capped so they are not edited. Aside form the standard gathering of various screen shots (these are now in our gallery so you can check them out at leisure, I added a section of the script which shows how the Mandalorians referred to those troopers I am the conduit to the LMO office so felt their work should be submitted, rather than dismissing it. Again we still believed it would go elsewhere. Below is the imagery and verbiage from the proposal put together in staff area. This is what went through on the proposal, there are a few pages of the discussions but this being the info used is the most important My closing taken from the email sent to the LMO team These troops have acted in the exact same fashion as the First order troops have in the sequel trilogies. Capturing the enemy with improved accuracy of shot like they did for Phasma. You will also notice almost the same shins as the first order TK and the identical boots. Armour covers most of their bodies, what, no butt plate LOL. We see no special operation other than to defend their leader, standard TK behavior and on mass, standard TK protocol, with accessories, again standard for various TK’s I can continue to gather more details as we have numerous staff working on the information capture but I think what we have presented here already shows well the direction we are heading. This is a Stormtrooper at heart and action. As always thanks for your time and consideration Kind regards Andrew Franke TK11469 (Sly11) FISD Detachment Leader Email response from one of the LMO team. Remember, this was not one LMO's decision, this was a vote by all LMO's, Michael was the one to deliver the news of the results of the Poll they ran and majority ruled.


 1 point
 -
I think a 501st member in Saskatoon. The same guy who has the R2, also did this. I'd be working with a 300x300x400 bed and single printer. Lots of forethought will be required before jumping in. Bart1 point
-
I also think shadow stormtroopers should come to FISD because they have the word stormtroopers in them1 point
-
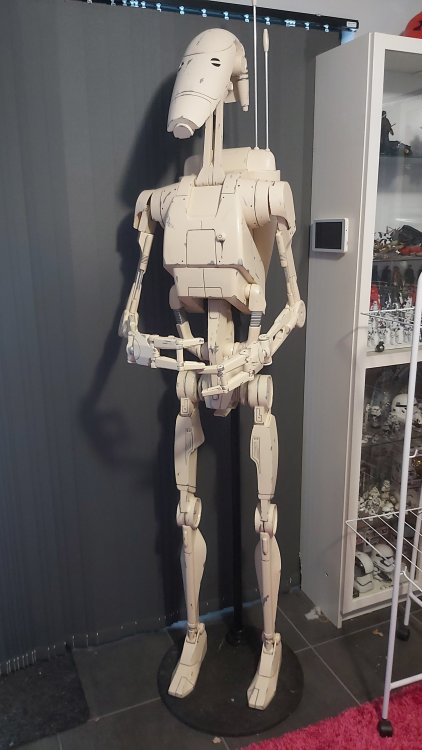
Some great files by Michael Baddeley on Facebook, you have to join his patreon but it's well worth it for the amount of files you receive Not an R2 but have done some larger droid builds, latest is an IG-12, 3/4 printed so far. Battle droid was my first project, all done on 2 x 220mm x 220mm bed printers, that took some time
 1 point
 -
Really don't think these decisions should be made in a vacuum, with just a few voices. This is the shoretrooper all over again.1 point
-
I also have mine mounted in the chest, in one of the peck sections. It's held on with 2 small strips of velcro, never had an issue with it coming loose.1 point
-
I'd eat the ears first. Bart1 point
-
LMO's deemed it would fall under FISD, I understand the wording "Stormtroopers" was used by the company that supplied the costumes. Guess we wait see what Disney and retail references call them, also there could be something in “The Making of Season 3”, streaming June 28 only on Disney+.1 point
-
Hopefully we'll get to see some refernces of these in the not too distant future, I'm seeing some designers adding the curved handles, be nice to know which will be correct.1 point
-
Some additional info FACEBOOK BUILD GROUPS Imperial Commandos (Moff Gideon's Stormtroopers) The Mandalorian Mandalorian Stormtrooper Build Group Imperial Mandalorian Command Build Group HELMET 3D Print Files mcflyprint3D Etsy Link , Instagram Link 3D Print Files DO3D Website Link Resin Sanotized Creations Facebook Link, Etsy Link WIP Additional Links 3D Print Files Marko Makaj Esty Link , Instagram Link ARMOR VENDERS WIP 3D print files Galactic Armory Link Here WIP 3D Print Files mcflyprint3D Link Here Etsy Link , Instagram Link WIP 3D Print Files DO3D Website Link Weapons: Blaster Pistol 3D print files RedzProps Etsy Link, Facebook Link, Instagram Link 3D print files CoelIndusttries Etsy Link, Blaster SE-14 Hybrid 3D print files Ceredir Cosplay Patreon Link, Instagram Link 3D print files DungeonsAndStarships Etsy Link 3D print files STARBUG-PROPS Cults Link1 point
-
UPDATE We have now officially opened the newest section of our forums to house the Imperial Armored Commando. Referred to as "Gideon's' Stormtroopers" by the makers of the costume, IronHead Studios, they are seen on mass in episode 23 and 24 of The Mandalorian1 point
-
Finally, FISD’s turn for a sit-capable CRL.1 point
-
No, for the year is 2023. It's finished. Well close enough anyway. I managed to prime the side cover things last summer, and looking at them last week I realised all it needed was a rub down and they would be okay for top coat. So during the week I've been sneaking up and rubbing them down with 400 and then 600 grit. Possibly a bit rough and ready, but take a look at real film props up close some time and see how rough they can be. In the end it came out nice. First job gloss paint. Always a phrase that fills me with dread. Took it slowly, a light dust coat and then a couple of wet coats to get a nice smooth finish. It's not flawless but you'd need to be pretty close to tell. Assembly was a bit scary as the paint probably could have been left another day or so. However I know that I need to do things when motivated or it will be another year or so loop. I started by using a scalpel to clean off paint where parts will glue and the barrel nozzle fits. I should have masked these but a blade works if you're careful. The top sight was assembled using M4? countersink screws. IIRC the original instructions wanted to use a grubscrew into the Glock slide but this felt like a better solution to me. The mount bracket was countersunk to accept them and then everything was done up to approximately "snug". The sight is resin, the mount PETG and doing things up too tight will just break things. At snug they should stay done up, and not strip out the threads. The top black thingy no longer fitted. Paint tolerances are a nightmare, but the fix was simple. I applied a bit of masking tape to the face of the file to make it safe then used the side of the file to add the needed clearance. This done a dab of Tamiya Semi-Gloss black was added to hide my crimes. The sheen is nothing close to the spray Satin Black I used but it's close enough for this. Next came bolting things up. The instruction PDF was long gone at this point and the one in the TFA download is for the TLJ build so some educated guessing was needed. I have a stash of M3 and M4 security Torx screws in assorted lengths, as you do. I used the TLJ guide to get the size and then picked the appropriate length by holding them to the part. I used the longest possible for each to get a solid join. The most important was the front M4 screw as I am actually using this to join the two halves, no glue. The longest I have went about 10mm into the other half which should give a solid fix, and on the other side the shortest one I had was used as it's effective decorative unlike the rest. The last job was to glue the red thing onto the sight, glue in the slide pull, barrel nozzle, and the sight into place. All of this was done with the smallest dabs of CA so not to make a mess but also give me a sporting chance that this semi removable if needed. Hooray pew pew time. I do need to add the holster bracket still. I have an idea for this but I need to get the hole spacing and hardware size for the R2Dan holster so I don't screw it up.1 point
-
Completed ATA ABS helmet #1 as delivered to it's new owner. I hope this is a helpful guide for those building a helmet, it just takes some extra time and care and you can build an awesome helmet too.1 point
-
Joining the face to the cap and back. I like to do it with the brow trim on, just be sure it's the exact height I want. I use small clamps to hold it in position. On this lid, the brow is raised up, but not curved like the "Move along" trooper. More canon look. For alignment, I place the end of the lens openings just a little in front of the temples. Drill the ear rivet holes I always install a washer inside to back the rivet. Rivet both sides. Now you can "hinge" the face up for down to adjust the brow height if you like. Lower...? Or higher...? I liked it slightly higher, so I clamp the halves together, and drill the holes for the bottom rivets (which are hidden under the ears). This is a good point to check and make sure that the lower edge of the back doesn't need to be trimmed further, and that the ear will actually cover this rivet without blocking where the lower ear screw will go. You can choose to roughly trim your ears to test this first. I've built enough of these that I know where to drill, so I just drill the hole and rivet it shut. I draw pencil marks along the ear indentations as a GUIDE. Do not cut along these yet! I usually trim up to 1/4" away from the pencil marks along the cheek tube area, but the round part, I trim right up to the pencil line. First test alignment. Obviously, it needs more trimming but this is to demonstrate where to cut. Getting better. I usually rough trim the front and back of the ear, then do a second pass on the front and the back, then concentrate on getting the front right, and then finish the back of the ear. One tip is to install the upper bolt through the lid for consistent alignment during test fittings. I simply use pencil marks. Back Keep adjusting the ear until you have it fitting how you like. I use a Dremel sanding drum to make adjustments quickly, but I still usually take about 35 mins per ear for fitment. I like to drill the holes in the ear before the helmet. I countersink the holes slightly so that the bolts sit a little deeper. I will line up the ear and drill the upper hole, then bolt the ear in and drill the second hole (stunt) and bolt it up TIGHT, then drill the lower neck opening hole. This will make it fit more flush. Repeat for both ears.1 point