Leaderboard


Popular Content
Showing content with the highest reputation on 12/24/2022 in all areas
-
Dear memebrs As the Holiday season is now well and truly upon us, I'd like to take this opportunity to thank everyone for a tremendous year here on FISD. If not for the high level of member engagement, our job as care takers of the forums would have been a lot harder. What I love most about these forums is the will for so many to help others. Be it a simple supportive post in another members build thread, or the generosity we see from day to day in members just wanting to give back and pay it forward. To be honest, I couldn't be prouder of you all. I'd also like to thank our staff, who without, this place wouldn't run as smoothly. Much of what we do is behind the scenes, be it maintenance, building new sections of the forums, keeping the spam out of our posts and pages, the monthly newsletter, brain storming for merch and anything more we can do for all, the list goes on. Thank you team. How ever you celebrate this time of year, please be safe, spend time with loved ones, or enjoy a break if you are lucky enough to be able to. Thank you from all the team here at FISD Much love Andrew Franke TK11469 Sly11 With unquestioned loyalty.10 points
-
I'm just going to point out the white elephant in the room, Is it me or do all of y'all have an unhealthy obsession with logging in to the forums way to much before BBB day? I cant get enough of the knowledge that's posted on the forums. I'm starting to feel guilty! It's the only thing I want to read if I get online.6 points
-
This really is one of the greatest communities I’ve had the pleasure of being a part of. Thanks Andrew, staff, and all the members for everything you do, seen and unseen! Have a pleasant holiday season! Caleb4 points
-
To everyone that sees this! The forum is alive and buzzing because of you! Happy holidays! I truly believe that our community is one of the best, ever! So supportive and engaged! To the people that are keeping an eye on members and especially the mini life updates A.K.A. the troop logs, and keeps commenting on them, making sure we are still feeling encouraged, even long after their build processes are over - thank you!3 points
-
I dove into this rabbit hole head-first when I first started and haven't come up for air since, lol. I never dreamed that there was so much to learn about this crazy hobby, and I've met some of the best people I've ever known on this site. Yeah, it can definitely be addicting (like Cheez-its), and since there is just so much information here it's possible to spend hours a day (guilty) before and during your build. BUT, it can be just as (or more) gratifying to stick around and stay active after you get approved. There are always new folks beginning their TK journey, and it's nice to be able to pass on what you learned to them.3 points
-
Hope everyone has a safe and prosperous festive season, best wishes for 20232 points
-
I wouldn't say that it is unhealthy! I love being in this amazing place of knowledge, feeling like I'm being a part of the research and preservation of the best costume ever made! Just by learning the details and sharing your own tips of achieving them helps us preserve the truth and bring an even deeper connection and feeling for the people we show them to when we are out on troops! I remember when I was waiting for my BBB. I spent to much time here and got obsessed and looked at so many EIB and Centurion applications that by the time I received my BBB I had already planned out a schedule and a list of details I needed to fix to reach Centurion! My feeling is that if you're already a nerd and you're doing research and loving it, why not go all the way showing your dedication! I still cannot help going on here about 10 times a day just refreshing the page to see what the people I follow has commented on, or look for new messages from people such as yourself! Another thing for me was an obsession to create cool signature banners with all the correct garrison logos and the achievements and stuff to look even more cool on here! I now help others with that but I still get the same feeling! Best forum I've ever been a part of! Welcome and keep the obsession alive!!2 points
-
2 points
-
A few months ago, I got a set of Electrobinocs from @justjoseph63 and have been extremely pleased with them. But... well... I wanted them to DO something. I got the idea to turn them into Bluetooth speakers so they could play the TK Chatter or some music during non-blaster troops. And, fair warning, this is now a finished project. This won't be an ongoing build. I've wasn't even sure I could make this work, so I didn't post up a build thread for the binocs. I didn't wanna be defeated by this little hunk of plastic. This was my first step - hacking open the binocs. I sliced it at the rear intersection as it seemed like the most logical place. I then cut off the lens and drilled a hole in the (extremely thick) resin. Joseph doesn't mess around in the creation of these guys. The resin is VERY thick front and rear. Walls have some decent thickness too. It can face some serious action without being damaged. You know, aside from being hacked up. The front 3/4 is attached to the back eyepieces with 3 screws and a thick layer of glue all around. I used a dremel cutoff wheel to saw it free. I wanted to use the top knob as the volume control, so off it came. It was held in place by a small screw. I bought this little bluetooth amp off amazon... and destroyed it trying to modify the buttons to be remote. I would not suggest anyone get this amp if you want to modify it. I'm pretty good with electronics and regularly solder gauge clusters back together for my day job. Relocating knobs and switches bricked this little guy bad. Recovery wasn't possible. Then I happened across this Bluetooth speaker KIT on Parts Express. It was mentioned offhandedly in a youtube vid that didn't really have anything to do with the project. At the time of this writing, the kit is about $44USD. Check it out on Parts Express. I didn't need all of the parts, expecially the 2.5" speakers, but the kit was much cheaper than buying the parts individually. Separately, the board and wires are more expensive than the whole kit. I also bought the optional battery board and batteries to allow the board to play without being plugged in. A total of about $66USD. I used two of these tiny 1.5" speaker drivers (coincidentally also Dayton) as they juuuust fit into the binocs. If anyone out there decides to use these parts for their own project, I'd highly suggest buying an extra or two of the 2.1mm DC barrel jack. They're quite delicate and I had to buy a spare. One hole wasn't gonna cut it, so I printed a new sensor array in ABS and sliced off the molded one. Not a bad fit! And not a bad finish after a bit of extra sanding. The volume knob board required a very very thin wall to be installed into. So much grinding! And the speaker fit pretty well in the far left of the binoc housing, but not so well toward the right. More grinding. My dremel extension handle got some action. The tiny speakers needed to be stood away from the front holes to allow them to work well. My local Ace Hardware hand 1/4" spacers and associated tiny screws to enable mounting. I believe each of the speakers uses 3 screws to mount. Drilling tiny holes in a deep housing isn't the easiest thing. This extension made it possible. And let me just apologize right here for the severe lack of build progress photos I took. I had roadblocks at like every step of this project. The drill bit extension for example. Every time I hit a dead end and had to wait another week for more parts from amazon, I was uncertain if this thing would ever get finished... so I didn't take many in-progress photos. I think this pic was of the nose and sensor being glued on for the first time in about 2 months. I also placed speaker cloth in each with hot glue. One of the very few pix I took showing the inner parts placement. It's TIGHT in there. Speakers at the very front and just a tiny bit of space between the back of them and the front edge of those huge batteries. The batteries are screwed on in the very front and have some 50lb double sided mounting tape holding them in place in the back. The extra speaker wire and wire bundle for that volume knob are zip tied and stowed to the right side. The main Bluetooth board has barely enough space to be flipped and live right above the batteries. I used the top center button between the viewports as the power switch. The bottom two hide some screws. The bluetooth blue LED indicators light up the viewports. And the wires are indeed everywhere. I tried to tidy them before screwing the two halves together, but was only medium successful. All of the parts hide behind a printed acrylic panel. And here we are! That's a finished and re-assembled Electrobinoculars!!! It doesn't have the front lens anymore, but the opened up sensor array sorta makes up for that lack of magic. I really like the look of that sensor array. Non-cannon LED pilot light are pretty easy to overlook. The little green one comes on when the unit is charging. Red is power. The two things above the power & green LED are my original attempt at power and line in. They didn't go well. They're basically tiny speaker ports now. Power on and blue Bluetooth lights lit. Note the top button - it sticks out slightly and is a latching SPST push button switch. I found a 6mm switch that would fit inside the little button housing. The only downside of this button is that it can spin a bit when pressed. That's just the nature of the switch I used. It's installed tightly, just the button itself that can spin a little. This is VERY hard to see IRL, but it looks pretty cool in the photo. I did a holofoil desert scene with a little sandcrawler. At least it hides the wiring. And here it is!! A working demo vid. I can't wait to troop with it.1 point
-
Signing up on here is truly one of the best choices I've ever made -- thank you to everyone who keeps this forum the place we all know and love! Whether that's the staff in their endless pursuit of keeping everything going on or the troopers/recruits contributing posts to this forum. So with that in mind, I too wish all of you very happy holidays and can't wait to start into another year on this forum!1 point
-
Yeah, it's kind of an obsession that some just cant get enough of. Ive been here for 8 years and still manage to learn things more frequently than you would believe. This community was welcoming and gave me so much that I have always felt compelled to be here every day and give back as much as possible. Never thought I would be elected as the detachment leader, and I don't take that for granted. It's a wonderful opportunity to grow this lovely hobby, help others along the way and make these forums the best they can be and inviting for everyone. I am glad that you feel the need to frequent these boards, it means we have something to offer, or at least something you like enough to want to learn more. Troopers helping troopers is indeed our unofficial motto, but one that many members live by. Look forward to your BBB day and future posts and build thread Terry.1 point
-
Was on here daily when I first started looking for build info and references, had everything saved on my computer for my BBB to arrive. Back then ATA was a 6 month wait (got up to 9 month's for a time there) so there was plenty of time to learn the in's and outs and what to do and not do. Some even stay around after they have finished their builds and log in daily, move onto higher levels and even lend a hand locally as a attache. Passing on to others what you have learned is a way to give back to the community for the help you have received, troopers helping troopers Looking forward to seeing those BBB photos1 point
-
Looking good Shiri, keep up the great progress.1 point
-
Adjust Ear Position Here's a little treat for all the perfectionists and improvement-seekers out there. How To fix my ears. I'll reference methods that I already used to change my knee rivet placement and adjust my ab-kidney rivets but will go a bit more in-depth for those curious. As Glen rightfully pointed out back in May, the angle of my ear and the ear screws wasn't as good as it could have been. With my ANH Stunt Centurion now achieved () it was a good opportunity to work on this problem. Firstly I removed the left ear, positioning it on the rest of the helmet to find a good angle, marking down the correct screw placements and other changes I needed to make, in order to fit the ear into the new position. Part of that was moving the top of the ear further back and the bottom of the ear towards the front. Since I needed to change the screw positions I filled the holes in the ear with ABS paste. Here's a tutorial I made a while ago. However, contrary to my advice back then (and now. Don't do this.) I went over it with barely ABS-soaked Acetone towards the end to give it that smooth finish. Don't do that, just sand and polish it. If I didn't have three pairs of replacement left ears I wouldn't have done it either. Luckily it turned out well for me. Once the ABS paste had dried I drilled a new hole into the ear, the time double checking the angle and screw placement. Everything fit well, so I counter-sank the screws for that Centurion Appereance. I apologize for the bad lighting, but this is what the helmet looks like now. I'll probably tighten the screws a bit further for a closer ear fit. Although the angle and placements aren't perfect now either, they're a lot closer to the desired outcome. All in all, this took me about 45 minutes spread over two evenings, so it was a pretty quick fix. Next up? I've talked with @MaskedVengeanceabout replacement canvas belts and how to properly fasten the ABS belt to the replaceable canvas belt, so I think that might be a good project to start into the new year with. Additionally I still have two proposed changes to my current armor that I'd like to implement in the future, based on information by Alan Flying, who had played one of the ESB TKs during the Bespin scenes. Happy holidays everyone and have a good start into the new year!1 point
-
Thank you all so much for the congratulations! They make for an amazing start in the day! Haha, I'm not surprised. Thanks Glen! Although I get a feeling that the EIB will take me at least as long as my ANH Stunt EIB did As always, I'll keep all of you updated on any and all progress. Thank you so much for your interest and support1 point
-
Approval Pictures I met up with one of the local recruits to have a small photoshooting with his scout and towards the end, we used this opportunity to take the Approval pictures for my ESB TK. Remember to use a contrasting background, unlike myself (Glen has an excellent guideline for this) and to take the pictures with good (natural, indirect) lighting and with the camera at face height. Here's the classic front, left, right, back overview (if a bit trimmed due to the collage). Then there's the buckets-off picture, a close-up on the holster and similar important details, as well as the action shot (all cropped differently for the collage!). Since I don't have an ESB E-11 yet, I went with this pose instead. Don't forget to try out different poses, so you can find one that you like All done, I submitted the pictures to the GMOs/GMLs and am now waiting for feedback. As always, thanks for reading along!1 point
-
Here is me giving them a work out. Man, that grubhub order is getting late...where is that guy?
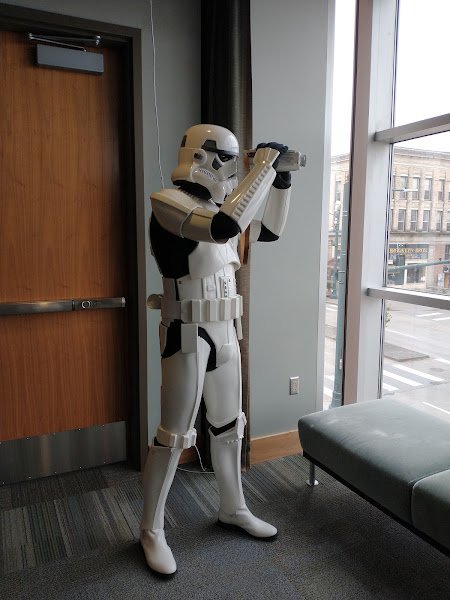
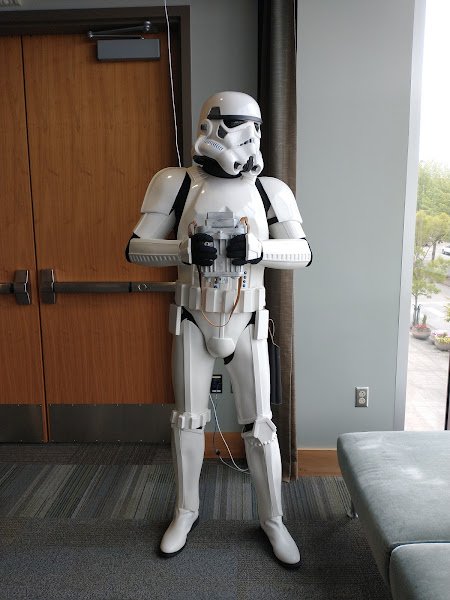 1 point
 -
Love looking at helmet interiors, so much room to get creative and so many different things you can put in there to suit personal needs. Here's mine, four 12v fans doing ~15CFM, iComm, Aker1506, powered condensor microphone, bluetooth transmitter to chest 10W speakers, 2W hovi speakers, and a switch box to toggle it all. But, beauty is you can't really tell outside the fans that all that is in here hehe (you can check out the thread I put together on it if you're curious: http://www.whitearmor.net/forum/topic/39469-howto-super-clean-helmet-electronicsinterior-build/)1 point
-
I only have my head in it.1 point