Leaderboard


Popular Content
Showing content with the highest reputation on 09/04/2022 in Posts
-
Welcome to FISD My name is Andrew forum name Sly11 TK11469 and Detachment leader (2020-current) of these wonderful forums. It is my pleasure to welcome you to what we hope you find is the most inclusive, friendly, welcoming and above all, helpful resource to bring your Stormtrooper dream to reality. The Detachment is truly immense in it's knowledge base and archives which can get somewhat overwhelming, but fear not as we also have many members and staff all waiting to assist you in any way we can. We do not judge or discriminate, we treat everyone as equal, and only ask kindly, you do the same. We don't only look after those who wish to join the 501st, we help anyone with a desire to build an accurate Stormtrooper costume, offering advice that could save you time and even money by choosing the right path for you. Some easy advise to get you on your way. The more you interact, the more information you will find. Please ask plenty of questions and the answers will flow. There is no such thing as a dumb/stupid/silly question, we are truly here to help you. These are your forums, the staff are here to serve in every way we can. You will meet some tremendous people both here and in real life on this journey you have chosen, share your stories and become part of our community. With unquestioned Loyalty TK11469 Andrew Franke3 points
-
Greeting all Please all join me in congratulation TK61490 TheRascalKing (Justin) on achieving two awards in this last week. Firstly he has completed the requirements for our first level Armorers award And secondly a 3D contributors award for his efforts in assisting with the development and refinement of some 3D printable First Order TK greeblies. He was also instrumental in getting these files offered up to our members free of charge, so please visit our 3D section and check them out.2 points
-
Congratulations Trooper!! Well done.2 points
-
Congratulations and welcome to the Centurion ranks trooper2 points
-
Hi Will, and thank you for your Centurion application! CRL and CENTURION Application Requirements: All required photos have been submitted, and on behalf of the entire D.O. staff we are pleased to welcome you to the rank of CENTURION. Congratulations! Other-Armor Fit/Assembly; In this area we review observations made by your fellow troopers and the DO team. Some observations may lead to suggestions to improve the overall look of your armor. Note that we consider both text (CRL) and pictures (screen caps/reference images) when reviewing submissions. Just a couple of things here: -Shoulder bridges are a bit wide...You can trim them a little (to make them more accurate). Reference images -We think you've done an excellent job correcting the overlap in this area. But you can adjust it a little bit more, and your look will definitely be more screen accurate. Reference images Congratulations Will... You have earned the Centurion badge. But remember, you can always apply those small changes we have suggested and make Lord Vader proud of you... P.S.: Don't forget to request your Centurion certificate HERE.2 points
-
OK, future Troopers, many of you have asked about how to set snaps for your armor connections, so I thought I'd whip up a little tutorial. Please note that the example that I am making is based on using the "double snap" connection system (see last photo). I highly recommend this method, especially on the back/kidney, kidney/butt, and ab/kidney connections, as it provides an extra layer of confidence. Yes, it costs a bit more to do due to the extra snaps involved, but you can be sure that no matter what happens, you will NEVER have a piece come loose or fall off on a troop. Some builders may have used others, but after countless troops I have experienced no problems. So here we go.... Materials needed: 1. Hammer 2. Soldering (woodburning) iron. (Available at home improvement and craft stores. WELL worth the $10-$12.00 investment). NOTE: The tip of this thing gets CRAZY hot, so be very careful where you set it. Many come with multiple tips, but I suggest the pointed one. 3. Snap setting kit. (Available at all craft stores). Please note that I am showing both sides of the base... more on that later. Convex side Concave side 4. For this purpose, I am using 2 inch (5cm) wide black nylon and 1 inch (2cm) black nylon. The 1 inch strips will be attached directly to your armor. I suggest using E-6000 glue and clamps for this. 5. Snaps, of course! Don't "cheap-out" when buying these. The cheap ones come undone very easily and are garbage. For this tutorial, I am labeling the 4 parts as such: STEP ONE Cut the 2 inch strapping to about 4 inches long** (or as needed) for the particular connection. Cut the 1 inch nylon into 2 inch lengths as seen below. **NOTE: The actual length will depend on there you are using them, i.e. the kidney to posterior plate connections will be shorter. Just be sure there are no gaps, and that the 1 inch wide base pieces are in the correct position before attaching them. Example: The ends will be a bit ragged and will fray. Use the soldering tool to seal them. Again, using the soldering gun, make 4 holes in the 2 inch wide nylon as seen below. Be careful not to make them too large (just larger than the shaft of the snap base) or the snap may eventually pull out. Take one of the 1 inch wide nylon pieces and slide it up under one end of the 2 inch wide piece, even with the end. Once it is lined up, use the soldering iron to make holes in the 1 inch wide piece. This will assure that the holes for the snaps line up correctly. (VERY important)! You should end up with this: Repeat for other side, but be sure not to get the sides mixed up, as one set of holes may be farther apart. Insert one of the male bases into one of the holes in the 2 inch wide piece. Flip it over and place one of the male snaps on the post. Place the base in the concave side of the snap setting kit base. Place the striking rod in the center (straight up and down) and strike it several times firmly with the hammer. The inside shaft should be sufficiently widened to keep the top from coming off. There... your snap is set! NOTE: Do not attempt to do this step on a regular table. You need a hard surface, and a heavy duty workbench or concrete surface works best. Repeat this step for the remaining 3 holes. Now onto the 1 inch wide strips.. Insert one of the female bases into one of the holes, then (as above) place one of the female snaps on top. Place the female snap base into the convex side of the snap setting base. Again, using the striking rod, give it a few good whacks. (Getting the hang of this now)? This is what you should have at this point (only one end shown) CONGRATULATIONS, you have one strap completed! Now that you realize how easy this is and have it down to a science, repeat as necessary. NOTES 1. For added security, the double snap system can be applied to other areas as well, including shoulder bridge attachments and bicep to shoulder bridge, (example below) This is especially good for those who wear packs (HWT, Sandie, Spacetrooper). 2. Snaps set in elastic (as seen above) can pull out over time with repeated use. For added strength I recommend doubling the elastic over before attaching the snaps. 3. Be sure to use the female base on all the straps that will be glued to your armor. The reason being is that the bottoms are flat, insuring a tight seal. 4. Some folks set the female snaps in ABS instead of nylon when gluing them to the armor. There is absolutely nothing wrong with this, it's just a different way of accomplishing the same goal. The reason I use nylon is that I find it conforms to the curved parts of the armor better, and gives a larger surface area for the glue to adhere to. 5. Some use CA (super) glue to attach the 1 inch nylon to their armor. I have found that it can get brittle and break off or even cause warping on ABS due to the heat it puts off while drying. E-6000 needs to be clamped and takes more time, but trust me, it's worth the wait. 6. When gluing the 1 inch nylon to your armor, do NOT keep the 2 inch wide nylon attached with the snaps. Some of the glue may seep through the hole in the snap and glue the whole connection together. Not a good thing. If you should have any questions, just ask here or PM me, and best of luck on your build! Photo 1 (Double snap system.. note clamps). SHOUT OUTS: Gary jr. ( @flashpoint0214 ) The guy who introduced me to the double snap system! Jeremy (Copper) who supplied the nice clean photo of the double snap system.1 point
-
The FISD Master Armorer program is an optional, detachment only incentive award to recognize individuals who have directly helped another 501st stormtrooper to achieve Expert Infantry status. Some people spend countless hours helping others, and want to reward their results as well as incentivizing new people to help as well. To register a “win” in the program, the assistance must have provided hands-on help trimming, building, and/or fitting of said armor for the person who was awarded Expert Infantry status. Other program notes: • Helping remotely, giving advice, or taking payment in exchange for help does not account, all work must be voluntary and without expectation of compensation. • The assistance must be for a period of 30 minutes or more. Spending 15 minutes tweaking someone’s fitting or taking photos does not count. • "wins" can be retroactive, e.g. if you helped 5 people in 2017 already, those can count as long as they are fully documented. Award Levels • 5+ “wins”: FISD Armorer Badge • 15+ “wins” FISD Senior Armorer Badge • 25+ “wins” FISD Master Armorer Badge The process • Person applying for the award will create an application thread to track the help they give. • For each “win”, they will list the person they helped achieve Expert Infantry status by copying their EI approval thread. • For each “win”, the person who was helped will validate that this person helped them. Next steps: • Need a badge design. Will be similar to marksman or other skill badge. Questions? Concerns? Please feel free to ask! Award Recipients 11/28/2017 - TK-61972, Walter @Haribon72, Golden Gate Garrison 11/28/2017 - TK-1636, Mike @TK1636, Dune Sea Garrison 02/19/2018 - TK-10116, Tony @ukswrath, Golden Gate Garrison 07/31/2018 - TK-70701, Jeff @Oztrooper, Southern California Garrison 09/11/2019 - TK-39093, Arthur @giskard8, Hong Kong Garrison 08/29/2022 - TK-61490, Justin @TheRascalKing, Southern California Garrison1 point
-
I've been collecting parts for this for a while. Time to start a thread for my pile of tupperwear! The bulk of what I've gathered up so far! 1) Garage Boss drain pan from amazon 2) Pack of Pop It!!! tupperware boxes 3) The Michael's photo box radio thing 4) All the little rubber feet anyone could need in a lifetime 5) A nice set of leather ammo pouches from ebay 6) Pauldrons! Because pauldrons. I prefer the black but the CRL has orange. 7) A rubber DLT-19. 8) Joseph's beautiful Electrobinocs Heh. Unsure about this. Such tupperware. Very plastic. Wow. Also, my wife is eyeing this pile of tupperware. Wants it for the cupboard and says I should just 3D print the boxes. My leather goods. In need of de-whitening and de-chromification. Question: Is this set of pouches approvable??? I ask because I haven't seen the center pouch for the chest on any HWT troops in many submissions, but it's on the CRL images. It's not in the game. I can cut it off, but really like it... Rubber DLT-19. It's really nice. A score from etsy. Back of the pouches are all angled. Gonna need some work. And just to show it off because I like it so much. To do: Everything.1 point
-
Mandatory Information Costume = Stormtrooper, A New Hope (Stunt) Costume CRL Link = https://databank.501st.com/databank/Costuming:TK_anh_stunt Name = Mirko Baltes TK ID = 20188 Forum Name = mirko_in_action Legion Profile = https://www.501st.com/members/displaymemberdetails.php?userID=32492 Garrison/Squad = German Garrisson/ Coastal Hammer Squad Armor = RS Propmasters Helmet = RS Propmasters Optional Information Height = 6 ft and 1.6 in or 187cm Weight = 187lbs or 85kg Boots = RS Propmasters Canvas Belt = RS Propmasters Holster = RS Propmasters Hand Plates = RS Propmasters Gloves = RS Propmasters Neck Seal = RS Propmasters Undersuit = RS Propmasters Strapping = RRS Propmasters Blaster = RS Propmasters E-11 Armor Photos Full Body Front Full Body Back Full Right Full Left Right Side Detail Left Side Detail Action Photo Helmet Detail Photos Front Side Back Hovi tip detail Lens color (Backlit if necessary) Accessory Photos wrist opening Ammo belt Neckseal Blaster left side Blaster right side Blaster D-Ring Thermal detonator back Cod connection Shoes Rubber gloves Interior Strapping Abdomen Detail1 point
-
Hi everyone! I'm Anne from the Wisconsin Garrison. Just got my Legacy Era Female Stormtrooper approved on Wednesday and I'm super excited! Did my first troop today as a TK and it went great!1 point
-
I was pretty much done with one side but my clear coat lifted up the enamel paint that I had used. I have been having issues with my oil paints and the application for weeks now so I just sanded it all off now so I'm back to square one, even though I have this matched paint already. I'm thinking of using thin coats of spray paint (RAL 9010) even though it was much brighter white than the ABS that I have. If I just take it easy and put on some dustings a few times a day and sand back where I don't need it, I think it will be fine in the end.1 point
-
I was curious how many of these awards are actually around out there, so for tracking (maybe add to the OP?), please find them below with approximate dates of award. So mine would be the 6th ever and first in 3 years... I'd love to see more and encourage others to put in the work and submit! 11/28/2017 - TK-61972, Walter @Haribon72, Golden Gate Garrison 11/28/2017 - TK-1636, Mike @TK1636, Dune Sea Garrison 02/19/2018 - TK-10116, Tony @ukswrath, Golden Gate Garrison 07/31/2018 - TK-70701, Jeff @Oztrooper, Southern California Garrison 09/11/2019 - TK-39093, Arthur @giskard8, Hong Kong Garrison 08/29/2022 - TK-61490, Justin @TheRascalKing, Southern California Garrison1 point
-
A little wholesome Doofus Rick content for all my fellow trophy hunters out there...1 point
-
Hi Mirko!!! Thank you for your request...One of us will be with you soon!!!1 point
-
Thank you all, I am honored. I would be remiss if I didn't thank Chemi for the help and support. Thank you all again.1 point
-
The diagram above is incorrect, this is what is should look like.1 point
-
1 point
-
1 point
-
Well done. Congratulations1 point
-
I think anyone that get's into costuming suffers with at least a little OCD, if not a MASSIVE amount . There are never too many questions, only silly mistakes from not asking them1 point
-
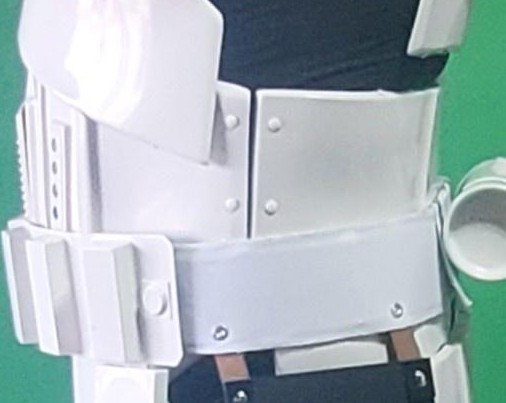
@15mm-20mm Chest piece may cover the "Han" snap depending on your armor and size Using a two snap system, starting with the posterior measure in @1-3/8" and 5/8" or so from the tip of the cod. Yes ab/kidney should meet at the top
 1 point
 -
I have now come back from the paint store. I am going to paint my armor like they did in the store which was with a little stain removal sponge which has a little bit of a sanding effect but the layer it applied was very smooth, and since it is a sponge it didn't leave any brush strokes which was nice. The code for my color they mixed is (some of it might be Swedish but the recipe should be of value): Product name: QUICK BENGALACK UNI-LACK BL Base name: A-BAS Recipe: OK000.5 SV004 Here are some images from the adventure:1 point
-
So I apologize if this video has been posted already or if it doesn't add to anything on the topic since its relatively old, but I found this close up video of the ROTK suit i believe was used on set. I know the CRLs are already posted, but I was wondering if anyone could add to them with the help of this. Resolution is pretty bad and the person recording it is a little shaky and doesn't focus on a lot of areas for more than a split second.1 point