Leaderboard


Popular Content
Showing content with the highest reputation on 04/05/2022 in Posts
-
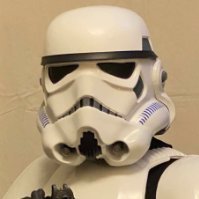
Hi Chris, Thanks for the side shots (via pm). Firstly, let me say that you’re doing a good job given that it’s derived from a 3D model. It’s better than quite a few helmets out there. Now, there’s a few areas that really catch my eye. Firstly, I’d say your faceplate is currently too far up into the back & cap. It’s looking more ROTJ than ANH. From this photo, you’ll also see that the ear caps (the disc parts) look too small, and the part that curves around the cheek is too thick. Yours look a little more like the ears on an SDS helmet, rather than the originals. Note the red lines I marked under the RS helmet above, how it curves from front to back. Yours is more straight, more like ROTJ. ROTJ REFERENCE As you mentioned, the face looks a little thin, and the eyes are perhaps a little “droopy”. Not sure if that’s just the camera angles. Here’s an overlapped comparison: Like I said up top, you’re honestly making a good job of something that is very hard to get right as it was hand sculpted and notoriously asymmetrical. Also, I’ve been staring at these things for the last 5 years and know their features better than my own kids (joke) so I’m far more fussy than the majority. Best wishes Dan6 points
-
Congratulations and welcome to the EI ranks trooper For future reference, ideal photo background info here3 points
-
Thanks everybody, I'm honored to join the ranks! Regarding Centurion Modifications Ahhh, I see what you're talking about. I'll try my luck with a brush first, as my hands have gotten more steady with a paint-brush since that first attempt and it would be closer to what I want the bucket to look like: hand painted with a brush Would you believe me, if I said this was already one of the twenty items still on my to-do list? It's now been moved up in the prioritizing. 15-20 Minutes sounds a bit ambitious, as I would prefer to not only cut them, but afterwards reform the return edges as well. If someone could provide me with a reference photo for a side-view, I would be grateful, as that would be an enormous help with shaping and cutting the thighs. I'll keep in touch throughout my steps, so I'm looking forward to any feedback offered Removing those rivets without damaging them will be impossible, I fear, due to my inexperience with rivets having already damaged them. I assume just gluing the head of the rivet into the correct position wouldn't be acceptable, even if the outside appearance matches the original armor looks? Filling and sanding won't be a problem, I do love my ABS paste. I'm looking forward to the next steps, thanks for the feedback, Joseph (and team)!2 points
-
Adding a couple of dabs of E6000 can also help keep drop boxes in alignment, notice on this image your not quite at the end of the belt, watch this when kitting up2 points
-
Congratulations and welcome to the EI ranks trooper For future reference, ideal background info here1 point
-
Congratulations Chris on a great accomplishment! Welcome to the ranks.1 point
-
Congrats Luca! Welcome to the ranks of EIB. Next stop…Centurion...1 point
-
Congratulations on EIB Luca!!! Looking forward to seeing you in Centurion ranks as well.1 point
-
Congratulations for reaching EIB, Luca. Glad to see you made it. To not leave you bored at home, the team has pointed out some minor things for Centurion which I am sure, you will be capable of fixing. Looking forward to your next update...1 point
-
Congrats! Nice work!1 point
-
Congratulations Luca! Welcome to the ranks. Onward to the next level1 point
-
Congratulations Luca, Welcome to EIB ranks! . Just a couple of adjustments and you're ready for the next step. Centurion. !1 point
-
Wow, that's an impressive upgrade.1 point
-
Congratulations #1043!!!1 point
-
Makaze was my first Squad and I still have lots of friends down there, so you can bet I'll be down! (Tell Gary sr., Gary jr. and Randy I said hello).1 point
-
Hi Luca, and thank you for your application for ANH Stunt Expert Infantry! CRL and EIB Application Requirements All required photos are now in and, after review, we are pleased to welcome you to EI! On behalf of the entire DO staff, congratulations!! Other-Armor Fit/Assembly In this area we review observations made by your fellow troopers and the DO team. Some observations may lead to suggestions to improve the overall look of your armor. Note that we consider both text (CRL) and pictures (screen caps/reference images) when reviewing submissions. Thanks for your patience!! Overall a really nice build, sir, and a lot of great attention to details! You nailed it for Expert infantry, but since Centurion is the pinnacle we have a few issues to over, but after seeing what an amazing job you did with this armor there's nothing you can't handle! Centurion Requirements In this section we prepare you for Centurion. More photos may be requested in the future that allow us to make better decisions on possible adjustments. If there are any areas of concern they will be discussed here. Because Centurion photos show much more detail than EIB, items to pertaining to Centurion might be seen there and not here. We try to point out all that we can from what is seen, but the final accuracy is the responsibility of the trooper. Starting with the stripes on the rear traps- the height is spot-on, but they need to be thicker to match the screen references as seen below. If you don't feel comfortable using a paintbrush, you could try a paint pen (link here). Reference images Next up- We noticed a couple of issues with the rear of your left thigh. The right one looks fine and dandy, but the left one has a much smaller gap between the top / posterior plate, and the cover strip is longer. A small amount is no big deal, but it's pretty noticeable and as seen in the reference images the thigh tops should be more or less level and the strips should be the same length. I would not suggest just lowering the left thigh, as the tops of the inside and the level in the front are perfect, but trimming the left one down to match the right would remedy both issues and give you a more symmetrical look. Should take you all of 15-20 minutes at most! Reference images Last up is a the rivet placement. Although not specifically mentioned in the CRL, the top one needs to be closer to the top of the kidney. Although it can't be seen, we suspect the ab rivet needs to be moved as well. This is an issue that we have seen many times in the past, and is honestly not as difficult to fix as it may seem. The rivets can be removed and re-used, and it's just a matter of filling/sanding the holes. I know this seems like a small issue and very few people would ever notice, but for Level 3 it's all about screen accuracy and those Reference images We KNOW that you can take care of these items, brother, and we are at your disposal if you need help. Looking forward to seeing the results when you submit for Centurion!1 point
-
There had been a couple around at the time but unfortunately many lost their images and have been archived. I used a heat gun which is a little more controllable than the blow torch in that thread.1 point
-
Congratulations centurion! Welcome to the ranks, you've earned it!1 point
-
Congratulations trooper and welcome to the centurion ranks1 point
-
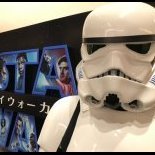
Hey troopers, More progress on this wonderful lid. This time around, I’ve been removing the liquid masking fluid. Remembering back, the Vallejo Liquid Masking fluid was applied to the helmet (with a paint brush) AFTER the Fossil Green spray paint was added. Since then, the Oxide Red and Ford Diamond White spray paint has been added. Gently removing the masking fluid reveals the Fossil Green paint, giving the helmet the illusion that there is a green HDPE/PP plastic helmet under the white spray paint, just like the originals. Here’s a video of the process, including more discussion about the original helmets and a how to. Now, for some eye candy; Work in progress. Hope you’re enjoying the build so far. Any questions, just drop a comment here or on the YouTube video. :-) Best wishes CableGuy Dan1 point
-
Some more photos. Muzzle and front sight was replaced with DIY'd one. Here's the original and modified side by side. Yes, I couldn't help myself from buying another clean original Disney Blaster. I'm going to keep this as it is because why not ? Comparison of the right side. Side by side comparison. This build was completed with only the basic tools and material I had. No resin parts, no printed parts. Just styrene plates, epoxy putty, sandpaper and patience. Hoping this may become some reference to anyone looking for a inexpensive reasonable and fun build.1 point