Leaderboard


Popular Content
Showing content with the highest reputation on 03/16/2022 in Posts
-
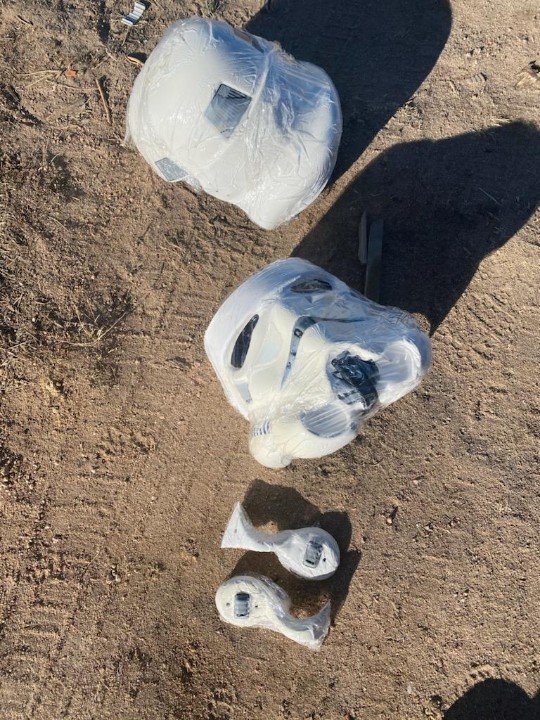
After 6 hours I brought the parts in and washed them with soapy water to get all the Hydrogen Peroxide creme off and there was no sign of yellowing anywhere.
 5 points
 -
Every time I get to update something in here I keep thinking it'll be the final build thread update. And then I get to do another small something to my armor. One of the four TD screws came free by itself... amazingly in my storage bin! So I didn't need to find a new screw, but I did have a very rattly Thermal Detonator due to the loose nut inside. No matter what I did, I could not get one of the end caps off to fix the screw. I boiled. I pried. I twisted. I spent two days not getting anywhere... so I sliced off the white plate and cut an access hole. And I made the hole big and pretty, because why not? I got the screw re-installed and applied some E6000 to all four of the inner nuts and threads. Should have used loctite in the beginning... I sent the above pic to @Scimitar and he was replied "close that up with some magnets and turn it into storage." BRILLIANT. Two days later, amazon brought me magnets. These are 60x10x3 mm bar magnets from FINDMAG. 12 came in the pack. Really nice quality! Pleasantly strong and they came with some foam double sided tape. They are almost precisely the size of my AP TD cover plate. A little too precisely. A little less wide seemed best to keep all modifications hidden. Fortunately, they are easy to trim with some wire snips. I hollowed out the magnet recess with a dremel sanding drum. Inner magnets are held on with the foam tape. There's about 1 mm or less wall thickness left in this hollowed area to separate the magnets. I just sanded till the magnet was flush with the top surface. E6000 applied. Cover plate carefully aligned. Rubber bands added. And a day later I got to take this photo! The magnets were indeed flush enough with the surface to glue to the cover plate. I added an elastic retainer and E6000'd that in place for the next day. This provides a sort of hinge for the cover plate and also keeps it from being able to get knocked off while trooping. And it doesn't keep the lid from closing. WIN! I also brushed on a little grey paint in the recess. Because why not? FINISHED! The cover plate actually fits more snugly than before with the magnets. No gap anywhere. There's no way to tell this got modified at all. The magnets are STRONG. It's probably possible to knock the cover off by backing into something hard, but the elastic will keep it from going anywhere. You basically can't pull the cover straight off, but it hinges nicely. And inside? STUFF!!! I'm calling this the Thermal Detonator of Happiness. A 2" wide sticker fits perfect. I drew up and printed about 100 of these little chibi troopers. I guess it was originally a silver coin from New Zealand? I drew up something close to the original with a little nicer helmet and blaster proportions. I thought it would make a fun sticker to hand out at events with little ones. There's also room for a couple tiny toys to give to upset younglings. And a challenge coin, complete with protector wedges nicely into the end. Honestly, I could fit twice this amount in there, but I can easily retrieve any of these with gloves on. With the TD packed more tightly it gets hard to fish out what I want. Maybe that's the final update on my TK build?4 points
-
Thanks! As you see from my pictures there is a VERY small gap that exists between the ab-to-cod moldline curve and I was thinking of splitting the difference there. That would give a flat-to-flat area for reconnections if needed. I think that the belt will cover it and, if anything, any "belt sag" would just be to the better for concealment. If the elastic stretches too much though and reveals the split, then there is the second snap provided by the Anovos thigh plate snaps. I'm still muddling over this before cutting3 points
-
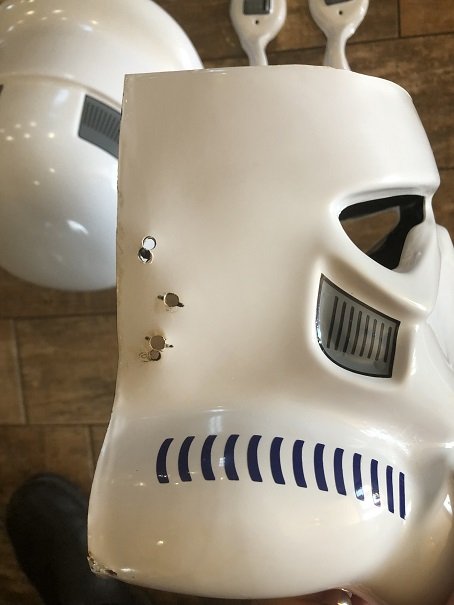
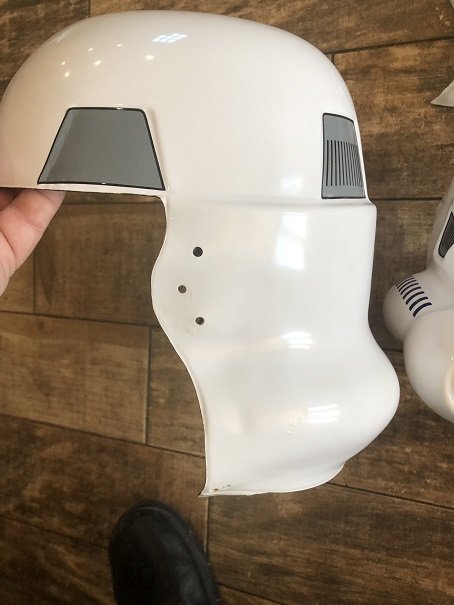
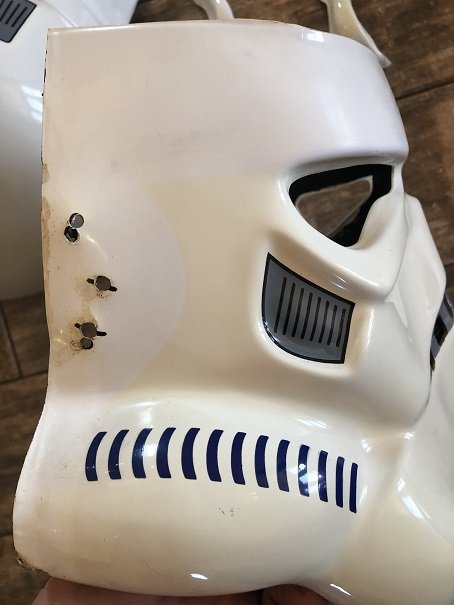
I would also like to point out that the decals and paint on the helmet were not damaged in anyway.3 points
-
If I may weigh in on this, it would be as follows: Yes, we have standards for all costumes within our Detachment, especially at higher levels of approval. But, once a Trooper attains those levels we have zero control over what they choose to change or deviate from. For instance, I have been approved at Level 3 for three different sets of armor, but I do not wear rubber gloves for normal trooping. As much as I would like to be 100% screen accurate. in a hot climate it's just not practical for comfort. Do approved Centurions change things? Of course! Let's face it, as much as we would like to see all TKs look the exact same that's just never going to happen. We are a crazy diverse crowd of folks who just want to dress up as shiny white spacemen (and women) and put smiles on faces. Yes, some of us are bigger and/or taller than others, but despite our differences we have the same goal, to get out there and have fun as members of this great organization and promote others to do the same.2 points
-
According to the database you are not currently active and have a "classified record" you may want to check with your garrison command team, GML (garrison membership liaison) should be able to help Member search link: https://www.501st.com/holocron/member/search2 points
-
The build of the FOTK is an entirely different beast. I 3D printed a set for my son (scaled down, of course). Looking again at my build, there is a strap riveted to the interior of the ab, and snaps were attached to that. This is how Tony's (Ukswrath) FOTK build went, so I did pretty much the same thing. Connection area is totally hidden by the belt. I wouldn't attach the cod directly to the belt of the ANH TK, though. It doesn't seem like it would be all that secure. From what I've seen others do, it's a matter of gluing snap plates to the inside of the ab above where the cod is cut. Add corresponding snap plates to the inside of the cod, then attach your snap/straps.2 points
-
I actually did cut my cod! And moved it up to fit my shorter torso. I let the parts overlap and glued them back together. You can't see at all that I trimmed things to accommodate my vertically challenged state. I don't see why a cod piece secured to the ab with nylon straps or elastic, or whatever, would be a problem. The belt hides everything where the cut would be, and the elastic at the bottom of the cod/butt plate would keep things from flopping around. (haha... see what I did there?) The FOTK kits have their cods secured separately from the ab using snaps on the inside of the belt. Can anyone tell? I doubt it unless you're staring intensely at the trooper's cod. And if you are doing just that, then you might have other issues going on.2 points
-
Little update: Hello there! Because of time constrains I will only be able to build on the weekends and maybe ones during the week. Concerning my centurion goal... well it will have to wait. I do not own a E-11 and currently can´t get my hands on one. RS told me there are having issues of Blasters being confiscated by customs and honestly I don´t want to gamble on that. I will still do everything according to the centurion CRL just without the title afterwards (at least for the moment). Talking about the armor, I cleaned the teeth as good as possible (I don´t own small plastic straws so thicker paper ones where used, do to that the really small teeth where hard to get to). I will now move on to assembling the Helmet. Until the next post.2 points
-
I recently figured out that I can sit in my AP armor. It's not great... it's more like perching than sitting, but I've got a pic of me doing it in my build thread. I've sat maybe a dozen times now with no damage to the butt plate or mounting tab area. And that's great and all, right. Doesn't help you with this thread. *and yet it might.* @MaskedVengeance replied in there that he was surprised no one has ever done a silicone butt plate for us. And I keep thinking about that post. A silicone butt plate would remove all the damage danger. Sitting would still be basically perching without more articulation in the cod area (which you're addressing in this thread), but... a silicone butt. That plus a bit of flex in the cod plate would give us troops a lot more posing options. It would require a pretty large mold and probably building up the back side of the master piece with some clay to make it thicker, but I bet a flexible posterior plate would be possible. Maybe worth reaching out to an armor maker to see if it's possible?2 points
-
Cod strapping placements and area marked for division areas that will be covered by the ammo belt (still deciding on exact cut-line above or below ab moldline to enable reattachment in the future, if need be) Sent from my SM-G950U using Tapatalk2 points
-
I've done one or two..2 points
-
Hi Shayan, and welcome to the forums! I'm a little late joining the party here, but I can help with a few of your queries: ESB TKs generally seem wonkier than the ANH ones, especially when looking at the biceps and shoulders. Is approval with these things more relaxed than say ANH troopers? Not really. The armor from ANH was re-used for ESB, and although I agree that many parts looked a bit "off", I mark this down to the set costumers. Although some Detachments like the MEPD insist for higher levels that a particular character be copied down to the minute detail, for Expert Infantry and Centurion here at the FISD we look for "ideal" trooper... think along the lines of 'fresh out of training and ready for inspection by Lord Vader'. In many shots of ESB, the rear part of the shoulder straps seem to be glued down or even riveted(!) in place. The CRL requires the straps to be free float and held with a fabric band, but looking at the film, I see no visible fabric bands and only sometimes free floating shoulders. Unfortunately close-up screen shots for ESB are rare, making it difficult to see small details like this. Did they use rivets or glue the straps down on some shoulder straps? Possibly in a few cases: But, for consistency among the ranks we insist for higher levels that the CRLs be followed. There is also some of the troopers with their shoulder bells sitting super high up, as if padded ROTJ style. When submitting for approval, can these requirements from the CRL be "overturned", as long as matching evidence is provided? When it comes to inconsistencies, there were a LOT on all of the OT films. Missing armor pieces, wonky biceps, missing tube stripes, well the list is endless, but we have to have standards. The CRLs are based on what was seen on the majority of the costumes used onscreen, not just a few or the one-off, and these are what we go by. They are not set in stone and are ever-evolving when new evidence comes to light, but unless strong proof (screen captures) is put forth they are followed pretty much to the letter. In saying that, we do allow certain amount of leeway for individual circumstances. Not all troopers here are the exact same height/weight. Some need shims to extend certain areas, some need to cut pieces down to fit correctly. I have seen troopers that are 5 foot 3 as well as those that are well over 300 lbs. end up with spectacular looking armor. No matter what issues anyone may have, as long as they are willing to put the extra effort (if needed) in we are here to help every step of the way to make sure the costume can pass at every level! The thighs are super uncomfortable, as I had feared. However, I have not trimmed them at all. Is return edge on the top of the thigh armor required? I'm pretty confident that I would fit no problem if I got rid of the return edge or at least the majority of it. As you may have already read in my thread, I am not a fan of return edges, lol, (especially on the thigh tops) so I would get rid of them completely. Looking forward to watching your progress, and if I can offer some advice it would be: Ask questions. Lots of them. When in doubt, always ask before cutting or gluing, and be sure to add photos (as many as you like) of the area in question. A picture really is worth a thousand words, and this will help us when it comes to offering advice. Best of luck on your white armor journey!!2 points
-
Honestly, I'm sure it's not just me, who's insanely grateful to everybody who's ever put up a tutorial2 points
-
Have finally decided to start my build. Have wanted to do this for years and now have my First Order TK kit ordered, just waiting on delivery. Looking forward to posting pictures of my progress, and hope noone gets tired of questions that may come up, thou looks like just about everything has been covered on the boards at some point.1 point
-
1 point
-
Despite my use of adult undergarments (just kidding.... seriously) the yellowing is mainly on the inside of the chest/ab and posterior plates. I knew going in that Anovos was famous for cracks, so I reinforced those areas during the build.1 point
-
I looked at several options online, and that particular product seems to only be sold in 4 oz. (113 grams) bottles for $15.00 or so. Since I will need a lot more for my Anovos armor I Googled "Stabilized 40 volume cream developer" and ordered a gallon of the product (albeit a different brand) for less than $17.00 on Amazon (link here). Strange thing is that on the Anovos armor the majority of the yellowing is on the INSIDE. As soon as it arrives I will be testing it out (inside first) and will post up here with results.1 point
-
If you know anyone who has access to a 3D printer you could always have a blaster printed, one of our members was kind enough to model the E-11 and shared his files here on Thingiverse1 point
-
Oh, and that thing you mentioned about adding ABS strips to stiffen the connection area if you're gluing.... I've never needed to do that. When I cut, I didn't cut right at the ridge at the bottom of the ab (where the cod starts). Instead, I cut about 3/4" below that. This allows a wide secure surface to overlap with your cod and to glue it back on (if you're shortening things). Also, it preserves the vertical ridge on the ab/cod, so you don't have to worry about guessing where to line things back up. The parts will naturally align to that ridge. I hope that makes sense! I very recently shortened my cod on my TK Hero kit, so I'm kind of familiar with how things go.1 point
-
As Adam said, for a couple years now I've wondered why such a flexible silicone posterior had not ever been created, or at least documented. I suspect one major reason is color-matching and painting challenges, which seem to be the hurdle with flexible TK shoulder bridges. Mr Paul (and some others) have made flexible bridges for Shoretroopers, and I have seen some for TKs as well, but I think it always comes back to paint. There are so many shades of white TK ABS out there, so tinting the material wouldn't really be an option, and there are certainly challenges with applying paint to very flexible surfaces. I'm eagerly following along on this thread to see how you implement your ideas! As Mario posted, looking at shorter troopers' threads might provide insight. In addition to Sha Sha's, I believe Christine @Cricket may have also done some height modifications (though I don't recall if she actually split the ab/cod piece).1 point
-
Looking forward for your advances and how it turns Jim.1 point
-
Awesome job ! It looks great1 point
-
I went through all the posts listed above and quite a few videos on how to whiten plastic and ended up using SalonCare 40. I had a badly yellowed TK bucket. I slathered the peroxide creme over the parts and wrapped them in plastic wrap to keep the creme from evaporating and left the parts out in the sun for about 6 hours.

 1 point
 -
Rivets can be troublesome, when one failed on my belt I switched it to Chicago screw. I also used them in my helmet for mounting lenses.1 point
-
Hi Caleb, I used 4mm screws to get the more pressure.1 point
-
New armor in hand (imperial surplus), this should fit a little better.1 point
-
Bending the belt into the shape of the armor helps to relieve any stress points, mine has only come off once on a troop and that was playing lazer tag, those younglings can be brutal There used to be a how to on it but unfortunately lost due to unrecoverable images. Some use paint stirring sticks, you clasp them either side of the belt and then clamp to hold in place, heat belt either hot water bath or heat gun (take care if using a heat gun, practice on scraps first), then bend and hold until it cools. You can also just use brute force but again be careful as thin plastic can crack. Here's one of mine And another
.png.fd8ed0c731c4b568625afda5f6363611.png) 1 point
1 point -
Nicely done. Jealous of your sitting.1 point
-
1 point
-
1 point
-
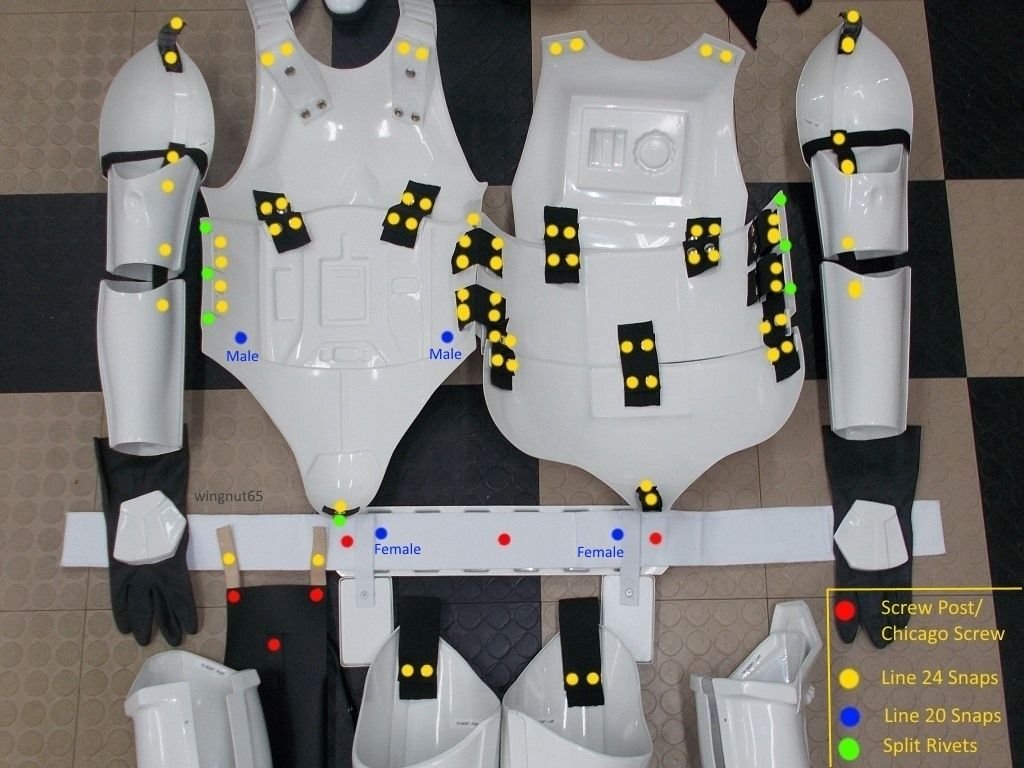
I think your best bet would be to not only check out, but study Tony's (ukswrath) incredible Anovos build thread located here: http://www.whitearmor.net/forum/topic/35086-ukswraths-anovos-tk-build/page-1 He is building it to Centurion level right out of the box, and everything (including a materials list) is explained in detail. Note that he is using the "classic" (movie accurate) strapping system, but there are many builds on here that use nylon straps. My buddy Jeff (wingnut65) has a great diagram (below) that shows the placement of snaps/rivets, etc. If you need any further clarification, just ask!
 1 point