Leaderboard


Popular Content
Showing content with the highest reputation on 01/19/2022 in Posts
-
Hi Ardeshir, and thank you for your Centurion application! CRL and CENTURION Application Requirements: All required photos have been submitted, and on behalf of the entire D.O. staff we are pleased to welcome you to the rank of CENTURION. Congratulations! Other-Armor Fit/Assembly; In this area we review observations made by your fellow troopers and the DO team. Some observations may lead to suggestions to improve the overall look of your armor. Note that we consider both text (CRL) and pictures (screen caps/reference images) when reviewing submissions. We noticed that you included photos of your upgraded F11D blaster. Since this weapon is considered an accessory, we think it should not block your new centurion badge. But we know you are a perfectionist, so, we would suggest changing out 2 items: -The picatinny rail is a bit long, should only have 2 raised sections (ribs) in the center and the holes are close to the ends as seen in the reference images below. Reference images -The D-ring you presently have is an actual D-shape as opposed to a more square shape. Reference images That's all sir and congratulations again for another well deserved Centurion Badge2 points
-
After an 8 year retirement I finally finished an old MTK kit I had. I submitted photos the other night and was approved. This kit is a stand in kit most likely though. I found it difficult to assemble because there really are not obvious trim lines and some of the pieces like the legs I trimmed years ago. In that time I have improved my making skills. I had a challenge ahead of me by having to work with bad cuts I did 8 years ago. The arms were easier because I had never trimmed them. The left leg I had trimmed way too much off. Massive credit to Trooperbay for working me up a set of replacement lower legs. I only used the left one and there is only a slight color difference. The helmet I am very happy with. I like my armor not looking super pristine and I can say "mission accomplished" lol. The funny part of my submission is I am wearing the same lower undersuit I did when trooping back in 2013. I have replacements on their way. I am really excited to be back in the 501st. I should have never left and I cannot wait to get out their trooping again. I also already built two versions of Kylo Ren and have a Snowy on order. After that is done I will reevaluate doing another TK and am currently exploring doing a FO.
 1 point
 -
Mandatory Information Armor Maker: Trooper Master Helmet Maker: Trooper Master (Assembled and painted by Trooper Master) Blaster Maker: Quest Designs Canada Optional Information Full Name: Chris Tate TK ID: TK-84215 Height/Weight: 5'11" 175 Lbs Boot Maker: Imperial Boots Canvas Belt Supplier: Imperial Issue Hand Guard Supplier: Justjoseph63 Holster Maker: Darman Props Thank you for your consideration, Chris1 point
-
The product I use (for the exact same reason) on the electrobinoculars I make is Rustoleum 2X clear coat, but be sure to get the Matte finish.1 point
-
1 point
-
Wow guys thank you beyond words for such a quick response. Thank you again for the suggestions and as soon as I can I will make those adjustments as well. As always I appreciate all of the support, encouragement and guidance. Thank you again for this amazing compliment.1 point
-
Keep it up Adam! I'll send you mine when you're done.1 point
-
Here are some progress photos!! So close to being done!! https://drive.google.com/drive/folders/1--wlD0xe9BOVdiw-FRWsUOw4kK3UmewD1 point
-
Hello there, Kenny! I, too, have been working an an ATA kit (for about two years actually). Linked below is a resource compilation thread I initially pulled together for myself and then published for the benefit of other builders. The bottom half of the thread is composed of links to many build and higher-level submissions, many of which are of ATA armor. We look forward to following along on your progress!1 point
-
I thought the frown might me boarder line. I'm on it! Thank you for the incredibly fast response too. I'll post new pictures of the frown as soon as I can. Most Likely this weekend. Do you recommend any paint remover. I read Isopropyl Alcohol, Mineral Spirits & Goo Gone will work. I have 90% Isopropyl Alcohol I use to clean my 3D printed resin parts. I will start with that. Again thank you for the compliments and quick response. Chris1 point
-
That pic! hahaha! I feel seen. Last weekend's hacking was some tiny details. This is my Before pic. It's not too bad I guess. There's decent detail. It's serviceable. But it could be better. Accurate screw/nut vs the huge thing that came with the mold. Much better! This was super easy, so I decided to start in on the three capacitors. I'll admit, they look rather wonky in this shot. They seemed a bit better IRL. They're barely visible anyway though. And just like that they're installed! This took an incredible amount of grinding to fit. The "floor" beneath these capacitors needed to be mostly flattened to get them all fitting underneath the center support/divider thing. But they fit! Rear insulators painted black, front insulators painted brown. I built the front support piece and ran wires through, around, and over. Some tiny resistors made their way underneath each capacitor. You can also just barely see the front wing. And wired up. It really looked like a mess until the spiffy red wires made their appearance. I no longer hate this and am pretty dang proud of the result. They're gonna need some careful weathering to really bring them out. And then... Reposting this to show that sad front sight. Look at that tiny thing. It's a bit better already. Please be forgiving when looking at this. I molded and sculpted this in place without removing the guard frame. It's not quite correct. The dimensions are a bit too large overall, but it's decent, about the right shape, and much much better than the nothing that was there before. The little block is made out of POR15 epoxy clay. It's easy to work and something I've used several times before. It smooths when wet and cures in about an hour. I sculpted the blocks with long thin screwdrivers. I cut down a threaded rod as per Tino's excellent tutorial. Drilled in place. I used green stuff to get the two metal pieces protruding to where I wanted them. And painted! Everything is protected by the guard. I also sanded the front of the guard flat to remove knurling where it shouldn't be. SO MUCH BETTER! Not perfect, but better than what was there. And for being sculpted in place I'm quite happy with the result. I'm feeling good about the blaster now. It's about time for paint and weathering.1 point
-
Nice build Chris, good luck with your application.1 point
-
Appreciate it beyond words. What a compliment. I hope I can live up to it. Appreciate it my friend. Super humbled by your compliment. Thank you1 point
-
Scope OK, back to it. Just when I thought I'd nailed the scope, in studying the reference images closer I noticed that the small brass grommet I had used on the front end was too small (photo 1). Even though I made the knurled screw insert (photo 3) I just wasn't happy with the look. I searched everywhere for a more accurate one but to no avail. I also was not over the moon with the overall shape of the rear part, but was not up to sculpting a new one. I ordered the mounting bracket on ebay: I know I'm getting WAY too finicky, and that many of these details will never be noticed, but that's just in my nature so thanks for bearing with me. Reference images Note: In the reference images (first 2 pics above) a few of the front sections were bent up, but not all of them.. I wonder if this was because they got caught up on the holster. I also noticed that some of the front sections were not at the bottom but on the side (last pic above). I'm sure either would be fine, but I'm going with the bottom. After some serious consideration, I decided to bite the bullet and ordered an accurate replica aluminum Stembridge scope. A bit pricey but well worth it imo. 1 2 3 You will need to cut out a section of the scope rail for the mounting hardware. Easy to do with a Dremel, but leave something (a small lip) for the mount to grab onto.1 point
-
While that tip would have been probably been nice before the dremeling, I've apparently never had a set of spade bits. There's a couple in my drill drawer but not enough, so I've now got a nice set on the way from amazon for the next project that needs them. Thanks Tino!! It's always nice to expand the tool collection. Today's update - the Hengstler counter. I originally ordered the hollow/empty counter from Tino to keep my options on this build open. I thought it might be good for electronics. I also wanted to print my own numbers as I did on my Hellhounds build. And then I was installing a set of early Miata gauges in a cluster for photos and spotted the odometer size. Look at those numbers... those 6 digits. Perfect? MAYBE!!! I make mostly Miata parts for a living, specifically gauge components, so I have a lot of clusters laying around. I fished a parts cluster out of the shed and harvested the odometer from it. A few minutes of work got some digits free and shoved in the Hengstler box for sizing. The box both closed and showed the numbers through the window. Proof of concept! Then I spent the next hour carefully hacking the odometer into place in the counter. The reset shaft (the "top" shaft seen in the pic where I'm holding the odometer) is the exact size for the holes in the Hengstler. It's a bit too long, but a quick snip got it cut down to size. I kept the security spacers between the digits for nice spacing. I moved that blank column from after the ones to before the hundred thousands. And I had to neuter the reset ability. The white teeth got nearly completely cut out and the springy reset button no longer springs. But that's okay. Having an NA Miata odometer inside my Hengstler with my TK number is maybe the best thing I could ever hope for. I've owned an NA Miata for almost 22 years now. It's part of my soul. And now it's part of my blaster.1 point
-
The tooth pick and thinners or mineral turpentine trick generally works very well. I have also used the Testors brand of thinners to do this with no issue. Best recommendation I have for painting those Ab buttons neatly is, Don't drink coffee before you paint them lol, I didn't think Caffeine had an effect on me until I tried to paint some very fine details after my usual double shot1 point
-
I found a small rectangle brush gave me the best outcome, I found it easier to control on the outsides, but what ever works for you. If you wanted you could go around the outsides with a toothpick and scrape away any excess, using a flat piece of scrap ABS plastic works as well.1 point
-
Square detail is on the left side above the trigger and between the magazine and counter as shown below
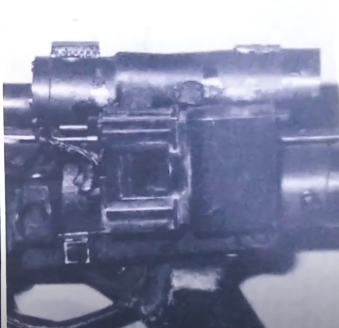 1 point