Leaderboard


Popular Content
Showing content with the highest reputation on 10/28/2021 in all areas
-
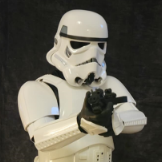
They saw it!!! The armor looks great!!!.... Congratulations!!!
 2 points
 -
Things like this is part of the downside to relying on friends who aren't costumers to take pictures. No big deal. I am glad to be working through some of this now. When I replaced/moved the arm snap on the left shoulder I should have done the right shoulder at the same time. RS sews the snap to the elastic and the stitching broke on the right shoulder while I was moving around. I'll make the right match the left now, using a spare piece of elastic and melting a hole for the snaps through both layers of elastic using a soldering iron. Should hold much better that way. I also need to shorten the stirrups that I put in the calves. They helped, but needs to be tighter to do the job better. I was impressed how this one little change made it so much easier to walk. I may not do any mobility cuts in the thighs now that I have these added and the thigh straps shortened. So glad I at least attempted my own armor build so I have all the pieces parts to modify and repair this set.2 points
-
Hi Brian. Welcome to FISD...I think you can order the kit while you lose weight. You can start(while you lose weight) with the TD, button plates, helmet, gloves, blaster... And also, while your kit arrives, you can research on the forum...There are millions of terabytes of information.2 points
-
Hi Brian and welcome to the FISD. Your weight can vary with you still fitting into the armor. The cover strips on legs and arms can be made wider for this. However, if loosing weight is your aim, I would suggest to wait with building until your goal is reached. You could use the meantime to study this forum, order tools for the build, or you could tackle the blaster build during your weight loss. Enjoy your Stormtrooper journey.2 points
-
I'm going to call this a happy accident. The bicep strap on that arm was too long. The bicep could come out from under the shoulder bell with no stretch at all. Shin stirrups have been shortened. Sewn in snaps replaced with hammered in snaps and reinforced. Bicep strap shortened. Shoulder straps shortened. Small velcro piece applied to keep the front of the belt a little higher. Every delay and issue has me making improvements I otherwise might not have. Hard to complain about that.1 point
-
It's hard when your photographer doesn't know what they are looking for, I find having a full length mirror on hand a great help, although my photographer is pretty much on top of the look, she's had some experience with me kitting up Looking good, nice work1 point
-
Sorry the read that, Things happens. just a small detail but very noticeable.1 point
-
looks great! Well done1 point
-
That's perfect. Thanks a ton.1 point
-
That's the first time I have heard about E-6000 not adhering to rubber hand guards. If you could post up a photo of the backs that may help solve the mystery or give us an idea of what you could use. I really don't recommend CA (super) glue or epoxy, as the adhesive can (and will) get brittle over time causing the bond to fail, especially on the edges. As James mentioned, I do sell flexible hand guards, but let's see if we can get the AP ones to work first. I sell the rubber gloves as well, and normally I only offer them with the guards but if you can't find any I can send you some at my cost (plus postage) for $8.00. Just PM me if needed. Flock-lined latex-free neoprene I have a tutorial here that may help.1 point
-
I think Q1 depends on Answer to Q2, @justjoseph63sells a pretty nice set of silicone handguards that come with fabric embedded on the underside that allows E6000 to soak and bond to the glove. Make sure you rough up the glove with some sand paper and clean with IPA to ensure the bond. You can purchase a set of new black gloves from TrooperBay. I used some rags to stuff the gloves to fill them, applied glue and attached the plates, then with blue painters tape, I secured the plates to the glove bundles by wrapping then tightly. Waited 48 hours for dry, washed the rags to remove the E6000 smell. Hope this helps1 point
-
With the patching complete, I drilled and placed the rivets in the new positions. I have not added any of the elastic yet as I am finishing up the rest of the torso strapping, then will complete the strapping that goes with this. Once I attach the Ab side elastics, I will trim out the bottom corner to match with the kidney as @TKSpartan suggested and then complete the connection to the kidney. Here is how it looks now. Thanks, M1 point
-
Another frustrating night. Had some friends come over to help with photos while wings were on the smoker.... and one of the arms wasn't sitting right and no one noticed. The button for the arm on one shoulder strap strap also broke. Not a fan of how RS fastend them. Didn't have enough time to make the necessary repairs, so photos will wait until tomorrow (I hope).1 point
-
Here you go Most polishes will be fine, I use one called T cut, others prefer Novos or Maguiar's1 point
-
You can take all your photos however you may find there may be some corrections you may need to make for either basic or EIB approval. You could post your images in the pre approval area to get a better idea of any adjustmens needed before seeking approval or higher levels https://www.whitearmor.net/forum/forum/193-request-tk-pre-approval/1 point
-
You're right L3- Ab button paint shall not extend beyond the bottom of the actual raised button. If you have any doubts, you can look at the CRL and the reference images (CRL - Reference Image Depository). Something that strikes me (may be the angle of the pic)....It looks like the clips are sitting above the control panel. You can round the corners of the clips a little(pic 1), otherwise they will scratch the armor when you put the TD on the belt. Also, you can put some velcro, (the soft side), on the outside of the clips, and this will protect that part of the armor as well (pic 2). 1. Reference image 2. Great job Alex!
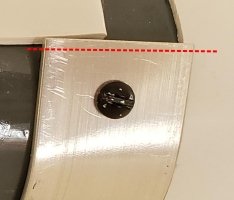

 1 point
 -
Thanks for pointing that out. I haven't been totally thrilled with the buttons. Work was definitely required. A little research revealed the buttons should be 11mm. Mine were between 13 and 13.5. I drew pencil circles at the base and just painted to there originally and.... not good. So I drew some circles in CAD at 11mm and had the plotter cut them out of vinyl. Maybe non-white would have been a better choice for visibility, but it was in the plotter at the time. I cut a row of them, so I ended up with about 40 of these little reverse dots. The old buttons. 13mm and janky. Protective tape applied and paint removed. And let me tell ya - wow. That acrylic blue paint did NOT want to go away. The grey enamel came off relatively easy but that acrylic was on there. Still, I got it free and didn't make a blue mess everywhere. Then I stuck on the 11mm templates and heat-gunned them flat in hopes of making the best seal possible. It meant a little glue residue removal was required, but that's much easier than fixing 9/9 buttons. Paint applied. I painted from the edges to the center in hopes of not forcing paint under the vinyl edge. Vinyl and tape removed and cleaned up. And BAM!!! It looks SO much better. They're much more round, far less janky, and actually the right size now. One more from a slightly farther distance. I'm really happy with this. I'll give them a cure overnight and then armor up tomorrow for basic approval pix.1 point
-
I actually got to armor up last night!!! Thigh garters installed and boot/shin velcro done meant I had legs and could actually walk around. It was fantastic. Sets rather cunning dontcha think? In all seriousness, I've got a little tweaking to do but am very happy with how it fits, moves, and aligns. Kitty does not approve of E6000 smells or clanky armor.1 point
-
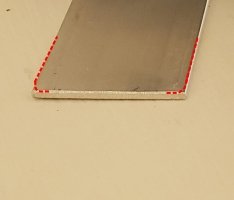
Great !! That's exactly. What I would do is to trim the lower section return edge a little more as below. Littel return edge References Check the distance and mark with pencil before to check again,1 point
-
Thanks for the input. I didn't think about the blaster build and gather tools; I like that idea. It will allow me to continue on the build journey without worrying about the impact of the weight loss. Great suggestion!1 point
-
Hi Matt, glad to see you were able to remove the rivets with no damage to the plastic. As you can see in the bellow comparison, and this is not the best new I would like to give you but It looks like you will need to relocate the kidney rivets too.1 point