Leaderboard


Popular Content
Showing content with the highest reputation on 04/22/2020 in Posts
-
Here goes nothing. Intro post: Many moons have passed since I placed my pre-order for Anovos' TK kit in May of 2015 and received my BBB in March of 2016. But there's no better time than the present! After reading an unhealthy amount of whitearmor content (if that's even possible), I finally accumulated enough supplies and time to start my build. I was initially leaning towards a sandtrooper, but now that I've found the HWT it's too tempting to not go TK/ HWT instead of TD. At least for this kit- there still might be a sandy for me in the future. I'll be updating this first post with all of my purchased supplies and accessories once I've finished the build, as I found those lists immensely helpful to me. I've greatly enjoyed many of your build threads, tutorials, and general banter, so a big thank you to all of you. A HUGE specific thank you goes to @justjoseph63 and @ukswrath for their detailed content and encouragement/ guidance for new troopers. I hope everyone keeps up the great work, and I welcome any and all feedback. Let's jump right into it. Centurion or bust. I started on Sunday by laying out all my armor pieces. I removed the numbered stickers from the tops of every piece and placed it on the underside, allowing me to keep track easily. Per Joseph's guidance, I'm going to remove all appropriate return edges right off the bat to ensure best fitment. I'm also trying to be accurate with my cuts to reduce the amount of sanding time required. I'm collecting and storing all of my ABS scraps for either ABS paste or inner cover strips (gotta reinforce that Anovos armor). I'm also leaving the plastic covering on until the end, meaning I have to peel little bits of plastic off my scrap ABS. Giddy and excited, I sat down at my folding table and pressed play on the A New Hope soundtrack. As the 20th Century Fox fanfare blared, I made my first cuts, starting on the biceps per the recommendation of many (provides cutting/ sizing practice). For the biceps, I removed all return edges. I used only straight and curved lexan scissors for these pieces, getting a feel for the technique. Below you can see my pencil tracing of the no-return-edge cut-line and my "stress-relief" cuts along the side of the piece. I used many of these cuts to allow the ABS to flex while I followed my cut-lines. After taping it up, the right biceps armor measured 15 3/4" around the widest part. I measured my biceps for reference and got 13" unflexed and 14 3/4" flexed. A test-fit with my undersuit confirmed that I need more room and a hot water bath to re-shape the piece. I plan on starting with a 10mm shim at the back of the armor- I'll moc that up soon and get feedback from you all. Next I cut out the forearms, using the score and snap technique for the long edges. As shown in the photo, I clamped my metal ruler to the piece and scored it 5-6 times with a hobby knife, using low pressure. I cut out all return edges on the wrist ends and tops of the inner pieces. For the tops of the outer pieces I'm leaving a 5mm return edge. After test fitting the forearms, I have plenty of room to remove material and taper the pieces. Aiming to get that done in the next few days. Yesterday I cut out the shoulder bells, again leaving no return edges. Next up, I'd like to dial in the fit of these pieces and start gluing cover strips (outer, then inner). This is gonna be fun!2 points
-
So before I cut the ammo pack belt piece I would like some clarification from you experienced people. Here is my RS belt next to my Walts belt My RS belt and a lot of ANH on screen TK belts had almost no gap from the "blocks" to the edge of the belt. Seems from my looking around in White Armor, I keep seeing a 3-5 mm width. So before I cut I would like some guidance. It seems like there is the smallest gap on what I have seen as references and I think anywhere from 4-5mm is too wide. Here is a image I found from browsing this site: For now I have my pencil lines almost right against the boxes, matching my RS RS width from the box closest to each edge is about 40mm. So I marked 40mm width on both sides: So long story short: each box to the top and bottom edge have a 1-2mm amount of space (boxes aren't all the same height) and the ends have marked at 40mm Buttons are pretty thick: Looks like I will sand them down to match the RS:2 points
-
Me, notices gum line: "I wonder if Joseph is gonna kick it back..." Me anyways: "Nawwwww...." - Goes to find non-acetone paint remover... finds acetone... no paint remover. - USES NOVUS TO POLISH OFF THE PAINT - Goes to find my Testors gray paint jar... no gray paint - Sprays can of gray spray paint onto a piece of cardboard to touch up uneven lines - Obviously doesn't match, paints entire frown So yea, that was fun. Also, a tiny part of me died inside modifying a "screen used" helmet @justjoseph63 I appreciate you.2 points
-
Thank you, I just need to accept this build is not going to done when I want. Patience is a virtue I guess2 points
-
As Dan mentioned, trimming them down will help a LOT. I would start with trimming down the raised area that faces out (yellow lines shown). In this particular case, the sides of the 15 mm wide cover strip should extend all the way to the edge of the raised areas (see arrows in reference image). Same with the forearms. After that, since there are no ridges on the other side any further trimming can be done there to give you a better fit. Can you post some photos of the forearms showing the seams (both sides) for us? Thanks!2 points
-
I will let the other (more knowledgeable) guys here answer in more detail, but for an approved weapon.. the short answer is no. I asked the same thing when I first joined here. I bought two for my nephews and was seriously impressed with the Nerf as a toy weapon. But it doesn’t match up in terms of being the correct dimensions for a screen used weapon. Sent from my iPhone using Tapatalk2 points
-
After ~2 years of assembling my armor in a clandestine manner with much appreciated help and advice from members of the Old Line Garrison, and with the primary objective to surprise my younglings, I was approved in February right before the elections. As usual, my timing is pretty horrible so I was able to get my first troop in to reveal the project to the kids before the lockdown and haven't been able to do a whole lot since. Using the time now to work on tweaks to the armor to remove some armor bite, and get my bucket fans and electronics ready for action oncethis whole thing blows over.
 1 point
 -
Great news, you're on the way future Trooper.1 point
-
“Exalted” don’t make his head any bigger then it is lol. The first part of this hobby is investing and having nothing to show for it. Second part is getting all the smiles when you troop and maybe some maintenance in between. Your on a great path to start and the timing is perfect your missing absolutely nothing, no parties, no troops. Hopefully you’ll be good to go when it’s all done. Glad to have you here can’t wait to see the finished product, I love my AM armor. Sent from my iPhone using Tapatalk1 point
-
Well done, Roy. Excellent work. :-)1 point
-
Congratulations Dixon, Yeah all of us are happy for you , We know how are you feeling right now mate!! Enjoy the process and remember to review all the info we have given and post photos, ask questions. we are here to help. cheers and congrats again!!1 point
-
IT'S HEEEEEEEERE! BBB has arrived!! It had to sit for a little longer than usual since it came from overseas but man oh man was it worth it!! You know that scene from A Christmas Story where Ralphie sees his coveted official Red Ryder carbine action, 200-shot, range model air rifle with a compass in the stock and this thing that tells time? That's how I felt. It felt great to be able to unpack and see every little piece there and accounted for, just like the rest of y'all in your build threads. I got one of my own now :') Sure enough, everything's accounted for, with some extra ears and drop boxes to boot (thanks Paul!). I'm debating when to get started on trimming and sizing up the arms; I'm in the home stretch of school this semester and I'm just finishing the process of moving out, so I may be going at a snails pace the first couple weeks or so--then again, nobody has anything but time on their hands so what's the rush, ammirite? CAN'T WAIT to get going, I'm sure I'll have a ton of questions to ask and pictures to link as the days go by.1 point
-
Congratulations Trooper, Welcome to the rank of Centurion.1 point
-
POSTERIOR PIECE PART 2 2 inward facing snaps are attached which will snap to 2 hanging webbing from under the back of the abdomen. The center snap is outward facing to be attache to the belt later. Here it is attached to the back, and you can see the 2 hanging webbing holding the posterior piece up.1 point
-
Shipping and stock is a common issues around the world in the current situation. I think the return edge in you chest plate image looks fine. Unless it’s causing you issues I would leave it for the time being until you can get fully kitted up and see how everything moves together. Sent from my iPhone using Tapatalk1 point
-
Hi Chris, I’d consider slimming them down a little. Usual rule of thumb is to have around a finger’s width gap around the part. As above, the original suits were a little more fitted. Especially take note of the gap around the wrist. The proportions of the parts look a little different at the moment, so I’m guessing either you are quite a tall trooper or the parts from this supplier are smaller. Slimming down the parts should help even out the proportions a little, as will reducing the gap at the elbow (moving the forearms up closer to the biceps).1 point
-
Roy Maunder 25869 Centurion A4 Sha Sha Thank you!! My pleasure, brother! http://www.whitearmor.net/eib/certificates/25869-centurion.png1 point
-
Thank you Sha Sha, you've made me a very proud trooper I have noted those observations and will sort them out Can't wait to get back to trooping.1 point
-
Hi Roy, Thanks for your application and for the fix with the shoulder bell. CRL and Centurion Application Requirements All required photos are now in and, after review, we are pleased to welcome you to Centurion! On behalf of the DO team and myself, many congratulations! Other-Armor Fit/Assembly In this area we discuss areas that could benefit from additional improvement. Note that we consider both text (CRL) and pictures (screen caps/reference images) when reviewing submissions Besides the items already noted, I have only two additional items. First, it could just be a shadow, but it looks like you may have a very slight overlap between the back and kidney. It's not so much as to block Centurion, but worth noting if you're really looking for that sleek look. Reference Image: Finally, it does still look like you could drop your left bicep (and forearm) a cm or two to really dial in the symmetry. It's especially obvious if you note the larger gap between the forearm and wrist on your left arm. Reference Image: And that's it! When we can finally get out and troop, I hope you will wear your armor very proudly. Please accept our congratulations in reaching Centurion!1 point
-
Nice dude! I think you're like literally just a few days ahead of me or near on my pace! I plan on doing my strapping very similar as well. How'd you attach the sniper knee, Velcro as well? Looking good!1 point
-
Some fantastic advice from @CableGuy there, Jonathan. Trimming them down just may do the trick! In looking at your overall build so far, I can definitely see a Centurion badge in your future should you wish to head there, but the thickness of those ears would have been a barrier. I realize that it is not specifically mentioned in the CRL, but for Levels 2 and 3 we consider source material (screen images) when doing approvals. Looking forward to seeing the updates!1 point
-
Don’t be angry at yourself, Jonathan. Ears can be a real pain! :-( Anyway, I’m sure you’ll learn from that and get the second pair sorted okay. On that note, you could consider reducing the size of the new ones when they arrive, unless the WTF ears are designed on the large side? Personally, I’d be tempted to try something like this;1 point
-
As you said, there's a good thing and it's only a plastic matter. Enjoy building your armor and consider in this project and in life, there'll be always challenges, fails and good things. Don't look back Trooper, keep on going ahead, you're doing an amazing work. Keep it up. .1 point
-
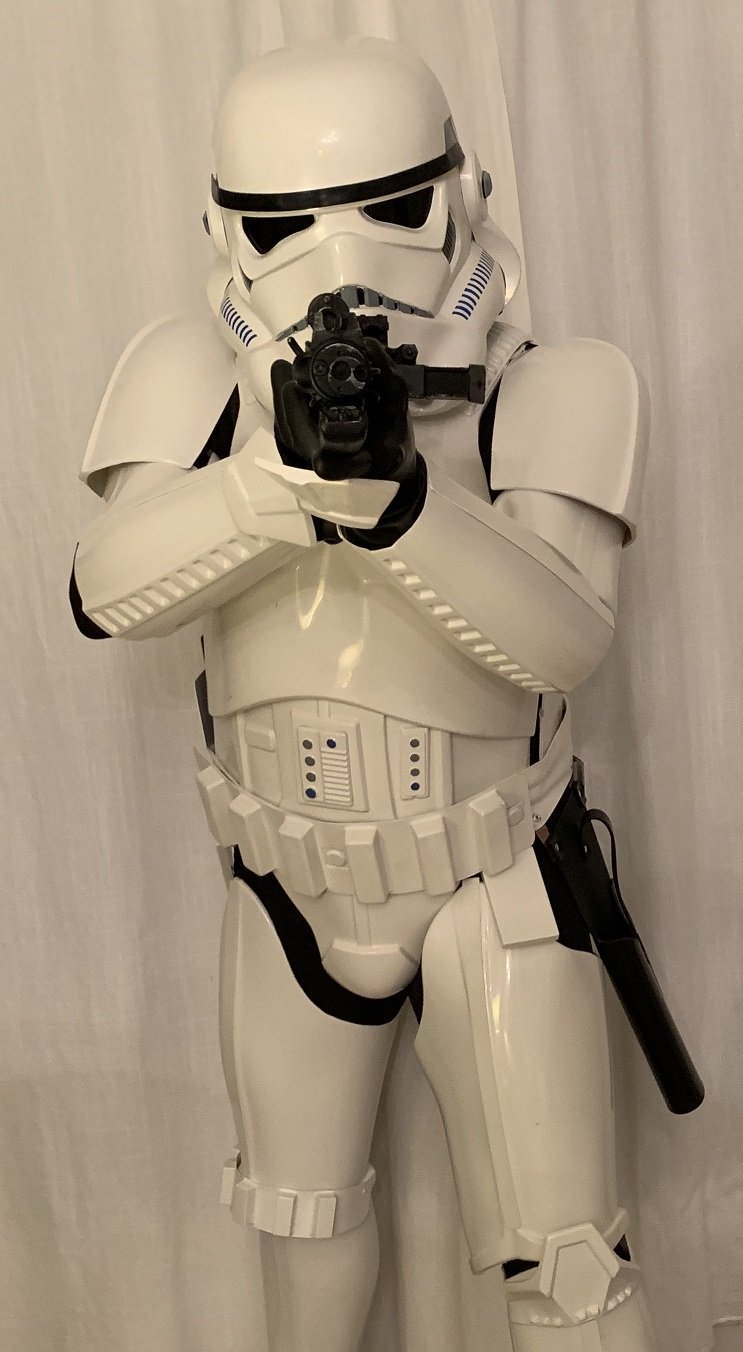
The armor build threads are terrifying!!! A million pieces of plastic in a big brown box? Yikes!! SO glad I went with a commission build! So I’m level 1 complete on purchases I think. - AM 4.5 Armor w/ bucket - neck thing (TrooperBay) - black undersuit (random online store) - canvas belt (Dave’s Darkside Depot - included w commission) - holster (Dave’s Darkside Depot - included w commission) - Gloves (TrooperBay) - boots (Imperial Boots) Anyone notice anything missing? I’ll need to decide on a blaster for level 2/3 And for future trooping I prolly overdid it with Ukswrath electronics for the helm. Mics and amps and speakers and hearing aids and fans. (Heck I hope my head will still fit inside!) Dang this shi! is exciting.1 point