
Leaderboard


Popular Content
Showing content with the highest reputation on 03/26/2020 in all areas
-
So it sounds like I have it set up pretty good, I need to go buy some needle files and do the teeth, but I should be able to rivet today, I’ll post an update when that’s done. Thank you everyone for your help3 points
-
It does look better. Try opening the window blinds and taking the pictures facing the opposite direction. My old-man eyes are struggling. Be wary of using that particular reference image - the "stop that ship" helmet has a particularly high brow and I believe the faceplate is slightly recessed compared to others.2 points
-
Took a little time this morning to do the modification to my MiCom setup. It came with a 8-button pad with an elastic strap to go around your hand. This works well with a bare hand but with my glove on and the buttons being so close on the board made it difficult to trigger the correct ones. Taking an idea from other push-button setups, I took the board out of the equation and added separate push-buttons that I will be attaching to small elastic loops that will go on my fingers, two on each finger. Sent from my iPhone using Tapatalk2 points
-
Hey all. pretty much finished my helmet! Big step forward. All it needs done it putting on the s-trim/mesh and putting in the head mount. It also needs to have a clean wipe to get all of the grime off of it. Photos here: What do you think needs to be touched up / fixed / adjusted? Go as hard as you want, I want this thing to be done and dusted for approval! Thank you2 points
-
Ok, so maybe I won’t wait to post pics.. Just drilled the holes and test fit the corner pieces. Is there a proper name for these? I think they’re supposed to be lights.. have yet to see them light up on screen. I’m liking how this turned out. Pretty clean looking even with the bolts and nuts. Way more work than I wanted to do, but I had to work with the parts I got. I’m using 5/16-18x1-1/2 nylon bolts with nylon nuts and washers. Same hardware I used on the ab boxes. Just have to complete mounting the trim and glass next. Then figure out what I want to do on the rear with the strap and handle. Finished applying, what I hope is, the last coat of XTC-3D on the trim pieces. I sanded them down and found a few spots that needed leveling out. Once dry I should be able to mount everything. Sent from my iPhone using Tapatalk2 points
-
I see this topic come up a lot and I have not seen a comparison so I thought I would do one. Please keep in mind that my knowledge on this subject is limited and I do not have any experience with OT TKs. So the obvious… Rogue One TKs are more detailed than OT. As far as I know, all the OT TKs were vacuum formed in High Impact Poly Styrene (HIPS). This process requires a buck (mold) that heated plastic is laid over then sucked to the buck by vacuum. This is a fast and efficient method of mass producing these costumes; however, the trade off is that all detail is minimalized and designed so that the formed plastic can be removed without damaging the buck. For this reason, parts like the helmet and forearms are formed in parts rather than one solid object. Consider an ANH forearm, the rectangle details are not very well defined. There are 2 parts to the forearm. One part has the rectangles and the other does not. The two parts are glued together and then cover strips of plastic are used to hide the seams. Rogue One TKs are were not vacuum formed. I have heard (although I do not know for sure) that the RO TKs were injection molded. This process requires a 2 or more-sided mold that is completely closed off then heated liquid plastic is injected into the mold. Once the plastic is cured, the mold is opened, and the parts removed. This process allows for thicker and more detailed parts. So both the OT and the RO stormtroopers armor are made from plastic but the RO version is thicker and more detailed. Yes there are differences between ANH, ESB, and ROTJ TK’s but for the most part, the process of making the armor was the same. RO, Solo, and some of The Mandalorian TKs were made to the RO standard. Another consideration in comparing the two types TKs is the methods of assembly and strapping. There is a ton of reference material on how the OT TKs were assembled. There are very specific requirements in the CRLs as to what type of snaps, straps, Velcro, and rivets are used and how they are used. Oddly enough we have less information about how the RO TK is assembled and strapped. One of the best sources I have found for RO TKs is the images from Celebration Europe 2016. In these images we can see Velcro in various places as well as some sort of plastic hook lines connecting the shoulder bells to the biceps. Regardless, the 501st CRLs for RO TKs does not specify how the TK is strapped as long as the strapping is not visible with the exception of the drop boxes and the thighs. It would be awesome if someone who has some contacts with LFL could get some more detailed information and pictures since there is no reason for this information to remain secret this long after RO, I digress. Additionally, there are significant differences in the soft parts of the costume. OT TKs have a neck seal and a black one or two-part undersuit. The undersuit has no detail and most of the people I know who have OT TKs wear under armor. The gloves were rubber military chemical gloves and the boots were slip on brown chelsea boots dyed white. RO TKs have a undersuit that has ribbed fabric at most of the joints and the neck seal. The top shirt has hex mesh in the armpits and the ribbed fabric runs from the top of the neck seal to mid chest. The ribbed fabric must be stitched between the ribs. The boots are the same as the FO boots with a flat sole and side zipper. The gloves are also the same as the FO; although they are all black with leather patches and gridded fabric similar to a mechanics brand glove. Lastly, the OT Tks had holsters and their E-11s are slightly different from the RO E-11. RO TKs did not have holsters. I suspect that it would be difficult to holster the E-11 with a tac-light on the side of it. So lets look at some comparison pictures. These were taking at the ROSW premier. On the left is a member of my Garrison (TK 41808) in his RS Prop Masters ANH Stunt. On the right is me (TK 20980) in my Jimmiroquai RO. Initially, we look very similar; however, closer inspection reveals the level of detail, shape, construction in each part. So, let’s start at the top and work out way down. The helmet: On the left is an OT TK from ANH, on the right is my ROTK helmet. One of the most talked about parts of the helmet is the infamous eye bump. Look at the right eye on the OT helmet, notice the bump along the bottom of the eye just left of the nose? That is the eye bump. All of the bucks for the OT helmets were hand sculpted and it is unclear if this bump was in the original buck or if it is a result of the vacuum forming process; however, what we do know is that the helmets are not symmetrical. RO helmets are symmetrical and although some people swear, they can see the eye bump, I do not see it on the RO helmet. Moving on, the frown is more pronounced on the OT helmet. The number of visible teeth is also an issue. There are images from ANH that show between 6 and 10 teeth. RO helmets have only 7 individual teeth backed by a dark grey mesh. Another difference is the height of the brow trim above the eyes. The brow trim on the OT helmet fits on the edge of the top dome and is adjustable. I believe the proper gap is about ¼” while the gap on the RO helmet is about 1/8”. It is unclear if the brow trim on the RO helmet is actually separate or painted on. On my helmet it is molded into the helmet and I painted it. I should note that is on of the things that must be modified on the Black Series helmet to make it CRL compliant. The gap on the black series is closer to an OT gap. Lastly, the V-coder on the OT helmet is a molded part that is painted. On the RO helmet, the V-coder is a separate part and there must be a visible gap at the bulbous part of the V-coder and the helmet. Looking at the sides of the helmets, the OT tear traps are a simple depression that is painted. The vent lines are painted as is the black outline. The same is true for the temple boxes, although there are no vent lines in the temple boxes. On the RO helmet, the tear traps are also depressed; however, there is a raised portion in the center that is painted grey and the vent lines are cut out (engraved) in this raised portion. I suspect on the screen used helmets the depression is painted black and the raised portion is a glued in part that has the vent lines cut out. On my helmet, I cut the vents out completely and backed them black breathable fabric. The temple boxes on the RO helmet also have a raised portion that is painted grey and just like the OT, there are no vent lines. I have seen a gap between the end of the brown trim and the top of the ear cap on some OT helmets. On the RO, the brow trim comes past the temple box and terminates at the center of the ear cap. There is no gap between the brow trim and the ear cap and the brow trim terminates at an angle. The OT ear caps have visible flat head pan screws (3 of them) and the CRLs require them. These screws actually hold the helmet together connecting the front and back halves and attaching the ear caps over the seams. On the RO ear caps, the screws (2 of them) are molded in and are non-functional. Additionally, the ear bumps on the OT helmets are different. The RO ear bumps are all the same and a very different design from the OT. The outer circle of the ear cap as well as the ear bumps are more detailed and defined on the RO helmet. Lastly, the blue tube stripes on the OT helmet is either a decal or painted on. On the RO helmet the tube stripes are completely cut out and for the screen used helmets, they were backed with blue painters’ tape. On my helmet I backed the stripes with a blue breathable fabric. The back of both helmets are very similar. On the OT helmet the rear boxes are more trapezoidal rounded in the corners, the box is a depression that is painted grey and again the vent lines are painted. On the RO helmet, the boxes are more rectangular and again they are depressed with a raised portion that is painted grey with vent lines cut out. Again, I believe the screen used helmets had a depression that was painted black and additional parts with the vent lines cut out was painted grey and glued in place. On my helmet, these vent lines are cut out and backed with a black fabric. On the black series helmet, there is a battery box and speaker that must be modified for approval. Although the shape of both helmets are very similar, there are some minor differences. The RO helmet looks thinner overall. On the black series I had to extend the jaw line about 1.5” to fit a proper RO V-coder. The Hovi mics on the RO are exactly the same as the ANH Hovi mics with white interiors and the proper mesh screen. The lenses on the RO are also the same as the ANH lenses, green. If you are considering a ROTK, there are several options for helmets available to you. The least amount of work would be a Jimmiroquai helmet and the largest about of work would be modifying a black series helmet. I have a tutorial for the modifications I recommend in the RO thread. I do not recommend attempting to convert an OT helmet to a RO helmet, but I guess anything is possible. Next, I will be comparing the upper torso and arms. Thanks for the interest.1 point
-
I love work arounds, if you get time it would be great to see a short demo video once you get this sorted.1 point
-
Hi all. Matthew from Florida (USA) here. Been a fan of Star Wars since first release; I was 19 and watched it 20 times in theater in 1977 (yea long time nerd). My son and I are starting a mandalorian incinerator build, which is how we discovered this organization. It looks like there is no CRL for this variant and I a quick search doesn’t show any in the works. Questions: If there is nothing in the works which forum should I start my build project in? Incinerator Trooper Forum Rogue One forum (since mando incinerator armor is clearly Rogue One) Thanks!!1 point
-
My eyes are clearly as old as yours... More examples here; https://www.whitearmor.net/forum/topic/48293-anh-helmet-alignment/1 point
-
Here there are a couple of references that i think may be helpful. :1 point
-
You're right, thanks for the advice.1 point
-
This will push the eyes into the brow. Personally, I feel that this would take away from the current appearance. Current alignment looks pretty close. :-)1 point
-
Excellent work, Thomas. Great to hear that you’re really aiming high. To that end, I’d throw in some potential suggestions; As in a previous post, you could look at the eyes. The originals were cut with a sharp blade so had nice sharp corners and cut lines. The majority of screen used stunt helmets had a fuller vocoder. As such, bars 2 and 6 could be extended. For more reference material on the vocoder, here’s a thread that I put together a little while back; https://www.whitearmor.net/forum/topic/48252-anh-tk-vocoder-examples/ Keep yo the good work. :-) Dan1 point
-
Like a bought one, nice job.1 point
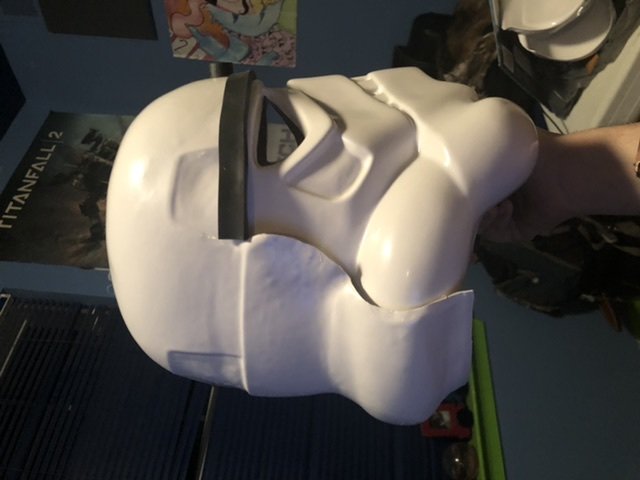
-
Updated cuts and brow fitment, what ya think?
 1 point
 -
Hi Thomas, welcome to FISD. I would like to recommend you the following Forum Thread, It would be so useful for this challenging part of your project. Be sure to post some photos of your build to receive some feedback before trimming or gluing. This one would help also. Hope this can help. Cheers1 point
-
Tried to put on the D-ring today, drilled with a dremel, bent the ring open and when trying to force it into the holes, broke the holes. Fortunatly found all the pieces and glued them back on with E6000. Will probably paint tomorrow.1 point
-
I believe that's because the visor in game reflects light ALOT. Id say Dark Blue, Dark Grey, or Black could be used. We ended us going with Black for this one.1 point
-
Looks good. What color do you use for the eye lens? The ref photos seem to show everything from grey, to light blue and black.1 point
-
https://imgur.com/a/Gr3riYn https://imgur.com/a/EU7cwCF Printed and painted by my good friend at @insider.propshop (instagram). Should be sent over soon, but with current events who knows. Ill be adding the 501st marking and weathering myself when it arrives :)1 point
-
That's a sensational effort David, congratulations.1 point
-
Hello all. is this gap alright for the back of the calves? is the overlap too much?1 point


