Leaderboard


Popular Content
Showing content with the highest reputation on 01/18/2020 in Posts
-
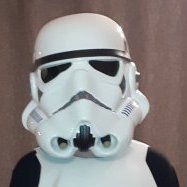
Hello everyone! After a grueling wait I received my 3D-Props DLT-19! I'll be starting with some photo's of everything you get, and will then go onto the build. Along with the basic build of the gun I will be adding the Blast-FX system that I purchase a few months ago. So, this should get interesting. Before I begin I do have to put in one disclaimer, and a review on this build. I am a military Flight Engineer Instructor and when we instruct new students, we have ways of providing new students what we call Constructive Criticism, or Points to Improve Upon. It is a way of pointing out errors to students in hopes that they improve on future flying lessons. It is not meant to bash students, but it is an honest way to try and help them. I will use the same technique to address some issues I had with 3D-Props in hopes that they (Eelco Sanders) can improve their customer service. I write this fully knowing this is a one man operation, and that we should expect some delays in a garage business. At some points in the last 7 months I was truly frustrated with 3D-Props, and held off writing a nasty review, in case Eelco decided to cancel my order and keep my money: POLICY:I DO NOT ACCEPT RETURNS OR CANCELLATION I will be going onto Etsy and his website to provide an honest review of my experience with 3D-Props so that other potential customers know what they are getting into. I then cooled down and went back to my training. I decided to wait until I got my package and then write this review. I placed my order for a DLT-19, paying IN FULL, through his website on 11 June of 2019. The disclaimer on his page stated: MADE ON ORDER - CHECK CURRENT WAITING / SHIPPING TIME Shipping time is determined by the number of orders in queue. 8-9 weeks1 1 Applies to shipping within Netherlands. Information about shipping policies for other countries can be found here: General shipping information Thank you for buying our product, if the product was out of stock it means it will be made on order. This takes around 8-9 weeks due to the amount of pending orders. https://www.3d-props.com/about-1/ After placing my order and waiting 3 months (Sept 2019) I emailed Eelco. It took a couple tries (with an automated email response) and he finally got back to me, stating he was busy but would get to my order. I emailed once again on 04 Nov, and he stated he was in the middle of a DLT print run and would mine done in a week. By 03 Jan 2020 I had still not received my DLT and emailed Eelco explaining that I understood he was busy, but it had been 7 months and I had not received my order after . He got back to me right away and my DLT shipped within 2 days. I received it on16 Jan 2020. So, start to finish it took almost exactly 7 months to get my order. I did read on FB he was having issues with production due to volume of orders and he was a one man operation. My simple solution for this: Change the disclaimer on your website and state an order can take 6 months or longer to fill. So my overall impressions don't get lost at the end of this post and a ton of photo's, here is score: Quality of 3D printing: 4.5 / 5 My first experience with 3D printed items. I'm not sure if some of the raised ridges could be improved upon. Minor flash and excess material on some parts. I have seen posts of what can be made of this kit and it is outstanding. Quality of material: 5/5 Looks sturdy and will hopefully stand up to lots of Trooping Ease of assembly: 0 / 5 There are NO instructions for something detailed and consisting of 84 parts. Thankfully, I have very good knowledge of GPMG's (but not MG-34's) and due to my model building / aircraft maintenance technical skills I can figure stuff out, but the exclusion of basic assembly instructions or diagrams is puzzling and dis-heartening. I understand there is this fantastic Forum and awesome Trooper help out there, but I personally think this is unacceptable Customer service: 1 / 5 I gave him a token 1 because he is a one man shop, doing the best he can, and others state he is a good person. It's just my personal dealings with him that bring down his score. I honestly hope he improves and continues to put out good products. I would even order from him again, IF (Big if!!!!) he could deliver in a timely manner. Okay. enough preaching. Onto the pics!!! Sorry for some grainy shots. My crappy point and shoot... MBB (medium brown box) All the stuff. Charlie is waiting for a box fort... Included 2 posters. would have preferred instructions... Strike off pack sheets for shipment? Nice customs explanation form All the parts. 62 parts Plastic and metal. 22 parts Hardware Parts broken down for reference by colour. For future help from Troopers (Joseph ….) I posted on my TK build page about not knowing what half these parts were, and Joseph got back stating to post pics and he could help ID them for the build. I took a page from my modelbuilding expertise and will label everything as follow: "O" = Orange "W" = White "B" = Black "H" = Hardware Two main assemblies, Upper / lower receiver with butt, and barrel assembly. This is how it is when shipped: Upper receiver feed cover (the long grey piece behind the orange rectangle) is removeable. Butt can be removed, as well as one or two other pieces. They all slip onto a grey PVC pipe that is used for main structural support: Barrel assembly includes a length of aluminum tube, and 5 pieces that slip on: Top of upper receiver: Bipod and pistol grip parts. Bipod can be pivot opened or closed: Grip has a "working" trigger mechanism with reset spring, Comes assembled: Bipod printing ridge details. Not really that bad: Feed cover ridges. Rearward portion of cover: Forward portion of cover, near where the removal pin would be and where it pivots upward: Puppy break: Flash hider: Gas plug(maybe....?) detail: Upper receiver barrel attachment point: Trigger details: Ahhhhh man...….: "O" Parts: Some O part detail shots. Not sure what some are, or how smooth all these will have to be sanded: Bipod leg ridges. Very minor: "B" Parts: Grip details: Cool! Rear graduated sight out to 2000 Meters LOL WTf is this? is this And this? "W" Parts: Are the steps supposed to be there? Reference pics of finished and painted parts would be nice...: "H" Parts: That's it for now. Overall I'm happy with the product.3 points
-
Perhaps it's a bit early to make this topic, though in my mind I feel its good to get things right... before the boxes come! A good use of time, since there's currently a snowstorm. Coming in.... R1 TK Hard Armor kit - ABS Plastic - 850 Armorworks - 2/11/20 Estimated ship R1 TK Helmet kit - Hybrid Urethene / Polyester Resin - Headshot Props - 2/4/20 Estimated ship (Yes I'm aware about them) E-11 prebuild - Aluminum, Resin, Plastic - QuestDesignCanada - 3/28/20 (will need "upgrades" for R1. D-Ring, Counter, Flashlight) R1 TK Gloves - Leather - Endorfinders - 1/24/20 Estimate Arrived 1/23/20! Helmet Lens Plastic -TrooperBay - 1/25/20 Estimate Arrived 1/25/20 Frown Mesh Wiremesh -TrooperBay - 1/25/20 Estimate Arrived 1/25/20 Helmet Brow Rubber -TrooperBay - 1/25/20 Estimate Arrived 1/25/20 Helm S Seal Rubber -TrooperBay - 1/25/20 Estimate Arrived 1/25/20 1P Undersuit Cotton/Lycra -ExtremeRacing - 2/1/20 Estimate On the Todo / Looking into / to Order list: R1 TK Gloves - Leather - Endorfinders Undersuit.... Any recommendations? Neck seal... Contacted GeekyPink with some Qs, their products look great. Balaclava... I own some winter balaclavas, though they're... for winter.... should this be tight fitting or loose? The one I have is tight and a bit thick. Knee Gaskets.. Depends on undersuit. R1 TK boots -Leather -Imperial Boots (Reminder set for 12am Feburary to make an order) TK Belt -Canvas -Imperial Issue [CRL States BELT SHALL BE MADE IN PLASTIC / 2 PART PLASTIC, included with 850 Armorwork kit.] Helmet Lens... Trooperbay or Amazon/Ebay for dark green face-shields lens. Harness... Possibly GeekyPink or just wear black suspenders. Paints - Full automotive Primers, Flat, Gloss, paints. (Local) Gonna touch base with my father on this, as he's a current Car Salesman, former Mechanic and Bodyshop worker. Strap/ Hookups.. Elastic straps with snap buttons Teeth mesh... Easy to find in local stores. Same goes for the Hovi Mix Tips (Hovi Tip Covers still needed) Brow trim... Rubber bar from local stores.. Anyone have reference on how much the brow protrudes? ABS plastic... Hoping to use the 'scrap' from the Armor kit for details like the Tube stripe blue indents. Aswell as re-enforcement if needed. If not, then Buying a sheet off of amazon. Most of the small stuff here, like glue and buying more clamps Travel container... Looking into it. Local Garrison suggests 50 gallon Husky 37 inch wheeled container. Purchased! Helmet lining... Home made using foam and leather Onboard mic... Possibly iComm from TK6294. Hide it underneath all the clothing / chestplate. Helmet AC... Something I plan to look into later. I've never really had an overheat issue with my head in previous costumes with thermal wear. (regular clothes + insulated bodysuit + biker pads). Concerning fogged up lens, usually id coat them with a AntiFog agent / Ceramic spray. Lasts a few hours, though temporary. M300A Mini Scout Light.... would this work? https://www.ebay.com/itm/Element-Airsoft-M300A-Mini-Scout-Flashlight-Black-180-Lumens-EX-191-/141610520007 E-Web Heavy Repeating Blaster... out of the price range Anything I'm missing? My workshop and dremel have been ready. Also worth noting I've been in contact with my local garrison, have been very welcoming and eager to help if needed! Goal: Complete before July 2020. 5 months of building. Acceptance into 501st eventually leading to Level 3.3 points
-
The whole point was to create a sheer scale of troopers. They actually created in excess of 120+ kits for the production - many, many more than the FO troopers. There were some big scenes filmed with these troopers and hopefully they’ll feature in either the touted Director’s Cut or the deleted scenes. Sent from my iPhone using Tapatalk Pro3 points
-
Greetings troopers! I am pleased to announce that the updates to the TFA and ROTJ TK CRLs are now live! For more information: https://www.501st.com/forum/viewtopic.php?f=29&t=91327&p=1334021#p13340212 points
-
Having previously built a version of Germain’s awesome TFA SE-44C back in 2017 I was keen to upgrade to a TLJ version. The decision coincided with the approval of my TLJ kit, and an impending cast event for Disney/LFL. Having seen the thread by Wilson of The Imperial Factory it was a no-brainer that I would buy one of their SLA kits, and once it arrived (very quickly I may add) I knew I had made the right decision. The kit was well packed and arrived intact. The detail of the kit was UNBELIEVABLE! I’ve bought some great prints before but nothing prepared me for the quality of this. For preparation I did nothing more than give the parts a light rinse and dry prior to moving to the prime and paint stage, both of which laid down nice and smooth. I decided to build the kit using the recommended springs, pins and screws to add the extra layer of detail to the blaster. And as parts became finished I moved to the gluing and finishing stage. I considered using some red Perspex for the small light, and also considered a Lego 2x1 piece but it is slightly oversized. Finally I settled on painting the piece with Toyota 3E5 Super Red - a colour I had lying around thanks to my Mudtrooper build. The colour looked great and gave the piece a nice punchy look against the black. I had an aluminium bracket lying around which I had purchased some time ago. It was the perfect addition to an already fantastic kit. And once all the correct security tied screws had been added the blaster was ready to go. Despite some challenging weather conditions including bushfire smoke and ash I was able to paint, build snd finish this kit within a matter of days. It was such a pleasure to build and I thoroughly enjoyed the process. If I were to build this blaster again - and I’m tempted - I would definitely request the body of the pistol be supplied with the grip as a separate piece. It would make the painting process even easier. So having completed this blaster I am now ready to update my F-11D, and there’s no question about who I’ll be using. Between Germain’s design and The Imperial Factory’s quality product, it’s a truly winning combination. Sent from my iPhone using Tapatalk Pro2 points
-
My blaster weighs 1lb 10oz or 752 grams. Sent from my Pixel 3 using Tapatalk2 points
-
I love how this photo has more then the actual movie lol Sent from my iPhone using Tapatalk2 points
-
While we wait for the armor to arrive I uploaded photos from my SE-44C Side-arm build. I also wanted to share the items I've already acquired. I am extremely impressed with the quality of the boots from Imperial Boots and Gloves from Endor Finders. Both feel high quality and fit great and as far as I can tell they are accurate to the current CRL.
.jpg.4054f3ddaf849bf3f2ff51ef8c4e5a11.jpg) 2 points
2 points -
Did restrapping for back and front today to make the gaps smaller and sit better for all pieces. Waiting on new glue to change butt plate strap locations to stop sag and gap. Sent from my iPhone using Tapatalk2 points
-
Got a few more hours in over the past days. Belt and thermal det are finished. Have been reading about cover strips and the different widths. Started work on the right arm. Lots of trial fits with masking tape and have glued up.1 point
-
Thanks for that! I was just confused! I'll be updating the pictures in a little bit! Just got done taking them!1 point
-
Dang, this is amazing! Great work1 point
-
Yep, no need to replace anything out of Mark's kit if you don't want to. Well, the only thing I would recommend changing out is the green visor Mark supplies. Although it is more screen accurate, it does not do a very good job of hiding your face when people are up close and personal or taking pictures with flashes. I ended up getting a green visor from TrooperBay - it was much darker and does a great job of hiding your face.1 point
-
The AP belt and holster will get you all the way to level 3, Chris, so no worries there.1 point
-
This is awesome Jorge, love it! Perhaps if you can find a little time you could add something in our 3D section about your Ender 3 pro the good and any bad and why you recommend it. That would be some great and valuable info for our members looking to get into printing for themselves. Great work.1 point
-
They’re delicious. A real delicacy. -Eric1 point
-
I am really loving these SLA prints, thanks for the share.1 point
-
Welcome aboard Zach, more FO goodness on the way I see. I’m excited for you. Sent from my iPhone using Tapatalk1 point
-
Rest assured the items from John and Vincent were created to be CRL ready [emoji1305] Sent from my iPhone using Tapatalk Pro1 point
-
that's correct.1 point
-
Looks good1 point
-
Before I start drilling...correct side? Right measurements? Please talk to me!!! 20mm from top, 10mm in. Same on bottom...middle mark is split distance. Sent from my iPhone using Tapatalk1 point
-
Ok, continuing with the abdominal plate. The front of the OT abdominal plate is one of the most detailed parts of the body armor. The groin plate is incorporated into the abdominal armor. In this picture I have several images to illustrate the details. In the top left is the inside (faces the body) of the abdominal plate. Note the return edge along the top, the return edge is present on a lot of the OT armor but not every part has a return edge. Also note the groin plate is all part of the same piece, it is not a separate part. The two detail parts, the center box with 5 button discs and horizontal lines, and the side 4 button box are parts that are glued to the abdominal plate. The bottom left image is the front of an unfinished abdominal plate where you can see that the center box has not been attached. The center image is a completed OT front abdominal plate and the two right images are close ups of the detail parts. Notice the other raised detail in the abdominal plate and how the edges are not as drastic as the edge detail we will see on the RO abdominal plate, again this is the result of vacuum forming. In the image above from ANH, you can see how the chest plate sits on top of the abdominal plate. The ammunition belt sits on top of the abdominal plate and is attached with snaps. The ammunition belt is constructed from a single piece of vacuum formed plastic that is trimmed. This piece is about 3” wide and all six ammunition boxes are formed with this part. The belt is attached to a white cotton belt that you observed in the back-side images. Additionally, there are two drop boxes that are made from 4 vacuum formed rectangles and are suspended from the ammunition belt with white elastic. In these images you can also see the attachment of the holster. The front of the RO abdominal plate is significantly more detailed. In the two images above you can see the vertical raised lines and how much more defined they are from the OT abdominal plate. Additionally, notice the three detailed sections. First, on the left there is a raised rectangle with three horizontal raised lines. Next is the center raised rectangle that starts from the abdominal armor with an angled top. Then there is another raised rectangle inset with the 4 discs on the left side and raised ridges on the right. Notice the detail of the depressed rectangle above the ridges. Even the discs have a raised outline. The raised rectangle on the right side of the abdominal plate has similar staggered detail. Lastly, there are two depressed vertical boxes in the center above the large center detail box. The RO ammunition belt is also very different from the OT. The belt is plastic and has a front and back section. The back overlaps the front belt on the sides and looks to be connect with Velcro. The front belt is about ¼” thick and has teeth along the top that align and lock (like gear teeth) between the raised vertical segments of the abdominal armor. The bottom front of the belt protrudes below the two center boxes and then tapers at an angle to a uniform belt height the same as the back belt. On the front belt there are six ammunition boxes like the OT belt; however, not all of these boxes are the same size or shape. The two center boxes are simple rectangles with beveled edges. The next two boxes are rectangles but slightly wider and have a unique angled top with beveled edges. Next the two outermost boxes are larger nearly square boxes with beveled edges. Lastly, the two drop boxes are larger rectangles similar to the OT drop boxes, but the RO drop boxes have beveled edges and are suspended by black 1” Velcro or nylon straps. And that is it for now. More to come and thanks for the interest.1 point
-
Thanks for the welcome folks. Feeling a little less nervous about getting into all this Hah I may have to get a Stormsurgeon pauldron just for kicks and giggles. To be fair at least the medics have better accuracy than most troopers Sounds like a few you guys mix-and- match parts eh? I've got about $1500 saved up. The only thing I'm weary is having to probably add shims and making it all flush, I'm not particularly much of a handyman- then again I suppose a dremmel, scrap test parts and youtube ought to at least help out.1 point
-
Haha! I know right. You guys are currently up to date. That was almost 2 months of printing. Get your TK first then buy a 3D printer. Honestly it’s a lot of fun and I definitely recommend the Ender 3 pro. It’s been nothing but good times. Sent from my iPhone using Tapatalk1 point
-
I'll keep updates here, so following this thread to keep up-to-date on any posts I'd make1 point
-
Not sure where they got their model from but there are some unusual details. I’ve created a couple of SE-44Cs now and by far the best kit came from The Imperial Factory (Facebook). It’s an SLA print. Lightweight yet sturdy. No sanding whatsoever. Incredible detail and so much fun to paint. Sent from my iPhone using Tapatalk Pro1 point
-
Hey, that wasn't so bad. See, just keep swimming, just keep swimming... And I printed and purchased some eye balls. I even started to glue! This is my first pieces glued together. I will be cutting a styrene top for the dome. I have a periscope and side doors to print to be fully complete with this dome but not needed at the moment to get this guy going. I'm off to start printing the skins for this dude.1 point