Leaderboard


Popular Content
Showing content with the highest reputation on 12/08/2019 in all areas
-
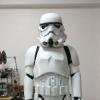
Slowly but surely getting close to getting this thing complete. Tested out the strapping of the upper body and got some pics.3 points
-
As the Boy Scout motto says, "Be prepared". In most cases, if taken care of a well built set of armor should last a long, long time. Inspecting the various components before an event is suggested, but when the inevitable "Oh crap" moments occur having things at-the-ready can really help. Not just for you, but for a fellow trooper as well! The following is a list of suggested items to have with you for "wardrobe malfunctions" which happen to many of us during a troop. I'm not saying you have to have each and every item shown below, so the choices are yours for what to include. 1. Gaffer's ("gaffa") tape (white/2" (5 cm) wide: This is a heavy cotton cloth tape with great adhesive properties, and is widely used in theatre, film and television productions. Although strong, it can be torn by hand as needed, leaves little or no residue and will generally not damage most surfaces. If you look closely, it was used a LOT in the first SW films, and is a good temporary fix for cracks/splits. -- alternatively -- 2. Duct tape (white/2" (5 cm) wide: Everyone knows it has a powerful adhesive property and super strength, but it leaves behind a strong, sticky residue which can be difficult to remove, especially if left on for extended periods. Rubbing alcohol, Goo Gone or even cooking oil can remove it, but it is not easy so therefore is not suggested. In case you have a strapping issue (snaps pop out, strap disconnects from an armor piece, etc.) it's not a huge deal if you are prepared. Installing/setting snaps in the field is not always possible (unless you have a hammer/snap setting device) and can take time. Though temporary, a quicker alternative is to use nylon strapping (you probably have a few feet left over from your build) cut to length with Velcro (cut to size) in lieu of the snaps. 3. Black 2" (5 cm) wide nylon strapping 2' (60 cm) long: Black 1" (2.5 cm) wide nylon strapping 2' (60 cm) long. Industrial Strength Velcro *** (2" x 4" sections) *** Although very strong, it will a leave residue from the adhesive backing. This can be removed from your armor with Goo-Gone or a similar product. NOTE: If you want to be extra prepared, having lengths of other materials (nylon.elastic, white Velcro etc.) used in your build are encouraged. 4. CA (Super) Glue (Single use sizes) 5. Zip-Kicker I am not a fan of using CA glue on any armor part, but in an emergency it can certainly come in handy. If needed, I highly suggest using the GEL type, as it will not run like the regular type does. Available at most craft and "Dollar" stores. Zip Kicker is an accelerant that will set CA glue instantly. There are other name brands, but I used this one as an example. Available in a spray or aerosol. 6. Razor knife 7. Lexan scissors 8. Sanding sponge Having a sharp razor knife on hand will come in handy for many things, including cutting strapping, Velcro, etc. For safety, I recommend the folding type as seen below, and always have a new blade in it. Dull blades are useless. Be CAREFUL when cutting. As TKs, we are not known for our shooting accuracy, especially when missing our trigger finger. Lexan scissors are great for cutting/trimming ABS, especially if you need to cut shims for cracks/splits (see below). Do NOT use these to cut Industrial Strength Velcro. The adhesive will gum up the blades. A sanding sponge is perfect to have in case you need to smooth out any rough edges that may be cutting into you or snagging your under suit. Scrap ABS A piece of scrap ABS about 2" x 6" can be used to make emergency shims for cracks. Just cut it to the width/length needed and CA glue it to the inside of the affected area. 9. USB battery charger/power supply 10. Batteries Whether you use the rechargeable USB type or regular type for your fan system, etc. having a backup is always a good idea. 11. Screwdriver (multi-bit) 12. Small pliers Although these may only be needed for those with the "classic" strapping system, they can be used to tighten helmet screws and such. I have loaned mine to those with costumes from Lord Vader to Boba Fett on troops. It's better to "have em' and not need em' than need em' and not have em'". I have the "stubby" type screwdriver as seen below, as it takes up less room and all the bits are stored in the handle. 13. Lens de-fogger Even if using a good fan system in your bucket, you can still get fogged lenses. Not only is it annoying, it's dangerous, as our field of vision is not the best to begin with. You can purchase a product designed to prevent this, or (as I do) rub a bit of shaving cream (foam type) inside and polish it out before each troop. Your choice. 14. Magic Eraser 15. Paint pens For minor scuffs on shiny white armor the Magic erasers really do the trick. A single one will last a LONG time. Paint pens are a quick and easy fix for deeper scratches in your armor (white) or touch-ups on the ear bumps, etc. (black). I suggest the Acrylic type (not the oil based) paint as it can be more easily removed if/when needed. 16. Adhesive bandages It happens. Cuts, armor bite, blisters, etc. I suggest having a few of each in various sizes, especially as they don't take up much room. 17. Disinfecting wipes Let's face it. We wear compression suits and plastic so we sweat, and sweat can smell bad. To keep my bin from having the aroma of a gym locker I use these to wipe down my armor before putting it away after each use. Your fellow trooping mates (and the public) will thank you. 18: Cleaner/Polish No Matter how careful you are with your armor, you are going to get scratches or scuffs. It happens. One way of dealing with it is to use a product that cleans and shines all at one time. Although I have not used it (yet), this product has high reviews: Link and reviews here. Thank you to Greg @Oldracer for this tip! Now, there are a lot of other items that I have seen people carry.... electrical tape, a hammer, snap setting tool, safety pins, files, etc. It all depends on your particular needs and how much room you have, but most of the above items will fit together in a medium sized plastic container. Please feel free to add anything that you feel may help, and happy trooping!1 point
-
Really depends what paint has been used, if water based you may be able to wash with warm soapy detergent. If that doesn't work as Rat mentioned try some mineral turps. Painting the whole armor will be fine BUT you will find that areas will get scuffed and the paint will rub off. If you do paint I would try to sand most of the dark weathering off first, using wet and dry @ 240 grit then prime and sand lightly with a 600 grit prior to paint. A big job and you'd have to toss up weather the cost of paint makes it feasible or is it worth turning into a zombie (death trooper)1 point
-
Coming along nicely, yes you can trim the shoulder straps some more1 point
-
Thank you all for your feedback thus far. I'm busy preparing for two troops this afternoon; I'll need to clean up my kit and set the lights / backdrop back up - but I'll get these photographs taken and posted for you as soon as I can. Have a great weekend everyone. Cheers.1 point
-
You can put the ab/kidney strapping anywhere that it fits, as it's inside and will not affect approval at any level. They don't make flatter snaps, which is why I suggest mounting the snaps in heavy nylon. ABS is flat, which can prevent them from conforming to the curves completely and can result in an uneven or weak bond in some cases, I have a tutorial here that explains it a bit better. For rivets, just be sure the placement is correct before adding strapping. Note that the measurements are from the center of the rivet. Rivets on both kidney and ab should line up horizontally.1 point
-
Erick Spader 35811 EIB Letter Sha Sha http://www.whitearmor.net/eib/certificates/35811-eib.png 2711 point
-
Way to go Erick, and I hope to see that Centurion submission soon!1 point
-
The blastpointprops is a fine looking weapon, but it's not a Doopydoos. There are a few differences that set it apart, like the corners on the Hengstler counter, the front of the folding stock, front sight, and no raised area where you would find the number cover plate. I'm not a fan of the wires, but EXCELLENT job on that scope weathering! Although Han and Luke used blasters with no Hengstler counter, power cylinders and a different scope, there is not a "Hero" version, as other TKs sported these as well. For level 3 Hero, they must adhere to the current CRL and have those items, but can have either the M-38 or M19 scope. Luke Han Stunts I'm glad to see that the bolt in the fan built photo has serial numbers, (always nice to see someone going the extra mile) but the originals had 15 numbers. When it comes to blasters, the sky is the limit. Some choose just a basic model for trooping, some do upgrades, and some go all out toward accuracy with scratch or resin builds. Will the general public notice? Not most of the time, but some of us are borderline OCD (myself included) and go nuts with the details. It's a sickness, lol.1 point
-
Congrats Trooper! Both on EIB and the LFL! I’m a new recruit and have been following your journey these last couple of weeks. I haven’t read all of your thread and story yet, but have covered quite a bit of it. I hope to join you at EIB and Centurion in the new year! Sent from my iPhone using Tapatalk1 point
-
The final finished F11-D hope you enjoy the built as much as I do. If you would like a kit or engage me for a SLA print, do let me know. Cheers! Sent from my Redmi K20 Pro using Tapatalk1 point
-
Thank you so much!! I'm so proud of the work I have done and proud to be part of this amazing group!! I just saw this post and that's why it took me so long to respond. This just rounds out my amazing day. It started with finding I have been chosen for a very awesome LFL event and now I'm officially EIB!! Thank you all for your time and encouragement! See you at Centurion next!!! Sent from my Pixel 3 XL using Tapatalk1 point
-
Congratulations,[emoji324] brother-from-another-mother !!! I told you !!! Sent from my iPhone using Tapatalk1 point
-
Congratulations trooper1 point
-
Congratulations Erick! Welcome to the ranks of EIB brother!1 point
-
Congratulations trooper. Welcome to the rank of EIB.1 point
-
Hi Erick! Thanks so much for your application and for the quick turnaround with the frown paint and cod rivet fixes! You have a beautiful build that fits you really well. CRL and EIB Application Requirements All required photos are now in and, after review, we are pleased to welcome you to Expert Infantry rank. On behalf of the DO team and myself, many congratulations! Other-Armor Fit/Assembly In this area we review observations made by your fellow troopers and the DO team. Some observations may lead to suggestions to improve the overall look of your armor. Note that we consider both text (CRL) and pictures (screen caps/reference images) when reviewing submissions Starting from the top, a very minor suggestion to clip off the end of the brow trim, as it tended to stop before the edge of the trap: Reference Images: Moving along, a suggestion with your shoulder bridges. The screen-used armor had no large tab on the back of the shoulder tabs, so you could consider trimming it off if it wouldn't make your shoulder bridges too short: Reference Images: Next, you have a very slight overlap with your back and kidney plate on the right side. It's so small that it won't block for Centurion, but adjusting the strapping would give you that ultra clean look. I myself have uneven shoulders and had to make some adjustments to minimize the overlap as well. Reference Image: Next, from the front you can see that your kidney plate is just a touch wider than your ab plate. Some gentle heat bending might help them line up better. Reference Image: Finally, as was already pointed out, the TD screws should technically be closer to the ends of the clips. Nothing that will block approval, but worth mentioning for those who want to really match the screen-used armor: Reference Image: Centurion Requirements In this section we prepare you for Centurion. More photos may be requested in the future that allow us to make better decisions on possible adjustments. If there are any areas of concern they will be discussed here. Because Centurion photos show much more detail than EIB, items to pertaining to Centurion might be seen there and not here. We try to point out all that we can from what is seen, but the final accuracy is the responsibility of the trooper. Starting from the top, the L3 CRL states: There should be a minimal gap between the shoulder armor and the chest/back plates. Yours actually doesn't look too bad, but we think the gap can still be reduced. Shortening the strap connecting the shoulder bell to the shoulder elastic should bring the top closer to your chest. I also noticed that the bottom of your shoulder bells still appears to have quite a bit of return edge on them, so trimming that all off should let them sit closer to your chest and back. Reference Images: Next, the L3 CRL states: The top of the ABS ammo belt should sit at or just above the bottom of the central and vertical abdomen button panels. Yours is sitting a bit low so will need to be raised. I added two small strips of velcro to the front of my ab to keep my belt from sagging during troops. Reference Images: Next, the L3 CRL states: Hand guards shall be latex or latex-like, solid white or painted white, and affixed to rubber gloves with no visible strapping or stitching. Yours are ABS, so they'll have to be replaced with latex ones for Centurion. There are a couple folks on the boards who sell them. I had a really hard time getting them to stick to the rubber gloves solidly; you might need to try a few different adhesives. Reference Image: Next, the L3 CRL states: No return edge on the inside of the front of the forearm is allowed. It's a bit hard to see, but it appears you do still have quite a bit of return edge on your forearms. Reference Image: Moving along to the belt, the L3 CRL States: The corners of the plastic ammo belt shall be trimmed at a 45 degree angle that that meets the outer edge of the cloth belt. Yours come in a bit too far. It can be a bit of a tricky dance to get them lined up properly, and I will say we are not generally extremely picky in this area, but you should be able to trim the edge and corners of the belt to get it much closer. Reference Images: Finally, at L3, we do not allow Rubies conversions: Bapty-style, Hasbro and Rubies blasters are not allowed, even conversions. So you'll need to get your hands on another blaster. There are a lot of options for accurate blasters; I troop with a Hyperfirm B-Grade rubber blaster, but unfortunately they're not around anymore. Praetorian makes rubber E-11s if that's the route you'd like to go. And that's it! I have full confidence in your ability to make the few small adjustments for Centurion, especially give the very quick turnaround on the EIB fixes. We'll see you at Centurion soon, but until then, get out there and make Lord Vader proud!1 point
-
Looking good Troy. Good luck with your approval. Sent from my VK815 using Tapatalk1 point
-
Looking good Erick! Looks like you will be EIB in short order. Good to have more EIB in the ECG. You are very close to centurion as well, I suggest you go for it. Only a few small things and you are there. Sent from my Pixel 2 XL using Tapatalk1 point
-
Yeah, I still make these, but only on request for now. $25.00 including tracked shipping. PM me if interested!1 point
-
I painted up a tackle box that I take with me on troops: It has most of the things in Joseph’s list. I also carry white/black/silver paint pens and sharpies for emergency scratch repairs.
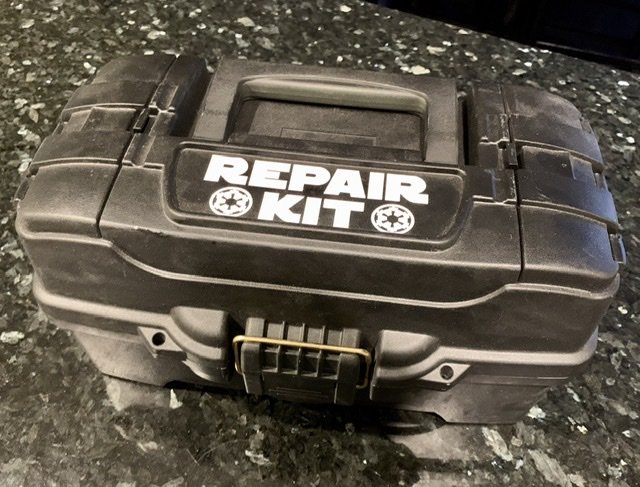
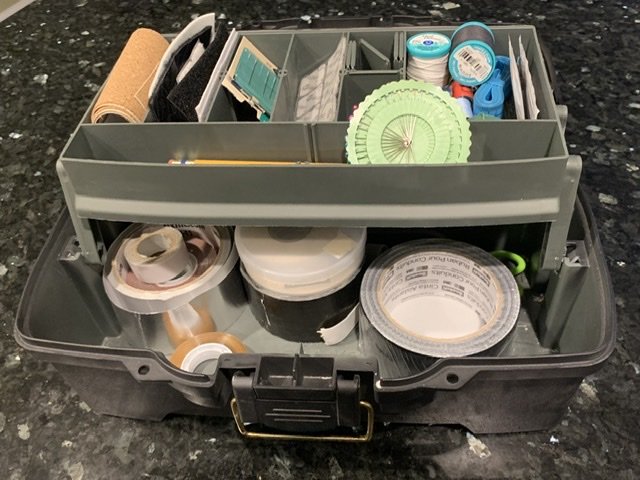 1 point
 -
Troop #2: Halloween Trick-or-treat 10/31/19 Had a wonderful Halloween. I just walked around the neighborhood, getting stopped by Trick-or-treaters for pictures! I also got some pictures in better lighting! This is me and my brother, who was dressed as a ghost from Ninjago. The people handing out candy at the houses got a kick out of seeing me coming up to their door! It was freezing out! plus it was super windy! It was the first time that I didn't sweat in costume! Happy Halloween!1 point
-
Okay, last post for today. To simplify the scabbard I cut of the frilly bits. Here I shaped one of the parts and attached it back on the right side. I then made a paste out of superglue and baby powder to fill the gaps. I'll be able to sand this down later. I am glad at the rate this is going. I am heading into Salt Lake tomorrow to pick up some silicone and resin. I still am not sure how I will mold these yet, so any input would be valuable. Cheers!1 point