Leaderboard


Popular Content
Showing content with the highest reputation on 07/05/2018 in Posts
-
Alright. Prep work trundles slowly along. One thing I need people to weigh in on first though, please. BLASTER I have discovered that I have zero interest in building an E-11 from scratch/kit. Frank (thanks!) suggested a Hyperfirm B-grade as a combination of reasonable price and low work needed for approvability. Just confirming, though, that you really don't need to do much beyond attaching a D ring to prep a Hyperfirm. No painting? Is a B-grade likely to make it to Centurion? MAGNETS Neodymium magnets arrived from AliExpress. $16.52 for 50 20mmx3mm N52 magnets is my cup of tea. I got two sets. (Link here, but if it's down, browse around if you have a month or so to spare for shipping time. Prices can't be beat! http://s.aliexpress.com/NFn2AvYv) I covered the magnets for ease of use, using (fun fact) scrap fabric from the lining of my Seventh Sister jacket. I found a pretty nifty method for securing the magnets in their pouches... Start with a pile of fabric squares in two colors. Different colors for opposing pairs make it easy to grab one of each magnet that will stick together. I eyeballed the size, was horrifically inconsistent, convinced myself it didn't matter, and ended up with 4"x4"ish squares. I used tiny 4" zip ties because there was a bag of 1,000 around. They worked fine. I highly recommend securing them all into loose loops (just a few clicks) before you begin. It's much easier to not have to wrangle zip tie ends into their slots while bunching fabric together. So here's the fun part. My bestie's coffee table is an old ship's hatch, which has large metal bands around either end. After a couple frustratingly inefficient tries at wrapping the magnets resting on wood, I realized the magnets wanted to be on the metal bands anyway, so why not make use of it? After determining polarity (the really tricky "does this want to stick to one of the opposite color that I've already wrapped?" test), I *carefully* laid each magnet in the middle of the appropriate colored square on the metal surface. I picked up each corner and pulled them through a zip tie circle. With the magnet happily held down, it was super easy to pull up on the fabric as I tightened the zip tie and got nice tight pouches every time. I'm betting you could achieve the same ease of wrapping with any metal surface - the top of your filing cabinet, a piece of steel clamped to a tabletop, hey, you could even use your fridge if you got really desperate. Tadaa! I wrapped some magnets in pairs (bottom of picture) due to concerns about holding strength. Those will be my "big guns" for any real warped cover strips. They also make for nice medium holding strengths when I use one of those doubles with a single on the other side. I tripled the zip ties on the doubles to differentiate them easier. 10 pairs of doubles, 30 pairs of singles. I am now really sick of zip ties. UNDERSUIT After trying half a dozen options, I found that a dance unitard was the best fit for me. For price, fabric thickness, and comfort, the Capezio tb114 won hands down. It's a 90nylon/10spandex blend so it'll hold its shape well. The unitard has a wide scoop neck, so I'll be doing something ingenious to connect my neck seal to the edge so I don't have any accidental skin showing by my shoulders. Stay tuned. Also it was way long on short me, so I put it on, measured the extra length on wrists and ankles, took it off, rolled the cuffs in on themselves by that length, and ran a zig-zag stitch around the middle of the rolled bit. The cuffs are now a bit loose so I'll sew them tighter to keep them from creeping up and call it a day. NECK SEAL Muahahahaha... after many excellent discoveries of bad ways to achieve deep, rubbery neck seal ridges, I have found a good one. And boy, is it good. Still a work in progress but if it turns out as well as I expect, I'll make a separate tutorial thread. Sneak peek: AND I'm going to my first armor (or lack thereof) party in a few weeks. Totally stoked. That's all for now, folks!3 points
-
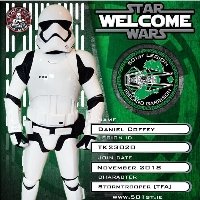
It`s been a long wait but the armor cleared the Swedish customs as of yesterday so figured it would be safe to start this up When I first watched the force awakens I was really disapointed with the new Stormtrooper helmet - DID NOT LIKE IT! The armor was cool though - however, over the years the helmet has grown on me so now I like it and really look forward building this kit. Here`s the version I´m going for: Besides from the armor (duh) one needs the following items: Cloth gaskets - Geeky pink`s phantastic gaskets (for Centurion you will need rubber). Armor vest - Diversity Props Boots and gloves - Imperial boots Undersuit - stromtrooperundersuit.com Belt and pouches - Trooperbay Blaster rifle - 3Dprops NL Metal holster - R2Dan Back pack - BSP (borrowed pic from FB, kit ships tomorrow)2 points
-
Thanks, Dan! Now I just have to put them to use... but yes, everyone should have happy little Sith magnets. Ooh, that's quite a good option. I've now been in contact with them and will likely be going that route. Much obliged, Daniel! @Pretzel , that is *very* good to hear. I'll need all the help I can get, so thank you in advance.2 points
-
Ahha I`ll go check it out and...Pssst….don`t forget my Sandtrooper pack Yeah me too, I won`t be able to fully relax until the box is here and all the pieces are accounted for KB Props2 points
-
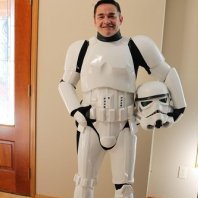
Some fitment pics. I am 5'11 ish and 165 pounds (i need to workout) Might have to heat up and shape the butt plate a bit so it hugs my rump a little better. The bottom elastic strap is being pulled pretty tight and its tricky to get it snapped, but I feel like once i get the belt all built and attached this gap will close up. Another question i have is if the back plate is sitting too low? Should i re-glue the white elastic shoulder straps to tighten em up ?2 points
-
Thanks ukswrath! So I've been working on the panels for the thigh pieces and the sides, and I'm happy to say that I think I got the pieces for the thighs just right. It took a sheet of ABS, the heat gun from my dad's office, and some trial and error, but both seem like a good fit. The next step is gluing them in place. After that, I'll use a putty or caulk to hide the somewhat uneven edges, then I'll paint over the edge (not wanting to buy a bunch of paint that will likely go to waste, I found a matching nail polish that should be enough). Pic of thigh panel: https://imgur.com/D4a21b7 The sides are a bit tough, and I'm still figuring out how to seamlessly attach them to the sides of the front of the abdomen. Initially on the armor tabs I was going to use velcro (I do love it so much) but it shows, so I'll have to figure out something else. Ordered hook only velcro so I could start matching up the armor to Theresa's amazing gaskets. Slowly but surely coming along!2 points
-
Hey A.J. My condolences on the family illness. Glad to see you're back at it. To my eyes, your shins look correct. I assume they are overlapping by different amounts in your picture, as they look vastly different in size. As for your questions .. 1) Cover strip ends - angled or slightly rounded are the ways to go. I personally like your personal feeling on the rounded corners. It look s best. 2) Popper - yes, those are snaps 3) Snap plates - Both ABS and webbing work great. Both are reliable. Only abs plates are repairable if for some reason your snap is pulled out. A webbing plate would have to be replaced. Webbing is faster to fabricate. Webbing also has a slightly thinner profile as you don;t have the thickness of the abs to contend with. It's personal preference. 4) Webbing color - I don;t know why we use black (dark side?), but yes, white makes sense. If anything, we are wearing black undersuits, so it's all hidden anyways. 5) Hovi Mic Tips - the ends are a black/white combo - mostly white from wear and tear 6) Kidney - the kidney notches are optional. If ever in doubt, consult the CRL. Nice work & keep going!2 points
-
Hi! I’m an old member wanting to get back in. I had an old FX suit that treated me well back in the day, but was yellowing and looking old, and I thought I would need to buy a new suit to get approved. I finally was able to buy some ANOVOS armor, but after long waits and other setbacks was playing with the old FX set. I was able to find a product that has worked amazingly to remove the yellowing and the FX plastic looks great now. I have an updated helmet and was wondering what would be needed to make the old FX kit good for basic approval as either a stand in until the Anovos kit is ready, or for a back up suit. Any help would be appeciated, thank you!1 point
-
Great work on the build..I've a few bits to iron out and finally go for clearance.. Sent from my iPad using Tapatalk1 point
-
Sweet, whos armour have you gone for? Sent from my SM-G950F using Tapatalk1 point
-
Wow - I’m ready and waiting to see your progress on this. Can’t wait. :-)1 point
-
Very cool. I am building the same one. Sent from my iPhone using Tapatalk1 point
-
Well, having kids out of school and recovering from hernia surgery has sidelined my build a bit over the past month. I've made some slow but steady progress, though! The torso is now fully strapped together, and the limbs are fully assembled. I'm thrilled with how the torso fits now. The next part was where I was supposed to size the arms and legs to fit relative to the torso while wearing it all. However, this is where my build will deviate. Another vertically challenged 501st member in my garrison really, really wants to buy this suit. While I am 5'4", she is only 4'11". She wants to be an OT TK, but doesn't have the time for the build. After much deliberation about things, I've decided to not only sell my suit to her, but also assist her in person with getting everything to fit her frame nicely. I don't want to do all of the final sizing to fit me, just to have to cut everything down again to fit her. I will do my best to take photos along the way of the final sizing process so I can complete this build thread properly. I see this as a total win-win for us. My garrison mate gets a Centurion-level, vertically-challenged-tailored TK (I will be encouraging her to submit for EIB and Centurion!), and I will be free to work on my upcoming RS TK. Yep. You read that correctly. I'll be starting the RS Hero (Luke) build soon. Who said that TK building isn't addictive?1 point
-
Glad to hear you are considering to build the scope with the lenses instead of the speaker inside. Your drawing contains the cool idea to access the BlastFX board through the ejection port and pulling back the charging handle. This compresses the spring, which causes problems with running the wires along the spring towards the speaker in the end cap - and the pressure on the speaker. Well, if I get this drawing right, you already found two workarounds: 1 - If the ejection port is covered with a separate piece (held in place with magnets), you won't need to pull back the charging handle to access the BlastFX. Easy way for the wires then. 2 - With the wires running in a small channel below your receiver tube, they won't cause any issues with the spring inside the receiver, even when this gets compressed. Both ways seem to work but the spring's last coil could damage the speaker in the end cap. The drawing shows two rings (styrene and foam) to absorb some of this pressure. Hey, looks like you already found a solution for each problem. Or did I get something wrong here? Oh, and I like your idea with the foam cylinder pressing against the end cap. That should work.1 point
-
Thanks everybody! I’m honored to be part of the legion and this detachment!1 point
-
Looks great #1 Yes the TD screws need to be replaced for EIB and Centurion as they are not pan head. #2 Butt plate looks to be good to go, although the pic is a bit dark so it’s hard to say for sure. #3 great side closure and yes the belt will make it perfect. #4 I would also reglue the shoulder strap making the back come closer to your body. Keep up the great work Trooper1 point
-
Now it leads to the index page, I think that's better1 point
-
Very Nice work so far Laura!1 point
-
Agreed with everything Brad said! The mic tip rims are typically white from sanding off the black paint to simulate the wear. Oh and the kidney notches are optional in that some armour has it moulded in, some does not. If it does not, no need to bother, but if it does, then I'm fairly sure you should cut them out (I believe this is what's alluded to in "if present"). Perhaps Tony or Joseph can provide a clarification on this? @ukswrath@justjoseph631 point
-
Yaay! Progress! Rivets are in: Side of the brow is trimmed! I only noticed I have a small placement issue - one side is a bit higher than the other causing the brow not be in line. The one without the clamp is how it looks now and the one with is like I would like to have the placement. What can I do to align them more? Any suggestions?1 point
-
yeah... true, stanley style knife would work of course.1 point
-
Looking good Martijn! One suggestion for your belt is to introduce some curve to it (the abs part) before marking holes in the canvas and attaching it. This will lessen the strain of your attaching rivets and will also remove any ripples in the canvas belt when bent around your waist.1 point
-
Congrats on your BBB Day. Great Start on your trimming. You're doing an awesome job. Great pics of the individual pieces too. Your bucket looks good, and yes, your brow trim is trimmed a little too angular. Easy fix. Keep going trooper!1 point
-
That's a great looking bucket Pam.1 point
-
I referenced some of these videos during my build. They helped me with the “how” type questions. What TK1636 does may not be perfect, but at least, it’s visually helpful as a guide. https://m.youtube.com/channel/UCeDunMes3e0wQn8_ns-ma4g1 point
-
Hi Martjin, Here’s a link to an armour maker using the score and snap method. With a relatively low profile straight edge, you should be able to get a Stanley knife or similar in there to score. If you’ve not done scoring before, just apply very, very light strokes to start. Once you get a good line you can start to apply a little more pressure. ***please note - I’m not saying this is the definitive or only way to do it - I followed this method and it worked well for me, leaving a nice straight edge. Personally, I went a little closer to the ammo boxes than this video. Skip to around 10:30 for the ammo belt. [emoji1]1 point
-
Hey Robert and like other have said - photos1 point
-
1 point
-
Still need to take some pictures, but making good headway on the trimming. Have a few more pieces left which I will get done tonight (following ukswrath thread for trim order, I am done to the shoulder bells.) Next will be to do some sanding to cleanup edges, then the daunting part (to me anyway) of how to tie everything together.1 point
-
Congrats!! Good luck on your build.1 point
-
If you are referring to the links in the merch and other sections you will need to request 501st access here:1 point
-
So waiting on a pouch..gotta trim thighs sort ears but lookin Kool n de gang Sent from my iPad using Tapatalk1 point
-
For anyone wondering what the various logos, bars, and titles to the left of posts is all about, this is the thread for you! User Ranks Found above the avatar, rank is determined either by post count or other criteria: Private: 0-24 posts Corporal: 25-49 posts Sergeant: 50-99 posts Lieutenant: 100-149 posts Captain: 150-199 posts Major: 250-499 posts Colonel: 500-999 posts Commander: 1000-1499 posts General: 1500-1999 posts Field Marshall: 2000-2999 posts Grand Moff: 3000+ posts Expert Infantry: Users who have received an EIB Award Centurion: Users who have been granted Centurion Status There are also special ranks given to Command Staff and Extended Staff, such as Detachment Leader, Deployment Officer, Combat Photographer, Hall of Fame Curator, etc. Achievement and Service Awards The FISD Achievement Award is granted for exemplary service to, or outstanding achievement for, FISD. Tradition holds that persons currently serving on staff cannot be granted Achievement Medals (or else it can become too self-serving). Thus, if you see a staff member with an Achievement Medal, they've all earned them prior to joining staff. To date only two people have ever earned a second medal, and no one has ever earned a third. Award Levels FISD Achievement Award (1st Award) FISD Achievement Award (2nd Award) ... FISD Achievement Award (6th Award) (and so on) The FISD Service Award is granted to recognize the contributions of Command Staff for their commitment to keeping the detachment running. Each award represents a full year of service. Additional awards are denoted by a star (1 Gold Star = 5 Silver Stars, 1 Silver Star = 5 Bronze Stars, etc.). A frame denotes fifteen years of service, with additional stars for further years. Award Levels FISD Service Award (1st Award) FISD Service Award (2nd Award) FISD Service Award (9th Award) FISD Service Award (10th Award) ... FISD Service Award (16th Award) (and so on) 3D Contributor Award This program, as with others, is an optional Detachment-only award incentive. It recognizes members who have gone above and beyond in contributing to our 3D forum section. The Silver award can be earned numerous times over the years. The Gold award is given to those that have contributed at such an astounding level that it is deemed appropriate. All awards are given at the discretion of Command Staff. Award Levels Silver 3D Contributor Award Gold 3D Contributor Award For more information please refer to this thread. Attaché Outstanding Achievement Award This award is bestowed to those who consistently exemplify the meaning of an Imperial Attaché and have gone above-and-beyond in helping their fellow troopers for at least one full year: For more information and a list of recipients please refer to this thread. FISD Master Armorer The FISD Master Armorer program is an optional, detachment only incentive award to recognize individuals who have directly helped another 501st stormtrooper to achieve Expert Infantry status. Some people spend countless hours helping others, and want to reward their results as well as incentivizing new people to help as well. Award Levels FISD Armorer (5+ "wins") FISD Senior Armorer (15+ "wins") FISD Master Armorer (25+ "wins") Centurion Badge These are awarded to those who have reached the highest levels of costume approval for FISD. These are awarded only once, to the person, regardless of costumes: Expert Infantry Badge (EIB) These are awarded per costume, thus a person can have more than one EIB award. Stars (like the awards above) indicate multiple awards, and appear above the EI badge (1 Blue Star = 5 Gold Stars, 1 Gold Star = 5 Silver Stars). Award Levels Expert Infantry Badge (1st Award) Expert Infantry Badge (2nd Award) Expert Infantry Badge (3rd Award) Expert Infantry Badge (4th Award) Expert Infantry Badge (5th Award) Expert Infantry Badge (6th Award) Expert Infantry Badge (7th Award) Expert Infantry Badge (8th Award) Expert Infantry Badge (9th Award) Expert Infantry Badge (10th Award) Expert Infantry Badge (11th Award) Expert Infantry Badge (12th Award) Expert Infantry Badge (13th Award) Expert Infantry Badge (14th Award) NOTE If you are approved with a "2nd Version" of a particular costume that you are already approved with you do not receive an additional award, there is only 1 award issued for each costume version ie: only 1 x Hero, 1 x Stunt, 1 x HWT, 1 x ESB, 1 x TFA and so on. If you have a second/additional version costume approved you will see "2nd Version" and [APPROVED] added to the thread title, no additional profile stars For more information on the Expert Infantry and Centurion programs, please refer to this thread. EIB and Centurion requirements can be found in the corresponding costume CRLs (as Level 2 and 3), additional information on how to apply is available here for EIB and here for Centurion.1 point