
Leaderboard


Popular Content
Showing content with the highest reputation on 12/26/2017 in Posts
-
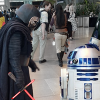
Someone asked for pictures? Dec 23. First Appearance of Captain Phasma and Captain Cardinal in the same place.... and World First appearance of Captain Cardinal. The Sandbox, PixelArts Props, and KB Props are to credit for the costume process for both costumes. KB Props supplied the Kit. PixelArts Props built the Kits. The Sandbox is the Facility we all work out of. (Phasma built in 3 weeks, Cardinal done in 1)3 points
-
Thanks, it's going slow but steady. I'm trying to find opportunities to add value for anyone following my progress. So when I have an idea that gets me somewhere, I figure it's worth putting out there in case anyone else could use it too. Here's another one for instance: I painted the split rivets that connect the Ab/Kidney a few days ago. I decided to sand the rivet heads with 400 sandpaper, then I gave them a quick coat of flat white primer (Rustoleum): Once this dried, I hand brushed some Testors Gloss White enamel paint (after reading ukswrath mention that the color match looked good in his build thread). I gave it 2 coats a couple hours apart. Note the brush marks: Overall I was happy with the coverage and the subtle hand-painted texture...but the finish was satin at best. I certainly wouldn't call it gloss. It could be the roughness of the primer underneath, I'm not sure and I haven't used Testors paint since I was a kid in the 80s. However, I do have tons of experience with painting props/models so one of my favorite tricks is to post-polish parts to get to a desired shine. I waited 48 ours for the enamel to cure and then grabbed some rubbing compound and did a quick rub/buff with paper towels: Here's what the look like after a polish pass: I was able to retain the subtle brush marks and imperfections so they have that nice hand-made 1977 feel Then I popped a few back into the armor to test the color/luster match: Again, hope this post wasn't overkill. Just wanted to share a process I'll be repeating on the bracket screws as well to get them finished up for assembly. Hope it helps someone. -Dana2 points
-
Hiya, probably worth having a look here :-) https://www.whitearmor.net/forum/topic/11538-the-various-types-of-armor-and-where-to-find-them/?page=422 points
-
Sent from my iPhone using Tapatalk2 points
-
GARRISON TITAN Operation: Rule the Galaxy Hello Legionnaires! If you were brought here by me, then you already know why you are here! If you've tripped on this subforum, please allow me to thank you for joining us on this wild ride, and allow me to tell you a little bit about us and why we are here. My name is Kay, DS-52956 and one of Garrison Titan's Membership Liaisons. My flagship costume is Kylo Ren (as you have probably guessed). I troop about 20 events a year, and at the time of me typing this, we have about x1 First Order Stormtrooper for each Kylo Ren we have in the Garrison....which totals to 5 (give or take my spotty memory). As you can imagine, I was DISPLEASED by this! So I did what any self-respecting loyalist might do. I went recruiting. And here we all are. Garrison Titan is based in Washington State and is currently home to a little over 180 active members, making us one of the top 20 largest Garrisons in the 501st Legion. We have a tremendous relationship with our sister clubs in the area, and have made appearances at all sorts of events throughout the year. In 2016, we raised just over $58,000 for charity at just over 1000 events, and are well beyond that number for 2017. Our goal here is simple: have a First Order squadron ready for the release of Episode 9. That gives us a timeline of ~2 years -- plenty of time for experimentation and learning. For several members involved, this is their first armor kit build. For others, it isn't. We plan to operate using an assembly line system to get these kits trimmed and fitted by our target date. I will be documenting the process as best I can -- I am notoriously bad at remembering to take pictures of my builds, but hopefully with a support group of x20 other troopers, we'll get some helpful info here in case anyone else would like to start one of these in their own Garrison. On behalf of Garrison Titan, thank you for stopping in, and don't forget to CRUSH THE RESISTANCE! Kay Ahern DS-52956 Garrison Titan GML2 points
-
Hello, My first post on White Armor! I'm stuck between deciding on purchasing Stormtrooper Hero Armor and Helmet Fully Assembled from TM or purchasing Stormtrooper Stunt Armor and Helmet Fully Assembled from RS. I'm also stuck on going Stormtrooper or Sandtrooper. If I go Sandtrooper, I'm going to go RS. My height is 5' 11'and I'm 145 pounds. PS. I was originally going to go SDS, But than saw the truth of AA.1 point
-
1 point
-
Thanks very much for a quick and very useful response! I'll be sure to stay as far away as possible.1 point
-
Ahh ok, I didn't realise that! Will leave that black then, Cheers! Sent from my SM-G925F using Tapatalk1 point
-
Here we are! The last pic of the exposed bolt is actually silver under the masking tape, just haven't taken it off yet. Will probably leave the tape on until I decide weather that part is gonna be gloss or matt. The clear gloss on the grip should give it a nice shine Sent from my SM-G925F using Tapatalk1 point
-
Merry Christmas to you too Dan! Yeh I've got a clear gloss to go on the grip, and a clear matt for the rest. I was actually wondering about the bolt though (silver parts), whether to use a clear gloss or matt on those? Or maybe neither? I've actually done all the black now too but don't have a pic yet. Just need to weather it a little and get the clear layers on. The replacement aluminium I've ordered doesn't seem to want to arrive, might have to look elsewhere. The bracket is the only bit I need to do before putting all the bits on and we're done!! Sent from my SM-G925F using Tapatalk1 point
-
Wow - awesome photos! That should def go in the FISD newsletter for January...1 point
-
Merry Christmas to all1 point
-
Thanks for the feedback, guys. My GML said the same, though for basic approval it should work. The ears I'll figure out for EIB. They're thick due to the face plate pitching too far aft, and my cap/back was pulled fairly straight, with no curve. My noggin is gigantic, so I pitched the face intentionally so I could get the bucket on my head! LOL choices I suppose. The eyes could use a trim, you're right. The reference photos I'd seen with that edge were mostly Sandtroopers. I'll also add it was the first component I assembled, and I admit I was timid trimming for the first time. The lenses are on epoxy puttied T-nuts, so if vision becomes a concern - - it was already tough going down one stair and a threshold - - I'll surely take your advice. Love it, thanks again guys! Sent from my XT1254 using Tapatalk1 point
-
Eye return edge could be thinned a bit, too.1 point
-
Lovely job. Your armour fits you really well. [emoji1303][emoji1] Aside from the belt, the only thing I’d mention, and I’m not sure if it affects clearance at any level, is that your ears could be considered a little thick. If it were me, I’d be tempted to trim them a little. Great job, Trooper. And congrats on the baby. :-) [emoji1303] Sent from my iPhone using Tapatalk1 point
-
This is how I feel after Christmas dinner.1 point
-
Nice job on that belt and best of luck1 point
-
How did you attach the sides to the chest plate and back plate? Is one permanent?1 point
-
Rogue One TK, probably... but I usually see it written as R1TK which is less confusing to Tolkien fans.1 point
-
Nice work mate. I do notice that your belt is sitting quite low in that last pic, perhaps it’s slipped off the poppers?1 point
-
Awesome build so far. I haven’t ever really looked closely at a TM kit before but after reading your thread, damn it’s nice! Next time perhaps?1 point
-
Torso and shoulders complete so half-a-Stormtrooper-dance-it-is Time to start on the limbs, cover-strips are rough cut and marked so there's no confusion later on1 point
-
You look really good! I can't wait to get my kit in1 point
-
Christmas 2017 With my family Sent from my iPhone using Tapatalk1 point
-
A very Merry Christmas to my FISD family. Through thick or thin, this community has been a shining light in my life.1 point
-
Merry Christmas to all and here’s to a Healthy and Happy New Year!1 point
-
Happy holidays to all! Sent from my iPhone using Tapatalk1 point
-
Merry Christmas to you all and have a safe and prosperous New Year1 point
-
In an earlier post, I mentioned that I was 3D printing pads to reinforce the bracket mounting areas of the torso armor. I took a slightly different approach with this step by choosing to print the pieces, but ultimately it's inspired by others here and I wanted to print them for several reasons: 1. I wanted to have consistent parts that could easily be adjusted by changing the design and waiting 30 minutes for a whole new batch to print 2. I wanted to do other things while bracket pads were magically made for me (got robots) 3. I could do it so why not Here's a look at the two different versions I designed to go with the bracket set (for the long and short brackets): I printed them in white ABS on my Prusa i3. I have a few other printers but this one is my current favorite. Below is a shot of the printer laying out the first layer of some initial test prints (I ended up changing the hole diameters to make it easier to pass screws through). And here's an example of one of the final short pads (15 of these were needed overall and 3 long ones for the chest): And here's a picture of how they fit between the armor return edge and the metal brackets with the hardware roughly in place (not tightened down or glued at this point) With all of that work done, my plan is to heat some of the brackets so that they better follow some of the armor contours using the hot water method since this is ABS! That shouldn't take long, then I'll glue them all in with E6000 and use magnets/mini-clamps/bracket hardware as clamps in order to secure them all. Hope this makes sense and gives some other people ideas, -Dana1 point
-
Looking good Sent from my iPhone using Tapatalk1 point
-
Hi guys, And the moment you’ve all been waiting for.... So, the rubber blaster IS lighter, but not by a massive amount. I tried a little tidying tonight, however it’s not a material I’m enjoying ‘working’ with. Resin is so nice to modify and adjust, whereas this is a bit awkward. It gives me extra respect for the work that Ryan did when making it. As such, I’m not really going to modify this past what is done. From a few feet away, it holds up well against my Doopy’s and, as intended, gives me a lower risk item for trooping. Here’s a few more shots, just for fun. I’ll get a few action shots too, next time I’m kitted up. Thanks for following guys. I’ll update if I make any more changes. Again, big thumbs up for this. Lovely piece from Imperial Warfighters. :-) Dan Sent from my iPhone using Tapatalk1 point


.thumb.webp.27f7939d37871f319ff836257d4a3668.webp)


