Leaderboard


Popular Content
Showing content with the highest reputation on 12/17/2017 in all areas
-
Well, more painting yesterday. Second coat of grey on the helmet. I did extend the frown a little - it doesn't look like it in the pic, but I tried to make the thickness of the last tooth the same as the other, more defined teeth - if that makes any sense. I forgot the ears during the first round of painting so I put a first coat on them (no pics). Since I had the grey paint out, I also started the button plates. I won't be getting much done today as my wife is doing Christmas baking and I'm entertaining the kiddos - which, unfortunately, does not include watching me build armor. for the buttons I traced a 7/16" circle on the button for guidance. 7/16 might be a little small, but 1/2" seemed a little large and these were the only sizes I had. to get the template to sit flat on the button, I had to sacrifice one and cut it up. For the Empire... I used a very small brush to do the outline of the buttons. Coat one of the grey paint done.3 points
-
I have more coming just need them to chime in on here, a lot of the guys I build for don't come onto FISD or don't put in for EIB. I try to build to EIB and Centurion from the get go, some don't want to post and I am fine with that. I started three years ago with my garrison because I wanted more accurate stormtrooper at our events, I never had any desire to post up videos but one of the guys I help got me started and the rest is history. Thank you all for the congrats and I will keep posting up video as long as people come over so I can help them build there kits.2 points
-
Well here it is, all done. There are some final adjustments that I am currently making but I’m happy with the end result plus my wife gets the dinner table back. http:// by -matthewwormleaton- its been an interesting experience and I’m already looking a a new one (FOTK) but one thing at a time I have to sumit my photos to the garrison for initial approval. Matt2 points
-
Got my friend to help check the armor out and take photos. I look with a critical eye at a few dressing errors that I could not see and my friend did not know to look for. It's a lot of ask of friends. Yeah. When locals build suits, I will host Photo Shoots and help get the armor to look right.2 points
-
I got a Sterilite 40 gallon rolly box for $24 at OSH. With clever packing the armor completely fits inside. Since it is black and has cool techy shapes molded into it, I could not resist also getting a rattlecan of glossy white and a roll of masking tape. The lid is drying. I'll have to sand it where I was a little over-enthusiastic in applying paint, then paint that area again … lightly. Gmrhodes, your animated GIF is cycling in time to my wall clock's ticking. It is almost as hypnotic as my Prius dashboard's Passenger Entrancement Mode.1 point
-
I think your frown looks better. Subtle difference for sure but better. Buttons look great.1 point
-
Wad of adhesive I ended up with after all the armor was cleaned: Anyone wanna buy a genuine Wookie booger?1 point
-
Photos to aim for, front, side, back, side, action and helmet off. Good luck.1 point
-
Hello and welcome aboard, some great info here Also look through some of the build threads, should help you on your way.1 point
-
Welcome to the FISD Ron! Looks like you're getting some local help now. Keep chipping away and you'll get there! Good Luck Future Trooper!1 point
-
With the bleed through issue if you paint white first it should fill any gaps and stop the blue bleeding Keep up the good work.1 point
-
Coming along nicely1 point
-
All in all been a good day at the Imperial factory1 point
-
Congratulations trooper1 point
-
Looks great1 point
-
You have done a beautiful job of the painting Matt , and those tube stripes..... perfect mate.... perfect. I must admit I love the rough wonky finish to my RS lid Sent from my iPhone using Tapatalk1 point
-
Great work on the ears! I certainly didn't get mine that nice. I had to keep reminding myself that the screen used helmets looked very rough up close, especially the ears. I did two coats of grey paint on the teeth. I waited for the first coat to completely dry before adding the second coat. As far as the end of the frown goes, maybe a little further. Not much though. I think I might have taken mine too far. Time will tell for that. Enjoy the movie!1 point
-
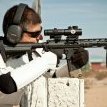
Thank you very much for your compliments, Jim. Sorry I haven't been able to get back to you soon enough, really busy this days. I am more that flattered that some of you guys think this conversion deserves applying for centurion level no less! Thanks a lot for that. Honestly I don't even know if you can't apply a weapon alone, but I'm afraid you have to do it with your armor... and my anovos kit will still take a while to be taken care of. I will try to cross that bridge once we get there. Anyway, this conversion has much of what is supposed to be in an e-11 blaster, as any hasbro with a good old doopy kit would have, but this, imho has the advantage of a better profile and better shape in general, being the he main issue with this the smaller size and how close are the things in the middle section among them. Definitely it worth the effort and who knows... one day it might become centurion. thanks again!1 point
-
Is it just the smell or is there yellowing on it? If it just the smell it should come out by cleaning it with a dish detergent like Dawn, and maybe even white distilled vinegar. Neither will harm the ABS. If it has a yellow discoloration it may be the ABS, which can discolor from extended periods of sunlight among other things. If that is the case, I would try this: https://trooperbay.com/trooperbay-armorwhite-plastic-whitening-gel1 point