Leaderboard


Popular Content
Showing content with the highest reputation on 10/06/2017 in all areas
-
trigger frame assembly phototype help from my little 3d printing friend4 points
-
Congrats!! You are the first ever approved. A rare distinction surely.2 points
-
Apply putty to seam line and bubble holes. Measuring holes to rear sight for scope rail measurement. I stick masking tape on my aluminum plate. Draw the measurement directly on it with pencil.2 points
-
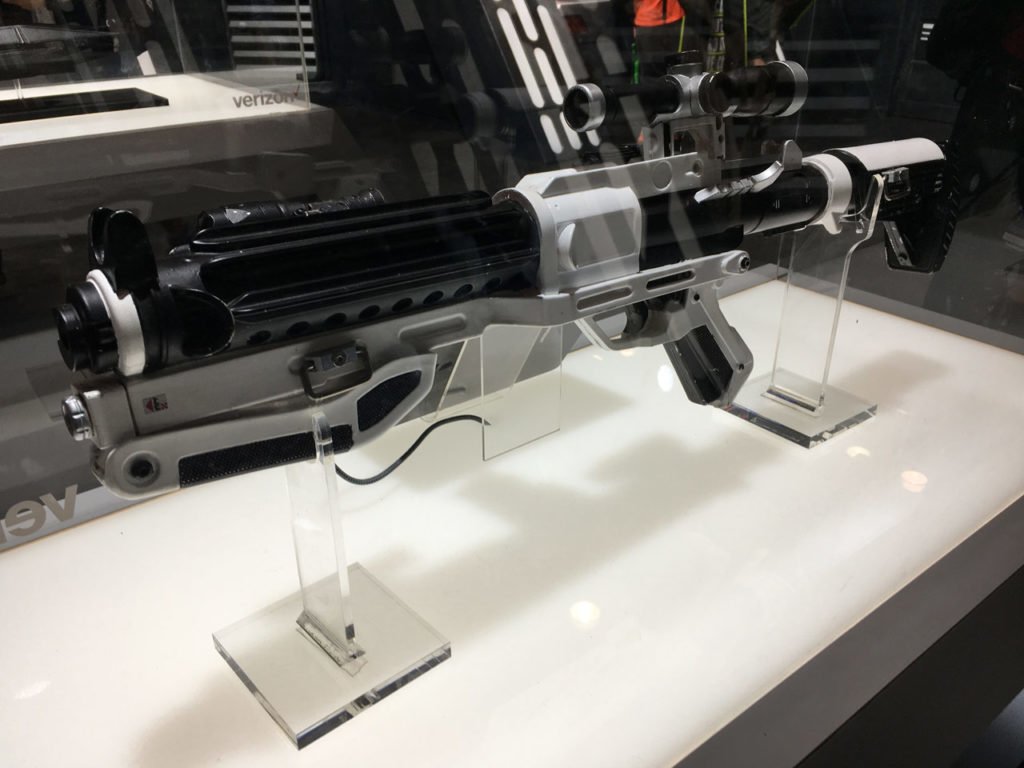
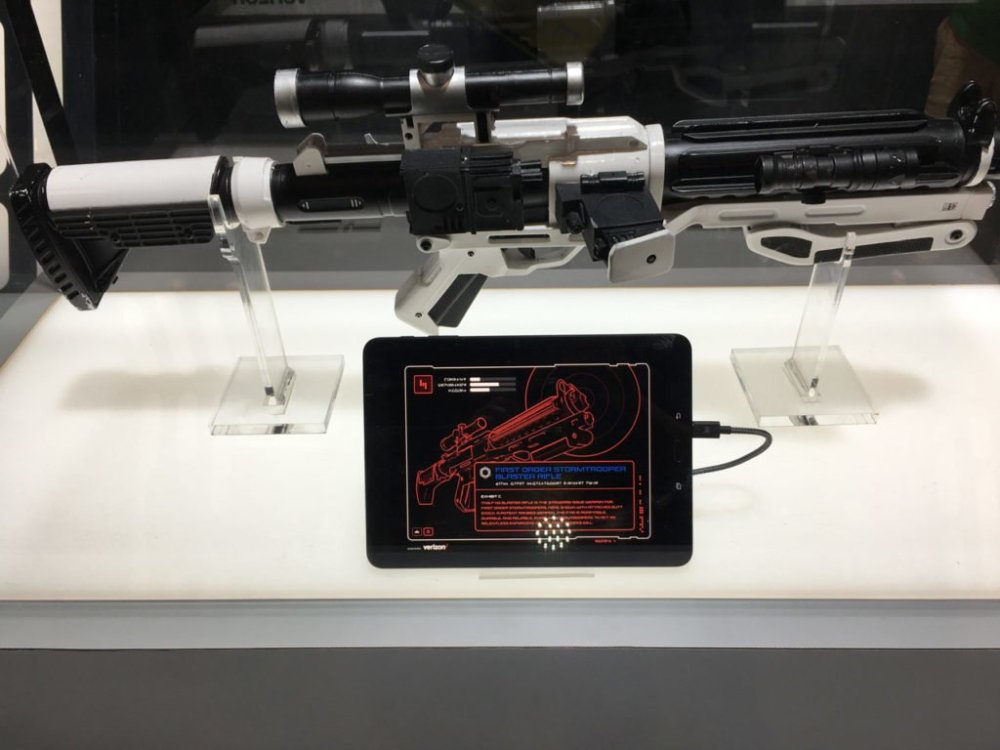
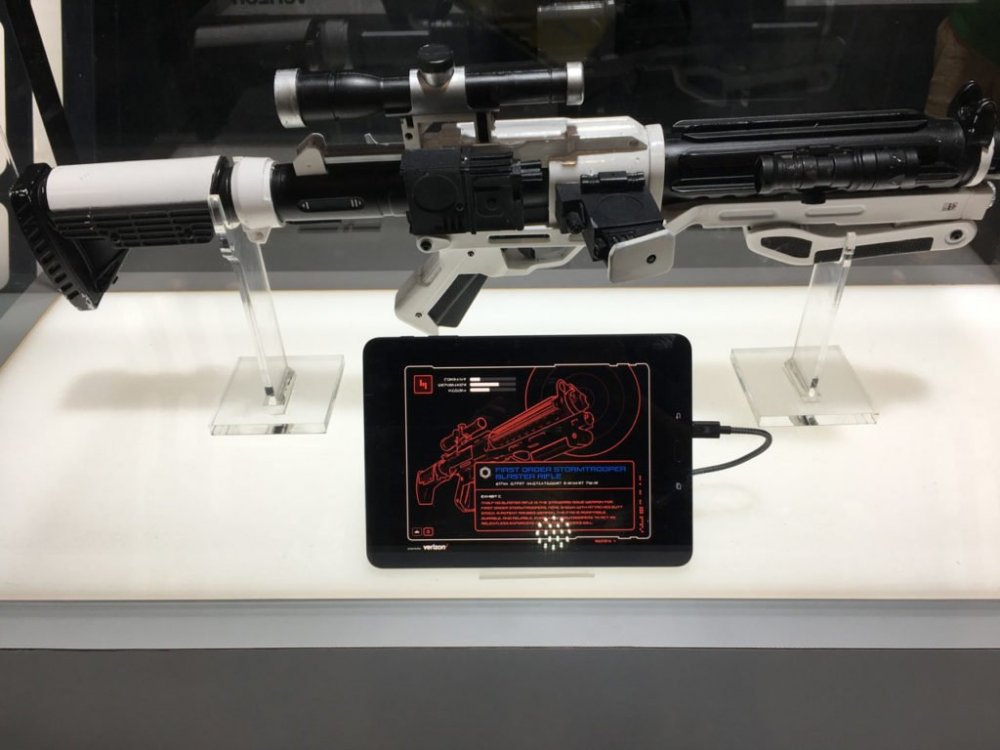
Check out the 2 photos of the F-11D from NYCC http://strw.rs/60148fuBK

 1 point
 -
Basic Information Name: Alberto Oscarelli FISD forum name: Albaz 501st Member Page: http://www.501st.com/members/displaymemberdetails.php?userID=24123 501st ID: TK-20055 Garrison: Empire City Garrison (NYC-US) Mandatory Information Armor Maker = AP Helmet Maker = AP Blaster Type = Hyperfirm E-11 EIB application/approval: Optional Information Height = 6'1" Weight = 173 pounds Boots Maker = TK Boots Canvas belt = AP Hand Plates Type = TrooperBay Electronics = iComm + AKER Neck Seal Type = DarmanProps Holster Maker = TrooperBay Corrections (belt, lens, drop box, and forearm) - Added a second layer of acetate lens, moved belt 1/2 up, and glued straps of drop boxes to belt to maintain alignment. I tried to move the forearm down as much as I can. Unfortunately I have long arms and this is the best I can do. also...I had to take the pics on my own, so every time I would get in position they would slide up a little since I had to bend my arms to reset the armor ;-P1 point
-
Basic Information Name: Joshua Hitt FISD forum name: Hittman 501st Member Page: https://www.501st.com/members/displaymemberdetails.php?userID=24465 501st ID: TK-11051 Garrison: Dune Sea Garrison Mandatory Information Armor Maker: RS Propmasters Helmet Maker: RS Propmasters Blaster Type: RS Propmasters E-11 EIB #730 Page: Optional Information Height: 5'9" Weight: 175 pounds Boots Maker: RS Propmasters Canvas belt: RS Propmasters Hand Plates Type: RS Propmasters Electronics: Ukswrath´s Hovi Mic Tips with Speakers, iComm Neck Seal Type: RS Propmasters Holster Maker: RS Propmasters Helmet and armor material. PVC FRONT REAR LEFT RIGHT LEFT CLOSE RIGHT CLOSE1 point
-
Poor Kylo1 point
-
I'm seriously hoping this is not the case. If it is, bummer!1 point
-
Ok looks like whoever is in the LFL prop department must have a share in a torch company, everything is getting one these days
 1 point
 -
You could use a matte clear, I didn't as I couldn't get any locally but I have some ordered and it's on the way, just means a re-mask but that won't take long, there's not that many pieces .1 point
-
It's still a standard TK, just means I have 6 TK's now1 point
-
Shame what they did with the shoulders, but explains why they say "it doesn't need painting" had a feeling something wouldn't be right. Anyone that has put one of these kits together would have been wondering the same thing1 point
-
Should be any minute today.1 point
-
Ah! Congrats dude! This is amazing! Did they decide on using just TK still, or are they adding a TKE or TKJ? or something?1 point
-
Many thanks once again Paul, thank you for all of your help getting this CRL squared away, one happy trooper1 point
-
You can do the drop boxes now. The drop boxes are only located/aligned by the belt, so it doesn't matter what your thighs& cod are doing. Check the control & Centurion pictures for proper alignment. Looking Good Trooper!1 point
-
weathering and pencil lines added. I may want to tweak the bell elastic in the left one a bit to get it more snug at the bottom. Attach the straps and should be ready for Freddy.1 point
-
That would have been cool to hang out with him.1 point
-
So apparently there is at least one of the standard FOTK kits out here. This showed up on Twitter yesterday - take a close look at the top of the "yoke":1 point
-
FYI the 50% off sale is now live again. $99 for the no-stock w/LEDs and equivalent prices for the others, $149 for the combo. Gonna try it for 72 hours this time and see if the sales are not too overwhelming.1 point
-
This is how I go. First, for a general cut, I score and snap. This is where you cut into the plastic, but not all the way through, then snap it off, with pliers. Then, I improve the rough cut with Lexan scissors. Then, use a Dremel (Or just a small sander, file, etc. It depends on the size of the cut) to smooth out the cut. Here's a grahpic: (I stole it from the instructions of an ANOVOS kit.)1 point
-
Nice measurements - looking forward to seeing the finished scope rail1 point
-
I prefer using a dremel, I use 3 tips, cutting wheel, drum sander and a drill piece, great for trimming thicker plastic.1 point
-
Legs were sliced in the back at the indent to hide the trap door. I used ~ 1.5" strip of very thin sign material. Flexibility is key. This was glued in on one side only. I don't think it matters too much which side you glue, but I chose the outside half of each leg (i.e., the right side on the right leg, left side on the left leg) on which to glue the floating shim. Once this is cured, I put a bead of E6000 down the outer edge of the floating shim for reinforcement. Let this dry as well. The top has a short piece of elastic CA glued to both sides to provide tension to hold the alignment properly. This should flex, but not much. The bulb area of the calf towards the top gets another piece of elastic, longer and with a bit more stretch. This will provide another bit of tension to hold the two halves together correctly, but still allow expansion enough to get your foot in an out. I highly recommend testing it without the elastic to visualize how much stretch you'll need before permanently gluing the elastic. Demonstration of the floating shim expanding to allow the foot through. This will prevent the need for a visible seam, and the easiest way to hide the trap door to match the on screen look. Hope this is helpful!!1 point
-
Hiya. Power cylinders now underway. Mod to front of stock nearly finished. Also started cutting down the end cap clip to fit into the aluminium channel in Tino’s kit. (*Work in progress) :-) Dan Sent from my iPhone using Tapatalk1 point
-
Thighs sized up, ready for assembly Did a test fit and shoulder-straps do need to be shortened... Blooper Notice the flex of the left shoulder-bell and...though not Luke I seem to be dreaming of a princess...1 point