Leaderboard


Popular Content
Showing content with the highest reputation on 07/11/2017 in Posts
-
So, several of you have inquired about the availability of the "Evolution of a Trooper" shirts that were mentioned by Paul (Daetrin) in this edition of the Newsletter. At the time that the NL was drafted, the shirts were well on their way to production and availability. Alas, they hit a snag in the approval process, which does indeed happen from time to time. They are still being pursued for production, to continue to ensure that the Legion's Stormtroopers are dressed to impress both in costume, and out. We already make everyone else look bad as it is. May as well pour a little salt in those salty wounds. They hate us cause they ain't us. Thank you for understanding, and standby for updates please.2 points
-
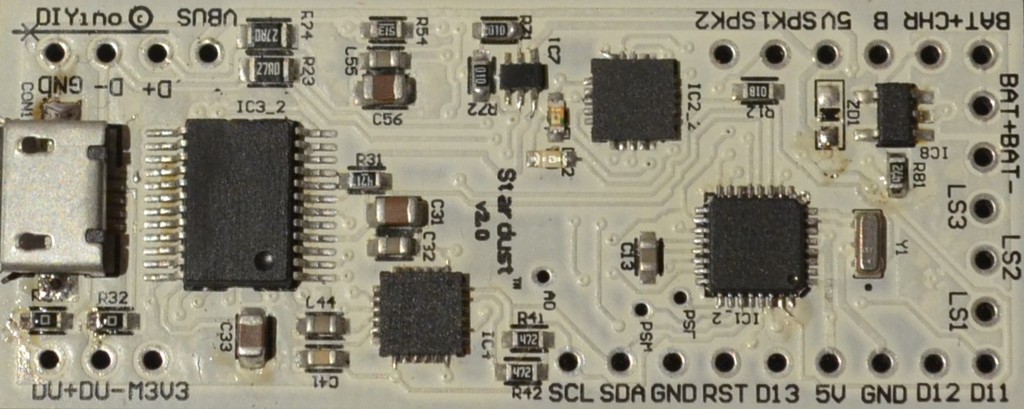
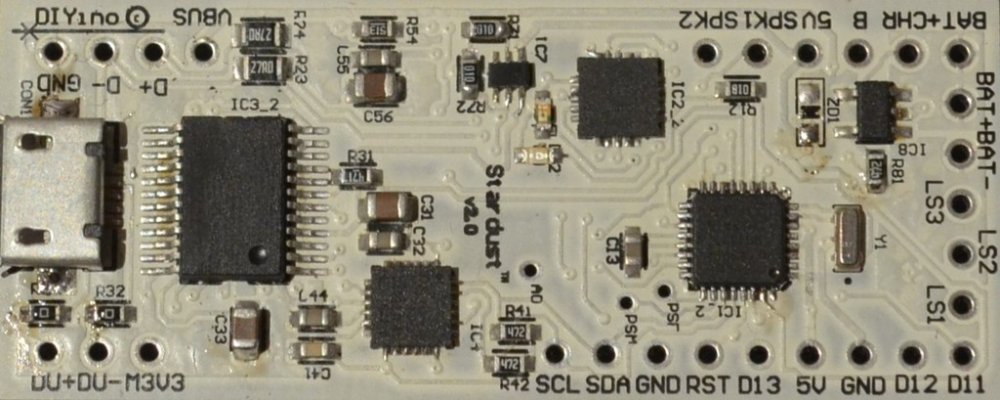
I'm happy to present you the first Arduino based, fully integrated blaster board, the Stardust "B" This tiny but powerful board is a mid-range member of the Arduino compatible DIYino boards, capitalizing on the already proven architecture of the Prime and at the same time streamlining the design to give you a board which is easy to integrate into a prop blaster of any size. To this end I applied certain adjustments to the Prime architecture, like: - replacing the bulky SD-card with a 16MByte on-board SPI Flash. No moving parts involved. - swapping the DFPlayer MP3 chipset to a more advanced one, capable of handling SPI Flash - using 3 instead of 6 driver channels for LEDs and other peripherials (making board smaller but still perfect for RGB LEDs and neopixel builds) - it comes with an micro USB connector for smaller size - the USB signals are broken out so you can hook up an external USB connector, serving as general access port (and more!) - all connections necessary to operate https://github.com/Protonerd/FX-BlasterOS are integarted on board, eliminating the need for on-board wiring - The board can operate on a single 3.7V Li-Ion/LiPo battery, usage of a small DC/DC to boost the voltage to 5V is highly recommended. - still based on the popular Arduino Nano board featuring an Atmega328P - it has added-circuitry to make the board low-power if not "trooped with", eliminating the need for a kill-key/switch for cutting power. All features discussed in other threads related to Arduino type blasters can be implemented with the Stardust with no big effort. The 3 PWM controlled low-side switches can be used to drive LEDs (up to 3), but also rumbling motors, smoke generators etc. . The board includes I2C signals to communicate with an OLED display for a blaster with added sci-fi flavor! But there is more! The Stardust is not a stripped-down version of the Prime! It incorporates a feature unique among prop electronics board: USB charging of Li-Ion/LiPo battery This opens up a whole new world of possibilities of design and interaction with the electronics. Only a single interface suffices to reach all features: - charging a single 3.7V Li-Ion/LiPo battery, via USB - no charging device needed, no need for a big recharge port or swap batteries - software updates can be flashed over USB - the on-board SPI flash can be directly accessed over the USB as well, eliminating the need to take apart the design if you want a new set of blaster sound I hope you like it and I will keep you updated about the details!
 1 point
 -
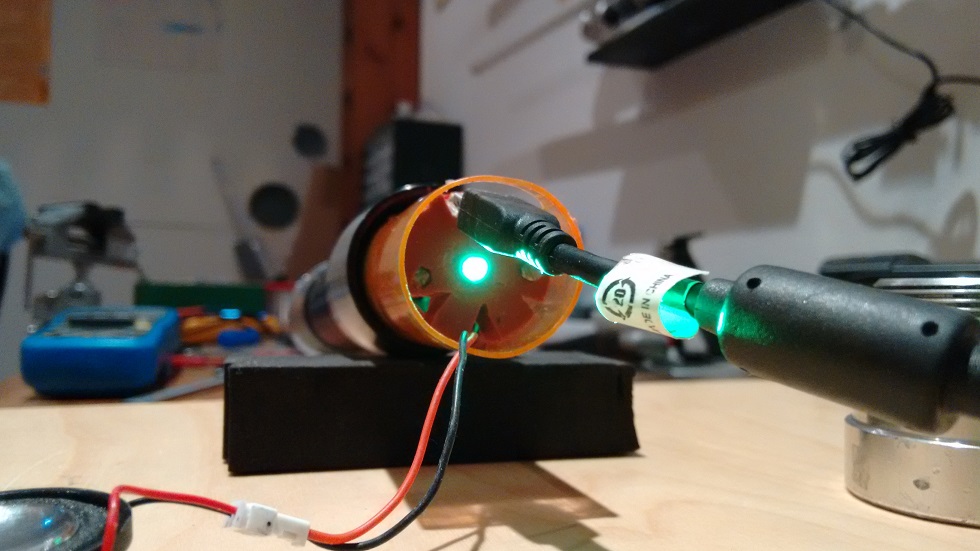
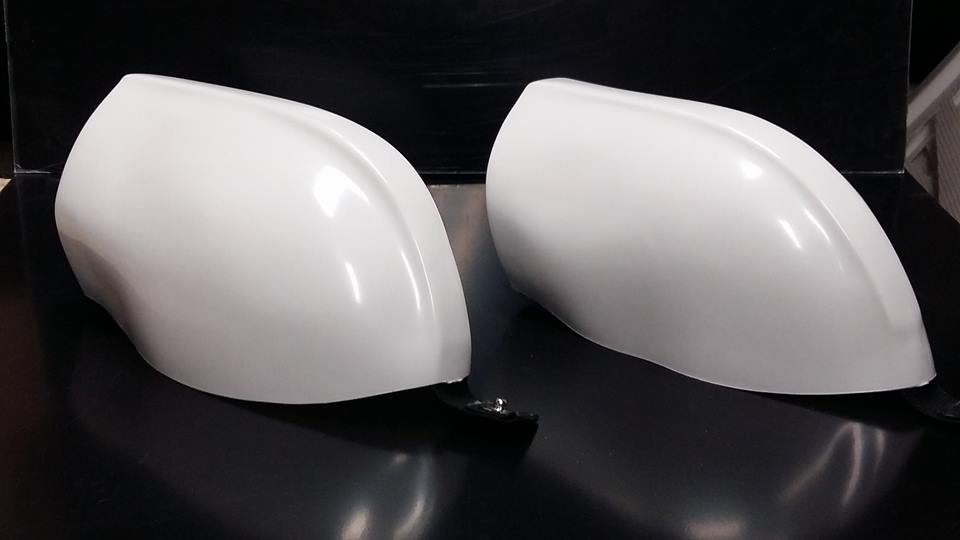
I'll just let the pics do the talking (sorry, late night and i'm exhausted after finishing only step 16 of 600 of the Lego Ghostbusters Firehouse for my kids)1 point
-
Started the frame prototype,,,, this is the inner section.. Extra switches and functional safety shown... Two out thinner pieces will sandwich the inner part to give it the same layered look of the vintage frame..1 point
-
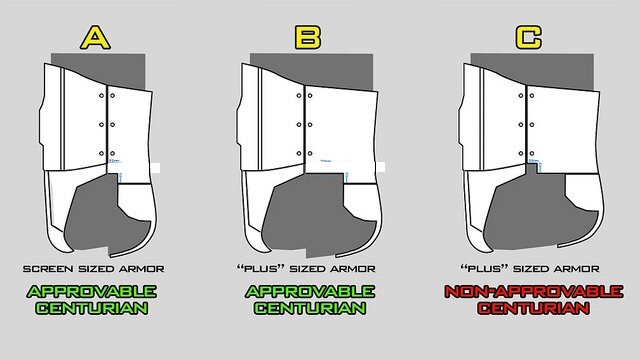
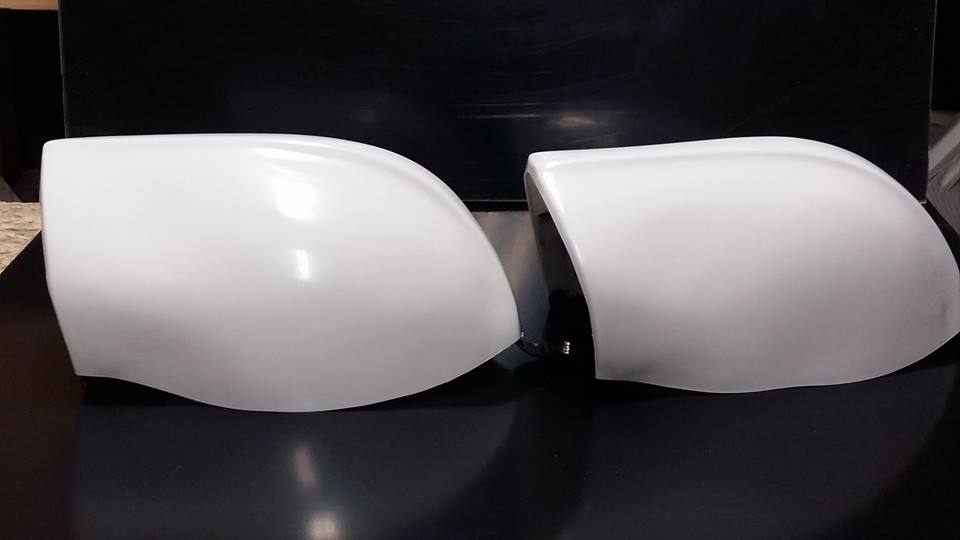
Not quite. The left side of the armour matches up better than the right which is slightly shorter, so the notch falls short of matching up with the corner of the abdomen. The left side matches up better, but neither are exactly perfect matches. That's the beauty of the original armour The first photo you posted has a bit of perspective going on, making the abdomen look longer because it's closer to the camera. The second photo has both parts butted up together and you can see the parts match up like in the image I corrected. But you are right in the fact that the tops want to line up and disregard any mismatch lower down. You can't have it both ways when you are having to make all these changes to make the armour fit you properly.1 point
-
Interesting. Seems on this screen-used kit, both are correct? Or maybe they are different screen-used kits? Weird! Either way, as long as the back (back/kidney/butt) fits you properly, and you make sure your ab/kidney is lined up at the top, you will do fine for Centurion.1 point
-
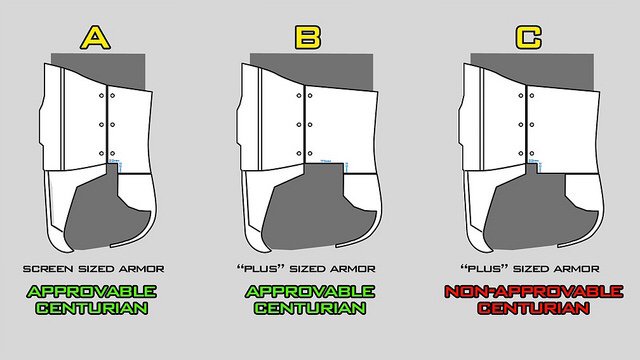
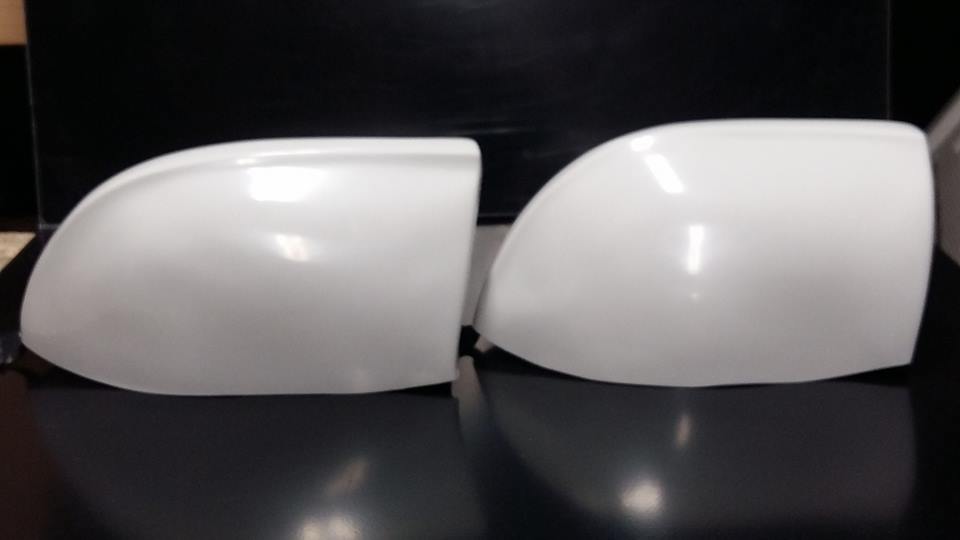
This is how the parts should match up correctly.
 1 point
 -
The problem here is that the image posted is incorrect.
 1 point
 -
About the greaves... Shove them down as far as you can before considering any more trimming. It looks like they can be pushed down still a bit. That might be enough to clear your knee. Make some elastic stirrups to keep them in place. (I love my elastic stirrups!) I overtrimmed the bottom of my shins because I wasn't watching how they kept creeping up on me while I was adjusting the size. For my new build, I will install temporary stirrups before sizing to make sure I get the length correct this time.1 point
-
About that kidney/ab thing.... Make sure the kidney and ab are lined up at the top. Don't worry about how the kidney notch is lining up with the bottom of the ab. The top alignment is what matters for Centurion. The bottom is all covered by the belt. On my kit, you can see how the tops are aligned, but the bottoms are not. That's okay for Centurion.1 point
-
http://whitearmor.net/images/newsletter2015/inthisissue.png From the DL From the XO Notable Troops Advanced Tactics Awards, Imperial Attache Outstanding Achievement Award & Master Armorer Award Follow FISD http://whitearmor.net/images/newsletter2015/fromthedetachmentleader.png Greetings Troopers! Just when you thought that the staff was going on holiday for the summer, think again! The FISD staff continue to keep the ball rolling with a slew of new items and updates for you, our most favorite Stormtrooper. Yes, the dark side has cookies, but we have CRL updates, forum updates, program updates, new merch and more. So take a break with your favorite smoothie and let's see what we have in store for you. Packs are on our minds, lots of packs. - The Spack Pack is now part of the ANH Hero CRL, so regardless of which ANH costume you do, you can rock a pack. - The Shock Trooper can now wear a pack as an accessory. Pictures are on their way, but the text has been approved and you are ready to go. Rogue One The Rogue One TK CRL first draft is complete and off to the LMO for review. Pictures are in progress and it should be ready for approval in July. Oh, and did you want dirt with that? Maybe a nice DLT-19? Yes to both! Keep your eyes peeled, it's going live sooner than you think. Rogue One Sandies to MEPD There has been a lot of chatter regarding if the Rogue One sandtroopers, also known as Jedha or Kyber troopers, the ones with the fabric packs, should stay on FISD. However after much discussion, the decision was that MEPD had a strong desire to create a welcoming experience and support of this costume, and so anyone interested in going full Kyber with their Rogue One trooper should log in to MEPD and see how to take their dirtyness to the next level. I think this is a natural fit both for the costume and for our members, and am highly confident that MEPD will do it justice. Forum Upgrades After many years of being a stick in the mud, our current forum software is no longer supported and we are upgrading. This meant a few days downtime for us, but the end result has been worth it. The UI now looks a lot like MEPD & SpecOps which will make being a dual member much easier, and there are a lot of new, convenient features such as being able to drag and drop photos in to a post. Nice, eh? And yes, there is even more goodness in the pipes. New Shirts, ID Badges, and more! The Evolution of a Trooper shirt is back and on sale after many years absence - you'll want one for sure! Also, we have changed vendors for the Celebration shirts so if you missed out you can now get one on demand. FISD ID badges are also on sale (they are super cool!) and after many iterations, a commemorative First Order version of our logo patch. So, check out the latest shirts on offer and be on the lookout for the next coinage & patch runs. Sounds good, so what's next? The First Order CRL is being updated and will soon have paths for Expert Infantry and Centurion levels. This is also true of Captain Phasma who is quite popular in the ranks. Also, the HWT CRLs will be broken out to include newer variants. Both should be done in July. And in case you missed it... - FISD Hockey Jerseys are still on sale. EDIT: Run ended prior to forum upgrades delayed publication of the Newsletter. - We launched the Master Armorer program. Ever help someone go EI? You can get a "win" for it and start racking up points. Think the EI badge is nifty? Check out what we have for builders. Summer is always a big parade season so I'll leave you with a final reminder to DRINK WATER. No one wants to win the dehydrated trooper award. Have a great month! With unquestioned loyalty, Paul TK-8020 "Daetrin" FISD Founder | DL http://whitearmor.net/images/newsletter2015/fromthexo.png If it seems like we just did this, that's because it wasn't all that long ago that we did this... Even though it was indeed not that long ago, it is always a good time to sit down and read even more stuff about Stormtroopers and what our peers in shiny white armor (and the various other types of TK costumes) are doing across the globe, wouldn't you agree? As always, we have a lot of activity happening and some great events and achievements to highlight. The Staff have been busy with a great many things in the background, and there is never a shortage of EIB and Centurion applications or awards to acknowledge. So as the Summer Season Heats up.. Take advantage of the opportunity to get to know your fellow members. Attend barbecues or get-togethers. Most of our world is entering the nice weather that allows for those things, so don't let an opportunity to get to know someone a little bit better pass you by. Also, be sure that you continue to do all of the things that lead to success when trooping - hydrate, maintain your armor, host or attend armor parties and pass along all that you have learned here. Take a new recruit under your wing and lead them to the FISD - and maybe even further to the rolls of Advanced Tactics Award recipients if you are already one yourself. If you're not, no worries, it isn't that difficult to become one. Take up the battle cry and become a part of the March to 1000! You're a TK, you're inherently awesome. Show the world what you can do, and make memories for them that they'll never forget! Be that Stormtrooper that they saw when they were young, the one that changed their lives forever. We Also Need to Acknowledge the Web Team Perhaps you've noticed that things look a little bit different around the Detachment these days. Well, we were due for a forum upgrade, and the supreme web-knowledge guys (the uber-nerd overlords) dug in deep and did their thing. Looks pretty snazzy now - at least I think it does. This is just another of the continuing efforts being pursued by the Staff to improve the Detachment and the experience for you, the members. Obviously, the timing was a bit rough, as this Newsletter should have been published at the height of the upgrades. A little bit of time lost is well worth the results though. One thing that many will be happy about, I'm sure? Well, see for yourself. Be sure to try out the Search feature at the top of the page. Of course, there are growing pains associated with change. The biggest issue that we are seeing at the moment is purely coincidental, and that is the decision by our formerly favorite photo-hosting site (Photobucket) to charge for third-party hosting. As a result, sadly, most of the photos in build threads, and posts from the past are missing in action. Hopefully members will get those threads repaired, but that will be a lot of work for everyone to tackle so we will see what happens. In the meantime, get comfortable with the new setup, and if you find any bugs/glitches/problems - or if you have any good suggestions for improvement, please share them with the Staff. We will be doing the same! You Know What I Think is One of the Best Things About Being a TK? I say it and post it all the time in Star Garrison, and I'm sure that the non-TKs are really tired of it, but that's alright, they hate us cause they ain't us. Anyway, what I say (to pretty much every single new recruit to the Garrison) is this: When it comes to events and costumes, there are never enough TKs, and there are never too many TKs! Being a Stormtrooper doesn't make you cool, but if you are cool, you're probably already a Stormtrooper! Have Fun and Be Safe Out There, Troopers - Take Lots of Pictures and Share Them Here, Too! With Unquestioned Loyalty, Tim Waychoff TK-51878 "Dark CMF" FISD Executive Officer http://whitearmor.net/images/newsletter2015/notabletroops.png Want Your Troop to be Include? Post your troop report in the Field Training Exercises section here http://www.whitearmo...ning-exercises/. Those with troop logs please post a separate troop report as it is easier to link too. RSPCA Million Paws Walk 21st May 2017 http://imageshack.com/a/img923/9141/FfbIe6.jpg More here: http://www.whitearmo...-21st-may-2017/ By: Glen, gmrhodes13, TK85421 Walk A Mile In Her Shoes More here: http://www.whitearmo...s-solo-journey/ By: Teresa, Soulart, TK41307 May the Fourth Rycroft School More here: http://www.whitearmo...der-candidates/ By: Teresa, Soulart, TK41307 HBF Run for a Reason 2017: Imperial Attache Outstanding Achievement Award In order to recognize those who have gone above and beyond the call of duty as members of this program, the FISD would like to announce a new accolade: The Attache Outstanding Achievement Award ribbon. This distinction will go to those who are not only consistently assisting present Troopers, but helping future Troopers on their white armor journey as well. This includes greeting first-time posters, offering advice and guidance, assisting with EIB and Centurion levels and staying active on the FISD and/or their local boards. Recipients are considered on the basis of a combination of those contributions and been an Attache for at least one full year. For those of you not familiar with the program, the Imperial Attaches are the ones that are on the "front-lines", using their knowledge and experience by helping out in various areas and contributing to the betterment of the FISD and 501st Legion. If you are interested in joining the program or would like more information, I have provided a link below. Below are the Troopers who will be receiving the award : 1. Randy (magni) NEG Attache- Is always in the forefront of providing great information, greeting new folks and assisting future and approved TKs with advice and guidance. 2. Allan (allan1313) ECG Attache- Also a mainstay here and one of our best I.A.s by far, he exemplifies the "Troopers helping Troopers" motto. 3. Tony (ukswrath) GGG Attache- In addition to serving as one of our D.O.s and helping folks on a daily basis, Tony's build threads have been viewed over half a million times! With over 8,000 posts to his credit, his contributions to the FISD are legendary. 4. Andrew (Sly11) Redback Garrison Attache- The "Wonder from Down Under" is also one of our D.O.s, and his knowledge of armor is simply amazing. His white armor wisdom and sage advice have helped countless Troopers become members of the 501st and FISD as well as join the ranks of EIB and Centurion. Please join me in congratulating them, and may you continue to serve the FISD, the 501st Legion and the Empire proudly! Attache Program information: http://www.whitearmo...ttaché-program/ With Unquestioned Loyalty, Joseph Pedigo TK-10963 "justjoseph63" FISD Amabassador http://whitearmor.net/images/newsletter2015/advancedtactics.png This month the 1st Imperial Stormtrooper Detachment would like to congratulate: Expert Infantry Badge Award: Will Humphies "willatfisd" TK 10064 EIB 727 Logan Lange "Logann_Blueline" TK 50911 EIB 728 Telmo Aparicio "Thrawn78" TK 50678 EIB 729 Joshua Hitt "hittman" TK 11051 EIB 730 John Cambra "johnbc21872" EIB 731 We are aiming to hit the 1000 mark for EIBs this year, and thanks to you we are getting close fast! Centurion Award: http://www.whitearmor.net/eib/centurion_badge.png Brian Vetter "vettereddie" TK 75053 (Centurion 334) Stephen Bauchan "GoofySGB" TK 17081 (Centurion 336) Roy Owen "rjowenuk" TK 91055 (Centurion 337) Will Humphries "willatfisd" (Centurion 338) Great job on reaching Centurion! If you see any of these Troopers around your Garrison or Squad, be sure to congratulate them! With Unquestioned Loyalty, Joseph Pedigo TK-10963 "justjoseph63" FISD Amabassador http://whitearmor.net/images/newsletter2015/followfisd.png Don't Forget We're on Facebook and Twitter! Facebook: www.facebook.com/whitearmor If you're on FB, stop by and say hi, ask questions, and share stories! Twitter: www.twitter.com/FISD501st or @FISD501st follow FISD on Twitter! Instagram: www.instagram.com/501stfisd With Unquestioned Loyalty, Tim Waychoff TK-51878 "Dark CMF" FISD Executive Officer On behalf of the 1st Imperial Stormtrooper Detachment Command Staff and the Imperial Propaganda Department, <End Transmission>1 point
-
Great advice from Christine...as usual. Isn't it nice to see the pieces coming together and really looking like a TK? I also think you should work on the permanent strapping. Getting the chest/ab/kidney/but pieces fitting correctly is the bulk of the work and really the most important. You can't truly fit the arms and legs properly until the torso is correct. I think you'll have to trim some off the bottom of your kidney plate to raise the but piece up. The chest position over the ab looks pretty good as does the chest-to-back positioning. Like Christine said, it's hard to tell for sure because your shoulder bells were taped hanging off your back piece rather than hanging from a point where the chest and back connect but it looks pretty good to me. Your newly trimmed bells will look better next time you tape this up. Oh, and if your chest piece is choking you, you can trim the neck line for some more room. You should consider bending the lower sides of your chest in and around your ribs. Those ends are flaring out a bit. May help the overall look/proportion...it did on mine. You could start with something simple...the white strap connections between the top of the chest and the top of the back. This would also make it easier to get the armor on/off during test fits. Then trim the bottom of the kidney. Then tape it up again and check the fit. If OK, do your brackets connecting the kidney/back and chest/ab. Test fit again. Check alignment at the sides between all the pieces and check that your bottom of chest is in a good spot above your ab buttons. Put your belt on too, helps hold it all together and gives you a better idea how the armor truly feels around you. If OK, do brackets connecting kidney/but. Also do your left side connection between the kidney/ab. This is an important part as this not only fixes the pieces together, it also makes the whole thing more rigid, taking some of the weight of the ab piece so it isn't completely hanging from the chest. Test fit again, checking the left side connection (you want it tight). If OK, do your right side rivet/strap connection. This is just an outline of the process I would do....if I could go back and do it again. You may have a better method in mind, take it slow. Trimming too much off these large pieces can be catastrophic so baby steps are needed. Lots of test fits are critical. If something doesn't seem right or you need help, just let us know....especially if you're using screen accurate strapping/bracket system...it can take a while to figure it all out.1 point
-
1 point
-
OK, so now it's back to the LMO to get the photos posted and approved.1 point
-
OK, I'm adding... L3: Inside each tear will be a raised area that is grey, with the black lines being engraved, not painted. L3: Frown is recessed to the proper depth compared to ANH.1 point
-
Yes. I am posting the progress at MEPD, since this is now a MEPD pack. http://forum.mepd.net/index.php?/topic/15207-rogue-one-jedha-patrol-sandtrooper-backpack-build-thread/#comment-1947311 point
-
I'm gonna need some clarification on this whole bump thing. I've been staring at the helmets for a while and can't put my finger on what you guys mean. As far as calling out materials in the CRL such as plastic for the hand guards, wouldn't it be better to just say that the rubber hand guards aren't permitted? Makes it easier on people if they want to make their armor out of fiberglass or cast from resin if they want the higher levels of approval.1 point
-
SE-44c Blaster Pistol - Painting Now that the weather is pretty fantastic for painting, it's time to get this blaster finished up. 1) First up was priming. I switched to Valspar spray paints from Lowe's this time for this small project (as opposed to the usual Rustoleum from Home Depot that I normally tend to use) just to try something new. The primer is a light grey colour. 2B7612EA-F434-419E-8F6C-3E23D4EB5264 by Taylor Goodson, on Flickr 2) Then, I coated the blaster with Valspar gloss white. DFA6C4BC-1C20-44E0-B67C-47492B5AD92B by Taylor Goodson, on Flickr 3) Spray painting was going to prove too difficult to get all the hard-to-reach areas, so for all the black (and the teeny tiny little red square), I enlisted aid from a friend of mine who's quite good at painting small details (as my talents in that field are somewhat lacking). Here are some shots of that in-progress. 9419CE32-5D9B-4D55-9F62-4DADF1A120B5 by Taylor Goodson, on Flickr 38DD03FC-46CC-49B4-8E8E-FB2F34CBC4DF by Taylor Goodson, on Flickr 4) We just used cheap acrylic paint for all the detail painting on the blaster, but, because it's basically a matte finish, it needed a top coat. I gave the blaster a handful of days to complete dry and cure before hitting it with Rustoleum Gloss Clear Coat. 16AC26B9-4113-4492-BE9C-7627B441DF08 by Taylor Goodson, on Flickr 5) Two coats of that was enough - then set it aside to dry before reinstalling the screws.1 point
-
Helmet Interior Upgrade The Anovos Standard Line helmet, as you can see above, comes with a pre-installed hard hat liner but is otherwise unfinished. To get a nice, clean look, I used Plasti-dip and acrylic black paint as I've done with most other helmets. 1) Remove the hard hat liner. It's held in with a pair of screws - once you remove those you can simply pull the liner off the tabs. 60150F4D-0D5B-48CC-8312-8472AE64AB61 by Taylor Goodson, on Flickr 2) Cover the areas we don't want touched with the Plasti-dip with painter's tape. The tabs, lenses, and black plastic interior pieces were all covered as well as the bottom lip to protect from spraying the dip. BA32FC57-ACDD-4537-9470-4F5DC63D6E40 by Taylor Goodson, on Flickr 3) Spray the interior. I do a couple light coats followed with a heavy coat to finish it off. CB2A6C97-B2C5-4DE8-83A2-B7C94B89DBBC by Taylor Goodson, on Flickr 4) Before the Plasti-dip dries, carefully remove the painter's tape. If you wait too long, the plastic dip can harden over the tape and pull up with it. CD9B58A4-37B3-4F2A-953B-982C40EE643F by Taylor Goodson, on Flickr 5) Clean up hard to reach areas and taped-off edges with black paint. You could also follow-up with the brush-on Plasti-dip, but I find just a touch of black paint to be easy and effective. Here's a shot of the chin vent detail that was taped off before being touched up. 92D71121-39F0-45E2-8D72-B48F7E86B5AB by Taylor Goodson, on Flickr And here's what it looks like after: 5A1F89E4-399E-49DC-B614-A187D87595FB by Taylor Goodson, on Flickr 6) Finally, re-install the helmet liner (if you choose to use that over padding). C705B5B6-D374-4C4F-9740-33A0F5DFD542 by Taylor Goodson, on Flickr Now it's ready to go!1 point
-
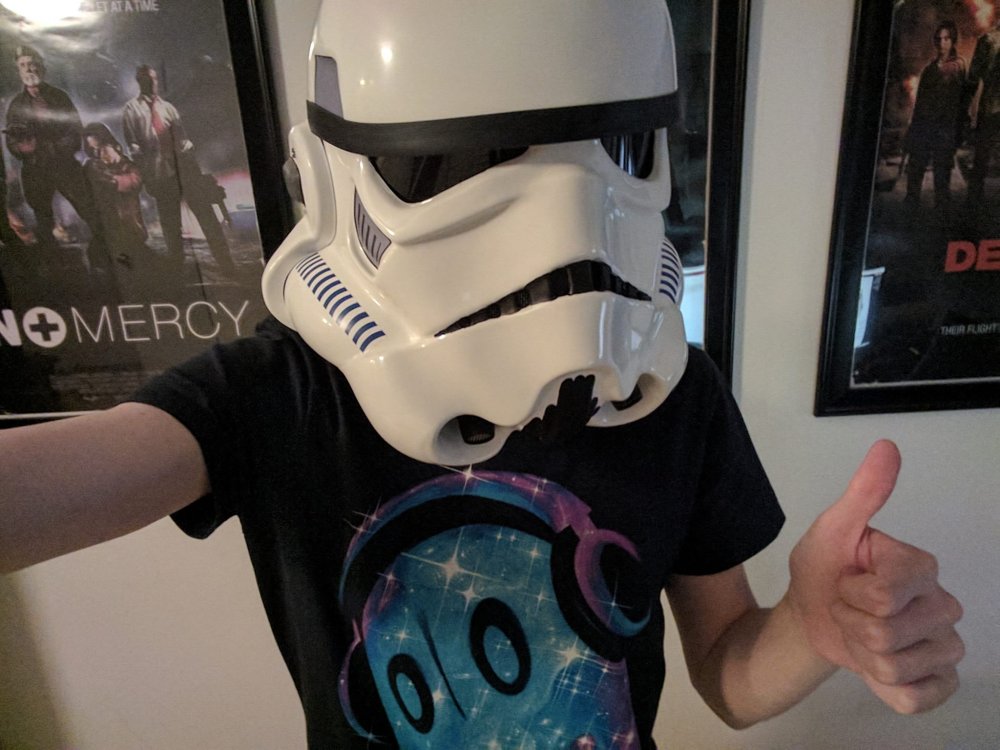
Anovos Standard Line Helmet I need to start this particular post with my personal thoughts on Anovos. I am shocked at their inability to project and hit targeted release dates. As someone who works in an industry in which timing is everything, I cannot fathom why Anovos seems to be unable to produce material in the time frame that they themselves designate. I know there is much more to be said due to the experience of others (such as customer service woes, shipping issues, et al), but my biggest problem with them is that they cannot seem to get a firm grasp on how to meet a deadline. That all being said, I can't take away from the product. A good bit of it (not all) is actually pretty good - the helmets in particular. The Shoretrooper and Tank Driver helmets released earlier this year are quite nice and easily some of the most accurate out there. The quality of their ABS armour plastic, not so much (it's pretty thin), but the pulls are good and the detail is there. The First Order TK helmet isn't bad, either - certainly the premiere line helmets are some of the best, though the standard line isn't too far behind in my opinion. I picked this particular helmet up from one of my Garrison mates who had bought it while back, and that is most likely the only way I would purchase one of Anovos's offerings - second-hand - unless they could somehow guarantee their shipping deadlines. I don't want this to devolve into a bashing of Anovos, but I just wanted to be clear with my position before continuing on. With all that being said, here's the helmet itself! The box: C767F328-03CE-4E9F-B052-D956BF7EC59D by Taylor Goodson, on Flickr Front: BC19499C-60D7-46B2-AB6E-F1B0DBBA5A4F by Taylor Goodson, on Flickr Back: D8ECD5C4-BEB2-462E-8AB8-4C6325C28EA9 by Taylor Goodson, on Flickr Side: 39DB71E9-4EEB-4CCF-9F04-F084390B4818 by Taylor Goodson, on Flickr Interior: 3C9B13A4-7B8E-48D7-8283-6B61F8F971E1 by Taylor Goodson, on Flickr Obligatory selfie: BEFC6480-FC9B-4A29-866A-40EF99BB83E4 by Taylor Goodson, on Flickr Some thoughts on the helmet itself: It's pretty light but still quite durable, not dissimilar than most of our standard TK buckets. There are a few seams here and there that you can see through if you really look for them (notably near the aerator in the left front and a pair of joined points along the bottom back edge), but nothing that isn't easily reworked. The helmet liner that comes pre-installed is decent and easily adjustable with a knob at the rear, and it's also easily removed with a pair of screws (the same screw allows for adjusting the helmet liner front to back as well). It's a fairly large bucket - with the helmet line pushed back I have ample room between my nose and the front of the helmet, perfect for adding fans and other electronics down the road. The lenses are curved, so they do distort your vision a bit similarly to the TIE Pilot bubble lenses (though less extreme), so that would definitely go in the con section as well. Overall, I'm happy with it - it's no more or less comfortable than your standard TK bucket if said bucket was 15% larger. Now, time to dive into some improvements!1 point
-
Try not to trim your shoulder bells in a straight line like you would if you followed your yellow tape. The real ANH shoulder bells were trimmed in a curved shape. Here are a pair of my bells to show you how to trim them, although I went for a wonky look and you might want to keep them a bit neater Trimming them in a curve really helps with the overall look and reduces gaps.
 1 point
 -
Things like the frown being attached separately are more properly fitting of levels 2 and 3 Imo.1 point
-
Hey Frank welcome back and thank your Centurion application, let's do this. CRL and Centurion Application Requirements: All required submission photos are present. Thank you for making the corrections suggested on your EIP app. We are happy to say your armor displays all the elements as set out in the Centurion CRL. Sly and myself would like to congratulate and welcome you to the L3 rank brother. Great job Other-Armor Fit/Assembly: In this section we may mention any additional adjustments needed to enhance the overall armor appearance, of course we have nothing to add . Excellent job, troop on Frank1 point
-
Another excellent Newsletter! The forum really is great. It is becoming very user friendly. Congrats to the new Attache Award recipients!1 point
-
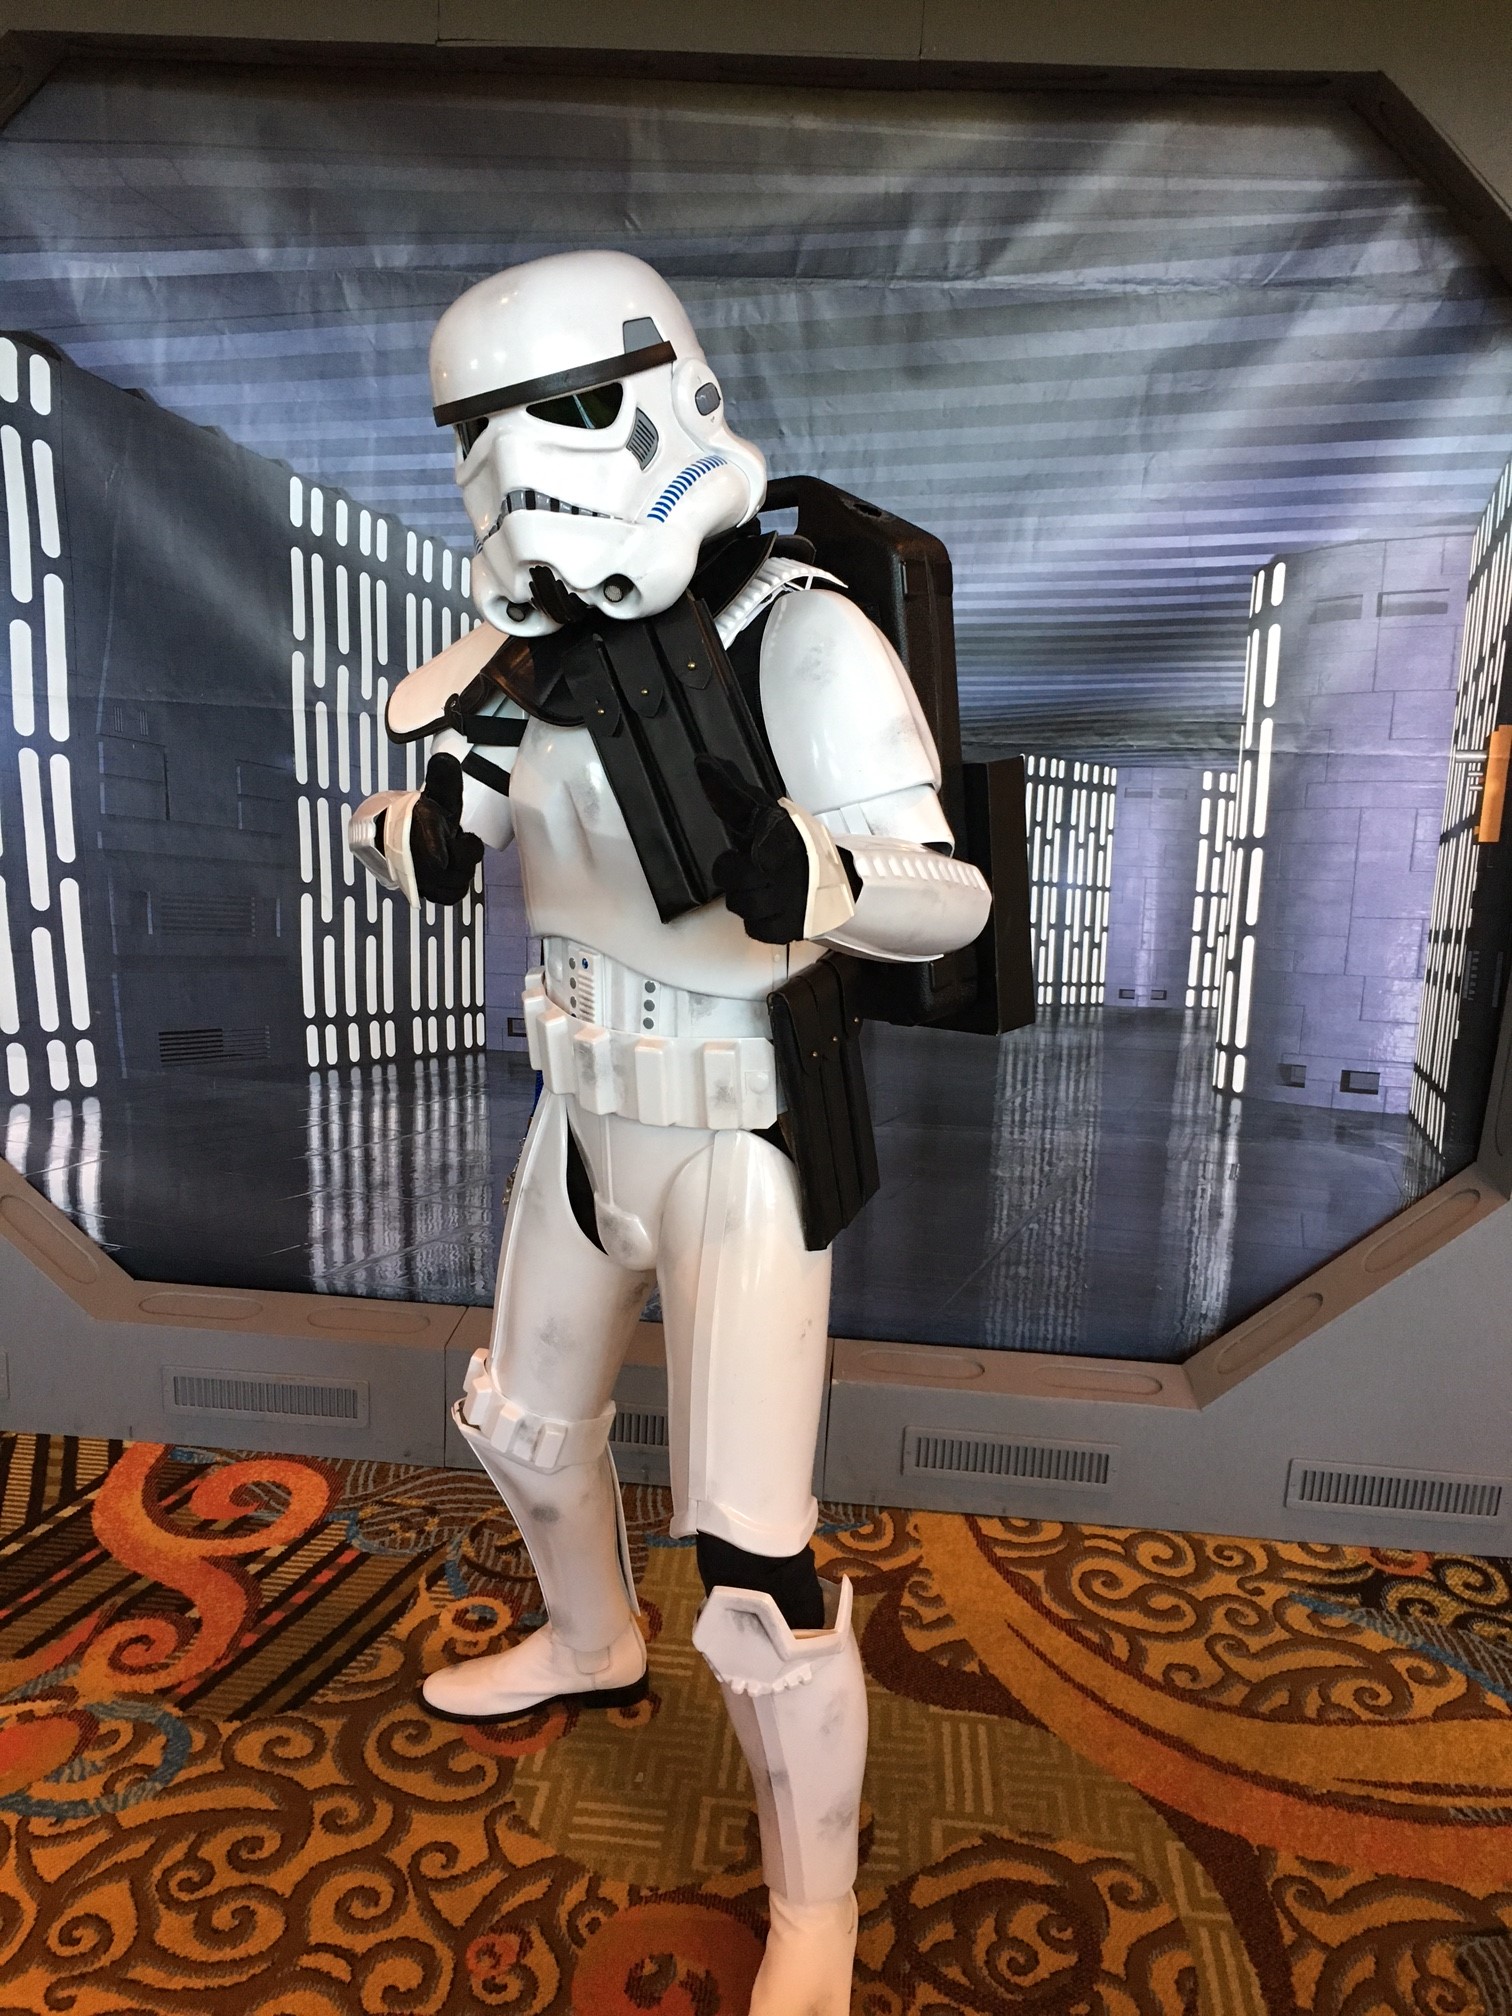
Converted to an HWT for a bit (image below) and working on an ESB conversion after that (Helmet completed tonight, also pictured below). Costume still fits great after about 20 troops. I resized the thighs down yet a bit more and it fits like a glove now.
 1 point
 -
If you are in Nuernberg, you can come and pick it up, I'm in Munich but I can send per Post as well. The Stardust is also based on the Nano design, the MP3 player module is different, but the board comes with an integrated 3W audio amp. You need therefore only a speaker and some Wav files.1 point
-
Hi fellow Stormtrooper and Star Wars fans! I've recently finsihed my E11 blaster, having spend a good portion of my Xmas vacation to plan the assembly, put together the parts, install the electronics. My goal was to build the E11 to not only look like the standard issue weapon of stormtroopers, but also to sound like, feel like and as a whole be like the E11 I remember from the movies. For this reason I wanted to give it a sci-fi look, still moving inside the boundaries of strictly visual screen accurateness, enhancing it with an Arduino based board I programmed with light and sound effects. The body of the blaster is a DoopyDoo E11 resin kit, inside the blaster I've built in the following parts to achieve the effects: - a DIYino Prime v1 Arduino compatible board - 32 neopixel LEDs (in two stripes of 27 and 5 LEDs respecively) - a RGB Cree HP-LED module for the nozzle - a 20mm 2W speaker - an 5V DC/DC converter - a single Li-Ion battery of type 18650 - 2 neodyn magnets - a momentary switch with long lever - an 96x32 OLED display - an aweful lot of wires - lot of fun programming it The blaster is ~90% ready, I need to add a trigger guard, and cover the opening on the side of the barrel to hide the wires. I'm happy with how it turned out, it's fun to play with it, I made a lot of learning during the build process and it was worth every min of work.1 point
-
i am working on a new project using the arduino microcontroller to give to the stormtrooper helmet new features: - 2x fan brushless cooling blower fan with themperature sensor control - voice amplifier 3w+3w - static burst effect added at the end of talking - loop stormtroopers random talking when idle the set includes: Arduino Nano 328 http://www.ebay.it/itm/200964325858?ssPageName=STRK:MEWNX:IT&_trksid=p3984.m1497.l2649 DHT 11 temperature sensor http://www.ebay.it/itm/DHT11-DHT-11-Digital-Temperature-and-Humidity-Sensor-Temperature-sensor-Arduino-/400489574221?pt=LH_DefaultDomain_0&hash=item5d3f09ef4d http://learn.adafruit.com/dht/overview WT5001M02-28P Mp3 sound module http://www.aliexpress.com/item/WT5001M02-28P-MP3-Voice-Module-SD-Card-Module/2050529179.html http://www.microelectronicos.com/datasheets/WT5001.pdf LM393 Sound sensor http://www.ebay.it/itm/171219012684?ssPageName=STRK:MEWNX:IT&_trksid=p3984.m1497.l2649 d.s. http://www.ti.com.cn/cn/lit/ds/symlink/lm393-n.pdf (but i think this is better http://www.ebay.it/itm/161245499808?ssPageName=STRK:MEWNX:IT&_trksid=p3984.m1497.l2649 because support the analog reading of sound so i might change to it) 2x fans 5volts 0,10 Amp http://www.aliexpress.com/item/5015S-5V-0-1-0-3A-Black-Brushless-DC-Cooling-Blower-Fan-50x15mm-hv3n/1244855982.html 2x NPN transistors 2N2222A (40V 0,8A) http://www.ebay.it/itm/SALE-New-20-pcs-X-2N2222-2N2222A-NPN-40V-0-8A-Transistor-TO-92-/200964739171?pt=LH_DefaultDomain_0&hash=item2eca6e9063 mini amp 3w + 3w http://www.ebay.it/itm/181303482967?ssPageName=STRK:MEWNX:IT&_trksid=p3984.m1497.l2649 d. s. http://diodes.com/datasheets/PAM8403.pdf voltage regulator 5volts 1A http://cgi.ebay.it/ws/eBayISAPI.dll?ViewItem&item=171178535811 the power supply is based on 6xAAA rechargeable batteries (2 boxes linked in serie) for a total of 7.2v (800mAh). I prefer to have the safer nickel–metal hydride (NiMH) batteries inside the helmet rather than lithium ones. this is the actual scheme (not final and not 100% tested) the end project should include 4 small boxes: 2 batteries boxes, 1 box for arduino, 1 box for mp3/amp modules, plus microphone and themp sensor. today i had to stop the work because i realized that i need an external 5v voltage regulator to give enought power to all the components. So i must wait around a month the delivery from china of that component to start again working on it. See you on the next stage (maybe final ) in this picture u can see the themperature sensor (blue) and the fan activated by transistor and arduino the actual stage (arduino nano linked to mini-usb)1 point
-
Assembly cont... Shoulder Bells. Prepare upper and lower shoulder bell sections for assembly. Funny thing happened here. So for at least a hour myself and my wife measured and measured, then attempted to make mathematical calculations, all to come up with the exact center of the main bell section so when the upper was glued in place it would be centered. Here's our progress. After all that I finally said, "forget this!" and I eye balled it. Man! talk about over thinking something lol Once I found what I believed was my center I traced out the upper section, applied glue and assembled. Finished.1 point
-
Assembly cont... Biceps. Cleans all burs from corners and prepare for assembly. Test fit sections prior to assembly. For those who do not have a template for your inner cover strips, follow along. If you do have a template feel free to skip ahead. NOTE: The inner cover strip is only needed on the bicep outer edge. The inner edge has a glue tab. Measure and cut cover strips from the strip material provided. In my case the cover strips measured 215mm in length and I used the standard 25mm for the width. Outline and cut out outer bicep indent. For best results evenly use the cover strip between bicep sides. Cut out indent section. Trim and taper upper and lower strip ends. Test fit cover strip and bicep halves. Apply glue to inside of bicep, hold in place and let dry. 45 minutes later remove clamps and magnets. I cut a bit too much off at one of the edges so I applied painters tape to create a dam for the glue the will recreate my missing area. Apply glue to cover strip this time. Easier to manage in my opinion. A bit more glue at the discrepancy area lol. Assemble. 45 minutes later. Test fit the inner connecting edges. Apply glue and assemble. UPDATE 12/1/15: If you're shooting for accuracy DO NOT glue the inside of the bicep. It will be velcroed at a later time. Finished, prior to filler1 point