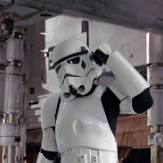
Sawanator[TK] Posted November 21, 2023 Report Share Posted November 21, 2023 TK-13239 Requesting ANH Stunt EIB Status Name: Matthew Sawa TK-13239 https://www.501st.com/members/displaymemberdetails.php?userID=37125 FISD: Sawanator Garrison: Canadian Height: 6’2” Weight: 225lbs Armor and helmet maker: Dave’s Darkside Depot Blaster maker: QuestDesignCanada Boot Maker: Custom boots made by Jasmine Martins. These boots were based of a pair of Crowprops that did not fit. I have a size 14 wide foot and I could not find a shoe maker. She did a pretty outstanding job IMO. Canvas Belt Maker: ImperialIssue Handguards: Justjoseph63 Holster and Neck Seal Maker: DarmansProps Here are my pictures for submission: 2 Quote Link to comment Share on other sites More sharing options...
justjoseph63[Staff] Posted November 21, 2023 Report Share Posted November 21, 2023 Lookin' sharp, Matthew! A few tiny issues, but nothing that can't be remedied, and I can definitely see an EI badge in your near future! You might want to think about extending the paint on your vocoder a little. It doesn't have to go all the way to the top as seen in the first two reference images, but even the ones that didn't (last image) went a bit higher. I would suggest covering the ridge(s) as seen in the first pic. The imprinting on your rubber gloves will come off easily with a small amount of Goo Gone or any stain remover. I think you pretty much have this nailed, and looking forward to seeing you at the next level! 1 Quote Link to comment Share on other sites More sharing options...
Nairy[Staff] Posted November 21, 2023 Report Share Posted November 21, 2023 Exciting Matt! Love the angle of the TD on the back, good job! And the work you've done to cover the previous split rivet holes is awesome, must have been a daunting task at first, so good job! You've got this! Quote Link to comment Share on other sites More sharing options...
TKSpartan[Staff] Posted November 21, 2023 Report Share Posted November 21, 2023 Hi Matt, great to see your EIB application! I will need you to do me a favor , could you please add your Legion Profile link to the info.? One of us will be with you ASAP. Added to the processing line. Quote Link to comment Share on other sites More sharing options...
Doggydoc[Staff] Posted November 22, 2023 Report Share Posted November 22, 2023 Good luck Matt Quote Link to comment Share on other sites More sharing options...
gmrhodes13[Staff] Posted November 22, 2023 Report Share Posted November 22, 2023 Good luck trooper Quote Link to comment Share on other sites More sharing options...
Sawanator[TK] Posted November 22, 2023 Author Report Share Posted November 22, 2023 19 hours ago, justjoseph63 said: Lookin' sharp, Matthew! A few tiny issues, but nothing that can't be remedied, and I can definitely see an EI badge in your near future! You might want to think about extending the paint on your vocoder a little. It doesn't have to go all the way to the top as seen in the first two reference images, but even the ones that didn't (last image) went a bit higher. I would suggest covering the ridge(s) as seen in the first pic. The imprinting on your rubber gloves will come off easily with a small amount of Goo Gone or any stain remover. I think you pretty much have this nailed, and looking forward to seeing you at the next level! Thanks for the tips. I can do that easily! I wasn't sure what to do about the gloves, so definitely feedback I was looking for. Cheers. Quote Link to comment Share on other sites More sharing options...
Sawanator[TK] Posted November 22, 2023 Author Report Share Posted November 22, 2023 19 hours ago, Nairy said: Exciting Matt! Love the angle of the TD on the back, good job! And the work you've done to cover the previous split rivet holes is awesome, must have been a daunting task at first, so good job! You've got this! Ya, that really sucked. I was following the standard gaps then realized I needed to even it out for larger armor. Oops! I would still love to improve those plugs and really buff it out, but it's good enough for now. Lost a few pounds once I realized that mistake! 1 Quote Link to comment Share on other sites More sharing options...
Sawanator[TK] Posted November 22, 2023 Author Report Share Posted November 22, 2023 13 hours ago, TKSpartan said: Hi Matt, great to see your EIB application! I will need you to do me a favor , could you please add your Legion Profile link to the info.? One of us will be with you ASAP. Added to the processing line. Just did that. Should I fix things up the suggestions above first? Quote Link to comment Share on other sites More sharing options...
gmrhodes13[Staff] Posted November 22, 2023 Report Share Posted November 22, 2023 3 hours ago, Sawanator said: Just did that. Should I fix things up the suggestions above first? I would while waiting for the Deployment Officers to review, the gloves came up on another EIB application recently GLOVES: Black in color, made of either rubber, nomex, leather, or leather-like material, with no visible straps or logos/designs. A touch up of black on your vocoder should be an easy task Watch out for dressing issues too, shoulder strap under backplate, a full length mirror can be a great help if you don't have a camera person who knows the costume well. Quote Link to comment Share on other sites More sharing options...
TKSpartan[Staff] Posted November 22, 2023 Report Share Posted November 22, 2023 9 hours ago, Sawanator said: Just did that. Should I fix things up the suggestions above first? Yes please. 1 Quote Link to comment Share on other sites More sharing options...
Sawanator[TK] Posted November 22, 2023 Author Report Share Posted November 22, 2023 13 hours ago, gmrhodes13 said: I would while waiting for the Deployment Officers to review, the gloves came up on another EIB application recently GLOVES: Black in color, made of either rubber, nomex, leather, or leather-like material, with no visible straps or logos/designs. A touch up of black on your vocoder should be an easy task Watch out for dressing issues too, shoulder strap under backplate, a full length mirror can be a great help if you don't have a camera person who knows the costume well. Wow, didn't notice that. Thanks. Should I retake that picture for submission? Quote Link to comment Share on other sites More sharing options...
gmrhodes13[Staff] Posted November 22, 2023 Report Share Posted November 22, 2023 1 minute ago, Sawanator said: Wow, didn't notice that. Thanks. Should I retake that picture for submission? Entirely up to the @Deployment Officer Team, I would wait to see what they say Quote Link to comment Share on other sites More sharing options...
Sawanator[TK] Posted November 22, 2023 Author Report Share Posted November 22, 2023 (edited) I have made changes to the paint on the vocoder and removed the writing from the gloves and replaced those images in the original post. Please note, the angled shot where I tried to show my lens is the old vocoder paint job. The new paint job is in the head on shot. I also added a picture from earlier in the summer when I was trying things on. You can see the shoulder bridge over the back plate in that one. Hope this helps. Cheers, Matt Edited November 23, 2023 by Sawanator Quote Link to comment Share on other sites More sharing options...
Chemi[Staff] Posted November 23, 2023 Report Share Posted November 23, 2023 hace 1 hora, Sawanator dijo: Wow, didn't notice that. Thanks. Should I retake that picture for submission? Hi Matt. Yes please, you better retake the photo. Regarding the painting of the vocoder, maybe you can touch up the new lines a little bit, (more sharper lines). As we continue with your review, could you add these photos?: -Photo of the helmet (more from the front) where we can see the paint on the teeth. -Left thigh ammo pack rivet close up (inside) -Right thigh ammo pack rivet close up (inside) -Boots (side picture) In addition, the blaster, in the photos, looks brown.... It's probably due to the lighting when you took the photos. If it's not too much trouble, could you post others where we can see the black color well? Thanks Matt! 2 Quote Link to comment Share on other sites More sharing options...
Sawanator[TK] Posted November 23, 2023 Author Report Share Posted November 23, 2023 I've add the photos requested. I just realized I put the wrong paint on (it was too glossy). I'll have to redo the vocoder, but I can seem to find the right paint at home, so I may have to pick one up before I can re-post with cleaner lines (my apologies, I have shaky hands when it comes to fine motor things). The photo (outside shot) I added of the shoulder bridges, it that ok for submission? Quote Link to comment Share on other sites More sharing options...
Chemi[Staff] Posted November 24, 2023 Report Share Posted November 24, 2023 Hi Matt. We need to ask you for a couple of fixes while we continue with your request. The first is very common. It is an easy fix. It looks more complicated than it is. We need you to remove the excess paint from the gums. As we always recommend, you can achieve this with a little mineral spirits and a toothpick. Reference image The other fix, are the soles of your boots. The CRL states: L1.- Flat sole with a short heel. We are aware of the dangers of a completely flat sole, but you could use the dremel, or take the boots to a "cobbler" (I think that's what it's called), to smooth the edges, so that the soles look totally flat. Regarding the photos, they are fine. Although for your Centurion application (which we are sure you will apply for ), you will have to publish all the photos with the fixes made. 1 Quote Link to comment Share on other sites More sharing options...
Sawanator[TK] Posted November 26, 2023 Author Report Share Posted November 26, 2023 On 11/23/2023 at 7:18 PM, Chemi said: Hi Matt. We need to ask you for a couple of fixes while we continue with your request. The first is very common. It is an easy fix. It looks more complicated than it is. We need you to remove the excess paint from the gums. As we always recommend, you can achieve this with a little mineral spirits and a toothpick. Reference image The other fix, are the soles of your boots. The CRL states: L1.- Flat sole with a short heel. We are aware of the dangers of a completely flat sole, but you could use the dremel, or take the boots to a "cobbler" (I think that's what it's called), to smooth the edges, so that the soles look totally flat. Regarding the photos, they are fine. Although for your Centurion application (which we are sure you will apply for ), you will have to publish all the photos with the fixes made. For sure. I will fix those things and repost when it's time. Thanks for the tips on the boots. I didn't notice that. I will fix the gums and re-post that pic. So as luck would have it, I can't find my black paint. I bought it a few years ago, when I started. Went to Michaels and a few local hobby shops. Nobody is carrying the Testors 1747, and apparently Humbrol is on the naughty list in Canada, so it's hard to get replacements. Does anybody know if there is any other substitute paint brand I can use for the black on the vocoder? Quote Link to comment Share on other sites More sharing options...
Sawanator[TK] Posted December 16, 2023 Author Report Share Posted December 16, 2023 Sorry, I've taken so long. I finally found black paint. Let me know about the vocoder. I started working on the grey from the gums. I will have to touch it up in some sections that now have rough edges, but please let me know if I've removed enough. 2 Quote Link to comment Share on other sites More sharing options...
justjoseph63[Staff] Posted December 16, 2023 Report Share Posted December 16, 2023 WOW... excellent work there, Matt! Quote Link to comment Share on other sites More sharing options...
Sawanator[TK] Posted December 16, 2023 Author Report Share Posted December 16, 2023 Trying to figure out which way to go with this part. I'm not sure if I went to far on the right side (blue) and should build it back up, or if I should work on the left (yellow) to lower it a bit a just clean up the blue side into a straighter line. Quote Link to comment Share on other sites More sharing options...
justjoseph63[Staff] Posted December 16, 2023 Report Share Posted December 16, 2023 The one with the yellow arrow looks like it could (should) be brought down just a bit, and the grey paint at the top of the tooth (blue arrow) should be evened out. The rest look awesome! An alternative to stripping the paint off of the top of the yellow arrow tooth would be to use a needle file (or a popsicle stick wrapped in sandpaper**) to even out/raise the areas between the teeth, as they look a little jagged. **You can shave the popsicle stick down to the width you need. Quote Link to comment Share on other sites More sharing options...
Sawanator[TK] Posted December 16, 2023 Author Report Share Posted December 16, 2023 1 hour ago, justjoseph63 said: The one with the yellow arrow looks like it could (should) be brought down just a bit, and the grey paint at the top of the tooth (blue arrow) should be evened out. The rest look awesome! An alternative to stripping the paint off of the top of the yellow arrow tooth would be to use a needle file (or a popsicle stick wrapped in sandpaper**) to even out/raise the areas between the teeth, as they look a little jagged. **You can shave the popsicle stick down to the width you need. Great tip. Thanks. I will try that. Thanks Quote Link to comment Share on other sites More sharing options...
Sawanator[TK] Posted December 16, 2023 Author Report Share Posted December 16, 2023 Here are my boots that I've sanded down. Hope these are ok now. 2 Quote Link to comment Share on other sites More sharing options...
justjoseph63[Staff] Posted December 17, 2023 Report Share Posted December 17, 2023 Looks MUCH better, sir! Design Quest makes an awesome blaster, no doubt, but If I may make a few small suggestions: 1. The Hengstler counter- Ideally it should sit a bit lower and more toward the rear. This can be easily remedied with a drill and about 10minutes of your time. Note in the reference images how it does not sit perfectly level but actually follows the angle of the folding stock. The process involves removing 3 screws- the first being the one that holds the scope rail on at the rear (pic 1). After you remove the rail, you will be able to access the plate on the rail that the Hengstler mounts to (pic 2). Just remove the screws, reposition it, drill a couple of new holes and re-attach the screws. Done! The second item is that there is no recoil spring. This is another thing that should take about 10 minutes. The inside diameter of QD's inner shroud prevents using a "standard" diameter spring, but it can be done! I believe the end cap of the QD is removable, and Adam @revlimiter did a superb job (second pic) in his fantastic build thread for the QD. The way he did it can be found in this post (you have to scroll down a bit to see it). The Hengstler position is not the biggest of deals and the D.O.s may not mention it, but the missing spring may be an issue. Again, fantastic job jumping on the previous suggestions! I can definitely see an EI badge under your name soon, and then it's on to Centurion! Quote Link to comment Share on other sites More sharing options...

Recommended Posts
Join the conversation
You can post now and register later. If you have an account, sign in now to post with your account.