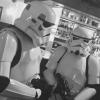
gabby7095[TK] Posted July 29, 2018 Report Share Posted July 29, 2018 Armour = Anovos Helmet = Anovos Blaster = Doopydoos Many thanks for your time Andy Gabbitas Sent from my F5121 using Tapatalk Quote Link to comment Share on other sites More sharing options...
T-Jay[TK] Posted July 29, 2018 Report Share Posted July 29, 2018 Hi Andy. Looking good so far. Beautiful armor, well built. All I noticed are the biceps seeming to rest a bit high under shoulder bells. (might just be that first picture) Not of any relevance here at all, but may I kindly suggest to replace the undersuit from Anovos?! These are known to transfer the black color onto your armor pieces and your armor starts showing this. I am not aware of any cleaning method to undo this but you can find cheap black undersuits in most motor cycle shops. Quote Link to comment Share on other sites More sharing options...
gabby7095[TK] Posted July 29, 2018 Author Report Share Posted July 29, 2018 Hi.Thanks for the quick response, here is another photo with the biceps lower. Sent from my F5121 using Tapatalk Quote Link to comment Share on other sites More sharing options...
TK-40996[TK] Posted July 30, 2018 Report Share Posted July 30, 2018 Hi good job on your armor ! You might be giving the suggestion to shorten the straps on your shoulder bels To reduce the gap between the shoulder and chest armor . Ref pic . also your drop boxes seem to sit a little bit of they need to be aligned with the end of the ammo belt with minimal gap between belt and box. ref . the staff will review your amor further but I think they will ask you to change this details , goodluck with your EIB application ! And goodspeed trooper ! Quote Link to comment Share on other sites More sharing options...
justjoseph63[Staff] Posted July 30, 2018 Report Share Posted July 30, 2018 Nice job on that Anovos armor,Andy! Tony or I will be with you shortly, but in the meantime could you post a clearer photo of the frown for us? There are a few other issues that will be addressed when you (hopefully) submit for Centurion, some of which have been pointed out by your fellow Troopers. Speaking of which, you will eventually need to replace the lower ear screw. It must be the flat V head slotted type like the ones that are presently on the top part. I would also suggest eventually repositioning the thigh ammo pack. The back sides equally spaced from the back edges of the ridges of the lower thigh (see lines). T-Jay (Tino) is absolutely correct about the undersuit. I can see that it is already staining the edges of your armor. Quote Link to comment Share on other sites More sharing options...
gabby7095[TK] Posted July 30, 2018 Author Report Share Posted July 30, 2018 HiThanks very much for the feedback, here are a couple of photos of the frown.Does the screw at the bottom of the ear need to be replaced for EIB Status?I'll get round to getting a new under suit at some point I've been trooping in it for 18 months now. RegardsAndy Sent from my F5121 using Tapatalk Quote Link to comment Share on other sites More sharing options...
justjoseph63[Staff] Posted July 30, 2018 Report Share Posted July 30, 2018 The screws at the bottom of the ears will not affect your EI application, Andy, but will need to be replaced for when you take the new pics of this awesome set of armor for Centurion!. Although it may seem like a trivial matter, the typical "Anovos overspray" on your frown is not in keeping with the CRL, which is why I asked for a close-up pic. As you know, the higher levels are all about accuracy and the pursuit of "TK perfection". Were there variations in paint jobs in the films? Of course! But for our purposes we have to follow the CRLs, which state Frown is painted gray and does not leave the teeth area I suggest using a toothpick and some non-acetone paint remover (like Goo Gone) to clean them up, and then you will be golden! 1 Quote Link to comment Share on other sites More sharing options...
gabby7095[TK] Posted July 30, 2018 Author Report Share Posted July 30, 2018 Ok thank you, I will get this sorted asap Sent from my F5121 using Tapatalk Quote Link to comment Share on other sites More sharing options...
gabby7095[TK] Posted July 31, 2018 Author Report Share Posted July 31, 2018 HiIs this better on the frown?RegardsAndy Sent from my F5121 using Tapatalk 1 Quote Link to comment Share on other sites More sharing options...
CableGuy[Admin] Posted July 31, 2018 Report Share Posted July 31, 2018 Nice job on your build, Andy. Just one tiny thing I’d ask and that is, how far are the tube stripes from the cheeks? They’re usually around a pencil ️ width from the “cheek”. Best of luck with your approval. Dan Quote Link to comment Share on other sites More sharing options...
gabby7095[TK] Posted August 3, 2018 Author Report Share Posted August 3, 2018 I'm waiting for a new set of tube stripes to arrive. Sent from my F5121 using Tapatalk Quote Link to comment Share on other sites More sharing options...
justjoseph63[Staff] Posted August 4, 2018 Report Share Posted August 4, 2018 (edited) Hey, Andy, we realize that the use of these decals is permitted in the UKG, but for the purposes of EI and Centurion it is not screen accurate so we will need you to remove the one from your left shoulder bell and resubmit the photos it is included in. (You can re-apply them after your approvals). Thank you, and we look forward to seeing the updated submission! Edited August 5, 2018 by justjoseph63 Quote Link to comment Share on other sites More sharing options...
gabby7095[TK] Posted August 11, 2018 Author Report Share Posted August 11, 2018 New tube stripes applied, a pencil width from the cheek. Sent from my F5121 using Tapatalk Quote Link to comment Share on other sites More sharing options...
gabby7095[TK] Posted August 11, 2018 Author Report Share Posted August 11, 2018 Photos with UKG decal removed.Many thanksAndy Sent from my F5121 using Tapatalk Quote Link to comment Share on other sites More sharing options...
justjoseph63[Staff] Posted August 12, 2018 Report Share Posted August 12, 2018 Hi Andy, and thank you for your EIB application... let's get right into it! CRL and EIB Application Requirements: All submission photos are present, Trooper, and your armor displays all the elements required for Level 2 Badge. Congratulations and welcome to Expert Infantry!! Other-Armor Fit/Assembly: In this section we review observations made by us and your fellow Troopers. Suggestions made here are to improve the overall look of your armor. If these suggestions would effect an application they will be mentioned in the below sections. Really nice job on this build, brother, and thanks for the updated frown pics, tube stripes, adjusting the biceps and especially posting up the requested photos with the decals removed! As you know, the higher levels are all about accuracy and looking your best, so here are a few minor things that could be taken care of to make your armor look even better. The back to kidney connection could really stand to be closer in the center. The edges look fine, and it may be just a matter of tightening up the center connection. Reference image You might also do that on the kidney to posterior plate to keep it from protruding. Looks like you have some extra strapping material there that could be tightened up. Reference image The thigh ammo belt needs to be aligned evenly on both sides with the squared corner ridges. Moving them slightly (5-8 mm) should do the trick and not let the previous hole show. Reference images Note that they are spaced equally on both sides. Centurion Suggestions: Because Centurion photos show much more detail than EIB, items pertaining to Centurion might be seen there and not here. We try to point out all we can from what is seen but the final accuracy is the responsibility of the trooper. The return edges on your wrists will need to be removed with a little "Dremel love" and is an easy fix. CRL: "No return edge on the forearm is allowed" Reference image The gap on the right ab/kidney connection will need to be eliminated, and tightening up the strapping should remedy that. CRL: "Ideally there is no gap between the ab and kidney". Reference image The rivets on your ab kidney connection need to be parallel to each other. They look to be spaced correctly, but they are not lining up parallel like they need to because the tops of your ab and kidneys are not lined up at the top, (red lines). Reference image GREAT to see that you upgraded to a quality canvas belt, but the outside of your drop boxes will need to be lined up with the outside edge of your ABS belt. Another common issue but one that can be easily remedied by adding a bit of E-6000 under the rear straps that hold them on to the belt. CRL: "Drop boxes are vertically aligned with the end of the ammo belt". Reference image As mentioned in a previous post on your thread, the bottom ear screws will need to be replaced with the V-shaped flathead type as used on the top 2. CRL: "Ears screws shall be slotted, flat topped, countersunk and painted white". Reference image Your shoulder bells should be moved in at the top to where they touch (or almost touch) the shoulder bridges. Doing this will also help bring them in closer to your chest/back plates, but you can also remove all of the return edges from the bottoms if needed. CRL: "There should be a minimal gap between the shoulder armor and chest/back plates" Reference image The control panel on your TD should face up, not to the rear, with the "O" on top. Also, it looks as if your clips are overlapping the panel a bit. This is a very common issue, but would be remedied by moving it up. You may also be able to do this by repositioning your clips, as long as there are no holes showing afterward. CRL: "The white control panel faces upward...". Reference image You have a little more work in front of you, but I have every confidence that you will do a fantastic job, and I look forward to seeing your Centurion submission soon. Now get out there and make the Empire proud, Expert Infantryman! 1 Quote Link to comment Share on other sites More sharing options...
CableGuy[Admin] Posted August 12, 2018 Report Share Posted August 12, 2018 Well done, Andy. Welcome to EI. :-) 1 Quote Link to comment Share on other sites More sharing options...
gabby7095[TK] Posted August 12, 2018 Author Report Share Posted August 12, 2018 Thank you very much for awarding my armour EI status, very proud to have achieved this level And thank you for all your comments and your time.Kind regardsAndy Sent from my F5121 using Tapatalk Quote Link to comment Share on other sites More sharing options...
justjoseph63[Staff] Posted August 12, 2018 Report Share Posted August 12, 2018 9 minutes ago, gabby7095 said: Thank you very much for awarding my armour EI status, very proud to have achieved this level It was my pleasure, Andy, and proud you should be! You really did a great job on that build...an hour or two with a few tools and some E-6000 and I expect to see your level 3 submission soon after! (Once you are approved you can add the decal back to your shoulder bell, ). 1 Quote Link to comment Share on other sites More sharing options...
gabby7095[TK] Posted August 12, 2018 Author Report Share Posted August 12, 2018 Thank you Joseph, I've added my details on the EIB certificate thread Sent from my F5121 using Tapatalk Quote Link to comment Share on other sites More sharing options...
justjoseph63[Staff] Posted August 12, 2018 Report Share Posted August 12, 2018 17 minutes ago, gabby7095 said: Thank you Joseph, I've added my details on the EIB certificate thread Done! 1 Quote Link to comment Share on other sites More sharing options...
magni[TK] Posted August 12, 2018 Report Share Posted August 12, 2018 Congratulations Andy! Welcome to the Ranks! 1 Quote Link to comment Share on other sites More sharing options...
gabby7095[TK] Posted August 12, 2018 Author Report Share Posted August 12, 2018 Done! Thanks very much for the quick response Sent from my F5121 using Tapatalk Quote Link to comment Share on other sites More sharing options...
TK-40996[TK] Posted August 13, 2018 Report Share Posted August 13, 2018 Good job ! And congratulations on achieving EIB !! Quote Link to comment Share on other sites More sharing options...
lucnak[TK] Posted August 14, 2018 Report Share Posted August 14, 2018 Congrats on your EIB! Quote Link to comment Share on other sites More sharing options...
gmrhodes13[Staff] Posted August 14, 2018 Report Share Posted August 14, 2018 Congratulations trooper Quote Link to comment Share on other sites More sharing options...

Recommended Posts
Join the conversation
You can post now and register later. If you have an account, sign in now to post with your account.