TK-4510[TK] Posted June 6, 2008 Author Report Share Posted June 6, 2008 No Hovi's yet. Quote Link to comment Share on other sites More sharing options...
Lizzeh Posted June 7, 2008 Report Share Posted June 7, 2008 Very nice work so far Mike! I've said this before, but again: it's so awesome of you guys to do this for Kent. Top stuff, looking forward to seeing it done Quote Link to comment Share on other sites More sharing options...
Trooperman Posted June 7, 2008 Report Share Posted June 7, 2008 this project looks awsome Mike, cant wait to see the end result i wish i had these skills Quote Link to comment Share on other sites More sharing options...
Smitty Posted June 7, 2008 Report Share Posted June 7, 2008 No bondo on the cap and back? I figured thats how you were gonna get rid of the waves and ripples. Quote Link to comment Share on other sites More sharing options...
Murray1134[501st] Posted June 7, 2008 Report Share Posted June 7, 2008 Wow, I'm impressed with your work already. I think you are going to have a lot more people asking you to build helmets for them after this is done. Quote Link to comment Share on other sites More sharing options...
TK-4510[TK] Posted June 7, 2008 Author Report Share Posted June 7, 2008 Yeah we'll use the glazing putty. But first a coat of primer Quote Link to comment Share on other sites More sharing options...
RoCKo[501st] Posted June 7, 2008 Report Share Posted June 7, 2008 looking good, bro! i just love those build-up threads... can´t wait to see this one finished! Quote Link to comment Share on other sites More sharing options...
ThayNerd[TK] Posted June 7, 2008 Report Share Posted June 7, 2008 Nice work so far. I love watching your build threads. Quote Link to comment Share on other sites More sharing options...
HPDblues[TK] Posted June 8, 2008 Report Share Posted June 8, 2008 Is it too late to donate sumthin'??? T Quote Link to comment Share on other sites More sharing options...
TK-4510[TK] Posted June 8, 2008 Author Report Share Posted June 8, 2008 oohhhhhh This could get really interesting!!!! Quote Link to comment Share on other sites More sharing options...
RoCKo[501st] Posted June 8, 2008 Report Share Posted June 8, 2008 btw: i don´t want to hijack this thread, but i finished the same helmet only two month ago. here is what i came up with, i hope you like it... Quote Link to comment Share on other sites More sharing options...
PunkRockTuba Posted June 8, 2008 Report Share Posted June 8, 2008 btw: i don´t want to hijack this thread, but i finished the same helmet only two month ago. here is what i came up with, i hope you like it... that looks fantastic Quote Link to comment Share on other sites More sharing options...
TK-4510[TK] Posted June 8, 2008 Author Report Share Posted June 8, 2008 Quote Link to comment Share on other sites More sharing options...
TK-4510[TK] Posted June 9, 2008 Author Report Share Posted June 9, 2008 Back at it again. Today I break out the glazing putty and smear it on the cap n back. Heres what we are fixing...I used a pencil to show the cooling lines the top and sides... Quote Link to comment Share on other sites More sharing options...
TK-4510[TK] Posted June 9, 2008 Author Report Share Posted June 9, 2008 We will be using "bondo glazing putty". I have a small disposable applicator, that probably is on its last leg Quote Link to comment Share on other sites More sharing options...
TK-4510[TK] Posted June 9, 2008 Author Report Share Posted June 9, 2008 I just put a small amount along the edge of the applicator and smear it on the cap n back about 1/16 of an inch thick... I have to work a bit fast or the putty starts to chunk up and I will be making more work for myself! I will let this set overnight and wet sand it tomorrow afternoon Quote Link to comment Share on other sites More sharing options...
TK-4510[TK] Posted June 9, 2008 Author Report Share Posted June 9, 2008 Now its time to address the ears. They fit well to the helmet, but I dont like the flared edges around the tops. So I am drawing a line where I will be sanding these bad boys down to. I have some old belt sander paper that is pretty good for this sort of thing. I rip it in half and lay it out flat. Then I take the ear and lay it on the paper and start sanding back and forth. Once the ears are sanded down to where I want them I sand them on the sides with a lighter grit. The end result is a smooth ear. You ony want these ears to be about 1/4 of an inch thick. I see alot of people making the ears too thick. Quote Link to comment Share on other sites More sharing options...
TK-4510[TK] Posted June 9, 2008 Author Report Share Posted June 9, 2008 Quote Link to comment Share on other sites More sharing options...
Darth_Nickel Posted June 9, 2008 Report Share Posted June 9, 2008 nice work Mike!!! I'm interested to see the bondo area progress. That's not an easy fix, as I've made more work for myself many, many, many times that way. Nice work man. Quote Link to comment Share on other sites More sharing options...
mark Posted June 9, 2008 Report Share Posted June 9, 2008 nice work Mike!!! I'm interested to see the bondo area progress. That's not an easy fix, as I've made more work for myself many, many, many times that way. Nice work man. ...more more more!.. Excellent work Mike, can't wait to see it progress even further. I'm anxious to see what you do to the interior of the helmet as well... Quote Link to comment Share on other sites More sharing options...
TK-4510[TK] Posted June 9, 2008 Author Report Share Posted June 9, 2008 Muahahahahhahahaha!!!!! Quote Link to comment Share on other sites More sharing options...
Ironclaw Posted June 9, 2008 Report Share Posted June 9, 2008 Superb work Mike! This is like my fav show!. Everyday after work I tune in to this thread and hope for new "episodes" Quote Link to comment Share on other sites More sharing options...
TK-4510[TK] Posted June 9, 2008 Author Report Share Posted June 9, 2008 In that case, STAY TUNED BATFAN!!!! Quote Link to comment Share on other sites More sharing options...
TK-4510[TK] Posted June 9, 2008 Author Report Share Posted June 9, 2008 Time to sand the Cap N Back. I am just gonna take it over to the sink and run some water over it. Sand, Sand, Sand!!!! Keep it wet and dont go too far. Quote Link to comment Share on other sites More sharing options...
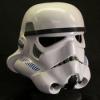
TK-4510[TK] Posted June 9, 2008 Author Report Share Posted June 9, 2008 Next its outside for some thick primer I put on three coats, waiting 5 minutes between coats. I am going to sand this baby smooth as glass.... Quote Link to comment Share on other sites More sharing options...

Recommended Posts
Join the conversation
You can post now and register later. If you have an account, sign in now to post with your account.