TK8280 Posted November 28, 2007 Report Posted November 28, 2007 This build is great, Where is the best place to get the spot putty glaze? I need some Quote
TK-4510[501st] Posted November 28, 2007 Author Report Posted November 28, 2007 Walmart, Auto parts stores, Lowes, Home Depot, etc.. Quote
TK8280 Posted November 28, 2007 Report Posted November 28, 2007 Walmart, Auto parts stores, Lowes, Home Depot, etc.. cool thanks brother, I need it for my clone armor Quote
Exodus[TK] Posted November 28, 2007 Report Posted November 28, 2007 Fantastic, detailed and completely pictured thread! Quote
TK-4510[501st] Posted November 29, 2007 Author Report Posted November 29, 2007 OK, I AM BACK! Lets jump right into the assembly. You will need some small clamps and a pencil as well as the rivets and a drill. A teaspoon of nerve will help from here on in too!! Dont worry, if you mess up it will just look like crap!!! Just kidding!! In the first shot here I just wanna show you how nice the repairs turned out. I can live with that! Quote
TK-4510[501st] Posted November 29, 2007 Author Report Posted November 29, 2007 OK take the two clamps and attach the faceplate to the cap n back like so. Try to line up the trapezoids on each side and pay special attention to the angle of the cap n back. If you want a more deathstar look keep the brow level. Want a Sandtrooper look? raise the brow and tilt the cap n back, back. Use a pencil and draw a straight line from the trapezoids to the ends of the eyes. Its important that the bottoms of the helmet meet as well or else your ears will have nothing to mount to. [ Quote
TK-4510[501st] Posted November 29, 2007 Author Report Posted November 29, 2007 Make your adjustments and line everything up. Make sure you leave enough room for the rubber trim to slide in and out easily. Its drilling time!!! Now we are going to drill and rivet the helmet just like AA's crew did back in 76'!!! You are just going to drill a hole in each side right in the middle of the ear. One you have a hole drilled, slip a rivet in and back it up with the provided washer. Using the rivet gun secure the first side then move on to the other side. When you are done your helmet will tilt back and forth a little for a better fit. You can test the trim now again. Be sure not to push the brow too far up or you will split the helmet at the temple.....Been there done that, got the T-shirt.... Quote
TK-4510[501st] Posted November 29, 2007 Author Report Posted November 29, 2007 Allright,....Now the part everybody dreads.... The ears. Its easy!!! I will show you how. Remember too that they dont have to fit perfectly. The movie used ones are really bad. The hero's are marginal too! For reference sake I am attaching a few shots of the actual helmet used for the TE recast. This is how the ears were attached. I am going to attempt to do the same... Sorry Cant find these anymore Quote
dougefresh Posted November 29, 2007 Report Posted November 29, 2007 SO cool! I don't even own a TE2, and this has me completely fascinated. Thanks for taking the time to share all this with us! It's awesome! Quote
TK-4510[501st] Posted November 29, 2007 Author Report Posted November 29, 2007 Start off by taking the ear and test fitting it against the side of the helmet. I realized that I needed to drop my cap n back down a bit to make the ears fit better. I dont show the pics here but I drilled out my rivets and dropped the cap down about 1/4 of an inch and also trimmed the brow a bit. Ok fit the ear. See where there are gaps? we need to eliminate those gaps. Take a pencil and mark where meat needs to be removed. Make sure you are placing the ear in pretty much the same spot each time you trial fit. On the TE the ears are very slanted compared to say an FX or even an AP. If you look at the reference photos you will see that the ears tilt forward and the tails hang wayyyy back. I continue trial fitting and cutting with the utility knife. When I feel I have a good fit I sand the ear smooth and really press it into the side of the helmet. Once you get an acceptable fit you will need to drill the ear. The ear has dimples in it for recommended screw holes. I mark them with a pencil and then drill them out on the table before I even lay them up to the side of the helmet. Holding the ear firmly in place I drill the top screw hole....... Quote
TK-4510[501st] Posted November 29, 2007 Author Report Posted November 29, 2007 Once you have that top hole drilled you will need to put a nice authentic brass screw in to secure the top of the ear. Tighten the screw down till its just a little tight. Now you are going to drill out the bottom of the ear... When you do, be sure to hold the ear to the helmet at the bottom and keep it all together like I am here. Put a screw in there too. Quote
TK-4510[501st] Posted November 29, 2007 Author Report Posted November 29, 2007 The last part is drilling out the middle of the ear. After you've done that..... Your right!!! put a screw in there too!! Make all the screws snug and see how everything fits. I needed to pull mine apart again and trim some more... Just keep at it until YOU are satisfied. Quote
TK-4510[501st] Posted November 29, 2007 Author Report Posted November 29, 2007 Measure the distance from the ear to the edge of the tear. You want to keep this the same on the other side. Mine was about an inch from the ear to the tear. Hey that rhymes!!! Mark the distance on the other side of the helmet and begin test fitting the ear to that side. Quote
TK-4510[501st] Posted November 29, 2007 Author Report Posted November 29, 2007 More ear fitting... Quote
TK-4510[501st] Posted November 29, 2007 Author Report Posted November 29, 2007 AH!! We have a good fit!!! Its a bit tedious at times but its worth the effort. OK on this side same thing mark the ear, drill it on the table, then drill the top hole through the ear and helmet, then screw, then drill the bottom, then screw, then the middle, then screw. Phew!!!! Quote
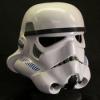
TK-4510[501st] Posted November 29, 2007 Author Report Posted November 29, 2007 Once its all done stand back and take a look at your work...... If you did good it will show. The same is true if you did bad. I think it looks awesome. I have taken some shots here for reference. The last shot is where I may trim the bottom to make everything even.... Not sure just yet. Next comes paint prep!!! ARE YOU READY???!!!! See you then! Quote
troopermaster Posted November 29, 2007 Report Posted November 29, 2007 Awesome tutorial and your helmet looks absolutely fabulous Extremely well done mate. Gotta be the best helmet tutorial I have ever seen Quote
TK-4510[501st] Posted November 29, 2007 Author Report Posted November 29, 2007 Thanks guys! I hope I do this helmet justice! Quote
Daetrin[Admin] Posted November 29, 2007 Report Posted November 29, 2007 Awesome tutorial and your helmet looks absolutely fabulous Extremely well done mate. Gotta be the best helmet tutorial I have ever seen Agreed! Best ever! Quote
elkamino Posted November 29, 2007 Report Posted November 29, 2007 Really great tutorial for everyone with every type of helmet. Nice job. Quote
TK-4510[501st] Posted December 5, 2007 Author Report Posted December 5, 2007 Sorry I havent posted lately. The sun is going down before I can even get home from work!!! Now we are going to primer. Wipe the helmet down really good with a dust free towel. Stick the helmet on a pole so that you can get up under it when painting. I like the rustoleum sandable primer, but any primer will work. I use a White primer because any other color may affect the end result of your painting later by making the white darker. Spray the helmet with a nice even coat of primer and let dry. Tomorrow I will sand it lightly and put on the secret paint that looks like polished ABS:) Quote
TK-4510[501st] Posted December 5, 2007 Author Report Posted December 5, 2007 Hey theres the man! You are correct sir! My yardwork is way behind. I love this time of the year though. I can go about 4 weeks without mowing the lawn sometimes Quote
kiyotei[TK] Posted December 5, 2007 Report Posted December 5, 2007 Just curious why you don't paint the helmet disassembled in individual pieces and then reassemble it? Quote

Recommended Posts
Join the conversation
You can post now and register later. If you have an account, sign in now to post with your account.