drosch Posted December 9, 2007 Report Posted December 9, 2007 I can't believe you get that finish from hand painting! I've built many model cars in my days and have always sprayed. I was going to spray everything on my AP bucket until I saw this. The color looks dead on too! Quote
TK-4510[501st] Posted December 9, 2007 Author Report Posted December 9, 2007 Next I am going to paint the vocoder. You will need a special brush for this. They sell them at Michael's and other art supply places. The brush you are looking for will be a camel hair round tipped brush that is thin when turned to the side..... Quote
TK-4510[501st] Posted December 9, 2007 Author Report Posted December 9, 2007 For paint you will need a Satin Black Enamel. I place the helmet in my lap and turn it to the most comfortable position. Dip your brush and press down on the first strip and pull.......Fatten it up by applying more pressure as you pull. Stay on your guides (Stay an Target!!!!) Quote
TK-4510[501st] Posted December 9, 2007 Author Report Posted December 9, 2007 Just keep painting and staying within your lines. If you take too long the paint will start to gum up. Enamel goes on like silk and dries quickly. You have about 2 minutes of easy flowing then it will start to dry. dont worry about though. Dont rush it. Just paint nice strokes and follow them through. Fill it in as you go down... [imghttp://www.whitearmor.net/forum/uploads/1203302334/med_gallery_548_103_47407.jpg[/img] Quote
TK-4510[501st] Posted December 9, 2007 Author Report Posted December 9, 2007 Here's the Dave M helmet.. Here's Mine....Not too bad Quote
TK-4510[501st] Posted December 9, 2007 Author Report Posted December 9, 2007 Now to paint the rank.. Just use a standard brush here like we used on the ears before. Dip the brush and just make a stroke up, then turn the helmet upside down and finish the other edge. We finish up by painting the rank on the other ear.. HOW'S IT LOOKIN'?????? Quote
TK8280 Posted December 9, 2007 Report Posted December 9, 2007 Next I will put on the pinstripe tape. I got tired of having to paint a pinstripe on the ears and thanks to a friend (Chris) I saw how easy it was to just use pinstripe tape. It looks great and if you mess up.....just do it again... I like that You can get the tape at any auto parts store. Unfortunately the place I went to only had the two strip tape...I went ahead and bought it. I just cut the parts off that I didnt need. You just start at the bottom of the ear and work your way around. When you come full circle just cut the tape with an exacto knife or a utility knife. what a great idea , I'm going to have to try that on my helmets..Ok Mike, how wide is the tape and where did you get it brother?, I need some ASAP Quote
TK-4510[501st] Posted December 9, 2007 Author Report Posted December 9, 2007 Thats it for tonight. Tomorrow we will put on the tube stripes and the rest of the goodies and WE WILL BE DONE!!!!!! The tape is about 1/16 inch wide. I just bought the standard twin stripes you see on every car, but I know they sell it in single strips. Quote
TK8280 Posted December 9, 2007 Report Posted December 9, 2007 Thats it for tonight. Tomorrow we will put on the tube stripes and the rest of the goodies and WE WILL BE DONE!!!!!! The tape is about 1/16 inch wide. I just bought the standard twin stripes you see on every car, but I know they sell it in single strips. thanks for the info Mike! Quote
Daetrin[Admin] Posted December 9, 2007 Report Posted December 9, 2007 I'm just in awe of your free-hand abilities. Quote
TK-4510[501st] Posted December 9, 2007 Author Report Posted December 9, 2007 I'm just in awe of your free-hand abilities. Anyone can do this, buddy. But thanks for the compliment! Quote
stukatrooper Posted December 9, 2007 Report Posted December 9, 2007 fantastic tip on the car auto strips.hats off for this public display of your build.Thanks mate. Quote
dougefresh Posted December 9, 2007 Report Posted December 9, 2007 Thanks for sharing such a comprehensive tutorial, Mike! Like everyone else, I have to tell you that your work is phenomenal! I think you've definitely given a lot of folks a ton of inspiration for their own helmet projects. Great job all the way around! Quote
firebladejedi[TK] Posted December 9, 2007 Report Posted December 9, 2007 I think you've definitely given a lot of folks a ton of inspiration for their own helmet projects. Your not wrong there buddy Quote
Bigturc Posted December 9, 2007 Report Posted December 9, 2007 Another solution for the black contour of the ear would be to use black electric tape, apply it on a piece of plastic and use and exacto to cut a line in it at 1/8". Then, Remove the thin line of tape and apply it on your helmet. That's what I came up with for my helmet, and it definitely look really good. See here Quote
TK-4510[501st] Posted December 9, 2007 Author Report Posted December 9, 2007 OK now we are going to finish this bad boy... My wife has had enough of my "playing in the garage" We start by applying the tube stripes. I use a pencil for reference he to get the distance from the side of the helmet. Make a small mark on the cheek and also one at the rear. Carefully peel the stickers from the backing. Lay them on slowly and keep track of the distance from the edge as you go towards the rear of the helmet. Once they are on smooth them out nice and even. If you get a wrinkle in one just use an exacto knife to lift it up and re apply. Now lets do the other side.... Quote
TK-4510[501st] Posted December 9, 2007 Author Report Posted December 9, 2007 Now we need to do the Mic Tips. Just drill a 9/64 sized hole in the dimples of the helmet that you can see here. I drill the same size holes in my mic tips centered. These self tapping screws and washers are all that you need to hold in the mic tips. Screw em' in and line them up. I wanted to match the Dave M helmet so I made mine a bit wonky. You can make yours straight if you like.. Quote
TK-4510[501st] Posted December 9, 2007 Author Report Posted December 9, 2007 Now I need to put in the green acetate. There are many types of lense materials out there, but for the purpose of this tutorial I will be using the acetate that was provided in the kit. Just put a couple of pieces of tape on either end and stick it in the helmet. Quote
TK-4510[501st] Posted December 9, 2007 Author Report Posted December 9, 2007 OK the last thing is the rubber trim. This is the trim from seals direct in the UK. It was also part of the kit. I see that I am going to need to trim my helmet to make the rubber fit nicely. Use a utilty knife to trim away the excess plastic. Start the rubber in middle of the chin area and work your way around... Quote
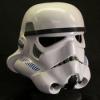
TK-4510[501st] Posted December 9, 2007 Author Report Posted December 9, 2007 OK... we are done. I would like to thank Starwarshelmets.com (Jez), Gino, TE, TE2 ( Especially YOU for this awesome helmet!!!!), Chris, Mike H, Seth, and everyone of my buddies here on FISD and MEPD. Here's the comparison shots of the Dave M helmet and The TE2. AND NOOOOOOO ITS NOT FOR SALE!!! This just goes to show you that anyone can do this with some preparation and patience. Just take your time and do it right. I hope I have done this great helmet justice. Quote
Smitty Posted December 9, 2007 Report Posted December 9, 2007 So there are pre-existing dimples in the recessed chin section from the originals screwholes? so that means you dont have to worry about making sure you drill into the faceplate in the right spot. Am I reading you right on this? Also what is the official definition of "wonky"? so far as I can tell it has something to do with mimicking the asymmetricalness nature of the screen used helmets. Once again, great looking helmet and excellent tutorial. Quote

Recommended Posts
Join the conversation
You can post now and register later. If you have an account, sign in now to post with your account.