
Search the Community
Showing results for 'Imperial Gaskets' in topics.
-
Greetings everyone! My name is Alex and I have been a member of the 501st for about 3 years. I currently own a ROTJ stortrooper and a magmatrooper! I've been wanting to do a FOTK for a long while so when an opportunity came for me to get a kit I jumped for it! This is the first time I have started a build thread so I will do my very best to be as descriptive as I can be so my thread can be helpful for future builders! Body Stats: Height- 5'6" give or take a half-inch Weight- 166 lbs Body Style- Average I know I am bit on the shorter side so I may be looking into getting inserts for the boots. Goal: I'm just going for basic approval for this build. Parts Origin: Helmet: Still haven't obtained one (Taking suggestions) Helmet Audio: Still haven't obtained (This isn't as important as other options but I would like to speak one day) Armor: KB Props FOTK Kit Gaskets: Still haven't obtained (Thinking of Geeky Pink's as I have heard a lot of good things!) Gloves and Boots: Still haven't obtained (Pretty sure I am going to go with Imperial Boots for both) Belt: Still haven't obtained (Taking suggestions) Blaster: Still haven't obtained (Taking suggestions but would like a kit that could have electronics added) Build Chapters: (These will link to later posts.) Foreword Out of the Box 1. Trimming 2. Assembly 3. Painting 4. Strapping 5. Test Fittings I look forward to the build and for everyone's help and advice!
-

Merkava74's TFA FOTK Build Thread (Anovos)
ukswrath replied to merkava74's topic in TFA Build Threads
Imperial Gaskets is back in business and listed on the FOTK Supply list. Also, Imperialsurplus makes FOTK armor, comparable to Anovos. I'm actually commission building a set as we speak, it's very nice. You can find them on FB. -
 TK-61514 requesting TFA EIB status Name: Daniel Andersen Height: 177cm (5'10") Weight: 79kg (174lbs) TKID: 61514 Forum nickname: Ensi (FISD + 501st) 501st Profile: LINK Garrison: Nordic Garrison Helmet: ANOVOS Standard Line Armor: Jimmiroquai (V4) Gaskets: Jimmiroquai Belt: JAFO (Belts of the First Order) Holster: Jimmiroquai Neckseal: Stormtrooperundersuit.com (Extreme Racing) Undersuit: Stormtrooperundersuit.com (Extreme Racing) Boots: Imperial Boots Gloves: Imperial Boots Blaster: Hestonkent (Heston3DSolutions) Electronics: TRamp Pictures: Link to Imgur album if you prefer. Helmet Gaskets and neckseal Undersuit Yoke Chest Bells + Biceps Forearms Gloves + Knees Abdomen TD Belt Thighs Thigh function. I too have not installed screws into my blaster yet, but it is fully functional. Let me know if this will be a problem. Shins Boots + Spats Blaster
 -
TK-24269 requesting TFA EIB status (KB) Name: Andreas Engstrom Height: 190 cm Weight: 84 kg FISD Name: Coil Legion ID#: 24269 Profile Page: https://www.501st.com/members/displaymemberdetails.php?userID=17434 Garrison: Nordic Garrison Build Information Armor Maker: KB Props Helmet Maker: Anovos Boots: Imperial Boots Gloves Imperial Boots Gaskets Fabric. Home made (many hours of swearing at the sewing machine) Neck Seal: Darman Electronics Aker and Trooper Talk F-11D 3DDK A bit unsure which photos are required for TFA so I tried to include the same as 85421. Front Helmet off Side Other side Back Helmet Helmet Neck Seal Gaskets Gloves Gloves Arms etc Arms etc Belt Thighs Holster (Haven’t put any screws on the blaster so showing it works this way instead. Metal holster from R2Dan) Spats Shins Boots Back Chest TD
-
.thumb.png.a4d2a6d16ce4c0ce138707572ba1bfe7.png)
Garrison Titan FOTK Build Thread
grenaidan replied to Daetrin's topic in Garrison Titan FOTK Build Area
To give everyone an update on where Garrison Titan is with our group build: Armor - Our order is in with BSP. Original ETA was June, we are currently two months overdue for that. Communication with BSP is limited, we ask for an update about once a month. BSP is mostly responsive, but have reported multiple delays which is not inspiring confidence. Helmets - Our massive helmet order fell through and we are back to square one. In short, we ordered from a shop, who had an order with Diamond (distributor) who had an order with Anovos. The shop closed, the order from Diamond could not be rerouted, so we completely lost every helmet. We were refunded at least, but this was a pretty nasty setback to the build. Gaskets - Trina and Wendy are working on prototypes for these, what I've seen so far is very promising! These are fabric gaskets, which should be much more comfortable than rubber Gloves - Our group order was completed, everyone (except Ryan, I'm working on it!) has received their gloves Soft Parts (Body suit, shiny shorts, balaclava, neck seal) - Everyone is on their own for these. Most members are not having issues finding these pieces Boots - Everyone is mostly sourcing these independently as well. Some are getting TFA/TLJ boots from Imperial Boots, some are opting for ANH boots from TKBoots, as they are acceptable for both TFA/TLJ Stormtroopers per the CRL Blasters and Accessories - Some of our members are already looking into these, but for the most part we are telling group members to hold off. Everything listed above really should be purchased before moving on to blasters. A bunch of stormtroopers with no blasters is better than not having stormtroopers because the focus was on blasters instead of armor/helmets. -
Items still needed neck seal Gaskets consumables (glue, paint, etc) Helmet fans voice/com system soft pouches for belt metal holster Items in my possession BSP Bucket mesh for frown F11D 3D printed parts to assemble and paint started working on it today 11/23/17 (so much to paint!) Husky bin Belt Helmet fans Imperial Boots Gloves Imperial Boots T7 boots gaskets neck seal KB Props FOTK armor sooo much to order
-
That’s a lot of sanding - there shouldn’t be a troublesome fibre left. You had contact with Imperial Gaskets? There was a rumour they were ramping up again. Sent from my iPhone using Tapatalk Pro
-

Sea_Marshall: Captain Phasma TFA
Sea_Marshall replied to Sea_Marshall's topic in Captain Phasma Build Threads
Well holy cow, I was genuinely caught off guard when I got home at 5pm and it was 70 degrees. So, I carped them diems! Plasti-dipped Phasma's interiors! So long fiberglass remnants! AND I got coats down on the gaskets. woop woop. For some extra bonus material, here's a few other items on hand! Imperial Boots, Spec Ops. I think they were renamed after I bought them: TK Boots Dry Fit of the boot and lower shin armor! Looks good. We'll see how it'll go once I incorporate my foot lol. -

FirstOrders TLJ/Executioner Build - 9.23.2017
First0rder replied to First0rder's topic in TLJ Build Threads
I just had a Future Trooper ask me a few questions about my Executioner so thought I would Post them on my build for future troopers as well. Some great questions asked. Hope these help but if not, pls ask for further clarification. - Can you list all of the spray paint you used I used Montana Cans Gold Series Universal Primer and Shock White and Black. Reason why i went Montana Cans is that its an Acrylic based paint that offers more flexibility than Enamels or Lacquers. I used Montana cans for all 3; Primer, Top coat and Clear coat. Clear was Gloss on white and flat on the black. Additioanlly i also used Primer from Rustoleum for Etching Primer and Rustoleum High build primer. - Can you List the steps you took to paint everything? Especially the helmet The paint was a lenghtly process, only cause i really like my paint to look like glass. But if you are not, you can certaintly skip some of the processes performed. Start - mix up bondo and run a skim coat over the helmet, this will start filling in all the low spots. Next lay a thin coat of filler primer and allow to dry. Block Sand the helmet with 240 grit carfully. Rinse with water and hold into the light reflecting the surface looking for high / low spots. if you see more low spots, mix up more bondo and repeat steps. Once level, spray ecthing primer and allow to dry. Wet sand with 400 and rinse and allow to dry. Spray 2 coats of Montana Cans Universal Primer. Once dry, using Bondo Spot filler, fill in any pin holes. Wet sand with 800 grit. repeat for any missed pin holes. Now your ready for Base Paint. Lay down 2 coats of White and allow to dry. Wet Sand with 1200. Lay down another 2 coats of White and allow to dry. Wet sand with 1500. Now your ready for Clear. Lay down 2 coats of clear and allow to dry., Wet sand with 1800. Lay down another 2 coats and allow to dry., wet sand with 2000. Now Very Important - Allow the Helmet to dry for 5 days before touching again. Since there is alot of paint and clear, it will take time to fully cure and harden. If you Dont wait and start masking off for the black, youll find that the paint is still soft and youll have tape marks left behind and will need to wetsand again. For the remaining parts - i repeated all above but skipped the 2nd bondo application. - Did you have to get any extra pieces to make the kit accurate? All the hard goods from Jim were acurate enough for lvl 1 approval. However when you want to achieve lvl 2 or higher approval, then youll need to outsoure a better belt, rubber gaskets. Youll want to reference the CRL closely: https://databank.501st.com/databank/Costuming:TK_TLJ_Executioner - Any areas you feel needed to be reinforced and how did you do it? Youll find that you need to Reinforce a few areas immediatly. Mainly the Yoke and Thighs. There are a bunch of build threads where the gents used Fiberglass Boat Repair to Reinforce the inside of the parts and others had used Devcon Plastic Welder. I would do either or. - Anything you wished you did now that your done? For the Yoke, I would recommend getting Ukswraths @ukswrath yoke supports. Really wish i used them as film acurate and fantastic option to reinforce the yoke. Wish i had also contoured hte back side of the thighs to allow more mobility and also countoured the upper thighs more to match the cod. - what glue did you use? Devcon Plastic Welder, Loctite CA Universal, Loctite Marine Grade Epoxy - How did you get the lens in? Epoxed Chicago screw bases to the inside of the helmet . then marked and drilled a small hole for each and secured with screws. - magnets or snaps? Both. Magnets on the Chest plate and snaps everywhere else. - Can you list all of the sand paper you had to use? 240 Dry, 400W, 800W, 1200W, 1500W, and 2000W - Can you list the extra pieces you had to buy on top of the kit? Undersuite from Stormtrooper Undersuit, Gloves and Boots from Imperial Boots, Belt from Belts of the FirstOrder @JAFO, Neck seal from Anovos Premeir Line, Cloth Gaskets from Jim, Canvas Belt boxes from TrooperBay, Helmet Sound and Fans from Ukswrath @ukswrath. -
I converted this thread into a generic build thread / Request For Comments to help me keep track of things as they move forward. I'll post what I'm planning as things move forward, if there's any feedback you have, feel free to dump it on. Planned vendors: * Nothing on hold... Ordered / Waiting: * Nothing on hold... Arrived / Building: * Armor Kit + Helmet - Jim (chrome is difficult to find someone to take you seriously, so I'm going to paint it myself.) * Blaster - BranfuhrStudios (Etsy, painting) * Gaskets - Imperial Gaskets, rubber Complete: * TK Talkie, configuring voice * Cape - DIY, rubberized
-
Rogue One Death Trooper Build Thread
mitcheg1 posted a topic in Build Threads Requireing Maintenance
So I'll start by apologizing for sticking this in the ANH forum, but since we don't have a Rogue One thread yet, figured this was the best place. Please feel free to move it to a more appropriate forum. With the release of all the great photos from SWCE and the Rogue One panel showing the Death Troopers escorting Director Krennic in, I'm more committed than ever to make this my next build thread. My goal will be to have something in time for the premiere. That will obviously depend on the availability of resources. So this thread will be part research documentation and part build thread. I'm calling on the amazing talents and knowledge within this detachment to assist in identifying the various parts. Here's my initial parts list with potential resources. Helmet: Phoenix Props Armor: 850 Armor Works Gaskets: Going to hand make Picked up some Yaya Han 4-way Pleather and plan to grab some headliner to see my own gaskets Boots: Doc Martens Jered Boots https://www.amazon.com/Dr-Martens-Mens-Jered-Boot/dp/B00C2QU640 These appear to be discontinued but there are other Dr. martens that look like they should work; Dr. Marten Talib - are readily available (I own a pair now), but may require the addition of a leather strip down the back to mimic the Jered Gloves: Endor Findors (alternatively White Eagle Work Gloves dyed black OR Imperial Boots FOTK dyed black) No question that the DT gloves are black version of the FOTK glove Belt: TBD Anyone have any insight? It is ribbed like the FOTK, but much wider Belt Buckle: 3D Print Belt Pouches:TBD Perhaps the FOTK pouches offered by TK-4510 would work for these. There appear to be 3 of the long rectangular pouches with hard covers on this kit. Blaster Pistol (SE-14R Light): SM picked up a scope off ebay Blaster Rifle (modified E-11):3D printing Lot of details similar to an E-11/F-11 (Huengstler counter, rear scope feature, etc) Specialist Variant Pauldron: Veeds Pauldrens Looks like a black sandy pauldron MP40 Shoulder Pouches: Epic Militaria Had to color the stitching and remove a tab, but I'm pleased with how it turned out. Hand Grenades (qty 3): KB Props Ammo Vest: Condor Barrage Chest Rig Vest consists of 6 pouches 4 with hard plastic covers and 2 are fabric. the pouches for the grenades attach to the center two fabric ammo pouches. Specialist Rifle: DLT-19 Anything I've missed? Hopefully this will come together smoothly! -
Progress so far. Everything other than the thighs is printed Fit seems ok so far Did a bit of reinforcing with fibreglass Lid taking shape All the soft goods either here or orders Boots and Gloves - IB Gaskets - Teresa Neck seal - Imperial Seamstress Belt - Belts of the First Order Pouches - Trooper Bay F-11 all printed and have ordered the rail that appears in TLJ Picked up an R2Dan holster
-
Hey all...figured I'd start a build thread to annotate my progress (positive or negative) on this journey. I'm new to building and this will be my first kit (unless I change mid stream LOL) What I have so far Bucket - Anovos Standard Bucket (bought at Hollywood Studios Galactic Nights in April 2017) Armor - Anovos standard kit (arrives...???) Gaskets - on the wait list from Imperial Gaskets Boots/Gloves - Ordered through Imperial Boots Undersuit - On the way from Stormtrooper undersuit While I await the armor...I'm anxiously working my helmet mods courtesy of another thread via SpaceAF09...they say imitation is the sincerest form of flattery so...I'm modding my standard Anovos helmet... With guts removed Masking in place First coat
-
Hi, I bought this armor before I knew about FISD and the eBay Armor page, so I'm curious what everyone thinks in terms of hindsight: http://www.ebay.com/...cvip=true&rt=nc Before buying, I asked him a few questions: Where did you get the armor? - He said it was the 3rd gen prototype offered to 501st members to promote TFA Can you prove its authenticity? - His evidence were pictures of the helmet that showed a black liner which was only offered by Anovos as well as a picture of the original Anovos Box Are you a member of the 501st? - He provided a link to his 501st profile where "the main photo on my listing is what they used to make my profile picture on the member page for this suit." How would I replace the gaskets? - He complained about how you had to use Weir's glue for the Anovos gaskets, and recommended Imperial Gaskets for replacements Thoughts?
-
Mau's Phasma Build [RFC]
Mau Abata replied to Mau Abata's topic in Build Threads Requireing Maintenance
Update - 4/12: Planning -> Starting Orders I've ordered a voice change to play with, as well as a blaster which I'm quite excited to build. I'm probably going to record some audio with the TK Talkie once it's fine tuned to the right voice. I've also heard back from the armor kits and gaskets, so I'll be moving forward with Imperial Gaskets rubber set, and Jim's armor kit. After a bit of internal debate, I've settled on doing TLJ Phasma. The new waters seems like a wonderful challenge, and it is just so chrome. I will be awaited in Valhalla for this, I'm sure. This weekend I'm going to scrutinize the films for any more information on the build I can squeeze out, and start work on the cape. So. Much. Chrome. I'm still weighing if I want to chrome it myself (heavily utilizing my friend's auto body experience), or if I should get it vacuum metallized. I'm leaning strongly toward the latter; I found a couple options locally that offer this service, so once Big Brown Box Day comes, I'll probably show them the bits and get quotes. My Plan C was to find an auto body shop and see if they would chrome it, but it seems the VM route has produced superior results. -

Where, What and Whom To Avoid When Buying
Flyrail47 replied to RogueTrooper's topic in Getting Started - Read this First!
Hi Everyone, I'm new here and I've been skimming these forums for the last few weeks. I only recently found out I didn't have to be a 501st member to join. I found this guy on ebay when looking at TFA armor: ebay Before buying, I asked him a few questions: Where did you get the armor? - He said it was the 3rd gen prototype offered to 501st members to promote TFA Can you prove its authenticity? - His evidence were pictures of the helmet that showed a black liner which was only offered by Anovos as well as a picture of the original Anovos Box Are you a member of the 501st? - He provided a link to his 501st profile where "the main photo on my listing is what they used to make my profile picture on the member page for this suit." How would I replace the gaskets? - He complained about how you had to use Weir's glue for the Anovos gaskets, and recommended Imperial Gaskets for replacements The majority of opinions regarding eBay from this thread are mostly negative, and I myself am always wary of eBay thanks to paranoia. Think I got screwed over? -
Hi, Thank you for your time investment in making these. I'll echo the note from Jeroen due to the way the shoulder can have a little gap between the shoulder bell and the back-shoulder. However, perhaps the gap will be so minimal that the advertisement won't be seen to any noticeable degree. Although, perhaps "imperial" is screen accurate; I haven't seen the movie yet, and didn't assemble the mannequins at the TFA exhibit at Celebration. A helpful note about fitting the gaskets to the wearer. I would caution an advisement for sewing the gasket to the underarmour, especially the knee gasket. Unless the sewing advisement was for the shoulders only, and I missed that point. Apologies, if so. Some of us who are lithely framed are attaching the knee gaskets to the armour itself. (Not permanently- something like Velcro- see Clint’s build for reference.) I found that the rubber knee gasket was chaffing/shredding against the ABS armour when keeping the knee gaskets close to my under-armour. If I sewed it to my underarmour, I would have a gap between the thigh and gasket, likely shin as well. It appears that a more ideal possibility for some body types is to attach it to the ABS armour and not the under-armour. Lastly, I’m a little concerned about the handwash/line-dry aspect to sewing the gaskets to the under armour. I look forward to hearing how others fare with this method. I would prefer to have my under-armour interchangeable, especially if I have a multi-day troop planned. I don’t know how long it would take to line-dry the underarmour to wear the next day. In this case, I'm assuming I’m just sewing the shoulder and possibly the elbow, pending forearm fit/gap. Again, thank you for your time and diligence with this alternative! Congrats! Warm regards, -krista
-
 My first attempt at EIB for my new FOTK TLJ. Armour information Armour maker- Jim Tripon Helmet maker- Jim Tripon Blaster/s - F-11D Branfuhr props ( it’s a converted Captain Phasma blaster) Se-44c- unknown 3d print( re detailed using plasticard by myself) Gaskets- Geeky Pink Neck seal- Geeky pink Gloves- Endor finders Boots- Imperial Boots Belt- Belts of the First Order Holster- R2Dan ( working and screen accurate) Personal info Name-Ian Rickhuss Height- 190cm Weight-106kg 501st ID- TK23650 Garrison- UK Garrison Just a note for the photos, you will notice my knee plates don’t sit quite right, this is down to my legs being a bit messed up after knee operations! This is as straight as they get. I’d welcome any feedback from your good selves and fingers crossed!! Many thanks Ian Sent from my iPhone using Tapatalk
 -
Now that the armor is finally here, its time to start the long awaited build! Main info: Armor - Back Stage Props Helmet - Anovos (The Last Jedi) Gaskets - GeekyPink Gloves - Endor Props Boots - Imperial Boots Belt - JAFO Volunteered to help sort the 16 kits arrived from BSP, which arrived Friday. It took 4 hours for us to get them properly sorted after inventory. Unfortunetly, there were some missing items in the shipment, such as 6 of the 7 AB boxes, a few belt boxes, and our Riot Shields. However, enough parts have arrived to start the build. Here's 7 kits sorted for pickup
-
 Name: Patrick To Height: 5'7" Weight: 180lbs FISD Name: Patricktt Legion ID#: 8136 Profile Page: http://www.501st.com/members/displaymemberdetails.php?userID=13314 Garrison: Hong Kong Garrison Build Information Armor Maker: Anovos Helmet Maker: Anovos Boots: Imperial Boots Gloves: Imperial Boots Electronics: TFA Helmet Fans - Echo's Neck Seal: East Asia Supply Gaskets: East Asia Supply F11D Blaster: 3D print SE-44C Blaster: 3D print Helmet Neck Seal Gasket Under Suit Gloves Boot Armor Belt Holster(from R2Dan) F11D SE-44C
 -
Captain Phasma- starting up a build
Captain Cupcake replied to FunkyAmazon's topic in Captain Phasma - TFA and TLJ
Hi! Im a Phasma here in Orlando. I think you may have already found the Phasma Costumers group on FB. I have fabric and rubber gaskets, both are great. For LFL and Disney troops I like to go with the rubber ones from Imperial Gaskets. For casual troops either ones work. My armor is fiberglass which really does a number on the fabric ones. Shouldn't have that problem with light ABS, not sure about Jim's as it is flexible fiberglass. My neck seal is Anovos which is super nice but hotter than Hades. -
 Hi, everybody! Thanks for taking a look at my submission! Name: Brendan May 501st TKID: TK-61596 FISD Forum Name: MakeNoiseMan Garrison: Canadian Garrison, Vindicator Squad Mandatory Information Armor = Authentic Props Helmet = Authentic Props Blaster = Quest Design Canada Optional Height = 5'10" Weight = 195lbs Boots = Imperial Boots Canvas belt = Authentic Props Hand Plates = Authentic Props Electronics= Ukswrath's Hearing Assist/iComm + Aker amp/Henry's Helmet Fans Neck Seal = Geeky Pink Gaskets Holster = Authentic Props Link to EIB application: On to the photos! FULL BODY Front Back Left side Right side ARMOUR DETAILS Ab/kidney attachment, left side Ab/kidney attachment, right side Butt/kidney, not fixed Hand plates Hand plates, flexible Shoulder bridges, front Shoulder bridges, back Back/chest connection, left side Back/chest connection, right side Thigh pack attachment, left side Thigh pack attachment, right side Knee plate Knee plate, left side Knee plate, right side Belt/drop boxes, back Left drop box, back Right drop box, back Cod/butt attachment Cod rivet Butt snaps Interior strapping Kidney plate notch, left side Kidney plate notch, right side Wrist end of forearms Boots, left side Boots, right side Boots, back HELMET DETAILS Front Back Left side Right side Hovi-mic tip detail Left hovi-mic tip Right hovi-mic tip Lens colour, back-lit S-trim *Note: In this photo, the S-trim is on backwards. I have fixed this, but the S-trim is glued on now so I am hoping this older photo will suffice. Current S-trim (glued on) BLASTER DETAILS Left side Right side D-ring ACCESSORIES DETAILS Neck seal, front Neck seal, back Thermal detonator, front Thermal detonator, back Thermal detonator, screws Holster attachment Thanks for your time! If you need any more photos, please let me know, I'll be happy to provide them.
 -
 Hi, this is my first attempt of applying for EIB, if I have missed any information please let me know. I do not have a SE-44C blaster pistol currently however this is something I will be adding to at a later date. Armour: Armour maker: Jim Tripon Helmet: Jim Tripon F-11 D: JJ industries Gaskets: Sheev’s Emporium Neck seal: Sheev’s Emporium Gloves: Endor Finders Boots: Imperial Boots Belt: Belts of the First Order Belt pouches: Jim Tripon Holster: Jim Tripon Personal Info: Name: Jodi Hook Height: 155cm (dekit) / 173cm (in kit) 501st ID: TK 25409 Garrison: UK Garrison Sent from my iPhone using Tapatalk
 -
Gaskets, Boots, and Pauldron Not much to update with just yet, but I did get some more pieces as I still wait on the armour to arrive. Here are Theresa's amazing gaskets - thanks so much, they are lovely! Untitled by Taylor Goodson, on Flickr My Imperial Boots TFA TK Boots came in as well. The package was really battered, but the boots seemed to have managed without much issue. Untitled by Taylor Goodson, on Flickr Finally, the pauldron from Trooperbay arrived a little while ago as well. It will need some painting and a few other small mods for assembly (magnets, primarily), but it's a nice and light piece that should be a nice addition to the armour. Untitled by Taylor Goodson, on Flickr Now the wait continues once again!
-
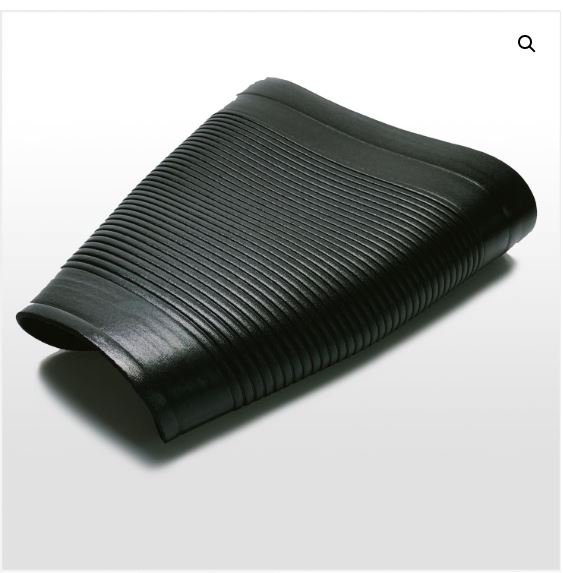
Hello Folks! Has anyone ordered and assembled their own gaskets from Imperial boots? Is this material and the details satisfactory to use? It says 8 gasket sheets should be able to complete a FOTK gasket system. Is the pic attached the actual piece received or is this something that was sewn and ready to go?


.thumb.jpg.e86e88beeb307b04b228a2b44e3af075.jpg)


.thumb.jpg.9aa2ee69957f7bed03842cc0ecb7bc70.jpg)