Search the Community
Showing results for 'Imperial Gaskets' in topics.
-
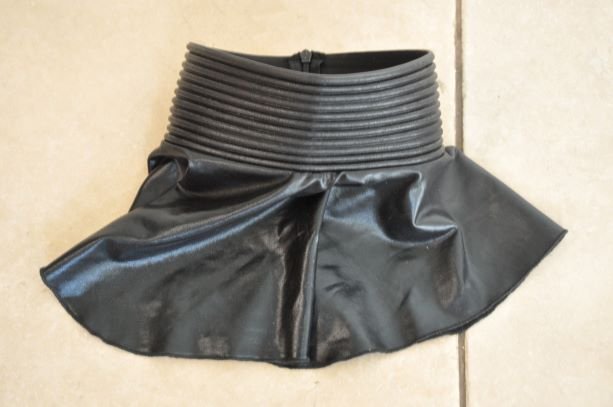
Yes. I requested this remain open to all members of our detachment for utter transparency and honesty. I’ve nothing to hide. I’ve recasted nothing. And 2 years later here we are again. This time it’s going to be public. For all to see as I’ve no desire to defend myself a third time. I’m not even sure why it’s an issue today , but here we are. So let’s dive right in shall we? This became an issue almost 2 years ago. The second I posted on the FISD and Facebook I was going to start sewing. I credited my brother publicly for allowing me to run with his initial pattern design. I was excited and happy. I was contacted by Mrs TK4205 saying my brother had her design. No. He did not. She merely told him the fabrics she used. Peter then used his own choice of fabric and a completely different design of his creation. I have read all interactions between my brother and Rhonda. And then responded to her from a place of security in defending both him and myself. I was accused of not being a member (which I was) using their ideas and fabrics (which I didn’t) and recasting their design (which I didn’t) I was investigated by this detachment almost 2 years ago and was found innocent. Upon that time, graciously accepted as an approved seller here on our forums. Upon which, if one scrolls back to the beginning, you will see both Wyatt and our DL welcoming me and encouraging me. Yesterday I was horrified to see Wyatt accusing me of “spoofing”him and insinuating I’m sabotaging his business (I still don’t know what that means nor do I care at this point) And today I wake to see that I’m now accused yet again of recasting!!!!! Ok. Let’s get this out in the open. As any of you that know me or have dealt with me for both business or personal know I’m pretty straightforward forthright and honest. My business practices are well above board, and I help anyone I possibly can build or sew. With pictures. Patterns. Advice. In any detachment. I’m going to invite you all to go read my initial post in my sales thread, where Wyatt and Paul and others welcome me, as well as head over to Facebook where you’ll see my original posting and comments made to Rhonda’s now deleted responses. But first let me leave you with some pics. Original fb post Comments indicating Rhonda posted publicly Original welcome post on FISD Paul himself commenting and offering help to get going. Part of a long conversation between Rhonda and I clearly stating my designs are different. Their gaskets My gaskets They use 1/8” headlining foam and lamay. Peter used satin. I did not like any of that and found my own materials. I use 1/4” upholstery SewFoam and a polyester spandex blend with a rubberlike finish. Nothing I do looks like theirs in design or fabrics. If anything should I then accuse them of changing their design to mimic mine now? Possibly. Or accuse Imperial boots of offering gasket sheets in the shape of a rectangle? Or Sheevs Emporium for using pink sew foam? Absolutely ridiculousness. Imperial Boots , Sheevs, /Sister Margaret and Imperial Gaskets I’ve recommended openly. And others. Encouraging anyone to check them all out and see who suits their needs best. Or to help them sew their own. Last time this was done privately. This time I wished it to be public for everyone to see and form their own opinions about all things. But I’ll be damned if I come back here a third time to defend myself from Wyatt, Rhonda or anyone else. Sent from my iPhone using Tapatalk
-
As Aaron mentioned, your sales post is indeed pinned: https://www.whitearmor.net/forum/topic/45807-imperial-gaskets/ When doing a search of Imperial Gaskets and selecting Topics, your threads are listed at the top (first two): https://www.whitearmor.net/forum/search/?q=Imperial Gaskets&type=forums_topic
-
 Armor info: Armor: KB Props Helmet: Props Emporium Gaskets: Imperial Gaskets Rifle: Branfuhr Studios Gloves & Boots: Imperial Boots Neckseal: Geeky Pink Lady Undersuit: Stormtrooper undersuit Cape: Geeky Pink Lady Belt & Pouches: Trooperbay Personal info: Name: Katie Taylor 501st ID: TK36544 Garrison: Wisconsin (Black Ice Squad) Height: 5' 5" Weight: 138 LB
 -
After building a Biker Scout and a Galactic Marine, I figure I'll complete the costuming saga with the TFA Stormtrooper. Seeing the Force Awakens with my 501st friends is an experience I'll never forget. The TKs in the drop ship was an awesome reveal! Need to Order Belt Received TFA Kit - Jimmiroquai Gloves - Endor Finders Boots - Imperial Boots Gaskets + Neck Seal - Geeky Pink Anovos TFA Helmet Accessories Metal thigh holster - R2Dan Z-26 Riot Baton - Amazon SE-44C Side-arm - 850 Armorworks F-11D Blaster Rifle - Anovos produced F-11D replica
-
 Haribon72’s First Order Stormtrooper (Jakku Chase Scene) – Large Trooper Build I waited this long to start. I had to have the blu-ray in hand for great references. For months, I've seen my garrison and legion friends build, progress, and finish their kits. Now that spring is here, its time to get this major project started. I choose this trooper because of the backpack, vest, and blaster set-up. Somehow I was drawn to it. I have the Sideshow Jakku Exclusive Sixth Scale figure coming in, so I can't wait to study it. I know the Heavy Weapons Trooper from Sideshow has some inaccuracies on the vest, but hopefully the Jakku Exclusive will be better. ------------ Height: 5’10” Weight: 240 pounds (this build is going help larger troopers like myself) Garrison: Golden Gate Garrison (Bay Area, California) Armor kit arrived: 10/08/2015 Rubber gaskets arrived: 10/08/2015 Helmet arrived: 10/30/2015 Imperial boots arrived: 11/11/2015 Imperial gloves arrived: 11/11/2015 Soft goods (gloves, pouches, etc) arrived: 12/07/2015 Neck seal arrived: 12/14/2015 Custom or handmade items from our legion sources: ABS White Plastic Extension Strips: TrooperBay. Purchased multiple times over the past few months. Blaster Rifle with Extended Stock: Jerry B (501st Legion) – Arrived 12/05/2015. This is came from a 3D print run. Blaster Pistol: In the market and looking for one. Belt: Ukswarth (501st Legion) – Got his leftovers from his build on 12/18/2015. Belt Boxes - Rubber Isolation/Vibration Pad: Ukswarth (501st Legion) – Got his leftovers from his build on 12/18/2015. Black Under Suit: I’m so screwed if I don’t start exercising. Chest Pill Hole Fabric: Ukswarth (501st Legion) – Got his leftovers from his build on 12/18/2015. Cloth Gaskets: In-progress. Attempting to make my own Hand Plates (Direct Copy from the movie): Dan S (501st Legion) arrived on 04/28/2016 Heavy Artillery Vest: Chris H (501st Legion) – Ordered 04/06/2016 Helmet Bag: Custom made by my wife (PM me for details if you’re interested). Holster (Real Metal): Dan S (501st Legion) arrived on 12/29/2015 Survival Backpack: Still researching with the Blizzard Force Detachment Screen references on the Jakku chase scene. ----------
 -
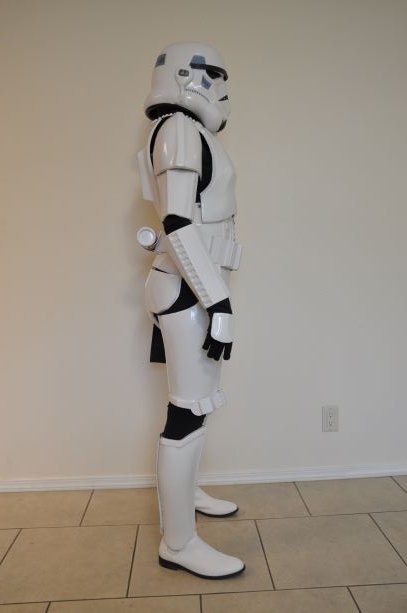
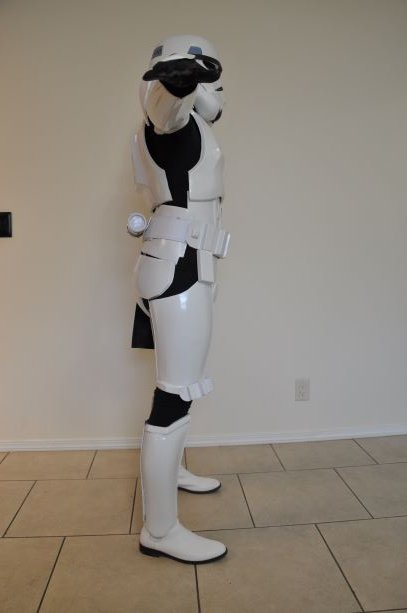
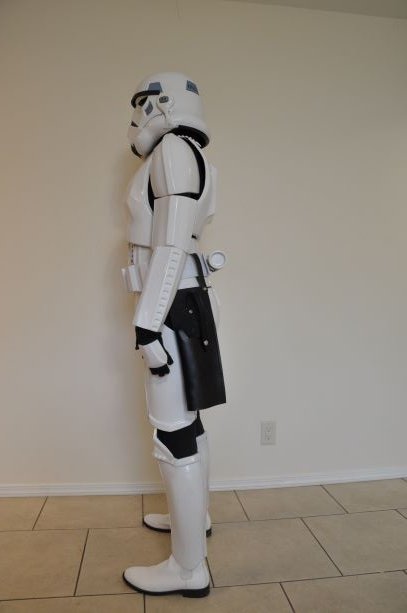
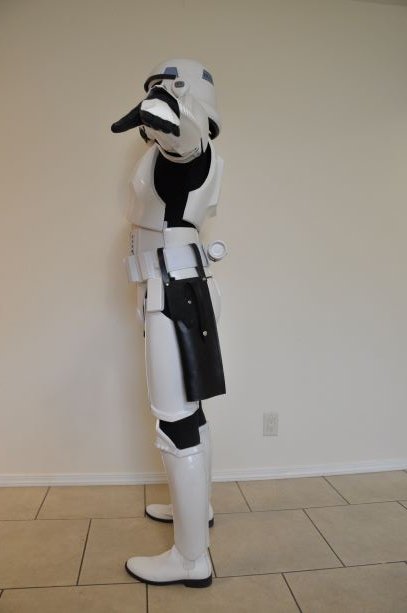
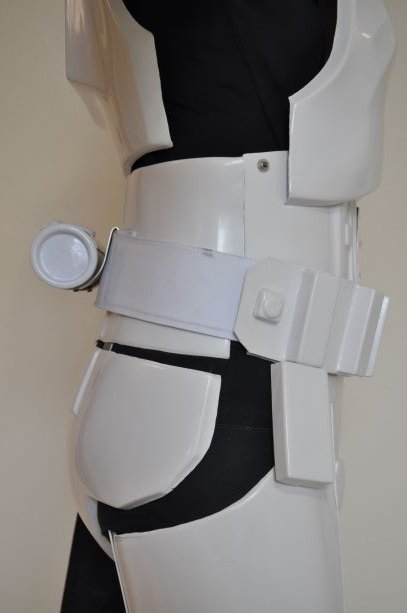
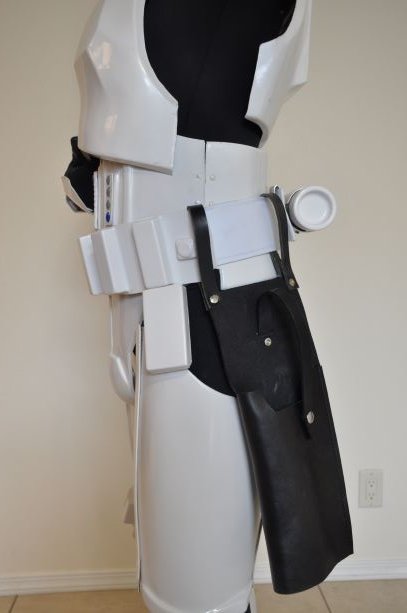
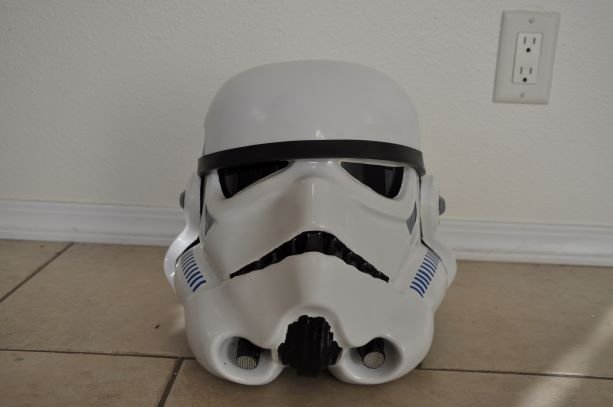
 Garrison: Ohio Garrison TKID: 84881 Name: Bryan Labaki Profile: https://www.501st.com/members/displaymemberdetails.php?userID=32854 Armor Maker: ATA Helmet Maker: ATA Blaster Maker: Doopydoos Pipe Kit Boot Maker: Imperial Boots Canvas Belt: Imperial Issue Hand Plates: Trooperbay rubber hand plates Neck Seal: Geeky Pinks Phantastic gaskets Holster: Trooper Bay EIB Thread: The Armor: Han Snap: (Armor isn't fully closed, just showing off the snap) TD: Gloves, Boots, Neck Seal: Helmet: E-11: If there's anything else you need to see, let me know. Thanks!
 -
Ok FISD. Teresa (Soulart) (Geeky Pink) has made a request that we re-open this thread. Please keep in mind that at this point the accusations regarding her "spoofing" Imperial Gaskets' threads and Imperial Gaskets' sales threads being deleted are now closed. The DCOG team has found that those accusations hold no merit. It has been brought to Staff's attention by Wyatt and Rhonda that Teresa may have recast their gaskets in the past. The staff feels that this thread will be re-opened and we will have a VERY close eye on this. If either party has any information to offer then I would suggest now would be the time to do so. I am going to make this VERY CLEAR to everyone involved. This thread will only remain open for 7 DAYS maximum. We will have the option of closing it sooner if the staff so chooses. Lets put this to bed for good...
-
Hi all! I am starting a new build of Captain Phasma from TLJ which I am hoping to have completed and approved by April next year. I have been researching a great deal both on FISD, the Captain Phasma Costumers group on Facebook and made some FB friends with the pioneers for emergencies! The CRL is still being built so I am also hoping that it gets done in time so I can be approved to troop! Bucket: Anovos Armour: MCM Gloves: TBA Boots: TBA Belt: TBA Might self build Gaskets and neck seal: Sheevs Emporium for trooping, and Imperial Gaskets for L2/L3 when available Undersuit: Imperial Undersuit Main Blaster: TDK Props SE-44c: TDK Props Cape: self build thanks to Luke Daley @ JJ Industries for the pattern Spear: TBA May self build, try to source locally or JJ Industries if they do another run! Sound: Boss multi effects guitar pedal and a 10 watt tour guide sound system. This was an idea that came from David on the FB group, thanks! I am getting 3D printed armour as I am comfortable with working with the medium (what my Deathtrooper was). I will be using more power tools with this build, I almost went crazy hand sanding everything last time! A big thank you to my vendor for helping me make this happen! As far as I can tell so far there are some notable changes for Phasma for TLJ 1. Glove armour is different (not C3PO fingers) 2. Armour is more aligned with FOTK, especially the spats 3. A heel is present on the boots 4. The frown is a little tighter on the bucket 5. The knee gaskets appear to be attached to the thigh (looks more like a hinge will need to get clarity on that as I get further) 6. The belt boxes are different 7. A large spear/javelin/stabby-stick 8. Pristine Chrome finish (no weathering) I have researched a few methods for the chrome and am going to try a spray on Chrome method developed here in Australia. I have been in touch with them and get the feeling I can work with them. I will be purchasing some to try out and see what the results are like. The key to this method is a near perfect base coat. So I will probably need to find a decent workshop to try out painting. I am super excited about this build and have a slight twinge of PTSD from the last build but I know I have the skills and support to do this one justice. I learned a huge amount from the last build and will be using more power tools this time (less hand sanding). As always I’ll be thanking Tom because he’s a wealth of information and I am sure he will have a hand in guiding me towards completion. Also will be looking to others who have done FOTKs for advice as well. I cannot wait to add to our Garrison First Order collection! The Anovos bucket I bought will be stripped down and repainted. The faceplate was glued on slightly off centre (which drove me NUTS) so I have already ripped that off. I will need to pull out the lining and lenses before I can start stripping all the paint off. It’s pretty scary making alterations to it but necessary as the Anovos was from Force Awakens. If I have missed anything (obvious or otherwise) please let me know
-
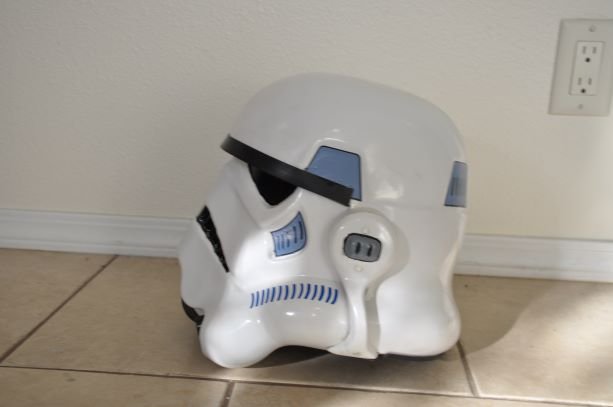
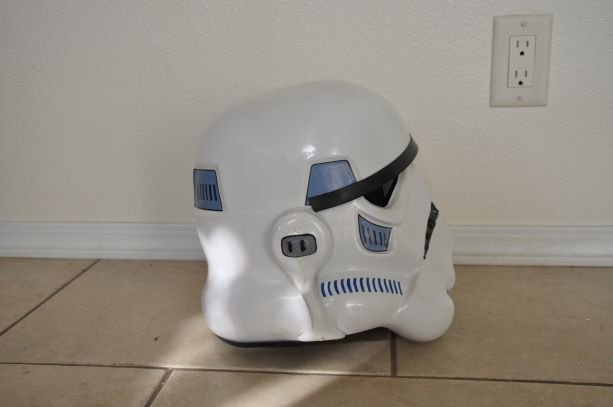
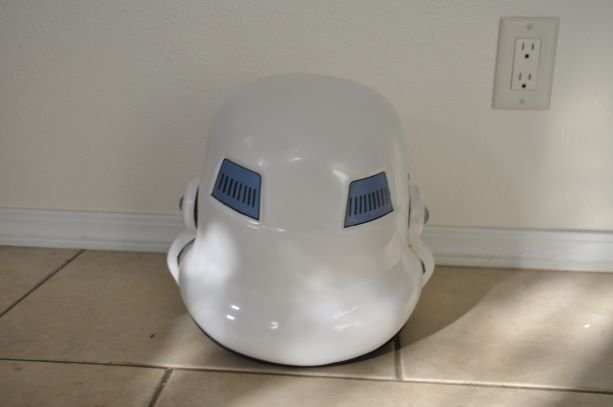
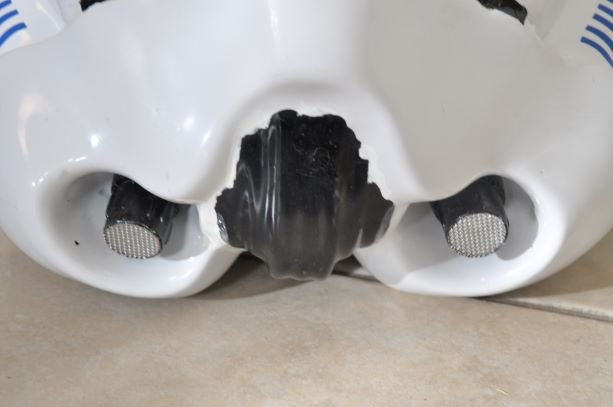
Hello everyone, I don't post nearly as much as I should or used to but I felt I would I would be remiss in my duties not to write a review for this armor. I know alot of folks are either on the fence for this armor or are on the waiting list. Hopefully this will help with that indecision or at the very least offer a solid set of finished pictures and information to the community. This wasn't my first set of armor nor will it be my last. However, after working with ABS all these years it was interesting to broaden my horizons. Here goes... Material: Flexible fiberglass. What is it? Well. It's what it sounds like. It is very much the same as it's rigid counterpart as it is different. It flexes very much in way that would be reminiscent of polyurethane. It cannot withstand too much abuse though or it will crack or tear just like any other material. Very common sense in this aspect. The weight- it's heavy. It is what it is. If you're like me and spent the last 4 years in an ABS ANH TK then you're gonna be a tad surprised. If you're a clone and already had rigid fiberglass with a slush cast helmet then you're going to be presently surprised as this stuff is much more comfortable then rigid fiberglass and I would venture to say it is also lighter. This stuff is awesome to work with. Unlike ABS, it is quite forgiving and any issues you have can simply be bondoed or sanded down with little problem as you will be painting anyway. Preparation: Not a whole lot is required but be prepared to sand and bondo in many areas. Like I said, it trims well and sands easily wit 220 grit. Expect the same level of preparation as you would from preparing any fiberglass or plastic part for paint. As always, a nice even surface is key to get the best from the painting and you will need to do a final wetsand and possibly during primer to get the best finish. The big things that were required were: - Cutting the pill holes - Cutting the chest 'vent' - Gluing the shins (overlap method) - Trimming the biceps depending on side and bondoing - Cutting the eyes and vents on the helmet - Trimming pieces and sanding for proper fit/ function etc. The good news: Jim includes an excellent and well thought out PDF file for everyone who buys the armor that walks you through step by step of how to correctly build and strap not just the armor but the helmet as well. Troopability and Comfort: Here I will reiterate: not as comfortable or light as ABS. However, I trooped the TFA premier for about 2 1/2 hours in the armor and if pressed I could have gone longer. That was after doing an event earlier that morning in a very hot and uncomfortable news studio for at least an hour. If you can troop and ANH you can troop this too. I can walk easily and movement is roughly the same as in the ANH except the upper body is much more rigid. The big deal is you need help. I can put on my ANH all by myself like a big boy. When it comes to this stuff I'm worse than vader. I think the other TFA troopers here will agree that this is the biggest issue with "troopability." But that too is overcome with solid handlers, which I know we have here in GA! Painting: I didn't use Rustoleum. Sue me. I have, and always will, prefer Krylon and that is what I used. As always, I had no problem spraying the armor. Because the armor flexes heavily you may experience some paint cracking in high flex areas. Simply spray in the "flexed position" as you would wear it and bazinga- you're good to go. If you are going to paint it yourself you may want to get rustoleum in order to match the color of the other TFA troopers in your garrison. I chose not to do this because I dislike rustoleum paint and I chose Krylon based on personal opinion alone. This armor will take whatever paint you throw at it. Again, surface preparation is the main key! Overall impression: I love this armor. It's a fan sculpt from an awesome guy and I love that. It has a "made with love" feel to it even though it may have it's imperfections. That's what I love about my ANH, and that's what I love about this. The build is the build. It can be as easy or as hard as you make it. Use this community as your guide as I always have, and your garrison mates and it will be none the more difficult then any other build. Approval process: I will touch on this very briefly. As with any costume, use the CRL as your bible for this build and work with your GML's requests and I see no reason you cannot be approved. Simply building the armor is not a guarantee of approval. Enough said on that. The Man: Jim Tripon is probably the most organized and decent guy you could ever buy from. He hand sculpted this armor and then has kept his runs going to help out the folks that cast it because it keeps their business afloat. He is truly what I believe the 501st represents. Sharing his passion for crafting with others not for his benefit but for ours. He will do whatever you need to make sure you have a smooth and pleasant transaction and will keep you well updated and informed. He answered all my questions diligently throughout the whole process and I would certainly purchase from him again anytime. Don't be afraid that he is in the Philippines. Shipping was no issue and everything arrived in perfect condition. Below are some recent photos of the armor. Here's a little rundown on my equipment to make it easy to see what's pictured. I hope that this review will genuinely help the community with this armor. Armor: Jimmiroquai Helmet: Jimmiroquai V3.0 Boots: TK Boots Blaster: Heston 3D solutions Gaskets: Jimmiroquai Cloth gaskets Pouches: Jimmiroquai Belt: Imperial Gaskets
- 91 replies
-
- 15
-

-
 (And potential build thread???? It could happen...) Hey Silver Siblings!!!! Welcome to the FISD and our chrome Lady’s build section. I thought I’d introduce myself first. My real human name is Teresa. I currently reside in nowhereland Northern Alberta Canada in a small community of 150 people. I am a very proud member of the Badlands Garrison, and have been since April 2016. I currently am going into my third term as Garrison PR Officer, and I’m one of the Moderators on the Captain Phasma Costumers Facebook page. I also can be found sewing gaskets, neck seals, harnesses and sexy biker shorts for our First Order Family, Classic TKs, clones, Sandy’s, Snowies, as well as a multitude of other items for a good many costumes. You can find me in the Ongoing Sales and Run section in the Imperial Commissary or on Facebook under Geeky Pinks Phantastic Gaskets. I answer to TK~41307, Miss Pink, Pinky, Pink Lady, GeekyPink, SoulArt, Snow Queen, Captain Sassy, Teresa and Mom [emoji175] I joined the Legion with my Authentic Props Stunt TK, Who has been worked on and built to EIB #719 and Centurion #335 levels. I began work on my Phasma in May of 2016. A very aspiring build for my second costume. I was a newb! I joined the ranks of Captain on February 28th 2017 as the Legions 9th Phasma. My kit is an ABS KB Props, with a Jim Tripon Helmet. C3P0 fingers from Shawn Thorsson. Holster clip from Justin Lee Morrison. All soft goods except pouches on belt (cape, gaskets, neck seal, belt) were made by myself including belt. Pouches were from Jimmi as well. The finish on the armor is Spectra Chrome. I did the sanding, wet sanding, priming and sanding. The guy at the autobody shop did the actual chroming. I often can be found here reading and interjecting comments here and there, but mostly I respond privately to people. And help them build. I’m not sure why I’m like a FISD ninja, I guess I didn’t wish to be out in the open helping for fear it looked super pushy. Elitist, Or like bragging. I’ve helped garrison mates build many many classic tks, and helped in my Twins FOTK. I’m also an approved ROTS Royal Guard, Director of Intelligence Ysanne Isard, Governor Ahrinda Pryce, and am tinkering in a Mara Jade, Legacy Fem TK, TFU Black Shadow Guard with full robes and First Order Snowtrooper. The Mara and Legacy require some weight loss before I feel comfortable wearing that skin tight body suit or tailored armor. As a woman, I understand the trials of armor building around a dead thyroid, hormonal weight fluctuations, body parts spilling over the edges of your armor because you just can’t lay off the salt n vinegar chips and dip, female body parts, stress, busy single Hockey Mom life.... I had always thought I’d come back and create my build thread.... help others by my mistakes and trials and build knowledge. Vader knows I certainly took enough pictures throughout. But time has a way of getting away from us, and here I am almost 3 years later and still no thread. Until today. Maybe you all will inspire me to get my buttplate in gear and get a build thread up for you. At the very least, I’m here at the gentle request of my dear TK Twin Pyrates, (who is always trying to get me to help openly instead of privately) and Andrew/Sly to let you know I’m here to offer any help and advice I may have on this particular costume. Or as a female of our species. Although I cannot guarantee that I will get that build thread created, or be in here 24/7, I will do the best I can for you all. I will share pictures. Offer Build advice. Vendor info. Sewing and construction advice. Always have a shoulder for you to to cry on when you end up hating her and wish to throw her down the stairs or light her on fire. (It’s true. This happens.) I will always listen. Help you as best as I can. If I do not know the answer of what you seek, I will find you a Phasma that does. I shall try harder to not lurk in the shadows, but be more present, in the hopes to help you all. I’ll add some of my favorite photos and armor bits then go into build stuff as the days go on. Wishing you all happy building and trooping! Sincerely SoulArt/TK-41307 Now for some armor bits just laying around in my phone. Mostly upper body. Cod, boot, etc. Ill clean this up later and organize it by body section. Sent from my iPhone using Tapatalk
 -
Merkava74's TFA FOTK Build Thread (Anovos)
merkava74 replied to merkava74's topic in TFA Build Threads
So at this point, I am done with the hard armour parts, and have sent them to the painters. Will probably take 2 to 3 weeks. In the meantime, I will be trying to do the other stuff as much as I can. Unfortunately, I screwed up a bit of my timeline, and while I have my 3D printed blasters, I had ordered BlastFX kits, and they are not here yet. I am intending to do a SE44C, F11D and F11D Heavy Rifle. I could probably work on a few parts that do not require the electronics for now. I am also going to do a bit of the rubber gaskets from Imperial Gaskets. Test gluing, etc. Stay tuned, but progress will be slower for now. -
So since I needed to make new knee gaskets for my Flametrooper, I decided to document a bit how I like to assemble Imperial Gaskets. It's working well for me so maybe it will work for others. STEP 1: Cut gaskets down to fit around legs. I usually cut it to be a tad snug, but not too much. It keeps them from folding too much while staying comfortable. STEP 2: Use the cut off as a backing glue strip, gluing to one edge at a time. This gives really good contact and keeps the seam nice and tight. Just using a flat piece of latex doesn't do that as well because there are far less contact points. I use Elmer's rubber cement for this and it works great. STEP 3: Create velcro tabs to attach to undersuit. I do this because it just hasn't worked out well to attach the gaskets to the armor. It pulls in weird ways and requires a bigger circumference in the gasket to stay properly anchored to the armor. This way the armor moves freely over the gasket and mobility is much better. For the tabs, I used to sew the velcro but then I found that the industrial sticky velcro sticks super well to the latex so no sewing required. I just use scrap latex as the tab and rubber cement it to the inside of the gasket. STEP 4: Plasti-dip the gasket and we're done! I initially started plasti-dipping these gaskets as a result of wear over time but found that I love the uniform darker sheen it gives the whole thing so now I periodically spray all my gaskets. I've been pretty happy with it!
-
Garrison: Ohio Garrison TKID: 84881 Name: Bryan Labaki Profile: https://www.501st.com/members/displaymemberdetails.php?userID=32854 Armor Maker: ATA Helmet Maker: ATA Blaster Maker: Doopydoos Pipe Kit Boot Maker: Imperial Boots Canvas Belt: Imperial Issue Hand Plates: Trooperbay rubber hand plates Neck Seal: Geeky Pinks Phantastic gaskets Holster: Trooper Bay The Armor: TD: Gloves, Boots, Neck Seal: Helmet: E-11:
-
So the Imperial Gaskets are definitely helping fill the gap between me and the armor. At least with the bicep and forearm pieces. We'll see how much it will help with filling the thigh and calf pieces as they are humongous on me and the main pieces I'm worried I'll have to trim. Also I see now what everyone was saying about the limited mobility with real rubber gaskets. I think I will purchase cloth gaskets for more casual events so I can be more comfortable.
-
I actually have a set of unused Imperial Gaskets rubber gaskets. They may we’ll be the last on the planet! [emoji1787] They’ve bloomed a little do I’m going to try and clean them up. Will let you know if I plan to sell. Sent from my iPhone using Tapatalk Pro
-
Well, I've been sitting on this kit pretty much since KB started making them. Like January of 2016. Life happens, and now I think I'm FINALLY going to give it a real go. I'm on vacation, I've got no place to go, so let's do this thing. I'm sitting on the old version of the thighs and the chest, so once KB gets his white ABS supply issues sorted, I plan on getting the upgraded chest and thighs. Chest just makes it easier, and the thighs make it approvable. The old thighs are pretty short on me. I've got almost all the pieces I need. Just need to actually DO it. So, here's what I've got: Armor: KB Props Helmet: KB Props and Greg Mitchell (I like Greg's better because it's a little bit bigger, and my noggin fits in it better) Metal holster from R2Dan Gloves: Imperial Boots Boots: Imperial Boots Neck Seal: Christy Giles (She did my FO TIE one as well) Gaskets: Imperial Gaskets (cloth, because Florida) Pouches: I got them from someone on here....sorry, don't remember who Blaster: Anovos F-11D (supposed to be shipping Winter 2017, I'm not planning on seeing it until Episode X) I've already built a KB Props FO TIE, so the forearms, yoke, back, chest and shoulders are pretty much the same. Also, looking at the CRL, looks like it's not all seamless anymore. Yay. Less to Bondo. Eventually, I'll get a TLJ bucket (I like the new teeth), maybe two and paint one Executioner style. KB has an "Executioner upgrade kit," and since I'm a competitionist, I'll probably get that, too. Other than that, I also need to get another SE-44C (mine is painted TIE style), and I'll likely get a pauldron and the vest for Heavy Weapons. Might as well get the shield and riot baton along with the heavy weapons blaster, too. Did I mention I was a completionist? Anyway, I've already got the KB helmet painted, but it's more or less my kid's helmet for now. Too small for me. I've got the yoke and back put together, but I'm going to wait on the new chest. The shoulder bells are done, but I haven't done the straps yet. I did ukswrath's shoulder reinforcement on my FO TIE, but it's kind of overkill. I've got the metal plates already cut and shaped, so I might as well on this one, too. And I've got the forearms put together. I was kind of doing this along with the TIE. Figured since they were the same, I might as well. Plan on mostly following Tony's thread here, but there are a lot of differences between the Anovos and the KB kits, so it gets a little different. Lots of guys in my local squad have built KB kits, though, so I've got some good resources there WHEN I run into a brick wall. Like the thermal detonator (shudder). Not sure if I'm going to cut things out and back it with black gaffer tape (I did on the TIE, not that you can really tell) or use stickers. I know TrooperBay has a sticker set for the Jimmi kit, but I don't know if those will work for the KB kit or not. Just trying to wrap my head around things before I dive in and cut (literally) too deep.
-
I’m dumb.. I’m not even following CRL. Centurion requires rubber. Any leads on who has rubber? I’m guessing Imperial Gaskets? My searches are only pulling up stuff from 2016 and 2017 for his gaskets. And then there’s a link to a page I can’t view on FISD. Can’t find anything in terms of anyone selling rubber.. I can see why not many go that route, kinda looks like a pain and I’m sure they’re hot and hinder movement. Question: Are you required to stay in Centurion approved gear to troop if you are going for that level? If not, when would you actually, if ever, need to gear up in appropriate level items? Sent from my iPhone using The Force
-
 Thanks!I have Jim's gaskets, imperial rubber gaskets, and fnarmour gaskets. For comfort, my favorite are fnarmour's For appearance, imperial rubber gaskets I have nothing against Jim's gaskets; they look great and will work perfectly. You just need to alter them to fit your size. The inside of my armor is just sanded down smooth and washed with light soapy water. Sent from my SAMSUNG-SM-G928A using Tapatalk
 -
Hey everyone, This build thread is a long time coming. I have a KB Props FOTK (TLJ) kit and am building as an Executioner. Armor/Helmet - KB Props Gaskets/Harness/Shorts - Geeky Pink's Phantastic Gaskets (My amazing garrison-mate Teresa) Boots - Imperial Boots Laser Ax - 3D printed parts courtesy of the Edmonton Public Library (EPL) SE-44C - TBD (likely 3D printed by another member of the Badlands Garrison) This is my first full foray into building a costume. My ANH TK was a commission that I did a little work on the achieve EIB. Pictures of build progress too follow...
-
 Armor = Walts Trooper Factory Helmet Maker = Me? (was a part of the Kit from Walt) Blaster= Shear Tech Height = 5' 10" Boots = Imperial Boots Canvas belt = Tkittle Neck Seal = Geeky Pinks Phantastic Gaskets Holster = Darmans Props
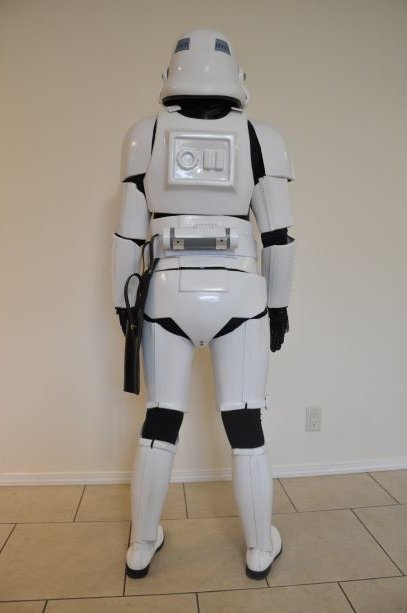

-
For my TFA build I think I want to go with a non-rubber gasket solution. The Anovos gaskets just feel bad and I know that the Imperial gaskets are much better. They are still rubber and I just feel that cloth will be much more comfortable in the long run. I am in line for cloth gaskets from Imperial but given the waiting time I am considering doing my own (high probability of me messing things up though). One question is fabric choice. The CRL states: Gaskets shall be rubber or a shiny black material with ridges The question is how shiny is shiny enough? I went looking at fabrics with the girlfriend yesterday and it seems that the shiniest options are quite fragile and wouldn't be very washable according to her. In the shiniest fabrics the surface is glued on which is more likely to crack and fall off when washed. There is a lot of wear and stress placed on something that will rub up against the rest of the kit and the inevitable sweat of trooping. I found a black bathing suit fabric which is stretchy and nice and sort of shiny. So would Under Armor shirt level of shiny be ok? Obviously it will depend on light setting etc. The pic may not accurately reflect the fabric. There is obviously a balance between shine, durability and washability. Question is just where?
-
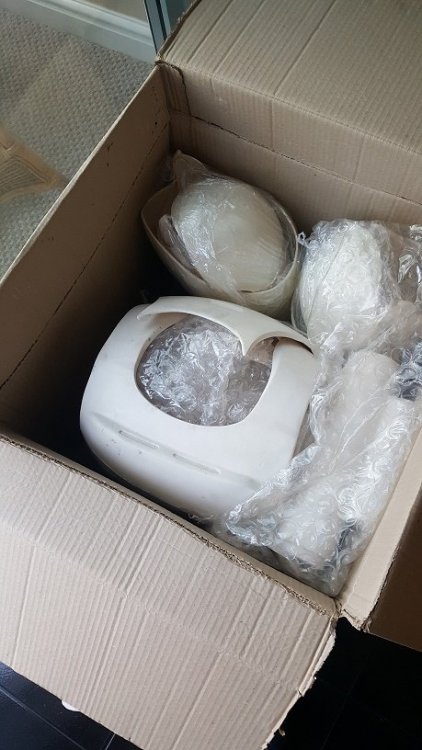
Hello fellow troopers, Been meaning to post something for a while but work and life seem to always get in the way - so apologies. I will start by saying that I have completed my build and had clearance approved by my local garrison but I still wanted to drop some notes in here on issues I came across / experienced along the way in the hope that it may prove useful or even just interesting to others on this journey......I will also include a bit at the end on some minor upgrades that I have completed and plan on completing, I'm also looking forward to seeing what other bits you guys can suggest to improve my build......... I will break up the build thread so its not just one long post and I will try to post updates as often as possible, but please dont expect anything like the quality of the build threads that ive seen from others, I'm just not that good .....tbh I forgot to take pictures a lot of the time!! So to start the list of bits / kit - Jim's TLJ fibreglass kit - think this was v4 - more on this later.... - Boots from Imperial boots - so comfy...... - Gloves - as above Imperial Boots - Belt - one of Darrens fantastic belts (Belts of the first order) - a work of art. - Undersuit - think this was from stormtrooper undersuit.com with shiny stictched in crotch area (ooer) - Gaskets - Geeky Pink - Neck Seal - Geeky Pink - Harness - home made - Blaster - originally from Heston studios but gave that to my son to play with and went with JJ industries 3d print (with my own electronic bits) - Aerator - 3d abs print from a friend - looks brilliant - Lots of sandpaper of various grades - Filler primer - P38 filler - Various webbing / elastics - Snaps - Small Files - Various screws / ball bearings for holster Pic below is from my BBB day, packaged extremely well and came within a matter of a couple of weeks after placing the order.... Note - Ive posted this in the WIP section but if any Mod feels it needs moving to the general TLJ area then please move ....
-
Hey everyone, As I noted in my Anovos build thread, I've decided to get a refund from Anovos and prefer to put my money with Jimmi as his kit will better fit me and most likely arrive sooner. So starting a new thread for this specifically I will keep this one specific to the build and not so much to general chatter. Here's what the my FOTK will eventually be built with: Buckets: Anovos TLJ Standard Bucket (Preordered) Jimmiroquai V5 TLJ Bucket Armor: Jimmiroqaui V5 TLJ Armor Holster: Dan's Metal Holster Gaskets: Pinky Geeks Phantastic Gaskets Pinky Geeks Neck Seal Harness: Pinky Geeks Harness Belt: Belts of the First Order Belt Soft Goods: FOTK Boots and Gloves from Imperial Boots Additional Items: Jimmi FOTK decals from Trooperbay Fabric Belt Pouches from gijim F-11D and SE-44c from Heston Solutions Later upgrades: Most likely will be purchasing Ukswrath's Audio system and fans for the FOTK helmet, but armor first. Will also most likely purchase some shiny biker shorts from Geeky Pinks as well. Hopefully with this build I will get the components sooner and be able to provide another build thread for this. I will aim to get plenty of details, photos, and even video of this build. thanks again for everything!
-
It`s been a long wait but the armor cleared the Swedish customs as of yesterday so figured it would be safe to start this up When I first watched the force awakens I was really disapointed with the new Stormtrooper helmet - DID NOT LIKE IT! The armor was cool though - however, over the years the helmet has grown on me so now I like it and really look forward building this kit. Here`s the version I´m going for: Besides from the armor (duh) one needs the following items: Cloth gaskets - Geeky pink`s phantastic gaskets (for Centurion you will need rubber). Armor vest - Diversity Props Boots and gloves - Imperial boots Undersuit - stromtrooperundersuit.com Belt and pouches - Trooperbay Blaster rifle - 3Dprops NL Metal holster - R2Dan Back pack - BSP (borrowed pic from FB, kit ships tomorrow)
-
 Just organizing my thoughts and links a bit... Shopping List (for approval) $400 Undersuit with cloth gaskets, neck seal, & rigging Sheev's Emporium $40 Shiny shorts Geeky Pink's Upgrades Metal thigh holster R2Dan Rear zipper closure Sheev's Emporium $38 Shoulder Bell and Yoke Brackets Ukswrath's Specialty + $4 Chest Pill Box Fabric Mesh Ukswrath's Specialty $55 Gloves EndorFinders $180 F-11D Blaster + $130 Se44-C Pistol The Imperial Factory Task List For Approval - repaint knee armor - repaint posterior - repair spat/greeblie - repair belt separation - replace all strapping Upgrades - install shoulder bell support brackets ~ strengthen/repair cracks in yoke shoulders - repair cracks ~ ab boxes - simulate separate pieces ~ ab boxes ~ wrist boxes - add magnetic attachments for chest panel - smooth and repaint all panel interiors flat white - remove and repaint thigh holster to match (need Torx security drivers - ordered) - repaint and clear any panels with severe paint issues ~ chest ~ ab - paint helmet interior black