

flinty360
-
Posts
48 -
Joined
-
Last visited
-
Days Won
1
About flinty360

Recent Profile Visitors
1,225 profile views

-
themaninthesuitcase 3D printed TLJ build
flinty360 replied to themaninthesuitcase's topic in TLJ Build Threads
Great progress Chris....watching this with interest.... -
Hey Tony, Thanks for the prod, been meaning to write an quick update here on current status etc but lift sort of got in the way at the beginning of the year and even with the lock down I am now busier than ever (work wise!!). However, as far as the armour goes it is all completed, cleared and has had a few troops under its belt now, but I still have some upgrades in the pipeline that i want to get sorted: 1. Add in the screw detail on forearm with an actual screw head, not exactly sure yet on the actual screw but it looks like a dome allen head? 2. Sort a slightly different shape cod piece - possibly 3d print one? 3. Review my voice / amp set up so its all within the lid and maybe even add the speakers to my lid? I've also sanded down and made some minor repairs to the abdomen section (the chest was rubbing on this so have added felt type material to underside of chest), the spats needed a bit of TLC and some fibre glass strengthening in a small area i had not covered as it was showing signs of wear after a few troops - tricky one as i want to keep the flex to get them on but maintain a robust, strong piece of armour. I've recently made some paint repairs to the back section and biceps so its kept me busy when i do have some time in the lock down period and the armour looks all fresh and new again :) I've also created more fixings for the belt and added more magnets and Velcro to my knees - both are now solid and stay in place. I'm really happy with it at the moment and after those first few troops, making the changes to the strapping etc really made a difference so all pieces now stay where they should....however I am always looking for ways of improving it. Ill pop up some pics when i have more... Hope you are all keeping safe? thanks mike
-
Cricket's 3D Print FOTK (TLJ)- ABS, Kid-sized- FINISHED!
flinty360 replied to Cricket's topic in TLJ Build Threads
That is simply awesome, you must be very proud.. outstanding gesture, can't wait to see your little trooper in his new armour...[emoji106] Sent from my CLT-L09 using Tapatalk -
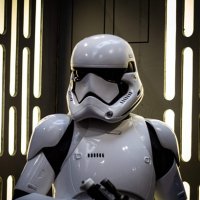
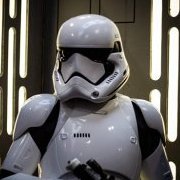
Some minor improvements...... As i said it quickly became apparent that after my first outing there were some changes required..... I had too many connections via velcro, I knew this would be an issue from building other TK's in the past- hate the stuff (velcro that is) but I just wanted to get this build over the line, it had been over a year to get to this stage mainly due to me losing interest at one point and putting it all in a box out of the way until i found my trooping mojo again and then breaking my shoulder (now almost fully recovered) meant months of nothing happening - however all of these velcro connections were all swapped out where possible for actual snaps.... The shoulder bells were sitting too low against the yoke so this is when i glued in place some abs supports. The yoke to bell connection was all velcro so i replaced part of the velcro with snaps on the bells, the velcro was left in place on the yoke end as this then gives me the option to change the size of the elastic piece - pulling in the bell if needed. You can see where the velcro used to connect in the pic below but now ive snaps in place, the small elastic then connects to the bicep pice - this then stops the bell moving to much and makes it stay in place better, it was all over the place before this!! Bell with velcro...... I also glued a snap onto the inside of the bicep and the other part of the snap was connected to my gasket fabric, again the biceps now sit in place perfectly dont spin and are set at the correct height- cant find a pic at the moment of the gasket snap but ill take some and post up later.... Knee caps were also improved as they are held on by velcro - was awful so have added magnets to gaskets and knee caps as well as velcro, both now very sturdy and do not move. The belt support again was not sufficient to hold the whole weight of the belt, boxes and pouches so as well as magnets ive also added a lot of velcro to the backside of the belt and also the belt support pieces on the abdomen section, again belt is now very secure. This is how it looked after a few of the upgrades and is the most recent image I currently have.....so we are pretty much up to date My next post will be about upgrades i plan on doing over the coming winter months to further improve things...... stay tuned.....
-
Thank you Sir.... The pics above are from my first outing / troop in this armour....before any mods to the strapping were made and before I had added the abs supports..... It was pretty clear from that troop and my second troop that a few adjustments were required, not just in those areas, and your observations above are spot on....[emoji106] I'll post an update later today on the changes I made and see if I can find some more pictures of these... For now I'd like to wish you all a Happy New Year.... Sent from my CLT-L09 using Tapatalk
-
Thanks buddy...funny you mention amigos....there was a small build group around the same time and they called themselves the 3 Amigos...I was not part of that build group though....however I did help them kit up etc at a troop which was invaluable getting some insight into the same kit... Sent from my CLT-L09 using Tapatalk
-
The final push............... So after months of surface prep work, adjustments to various pieces and decals added I finally got to a position where I could get fully kitted up to see where / what I needed to adjust before putting in for clearance.... this is how it looked Few minor dressing issues noticed that were easily fixed but apparently this was good for clearance so I requested through my local garrison.... That was it I was finally cleared with a note to paint out the screws on my belt and to make sure the dressing issues were sorted.... Now it was time to get out and troop, pics below are a couple form my first outing.... So i was now cleared but there is more yet to come......I will update the thread next with improvements i made after getting a few troops under my belt in this kit as well as some improvements I am yet to make but have planned......
-
Happy Christmas to you all........ Apologies for the delay in updates on this WIP things seem to have gotten away with me over the past week, also many thanks for the very kind words on my build..... One thing i forgot to mention was some damage to my yoke piece - this was entirely my own fault as i was too heany handed with the piece of armour and caused one of the prong pieces to snap off!!! Unfortunately I didnt take a picture at the time as i was too annoyed, however after calming down with a cup of tea I set about repairing. My brother works with composites and carbon fiber etc so he gave me some adhesive to use to glue the 2 pieces back together, this was clamped together and left to set for a day or so, next I set about filling the damage on the surface then sanding back to a smooth finish as I did before the damage occured - more filling, sanding, filling sanding etc. At this point I also reinforced the yoke prongs with a thin layer of fibre glass, not too much so that they are solid and have no movement but also just enough to make sure they are stronger than supplied. I should add that reinforcing the yoke earlier would not have made any difference to the damage as i was just too heavy handed...it was always going to end badly! That being said if you have the same kit and yoke piece you should reinforce asap - the newer yoke is a full chest piece so does not have the prongs. The following image shows the underside of the yoke after I had repaired, added some reinforcement along with some other improvments - note the white plastic bits these were added after my first troop to stop the soulder bells from dropping - the bells now sit where i want them and improves the look, no more droopy shoulders. The small piece of webbing hanging down is my safety line that connects to the chest piece, as my chest is eld on by strong magnets I still felt the need to have a safety line just in case it gets knocked off or the magnets fail for some reason - would rather have it hang there than smashed to pieces on the floor!
-
That will be it for a few days - Ill hopefully post up more either over the weekend or Monday Stay safe troopers.....
-
I should probably talk about my blaster - pew pew So i really was not sure on what to do about a blaster, not many people offering good quality kits that I could find initially so I opted for a 3d print from a seller on etsy - I believe they are also on here, the blaster came assembled and felt solid but the quality of the print was not great, see pics below this was not cheap either after P&P to UK, so my dilemma do i try to break it apart and sand down each part then fill, paint etc, or just look for a better kit to start with? At this time my youngest wanted a new blaster so i prepped this one quickly and painted it black and red (his choice of colours) for him to play and cos play with..he loves it So that was all great but still left me with no blaster and i was quickly getting close to finishing the build...... I made some enquiries at garrison level and found a prop maker in our garrion who was happy to print me off a 3D F11D in kit form....fast forward a week or so later and another box arrived , I downloaded some instructions on line and proceeded to again hit up ebay for all of the required screws, allen screws etc to complete the build. The kit supplied was amazing, quality wise with some of the finer smaller detailed pieces being printed in a much finer 3d print filament I also purchased some of this this spray putty was amazing, I sanded down each component part of the kit and sprayed it with this putty and it filled the surfaces brilliantly, was a dream to work with....afterwards it was a matter of some more sanding, filling and then painting up all the correct parts and figuring out how i was going to get electronics into my new blaster. I sat down and drew up a simple lighting circuit with a 9v battery, switch, capacitor and a few red leds, i soldered this together before installing (no way was i going to install then find out my wiring was rubbish) and it actually worked.....so now to figure out how to fit this to the blaster whilst building it!!! I fed all wiring from the rear of the blaster - the battery sits in the rear barrel behind the end cap, all wiring goes through the main barrel into the leds and also the switch which i fixed to the underside of the hengstler....final touch was to install a small led torch in the fornt end, you just twist it to tuen on / off think youll agree the finish is slightly better than my first?
-
Main Strapping After altering the size of the AB section i cut six holes out at equal spacing on the rear (3 on each side of the opening at the rear) installed small brass eyelets to these and fed a simple shoe lace through - this then acts as a corset type fastening and just needs tightening then tieing up when getting the kit on. The harness was created by using some old large trouser braces - I cut the clip ends off and applied some snaps to these with the opposite ends glued in place on the inside of the AB section, I can then adjust the braces up and down as required and its pretty easy to get the AB section on then clip these into place over your shoulders. (cant find a pic at the moment so will post one later) Thighs - I created a suspender belt type system wit an old black leather belt and some elastics connected from this to snaps at the tops of the thighs - same as my OTTK works really well Finally some painting...... So after getting to a point that I was happy with all of the cuts, trims etc I got straight into the final surface prep ready for primer and then paint - been a long time getting to this point... All of my painting was done over the summer (well if you can call it that in the UK), I didnt have access to a garage / workshop all of the time so alot was done over many nights in my garden after work or at weekends, sanding and then primer and once I was totally happy all of the minute pinholes had been dealt with I finally started to apply the gloss paint I would apply the paint then dry it out for a day or so then lightly sand back with a high grade paper 2000+ and then re apply another coat of paint, I did this to slowly build up a good number of paint layers, finally achieving the finish i was after. I then left each piece to dry in our house (not the shed) - the wife was not amused - for a good week or so until i was happy the paint had hardened enough Various bits after painting Glove with decal applied next it was the final push to get all gaskets positioned correctly so i could then velcro these in place to the matching armour pieces and also finish off the decal application
-
After alot of cutting various pieces down, trimming and filling to get better shapes I had a quick kit up - with the all important tape holding everyhing in place, I really wanted to get a feel for where the kit was and to see what other adjustments were needed This pic was before I had finished the thigh shaping at the bottom and just before i finished the lid upgrades..no hard hat liner hence why I'm holding it in place As can be seen from this pic I went back and bought in my leg gaskets some more as they were still bunching too much Not a bad place to be in, now it was time to finish all of the strapping and then onto the final surface prep work before primer and paint
-
The belt As i said previously I purchased one of Darren's (JAFO) superb belt kits, come expertly packaged with all the screws, elastics etc you need to complete the belt - and a super trading card. I did a lot of research - checked other WIP threads in my garrison and also here on the FISD before starting the belt as i did not want to ruin it, my plan of attack was as follows: - Get torso / AB section to correct size for my waist - basically trimmed the armour down to fit me better - whilst leaving enougb space for move and flex. - Afterwards I stuck on some black ABS belt supports that a garrison buddy was supplying at the time - these basically velcro / glue to the AB section in 3 parts (Jims kit doesnt have tabs like others), and you can then use magnets or velcro matched to the back side of the belt to secure in place - I use both so its now very secure Once i was happy with the size around the torso piece i trimmed the belt to match making sure to leave enough material to overlap on the outside of the belt to cover the buckle that closes the belt on the LHS The buckle sits between the 2 pieces in the pic below but cant be seen if using the overlap piece All boxes in place - held in place with either screws through the rear of the boxes or the elastic supplied in the kit for the ones that hang down One thing i plan on doing (over the winter) is to make the boxes alot more square than they are (tidy them up) with some ABS and filler, ill then sand and paint again when it warms up so they are much sharper - Ill post pictures as i go and when complete on this upgrade.
-
See below pic of TD, with decals added etc
-
Thanks, the little black strip is cut out (sort of) on the TD already and I've now got the decals added - pictures to follow Yes I cut out the calf pills and chest pills but stopped there after finding out they didn't need to be cut out [emoji35] - bit of a pain but not a biggy and I can always fill them again if needed...easy enough. The chest pills were interesting - again I'll post up pictures tomorrow Thanks again for the comments and guidance.. Sent from my CLT-L09 using Tapatalk
