Search the Community
Showing results for 'Imperial Gaskets' in topics.
-
After reading/researching other build threads here, observing and talking to local garrison members I am starting one of these threads! My first official build step (other than acquiring the kit). I just purchased a kit from a fellow garrison member here in VT who lost interest in the build . The good thing is it is staying within our local squad and most of the trim work is done (only the belt, ab boxes and ankles left). All the soft goods came with the purchase as well . The kit is from Back Stage Props, that I believe, has since gone out of business. I have two other members @ShadyP here that bought this run a few years ago who I will be working with. The known issue with this early kit is the lack of a return edge on the chest yoke. I am in communication with a few vendors to see if I can get a replacement part instead of trying to build an edge. Here is what I have so far with a few pics: Boots: Imperial Boots Belt kit: Belts of The First Order Pouches x2: Trooper Bay Gaskets: Geeky Pink (he and I are are ironically close in size- 5'6" and slim) Tactical vest Gloves: Endor's (I think) Under suit: UK Extreme Racing Helmet: Anovos "BBB Day" for me was the day I got to pick everything up from my fellow squad member! Nice boxes of pre-trimmed armor I started to lay everything out and label L/R Belt Kit Blaster base and shoulder bell hanger Greeblies (I think everything is here?) Gaskets
-
Sorry for any confusion, I meant the other way around. Keep the list simple, titles highlighted in colour and links supplied, so the list is quick to read/reference. The bulked out version is good but very large. My thoughts were around quick reference and a streamlined approach. Don't get me wrong, I love the images in he R1 list, I would just like to build a sub forum for that newer section and have an easy list to fall under that. This is part of the FOTK list look. As you can see we have COO (Country of Origin) some descriptors which indeed could be fleshed out a little more, what parts they supply under headings and links to there platform and/or email addresses. Armor: Jimmiroquai - Origin PHILIPPINES: Kits are partially assembled/fully trimmed lightweight fiberglass (ready for rigging and painting). No issues with quality or service reported. Contact for delivery times/price details. Link Here, Email KB - Origin USA: Kits are made of ABS and will need to be trimmed and assembled. No issues with quality or service reported. Contact for delivery times/price details. Link Here, Email Here Armoryshop Props - Origin RUSSIA: Supplies a range of First Order Armour and Specialised 3Dprinted Helmets Link Here Armor vendors under review: 850 - Origin USA: Kits are made of ABS and will need to be trimmed and assembled. No issues with quality or service reported. Contact for delivery times/price details. Link Here Imperial Surplus - Origin USA: Kits are made of ABS and require trimming and assembly. Quality has been solid and service good when he is producing. Link here WTF - Origin USA: TFA and TLJ new kit awaiting member feed back and reviews for quality etc. Kit made of ABS with some resin parts. Anovos- Offers a "Pre-order" FO kit at this time, but due to legal issues and extended (1 year plus) wait times is no longer recommended. Soft goods vendors: Soft goods assorted (Soulart) - Origin CANADA: Neck seals, Harnesses, Shiny biker shorts, First Order gaskets, Phasma capes. Link Here Soft goods assorted (Imperial Gaskets) - Origin USA: Rubber gaskets, Pauldrons and Waist belts. FB contact Soft goods assorted (Trooper Bay) - Origin USA: Link Here
-
 Hello everyone, I usually like to get right to my approvals, but work had kept me from it. All requested changes have been made for this centurion submission. I am also submitting this with both helmets. Fiberglass and Plastic Anovos Helmets. Name: Ardeshir Radpour Username: equuspolo TK-42128 Southern California Garrison Los Angeles Squadron Height = 5'10 Weight = 165 Armor Maker = KB Armor - Trimmed to fit like Anovos Helmet Maker = Anovos Plastic Helmet and Anovos Premium Fiberglass helmet Boot Maker = Imperial Boots Gloves = Endor Finders Belt = Trooperbay Belt Pouches = Trooperbay Pauldron = Trooperbay Neck Seal = Imperial Seamstress Holster Maker = Dan Sczudlik Gaskets = production made silicon rubber gaskets F-11 = Branfuhr Studios Resin Kit- Custom built by me with custom light system. SE-44C = 3DPrintMerchant Electronics = Wireless Microphone with Acker Amp Custom Parts = Chest yoke and Backplate welded together with ABS Slurry. Chest Pills and Chest cut out backed with Textured Fabric, TD slurry welded. Entire armor painted with Rustoleum 2x Glossy White. Belt, Cod, Butt Plate attached to armer with Anovos leather waist tassets EIB Approval TFA Anovos Plastic Helmet TFA Anovos Premium Fiberglass Helmet
 -
Hello everyone. Been a little MIA due to work. Here is my TLJ Executioner submission. This is the same suit that is EIB approved already. That TFA is being submitted for Centurion. Name: Ardeshir Radpour Username: equuspolo TK-42128 Southern California Garrison Los Angeles Squadron Height = 5'10 Weight = 165 Armor Maker = KB Armor - Trimmed to fit like Anovos Helmet Maker = Anovos Plastic Helmet Boot Maker = Imperial Boots Gloves = Endor Finders Belt = Trooperbay Belt Pouches = Trooperbay Pauldron = Trooperbay Neck Seal = Imperial Seamstress Holster Maker = Dan Sczudlik Gaskets = production made silicon rubber gaskets F-11 = Branfuhr Studios Resin Kit- Custom built by me with custom light system. SE-44C = 3DPrintMerchant Electronics = Wireless Microphone with Acker Amp Custom Parts = Chest yoke and Backplate welded together with ABS Slurry. Chest Pills and Chest cut out backed with Textured Fabric, TD slurry welded. Entire armor painted with Rustoleum 2x Glossy White. Belt, Cod, Butt Plate attached to armer with Anovos leather waist tassets EIB Approval for SAME TFA Suit EIB Approval UPDATED TLJ COD PIECE Updated Gray Painted Rail Button
-
Hello everyone. Been a little MIA due to work. Here is my TLJ submission. This is the same suit that is EIB approved already. That TFA is being submitted for Centurion, then this one and the Executioner as well. I am submitting with two of my helmets, Noseplate and clips have been converted on helmet. One Fiberglass helmet and One Plastic Helmet. Name: Ardeshir Radpour Username: equuspolo TK-42128 Southern California Garrison Los Angeles Squadron Height = 5'10 Weight = 165 Armor Maker = KB Armor - Trimmed to fit like Anovos Helmet Maker = Anovos Premium Fiberglass and Anovos Plastic Helmet Boot Maker = Imperial Boots Gloves = Endor Finders Belt = Trooperbay Belt Pouches = Trooperbay Pauldron = Trooperbay Neck Seal = Imperial Seamstress Holster Maker = Dan Sczudlik Gaskets = production made silicon rubber gaskets F-11 = Branfuhr Studios Resin Kit- Custom built by me with custom light system. SE-44C = 3DPrintMerchant Electronics = Wireless Microphone with Acker Amp Custom Parts = Chest yoke and Backplate welded together with ABS Slurry. Chest Pills and Chest cut out backed with Textured Fabric, TD slurry welded. Entire armor painted with Rustoleum 2x Glossy White. Belt, Cod, Butt Plate attached to armer with Anovos leather waist tassets EIB Approval for SAME TFA Suit TLJ Plastic Helmet TLJ Premium Fiberglass Helmet UPDATED TLJ COD PIECE Updated Gray Painted Rail Button
-
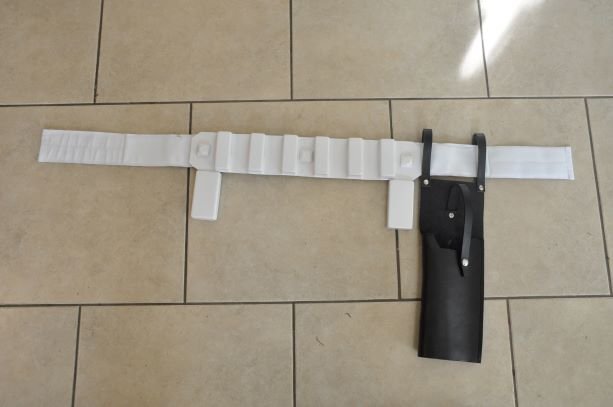
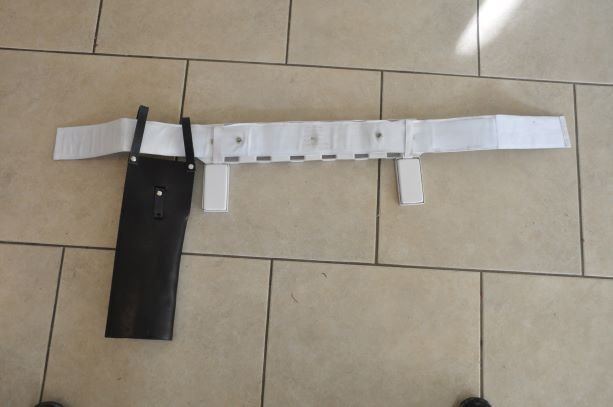
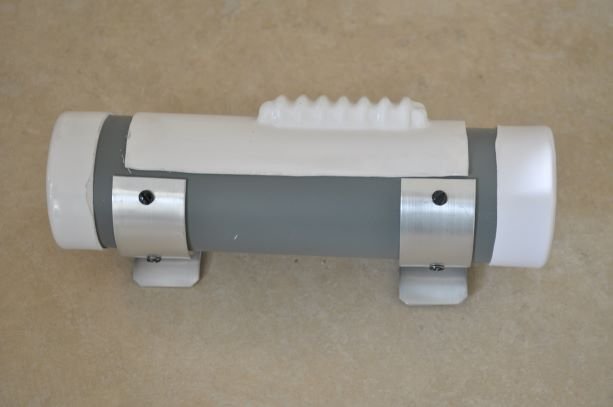
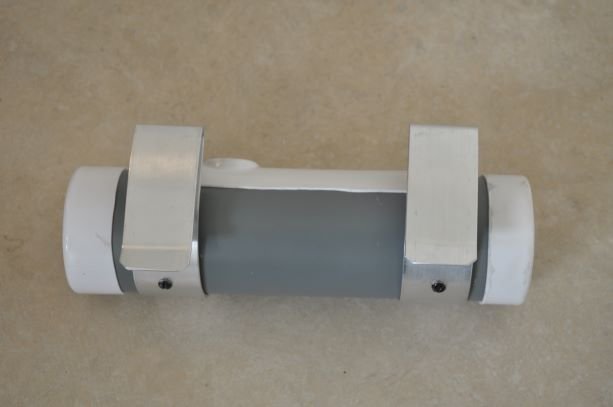
This is going to be a slow build, so strap in and hang on. First is the BBB day (minus the BBB). its a lot of parts Planning on L3, so rubber gaskets are in hand Lots of sourced bits/bobs, this one is for the back of the armor (goes underneath the thermal det),
-
Just wanted to share my TLJ Executioner final approval pics and Facebook build page Armor is Jim Tripon Fiberglass kit Gaskets: Geeky Pink Gaskets Boots & Gloves: Imperial Boots Speaker / Voice: RomFX Cooling System: Ukswrath on Etsy Armor Paint by: Mad Scientist Workshop / Auto Paint: Fiat 249 Axe: 3D printed / Diversity Props Pistol and F-11: Heston 3D Solutions Belt: Trooper Bay Build and Submission Pics here: https://www.facebook.com/TK41970
-

Dead Post Links & Broken Photos, How You Can Help
gmrhodes13 replied to Sly11's topic in Forum Help & Support
https://www.whitearmor.net/forum/topic/32826-is-anyone-making-pistols-yet/, restored by gmrhodes13 https://www.whitearmor.net/forum/topic/32436-undersuit-gaskets/, restored by gmrhodes13 https://www.whitearmor.net/forum/topic/32663-epvii-nerf-blasters/, restored by gmrhodes13 https://www.whitearmor.net/forum/topic/32204-concerns-with-forearms-and-big-hands/, restored by gmrhodes13 https://www.whitearmor.net/forum/topic/32168-behind-the-scenes-armor-assembly-photo/, restored by gmrhodes13 https://www.whitearmor.net/forum/topic/32012-to-paint-or-not-paint/, restored by gmrhodes13 Page 15 complete https://www.whitearmor.net/forum/topic/27323-stormtrooper-in-episode-vii/page/, restored by gmrhodes13 Page 16 complete - TFA Stormtrooper COMPLETED -------------------------------------- not done yet in progress completed (Command Staff) (Extended Staff) Communications Center Announcements Forum Help & Support New Recruits Getting Started - Read this First! FISD Guidelines 501st and Detachment Access Requests New Member Introductions Newly Approved Members - Sound Off! Enlisted Barracks Off Topic Field Training Exercises 501st & Detachment Members 501st General Discussion 501st For Sale/Trade Detachment Only - General Discussion - Election Archives ???????? - Poll Archives NA ???????? Detachment Merchandise - Trading Cards Events Fire Team Area Advanced Tactics TK Pre-Approvals - TK Pre-Approval Questions & Discussion - Request TK Pre-Approval Expert Infantryman Program - FISD Expert Infantryman Badge (EIB Requirements - Request Expert Infantryman Status FISD Centurion Program - FISD Centurion Requirements - Request Centurion Status FISD Master Armorer Program The Replica Section Imperial Commissary For Sale/Trade (Personal Items Only) - For Sale - Archive Ongoing Sales & Project Runs eBay Armor Armory Hard Armor (General Discussion) Assembly, Mods, and Painting - Tutorials, Tips and HOWTOs - Templates and Blueprints Boots, Soft Parts, and other Accessories Electronics for Helmets / Blasters 3D Parts and Technical - 3D File Depository - 3D Printer owners - 3D CAD Designers and Tinkerers FISD 3D Contributor Program The Foundry - Armor and Prop Making Costuming And Builds Original Trilogy (501st Approved) Rogue One - Rogue One Build Threads ANH (Stunt and Hero) - ANH Build Threads ESB Stormtrooper - ESB Build Threads ROTJ Stormtrooper - ROTJ Build Threads First Order Battle Group Costuming and Builds First Order (501st Approved) - TFA Stormtrooper ------First 4 pages complete > TFA Build Threads > Garrison Titan FOTK Build Area - TLJ Stormtrooper > TLJ Build Threads - TROS Stormtrooper > Rise of Skywalker Build Threads - Captain Phasma - TFA and TLJ > Captain Phasma Build Threads - Captain Cardinal > Captain Cardinal Build Threads - Commander Pyre > Commander Pyre Build Threads CRL's and check lists Quick access Weapons of the First Order Quick find resources Gallery & Research Costuming and Builds - EU (501st Approved) Heavy Weapons Trooper - HWT Build Threads Stormtrooper Commander - TKC Build Threads Incinerator Trooper - INC Build Threads Sky Trooper - SKY Build Threads Death Trooper - Death Trooper Build Threads Battlefront DICE Shocktrooper Star Wars Rebels - Rebels TK Build Threads Concept Armor - MQ Build Threads Legacy Stormtrooper (Joker Squad) - Legacy Stormtrooper Build Threads Weapons Locker General Weapons Discussion BlasTech E11 - ANH BlasTech E11 - ESB BlasTech E11 - ROTJ BlasTech E11 - TKC BlasTech E11 - R1 BlasTech E11 BlasTech SE-14R BlasTech DLT-19 MiniMag PTL Missile Launcher, T-21, RT-97C (MG-15) BlasTech DC-15A and DC-15S TK Lightsabers Flamethrower (Plasma Rifle) Recon (non TK 501st approved) Kasyyyk Stormtrooper The Force Unleashed Stormtrooper Other 501st Costumes Other Non-Approved Star Wars Costumes Non Star Wars Costuming Imperial Embassies /Danny Ayuda en español Unterstützung auf Deutsch Praesidium Italica 银河帝国中华大使馆 Section Française 日本語 Kiosk Русскоязычный форум Recasting Discussion Recasting Discussion ---------------------------------------------------------- NEXT: First Order Battle Group Costuming and Builds First Order (501st Approved) -TLJ Stormtrooper -
Dead Post Links & Broken Photos, How You Can Help
gmrhodes13 replied to Sly11's topic in Forum Help & Support
https://www.whitearmor.net/forum/topic/37260-questions-on-new-fn-armor-maker/, restored by gmrhodes13 https://www.whitearmor.net/forum/topic/36506-fotk-backpack/#comments, restored by gmrhodes13 https://www.whitearmor.net/forum/topic/36921-tfa-tk-quadnoculars/, restored by gmrhodes13 https://www.whitearmor.net/forum/topic/34068-question-about-imperial-gaskets-arms-fitment/, restored by gmrhodes13 https://www.whitearmor.net/forum/topic/36503-tfa-variants-spotted/, restored by gmrhodes13 https://www.whitearmor.net/forum/topic/36605-gaskets-how-shiny-is-shiny-enough/, restored by gmrhodes13 Page 10 complete https://www.whitearmor.net/forum/topic/34541-anovos-tfa-fn-stormtrooper-helmet-thoughts/, restored by gmrhodes13 https://www.whitearmor.net/forum/topic/35948-how-to-transport-the-new-armor-safe/, restored by gmrhodes13 https://www.whitearmor.net/forum/topic/34719-coating-inside-of-anovos-helmet/, restored by gmrhodes13 https://www.whitearmor.net/forum/topic/34981-recaster-alert-furry-props-on-etsy-selling-recasts-of-my-tfa-armor/, restored by gmrhodes13 https://www.whitearmor.net/forum/topic/35343-kellwolfs-first-order-tk-build/, restored by gmrhodes13 https://www.whitearmor.net/forum/topic/34458-anovos-first-order-stormtrooper-statue/, restored by gmrhodes13 Page 11 complete -
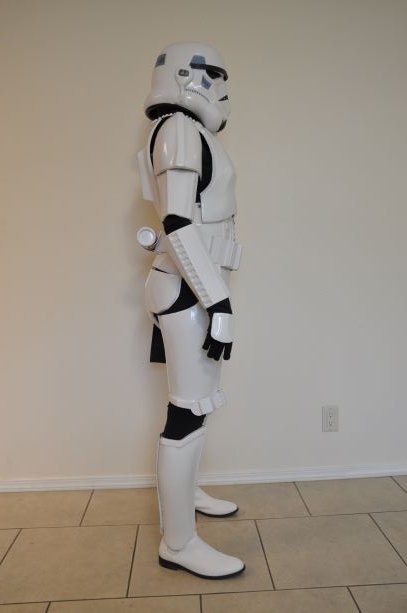
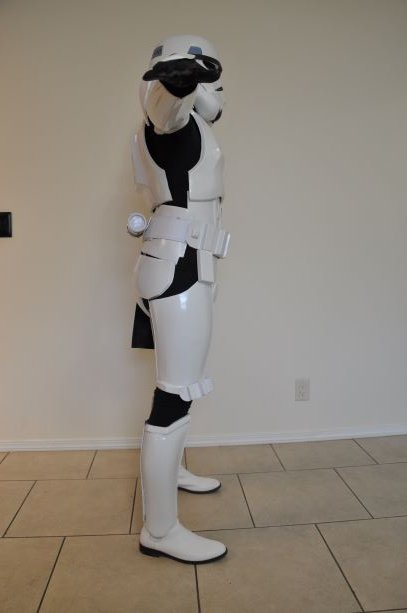
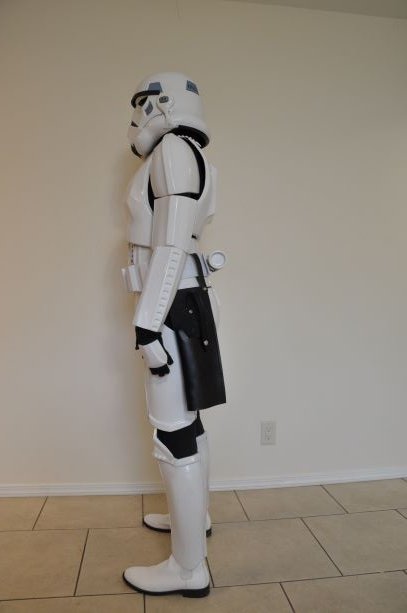
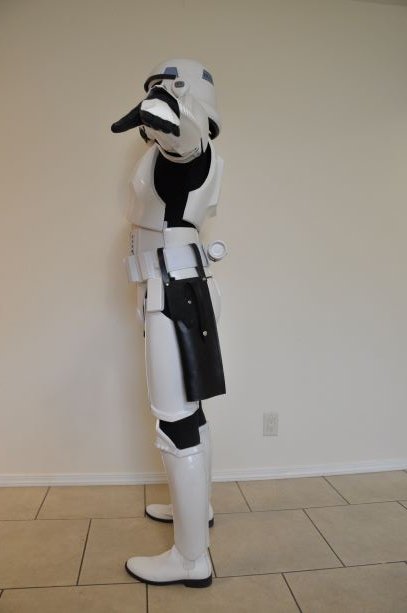
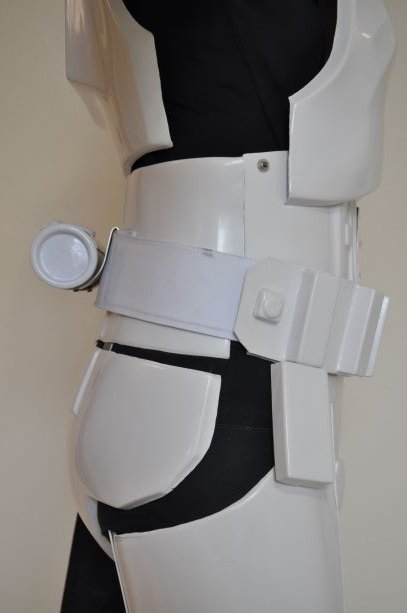
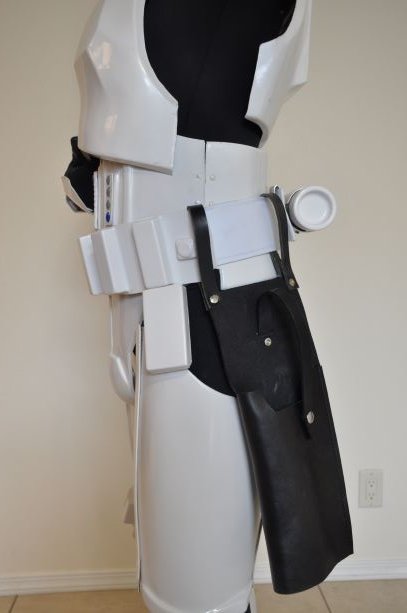
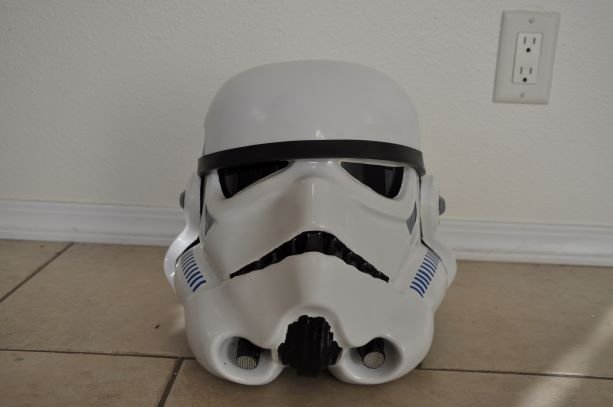
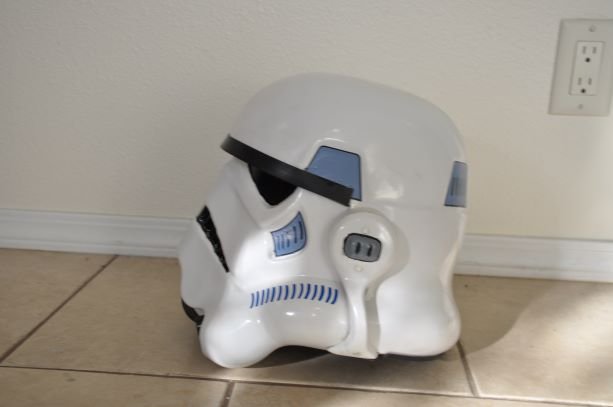
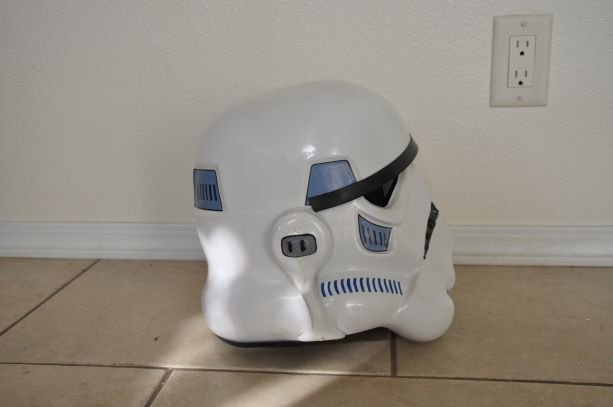
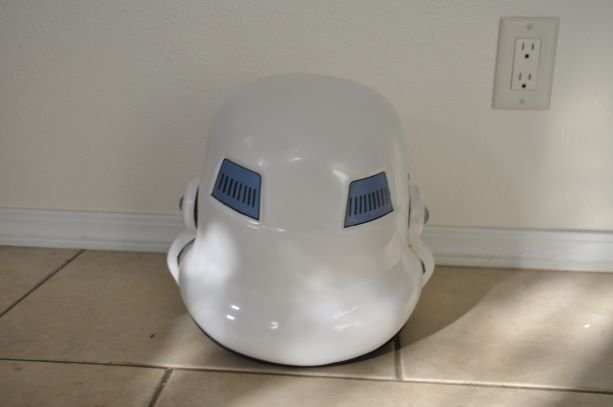
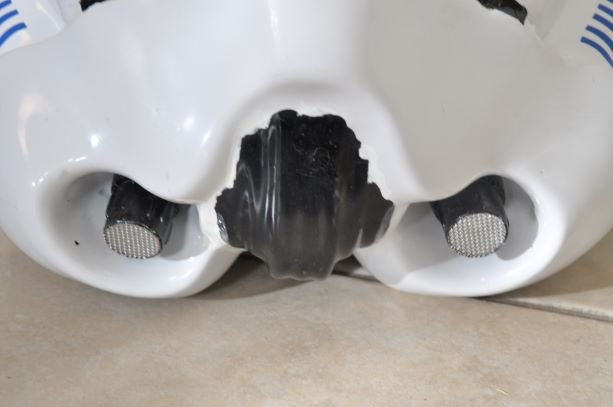
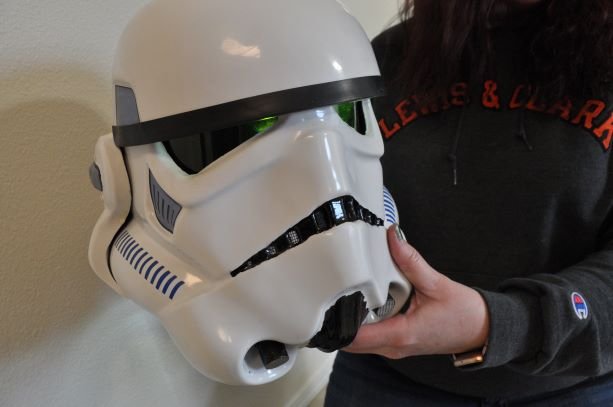
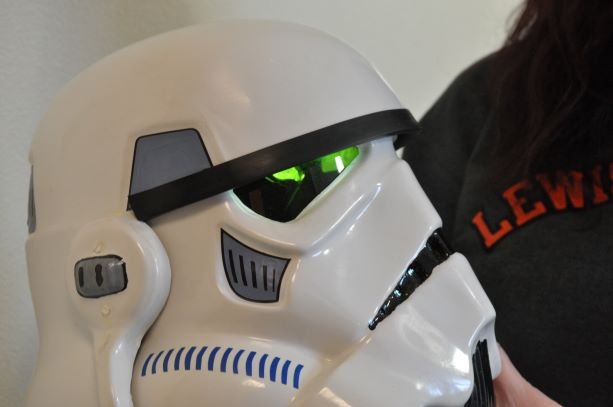
 INFORMATION: 1. First/last name: Jonathan Curtis 2. Future Garrison/Squad/Outpost or local area: Garrison Tyranus, Sienar Fleet Squad 3. Armor maker: Walt’s Trooper Factory 4. Helmet maker: Walt’s Trooper Factory 5. Cloth belt maker: Imperial Issue 6. Neck seal maker: Geeky Pink’s Phantastic Gaskets 7. Boot maker: Imperial Boots 9. Blaster maker: N/A 10. Gasket maker: N/A 11. Height: 5’ 7inches 12. weight: 153 Pounds 13. TK type (ANH Stunt/Hero. ESB, ROTJ. TFA etc.): ANH Stunt 14. Name(s) of any Trooper(s) who significantly helped with your Build: Gmrhodes13, TKSpartan, Sly11, Cricket, Cableguy, Troopermaster, TheSwede, JustJoseph63. Front View: Back View: Left Side: Right Side: Ab section: Helmet:
 -
Name: Ardeshir Radpour Username: equuspolo TK-42128 Southern California Garrison Los Angeles Squadron Height = 5'10 Weight = 165 Armor Maker = KB Armor - Trimmed to fit like Anovos Helmet Maker = Anovos Premium Fiberglass Boot Maker = Imperial Boots Gloves = Endor Finders Belt = Trooperbay Belt Pouches = Trooperbay Pauldron = Trooperbay Neck Seal = Imperial Seamstress Holster Maker = Dan Sczudlik Gaskets = Geeky Pinks F-11 = Branfuhr Studios Resin Kit- Custom built by me with custom light system. Electronics = Wireless Microphone with Acker Amp Custom Parts = Chest yoke and Backplate welded together with ABS Slurry. Chest Pills and Chest cut out backed with Textured Fabric, TD slurry welded. Entire armor painted with Rustoleum 2x Glossy White. Belt, Cod, Butt Plate attached to armer with Anovos leather waist tassets
-
 Armor = Walts Trooper Factory Helmet Maker = Me? (was a part of the Kit from Walt) Blaster= Shear Tech Height = 5' 10" Boots = Imperial Boots Canvas belt = Tkittle Neck Seal = Geeky Pinks Phantastic Gaskets Holster = Darmans Props
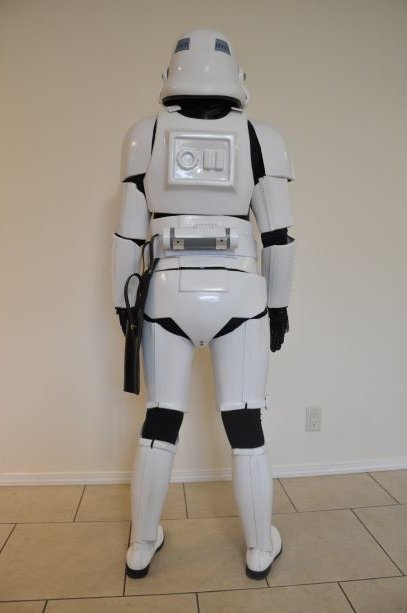

-
 Just organizing my thoughts and links a bit... Shopping List (for approval) $400 Undersuit with cloth gaskets, neck seal, & rigging Sheev's Emporium $40 Shiny shorts Geeky Pink's Upgrades Metal thigh holster R2Dan Rear zipper closure Sheev's Emporium $38 Shoulder Bell and Yoke Brackets Ukswrath's Specialty + $4 Chest Pill Box Fabric Mesh Ukswrath's Specialty $55 Gloves EndorFinders $180 F-11D Blaster + $130 Se44-C Pistol The Imperial Factory Task List For Approval - repaint knee armor - repaint posterior - repair spat/greeblie - repair belt separation - replace all strapping Upgrades - install shoulder bell support brackets ~ strengthen/repair cracks in yoke shoulders - repair cracks ~ ab boxes - simulate separate pieces ~ ab boxes ~ wrist boxes - add magnetic attachments for chest panel - smooth and repaint all panel interiors flat white - remove and repaint thigh holster to match (need Torx security drivers - ordered) - repaint and clear any panels with severe paint issues ~ chest ~ ab - paint helmet interior black
 -

The BigJasoni's ROTK 3D Print Build Thread
BigJasoni replied to BigJasoni's topic in Rogue One Build Threads
End of the road. Here it is... I know I write long posts, so bear me, this one's going to have a lot of content. Honestly this will serve as a summary of the end of the build as well as me spelling out my 3d printed TK lesson's learned. I'll start with what I call "the glory shots" and then bring everything back around to a post Halloween damage assessment. The following shots were prepared for my armor submission; the trained eye will be able to pick apart some details, which I'll try to point out as this post goes along, but I'll cover my overall assessment later. First a few shots that tie up a couple loose ends: The new stainless steel mesh that @11b30b4 steered me towards came in and the difference is night and day. Stainless on the left, Michael's aluminum mesh on the right. Thanks Jeff! I also did my strapping last Sunday, but kind of got in a flow and forgot to take pictures. We discussed PC-7 previously and this was the result after some shaping and curing: I also went a little rogue (no pun intended) and rather than connecting the buckle to straps extending from the abdomen, I took one of my old Marine Corps Martial Arts belts and rigged this up: I did this mostly because the thighs are tight and only go up so far. Additionally, the suspenders I have are very stretchy and were already working overtime to hold up the abdomen, belt, cod, and butt piece. The belt can't be seen under the armor, but it's really uncomfortable. I'll use something similar for my clone build, but it needs to be worked on. The glory shots. Sorry, the lighting makes some of the pics look kind of weird: Gloves: Endor Finders https://www.endorfinders.com/. $55.00 + $3.95 shipping. They're awesome. That's all that needs to be said about that. Boots: Imperial Boots https://www.imperialboots.com/ $119.90 + $30.00 DHL Shipping. Very nice and sturdy. The insole is garbage, but that's an easy swap. Undersuit: The Dark Side Closet https://www.facebook.com/TheDarkSideCloset $230.00. A little pricey, but it was a gift. Amazing quality and even better customer service. Without going into details, I contacted them after receiving my order and they took care of me in a day. I can't overstate how good they are and I'll definitely be buying from them again. I wouldn't troop in this shirt during the summer months though, it is HOT. The material they use is very thick and I was sweating like crazy up until I got outside. As it dropped into the 40s tonight, I was very, very happy I had this suit. I also wore my cycling pants under the knee gaskets and they worked perfect together. Helmet: Modified Nerdforge Designs 3d Print; Etsy. $8.00 STL file. Hovi Mic Tip and gap between vocoder and chin Blue fabric behind tube cutouts, black behind tears and traps. Hand plates: Rogue One style, recess present in front. Forearms: Closed with Velcro on one side, elastic on the other. Will re-think the elastic side for future builds. Back plate/ kidney armor/ trauma plate. Tabs present for belt alignment. Modified back armor. 8mm circular indent, top of box wall indentation, O cog has 16 spines, 5 raised bars on the 11 bars, and rectangular tabs on rear shoulder strap trapezoids. The tabs are a little big, and I should have attached the trapezoids much sooner, before paint. This would have eliminated the gaps. Chest armor with shoulder strap trapezoids, black gloss side extenders, outward swooping pectoral outline and rib cage flare. Chest should probably be "taller" with a more aggressive flare on the bottom. This was one of the first things I asked the designer to correct, which they did, but I think we could have "leaned" the armor out a little more. I still love how it turned out, but maybe just a little more tweaking. Abdominal armor and belt. I forgot to attach the drop boxes on for this pic, but did later. Closeup showing separate belt boxes, trapezoid on middle box, and teeth on top of belt. What color is the rectangular recess supposed to be on the middle greeblie? It's not noted on the CRL, but the picture appears to be a grey outline. Other than that, I can't find a clear pic, but I think I've seen others paint the inside blue. Rear belt, thermal detonator, and kidney/ trauma plate. The contrast is a little off, so the trauma plate kind of blends in with the rest of the back. For brevity's sake, I'll skip the rest of the "glory shots" and go straight to the things that pain me: First, I touched on this in my previous post, but soon after going crazy with the PC-7, even it was no match for my lower legs. The sound of the shins cracking was quickly silenced by the moans of frustration coming from me. If the paint looks sloppy and rough, it's because after these broke, I decided to do a quick spray and cover-up for Halloween. Additionally, until I go through a re-design with Akira-Yuming, these shins just won't work. First, the bell-bottom is not nearly big enough which means that my boots won't fit under cleanly. Next, the wall thickness is way too thick; there's absolutely no flex to the armor especially after putting on the sniper knee plate. I have already sent the designer some ideas, but ultimately it's going to have to be a total re-design with thin walls. By comparison, I printed out Sean Fields' Shoretrooper shin for my Mando build and it has a lot of flex and fits perfect, I've already spoken with the 850 Armor Works guys and will likely buy a set of shins from them for this costume. But, I will still print off a set of whatever Akira-Yuming and I come up with for my 100% 3d build. So, for pictures I went outside like this: Also, I mentioned previously how thick the Darkside Closet undershirt is. I actually had to modify my forearms to get them to close. My wife decided to take over my Mando armor, so while that costume would have been a good fall-back, I already promised it to her for tonight. Also, it's my size not hers, so if there's any Mando fans out there, please don't pick it apart. She got a lot of compliments when we went to Target. Post Halloween trauma: Scrapes scratches and dings were the most common issue. A lot of these are in places that just confuse me honestly. The above pic shows some pretty bad scratches that occured below the chest and back armor. Essentially, this wasn't touching anything and still got dinged. Overall, the abdominal armor still looks good and the scratches can be touched up, but the cod got a huge gouge in it from when I tried to sit down (this was pretty funny by the way). Also, I previously mentioned that I forgot to show the drop boxes in my "glory shot" so here they are. They're way too big. Since I originally scaled my abdominal armor to 105%, I did the same with the belt and boxes. However, when I remade the belt with HIPS, I re-scaled the belt boxes to normal size but totally forgot about the drop boxes. Since I forgot them during the "glory shots," I didn't notice the size difference until I put the armor together yesterday. And this one broke my heart. When I was closing my forearms, I kind of reached out in front of myself with both arms simultaneously (imagine Lou Ferrigno in his famous hulk flex). While I'm no Lou Ferrigno, the pressure from the biceps pressing against the chest from both sides just made it crack. What sucks so bad about this is that I was real happy with how the chest was holding up and it ultimately stood as a sign to how careful you have to be with 3D armor. 3D Print ROTK Summary: After three months of printing, and building I've performed these final calculations. Total weight of armor raw (no paint or filler): 7.12kg (15.67 lbs) Total weight of finished armor: 8.9 kg (19.58 lbs) Price of filament + Tax $19.95 per kg. Total price of armor @ $19.95 per kg: $142.04 Waste (pile of lesson's learned): 5.25kg Price of lesson's learned: $104.74 (ugh) Paint/ primer: $200 approx. Filler/ sandpaper/ supplies: $100 approx. Total Cost of armor: $442.04 + waste = $546.78 Total Cost of Armor/ Soft Parts/ Boots: $880.89 + waste= $985.63 So, with all that said, my opening statement on August 9th was "Throw my name in with the other ROTK threads, but let's do this with a 3D printer, and finish the project." Ultimately, other than the inaccurate stuff on YouTube, I had seen several 3d projects that were started, but none that had been finished. In the beginning, my wife and I were curious if it could be done to an acceptable standard with a 3d printer. While I did break the shin armor, I finished my project and would have submitted pics this week, had the mishap not occurred. In the end, I think it's at an acceptable level, but that's mostly due to the help you all have given me. I've decided not to submit pictures of this armor set to my GML. I do like how it looks, but the 3d print settings need to be overhauled before it's "troopable." Basically, I feel that after I clean it up and get rid of the Halloween damage, I'd be able to take some pretty good "studio" shots, and probably be accepted, but then not be capable of doing the things that drew me to the 501st legion in the first place. I really want to get out there and start participating in events, but I think I'm going to have to wait for the BBB like everyone else that's assisted me through this project. Jimi sent me his price list this week, and of course, I've already spoken with the 850 Armor Works guys. Also, while there is a Din Djarin CRL out there, and I could put together some pre-beskar armor pretty quick, I linked up with the 501st to be a Stormtrooper; the other stuff comes later. Overall, through this project, I learned a lot about this hobby and the ROTK armor. By the time I'm able to start building a new set, I'll be well prepared to build towards the Centurion Level set and join the ranks. While I'm waiting to start my next project, I'll continue being active on the FISD forum and learning as much as I can. Additionally, I'll be sitting on another 3d printing forum next month with Garrison Tyranus' Inferno Squad and use all of this as valuable information to pass on to the viewers. I'll post information about that as soon as it's solidified. Lastly, we're one episode into the Mandalorian season 2 and haven't seen any Stormtroopers yet. I'm still hoping for some Remnant Stormtroopers, like in season one, to come out (ROTK Armor with OT Helmet). For me, it would be my dream CRL. I don't know why, but the armor combination with the weathered look just works. I've already put my email on the Anovos interest list and will be picking up a helmet kit regardless. In the meantime, I'm collecting as many reference pics as I can and will gladly help out however I can. Thanks again for everything. -
 Armor info: Armor: KB Props Helmet: Props Emporium Gaskets: Imperial Gaskets Rifle: Branfuhr Studios Gloves & Boots: Imperial Boots Neckseal: Geeky Pink Lady Undersuit: Stormtrooper undersuit Cape: Geeky Pink Lady Belt & Pouches: Trooperbay Personal info: Name: Kaden Taylor 501st ID: TK36544 Garrison: Wisconsin (Black Ice Squad) Height: 5' 5" Weight: 145 LB
 -
.thumb.JPG.0594464b5116e73e45fce31c6b373ef5.JPG) COSTUME INFORMATION Armor: ANOVOS TFA beta kit Chestplate seam mod (wings cutted and reassembled) Chestplate chestslot mod (cutted and reworked) Biceps detail mod (3 step stairs) Shoulder bracket mod (àla Ukswrath) accurate fabric behind detail holes replaced front Belt Boxes with resin Belt Boxes (made by R2Dan) replaced Handguards with resin Handguards (made by R2Dan) Helmet: ANOVOS TLJ Standard Line Gaskets: ANOVOS Belt: Belts of The First Order Belt Pouches: custom made (by TK-72216) Holster: working metal holster (made by R2Dan) Undersuit: shiny pants and black top from Amazon Neckseal: custom made (by TK-72216) Boots: Imperial Boots Gloves: Endor Finders F-11D Blaster: 3D Printed (printed by Sanotized Creations) Name: Richard Voss Height: 176cm (5‘9“) Weight: 85kg (187 lbs) TKID: 40193 Garrison: German Garrison Basic Approval: https://www.501st.com/members/displaymember.php?userID=26769&costumeID=408 About my action Shot: unfortunately I forgot my blaster, when we were taking photos of me in armor. While we still had to do an action shot, I was lent the Blaster of TK-51337. The Blaster in the single shots is my own (this single photos we taken a few days later). Of course, if required I can jump into full armor again and take a new action shot with my own blaster. Here is a picture with all of our F-11D's at once (mine is in the middle) Basic Shots (Guideline Points 1-5): Chest (Guideline Points 6-10): Detonator (Guideline Points 11-13): Shoulders (Guideline Points 14): Biceps (Guideline Points 15): Forearms (Guideline Points 16-18): Abdomen (Guideline Points 19-21): Cod (Guideline Points 22): Posterior (Guideline Points 23): Thighs (Guideline Points 24): Shins (Guideline Points 25): Ankle Spats (Guideline Points 26): Helmet Details (Guideline Points 27-30): Neckseal (Guideline Points 31): Undergarments (Guideline Points 32): Shoulder Gaskets (Guideline Points 33): Knee Gaskets (Guideline Points 34): Gloves (Guideline Points 35-36): Belt (Guideline Points 37-38): Boots (Guideline Points 39): Blaster Details (Guideline Points 40-45): To prevent confusion: We (Richard TK-40193, Daniela TK-72216 and Sebastian TK-51337) built our stormtroopers together last year - the local Rise of Skywalker premiere was our first troop as FOTKs. In January we submitted our armors for basic approval and passed it. We then decided to update the few parts that we hadn't initially built to the Level 2 and Level 3 standards and are now appliying for the next levels of approvement. Since we built the armors together almost every mechanism, closure method and solution to strapping problems is the same - there are small individual differences but nothing major. We took our new approvement photos before a green screen in our living room with a set up to lights over a couple of days so lighting and background should be consistent in all three of our applications. Thank you very much for your time!
COSTUME INFORMATION Armor: ANOVOS TFA beta kit Chestplate seam mod (wings cutted and reassembled) Chestplate chestslot mod (cutted and reworked) Biceps detail mod (3 step stairs) Shoulder bracket mod (àla Ukswrath) accurate fabric behind detail holes replaced front Belt Boxes with resin Belt Boxes (made by R2Dan) replaced Handguards with resin Handguards (made by R2Dan) Helmet: ANOVOS TLJ Standard Line Gaskets: ANOVOS Belt: Belts of The First Order Belt Pouches: custom made (by TK-72216) Holster: working metal holster (made by R2Dan) Undersuit: shiny pants and black top from Amazon Neckseal: custom made (by TK-72216) Boots: Imperial Boots Gloves: Endor Finders F-11D Blaster: 3D Printed (printed by Sanotized Creations) Name: Richard Voss Height: 176cm (5‘9“) Weight: 85kg (187 lbs) TKID: 40193 Garrison: German Garrison Basic Approval: https://www.501st.com/members/displaymember.php?userID=26769&costumeID=408 About my action Shot: unfortunately I forgot my blaster, when we were taking photos of me in armor. While we still had to do an action shot, I was lent the Blaster of TK-51337. The Blaster in the single shots is my own (this single photos we taken a few days later). Of course, if required I can jump into full armor again and take a new action shot with my own blaster. Here is a picture with all of our F-11D's at once (mine is in the middle) Basic Shots (Guideline Points 1-5): Chest (Guideline Points 6-10): Detonator (Guideline Points 11-13): Shoulders (Guideline Points 14): Biceps (Guideline Points 15): Forearms (Guideline Points 16-18): Abdomen (Guideline Points 19-21): Cod (Guideline Points 22): Posterior (Guideline Points 23): Thighs (Guideline Points 24): Shins (Guideline Points 25): Ankle Spats (Guideline Points 26): Helmet Details (Guideline Points 27-30): Neckseal (Guideline Points 31): Undergarments (Guideline Points 32): Shoulder Gaskets (Guideline Points 33): Knee Gaskets (Guideline Points 34): Gloves (Guideline Points 35-36): Belt (Guideline Points 37-38): Boots (Guideline Points 39): Blaster Details (Guideline Points 40-45): To prevent confusion: We (Richard TK-40193, Daniela TK-72216 and Sebastian TK-51337) built our stormtroopers together last year - the local Rise of Skywalker premiere was our first troop as FOTKs. In January we submitted our armors for basic approval and passed it. We then decided to update the few parts that we hadn't initially built to the Level 2 and Level 3 standards and are now appliying for the next levels of approvement. Since we built the armors together almost every mechanism, closure method and solution to strapping problems is the same - there are small individual differences but nothing major. We took our new approvement photos before a green screen in our living room with a set up to lights over a couple of days so lighting and background should be consistent in all three of our applications. Thank you very much for your time! -
 Garrison: Ohio Garrison TKID: 84881 Name: Bryan Labaki Profile: https://www.501st.com/members/displaymemberdetails.php?userID=32854 Armor Maker: ATA Helmet Maker: ATA Blaster Maker: Doopydoos Pipe Kit Boot Maker: Imperial Boots Canvas Belt: Imperial Issue Hand Plates: Trooperbay rubber hand plates Neck Seal: Geeky Pinks Phantastic gaskets Holster: Trooper Bay EIB Thread: The Armor: Han Snap: (Armor isn't fully closed, just showing off the snap) TD: Gloves, Boots, Neck Seal: Helmet: E-11: If there's anything else you need to see, let me know. Thanks!
 -
 COSTUME INFORMATION Armor: ANOVOS TFA beta kit Chestplate seam mod (wings cutted and reassembled) Chestplate chestslot mod (cutted and reworked) Biceps detail mod (3 step stairs) Shoulder bracket mod (àla Ukswrath) accurate fabric behind detail holes replaced front Belt Boxes with resin Belt Boxes (made by R2Dan) replaced Handguards with resin Handguards (made by R2Dan) Helmet: ANOVOS TLJ Standard Line Gaskets: ANOVOS Belt: Belts of The First Order Belt Pouches: custom made (by me) Holster: working metal holster (made by R2Dan) Undersuit: shiny pants and black top from Amazon Neckseal: custom made (by me) Boots: Imperial Boots Gloves: Imperial Boots F-11D Blaster: 3D Printed (files by The5thHorseman) Name: Daniela Hofmann Height: 166cm (5‘5“) Weight: 68kg (150 lbs) TKID: 72216 Garrison: German Garrison Basic Approval: https://www.501st.com/members/displaymember.php?userID=23851&costumeID=408 Basic Shots (Guideline Points 1-5): Chest (Guideline Points 6-10): Detonator (Guideline Points 11-13): Shoulders (Guideline Points 14): Biceps (Guideline Points 15): Forearms (Guideline Points 16-18): Abdomen (Guideline Points 19-21): Cod (Guideline Points 22): Posterior (Guideline Points 23): Thighs (Guideline Points 24): Shins (Guideline Points 25): Ankle Spats (Guideline Points 26): Helmet Details (Guideline Points 27-30): Neckseal (Guideline Points 31): Undergarments (Guideline Points 32): Shoulder Gaskets (Guideline Points 33): Knee Gaskets (Guideline Points 34): Gloves (Guideline Points 35-36): Belt (Guideline Points 37-38): Boots (Guideline Points 39): Blaster Details (Guideline Points 40-45): To prevent confusion: We (Daniela TK-72216, Sebastian TK-51337 and Richard TK-40193) built our stormtroopers together last year - the local Rise of Skywalker premiere was our first troop as FOTKs. In January we submitted our armors for basic approval and passed it. We then decided to update the few parts that we hadn't initially built to the Level 2 and Level 3 standards and are now appliying for the next levels of approvement. Since we built the armors together almost every mechanism, closure method and solution to strapping problems is the same - there are small individual differences but nothing major. We took our new approvement photos before a green screen in our living room with a set up to lights over a couple of days so lighting and background should be consistent in all three of our applications. Thank you very much for your time!
 -
 COSTUME INFORMATION Armor: ANOVOS TFA beta kit Chestplate seam mod (wings cutted and reassembled) Chestplate chestslot mod (cutted and reworked) Biceps detail mod (3 step stairs) Shoulder bracket mod (àla Ukswrath) accurate fabric behind detail holes replaced front Belt Boxes with resin Belt Boxes (made by R2Dan) replaced Handguards with resin Handguards (made by R2Dan) reworked Forearm detail holes Helmet: ANOVOS TLJ Standard Line Gaskets: ANOVOS Belt: Belts of The First Order Belt Pouches: custom made (by TK-72216) Holster: working metal holster (made by R2Dan) Undersuit: shiny pants and black top from Amazon Neckseal: custom made (by TK-72216) Boots: Imperial Boots Gloves: Endor Finders F-11D Blaster: 3D Printed (files by The5thHorseman) Name: Sebastian Schlump Height: 187cm (6‘2“) Weight: 81kg (179 lbs) TKID: 51337 Garrison: German Garrison Basic Approval: https://www.501st.com/members/displaymember.php?userID=20276&costumeID=408 Basic Shots (Guideline Points 1-5): Chest (Guideline Points 6-10): Detonator (Guideline Points 11-13): Shoulders (Guideline Points 14): Biceps (Guideline Points 15): Forearms (Guideline Points 16-18): Abdomen (Guideline Points 19-21): Cod (Guideline Points 22): Posterior (Guideline Points 23): Thighs (Guideline Points 24): Shins (Guideline Points 25): Ankle Spats (Guideline Points 26): Helmet Details (Guideline Points 27-30): Neckseal (Guideline Points 31): Undergarments (Guideline Points 32): Shoulder Gaskets (Guideline Points 33): Knee Gaskets (Guideline Points 34): Gloves (Guideline Points 35-36): Belt (Guideline Points 37-38): Boots (Guideline Points 39): Blaster Details (Guideline Points 40-45): To prevent confusion: We (Sebastian TK-51337, Daniela TK-72216 and Richard TK-40193) built our stormtroopers together last year - the local Rise of Skywalker premiere was our first troop as FOTKs. In January we submitted our armors for basic approval and passed it. We then decided to update the few parts that we hadn't initially built to the Level 2 and Level 3 standards and are now appliying for the next levels of approvement. Since we built the armors together almost every mechanism, closure method and solution to strapping problems is the same - there are small individual differences but nothing major. We took our new approvement photos before a green screen in our living room with a set up to lights over a couple of days so lighting and background should be consistent in all three of our applications. Thank you very much for your time!
 -
Progress Report - 9/8/20 Not all progress is plastic! The undersuit that once did not fit, now fits! Good to know the diet is working! Gotta keep it going, even if the bigger undersuit is about to come in the mail. The knee gaskets right now like to slide down my legs, hence why I'm not wearing them. I'm thinking this wont be an issue once its velcro'd to armor. My order of extra neodymium magnets came in the mail, also the mesh for the TLJ helmet and my gloves from Endor Finders. The endor gloves fit a bit better and they are also soft on the inside compared to the gloves from Imperial Boots. But I also like how the gloves from IB feel a bit more breathable. I think I will keep both but that means I need another set of handplates. The velcro is not the same side on the 2 pairs of gloves. As for the Deathtrooper gloves I got by accident, someone in the garrison already called dibs
-
 Name : Dave Galant 501st ID : 98695 FISD forum name : Helotech Garrison : Outer Rim Garrison, Canada Armor : SDS Helmet :SDS Blaster : SDS Height : 5' 10" + Weight : 180 lbs Boots : SDS Canvas Belt : Imperial Issue Hand Plates : Silicone, Joseph Neck Seal : Geeky Pink's Fantastic Gaskets Holster : SDS Audio system: TK Products EI Application Link: Front action Front Back Right Side Left Side Helmet Bonus Helmet Details Single Male snap, right side 6 Left Side rivets
 -
 First Order ( The Force Awakens) Armor- Anovos beta kit. Helmet- Anovos Blasters- printed by Gerry Budde and assembled and painted by myself using accurate torx screws and rubber for the grips. profile - https://www.501st.com/members/displaymemberdetails.php?userID=20568 William Glasgow TK-90277 5'11"/ 163lbs. boots- Imperial Boots gloves- Endorfinders gaskets - Sister Margarets undersuit - extreme racing neck seal- extreme racing belt - belts of the FO holster- r2 Dan Thank you for your consideration. I will keep an eye out for your response. Will G. TK-90277 Surfintrooper
 -
Progress Report - 9/1/20 Special deliveries today! My stuff from imperial boots finally got here! Here are the boots! Oooof...they got my glove order wrong. They already got the message and are sending me the proper pair...got a bad feeling it will be a month before they get here. Just in case, I went ahead and ordered a size small gloves through Endor Finders. The IB gloves kinda run big since their smallest size is a medium and I found they were more loose on my hands than I'd like them to be. So perhaps its a blessing in disguise. Also my gaskets and neckseal arrived from Sheev's Emporium. Looks great and feels comfy! Alright back to this pile of ABS on my bed. I need some feedback about a couple of things, as I'm not sure what to do from here. I think this is how the shin has to look, the front part overlaps the back right? I may need to put some shims on the inside cause theres not a whole lot for glue to hold on to. The other side will need a shim too cause it will be the same issue for velcro. Now if this is how they have to be there are some other issues with them. The greeblie space doesnt really line up between the two halves of the shin. The inside tops of the shin dont line up well at all. Only way this will line up is if I cut it, and maybe I can rebuild the return edge with some good use of a file. Now if I'm right about the shins, then the thighs will be done in a similar fashion except those will just be 1 piece instead of velcro together on one side. The thighs have to be STRONG as this is gonna be a high traffic and stress area of the armor. Cant risk velcro coming a loose on my thighs. I finally got around to trimming the back of the thermal detonator plate. I've seen people trim this a bit more but I'm scared to until I get further along with the abdomen armor. Also cut out the circle for the one side of the thermal detonator. Some time this week I'm doing to clean it up and glue that circle to it and then JB weld the thermal detonator to its plate. Alright, its time I go about trimming this edge. I'm not sure how much to take off though. I'm worried there will be gaps between it and the yoke if I do it wrong. It cant stay as it is though, it clashes with my helmet. I finally sorted out which boxes belong to the ab plate so I'm going to set these aside. The belt boxes are another matter entirely... I forgot to dremel out the details on the handplates so I will do that tomorrow for sure. My goal tomorrow is to at least get both shins put together on one side while the other awaits for velcro. If I have time maybe I can get the thighs in order too. 95% of the pieces are trimmed now so its time to get these pieces put together.
-
Progress Report - 8/31/20 Anovos bucket came in the mail, awesome! One less thing to worry about! Field of view is...lacking. I know some vision loss is expected but I feel uncomfortably blind wearing this compared to other costumes I've worn. With the armor off its not as bad. But with the yoke and chest plate on its soo hard to see in front of me. No wonder TKs cant hit anything! Maybe the chest plate needs to be trimmed down, or helmet needs some adjusting, cause the yoke is as far as I can lower it unfortunately and the helmet still has a tendency to rest on my shoulders. It's like my neck isnt long enough xD Got busy with the dremel today, heres some pretty holes. Not my first rodeo with the dremel Finally got around to JB welding these support brackets from Ukswrath! Trimmed the ab plate and back plate. Did a test fit and theres definitely a good 5" gap thats going to occur. Fortunately I think the thermal detonator plate will cover this up in the back. Also pretty sure im going to need to cut off the top of this ab plate as it comes up too high and then my bust causes issues with it. Calf pieces. Definitely some shenanigans going on here with stuff not lining up 100%. At least they fit around my beefy calves though! Need to make some system to open and close these cause just sliding them on is not happening. I really need a better workspace... but dont have one D: Still waiting for more soft goods to come in the mail too. Would be nice to see what some stuff looks like with the gaskets on. Really cant wait till the stuff from Imperial Boots gets here too.
-
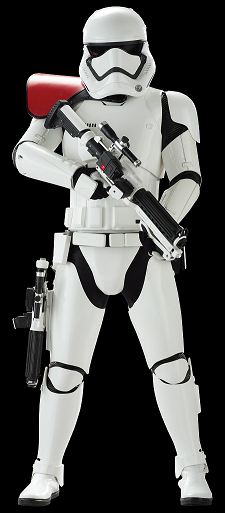
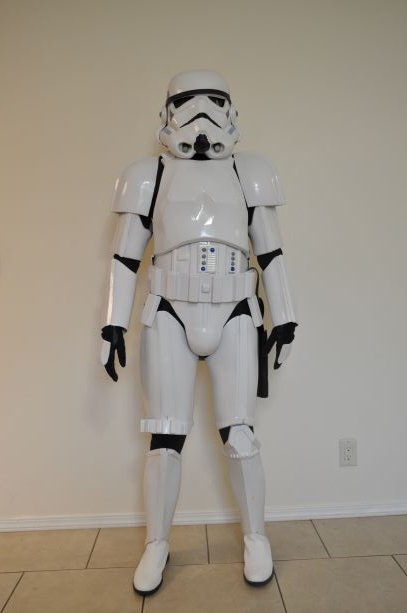
So last month I made a build thread in TLJ FOTK section about getting started on a TLJ FOTK. But I guess it was my bad to think I would get TLJ armor with my TLJ helmet. KB Props armor is TFA by default even if you get a TLJ helm, so that brings about a bit of issues when its time to go for EIB and Centurion. [IE: Cods are different, forearms are different, thermal detonator is different, and probably more I dont know about] Speaking of EIB, theres this #1000 EIB thing going on in the FISD announcements that I think I want to be a part of. So I've decided instead of TLJ to go full TFA to see if I can reach this milestone before the window closes. I'm pretty new to all this but from the previous thread I've already been through the whole BBB moment and got the ball rolling with trimming stuff. I've been scratched by abs, glued my fingers together, and got pinched by neodymium magnets. I've even been burned by CA glue already and almost lit a paper towel on fire! All the great noob stuff ya'll missed! Plan is to look something like this guy by the end of everything. Not gonna have the heavy F11-D at the moment, and I may or may not have the pauldron when I go for EIB cause the window is closing pretty fast, and theres a lot to do! Also 2 rifles? Overkill maybe? Should have an SE-44C holstered I feel like. Guy is packing some serious heat and doesnt even have the ammo vest! Anyways, I'm gonna do like my other thread and list off equipment I have thus far. I'll be editing this to reflect updates on what I have and what I need to get. Parts List: -Hard Bits- TFA Helmet: Anovos (Received) Armor: KB Props (Received) Pauldron: KB Props (Received) Holster: R2Dan (Inquired) Yoke Reinforcement: Ukswrath (Received) -Soft Bits- Belt: JAFO Belts of the First Order (Need to get a bit further in fitment before I commit to a size) Pouches: TrooperBay (Received) Gloves: Endor Finders (Received) Boots: Imperial Boots (Received) Undersuit: StormtrooperUndersuit (Received) Balaclava: UnderArmor HeatGear Tactical Balaclava (Received) Rubber Gaskets: Imperial Gaskets Cloth Gaskets: Sheev's Emporium (Received) Neck Seal: Sheev's Emporium (Received) Harness: Geeky Pink -Electronics- Helmet Cooling: Ukswrath Comm System: Ukswrath Chatter Loop: Ukswrath -Weapons- Z6 Riot Baton aka "Whappity Stick": Force FX Black Series Z6 Riot Baton Hasbro (Acquired) SE-44C Pistol: Arsenal Studio (Received) F11-D Blaster: Arsenal Studio (Ordered) Heavy F11-D Blaster: Branfuhr Studios -Armor Storage- Chest: Husky 37in Rolling Tool Box Utility Cart (Acquired) As I've said in the other thread, this my first stormtrooper and this be exciting times! I hope I can pull this off in time to make it to that special EIB, if not. Oh well, it'll be fun anyway!