Search the Community
Showing results for 'Hasbro' in content posted in ANH BlasTech E11.
-
I started to mod a Hasbro,but i goofed up so bad that i switched to building a pvc type.However i used some of the small parts from the hasbro such as the front/rear sights and scope.I trimmed the scope from that speaker box then used a few pieces cut from a plastic for sale sign to make a new base and front face for it and a tube of bondo auto filler to build up the scopes body.I also used the rubber cup from one of the Nerf darts to make the small lens in the frontby cutting off the suction part using the base of it for the rim.Take a looky,lol
-

Converted Hasbro or Hyperfirm - need input!
tkrestonva replied to Millar007's topic in ANH BlasTech E11
Hyperfirm all the way. About the only reason you could possibly want the converted Hasbro over the B-grade Hyperfirm is for the "pew pew!" lights and sounds. -

Converted Hasbro or Hyperfirm - need input!
BuzzLiteBeer replied to Millar007's topic in ANH BlasTech E11
Hey Jefferson, I think ultimately it depends on what you intend to do with it and who might borrow your blaster from time to time. (if you let kids hold it for photos) I've been working on getting all my stuff and bought one of the updated ANH hyperfirms. Looks sweet and extremely durable. It is what I'll definitely prefer to troop with, still looking to get a modded hasbro. If it were me I'd say both -
Great topic guys. It just happens that me and my neighbors brother are working on the same project. I purchased a decommissioned Sterling at a gun Show which had to be welded back together after being put through degreaser several times. Im using my backup Hasbro wiring and sound card to be placed inside. I still have to cut the magazine to the correct size. Working on it to work as a loading compartment for AA batteries.
-
 The quick and easy path (eBay, etsy, etc.) isn't a good choice for blasters unless you move into the $250 range. And then you still will want to research and double check the maker. Disney, Hasbro or rubies make good cheap starters to mod and/or paint. Hyperfirms are pricey but look great out of the box. Keep looking
 -
 overpriced unmodified hasbro toy. I think you could paint one for less than 80 bucks? they retail about 30.00 way too many errors to list.
 -
My friend bought the hasbro conversion kit from them a few weeks ago for his 7 yr old for Xmas (he has a few other things planned to go with it) and no delivery, no reply to emails and the number doesn't work anymore. He's annoyed because it's for his only child. Anyone had any success and if so how?
-
Hi Dan, remember weapons aren't required for 501st approval. Only the 2nd and 3rd tiers within the detachments. FISD requires some special mods for a Hasbro to be approved at Level 2. Not allowed at all Level 3. I'd be posting your specific question on the MEPD forum, if that's what your building for.
-
Most folks have covered the topic well but for me I'm not a blaster accuracy guy. I often carry my Hasbro because it makes pew pew noises. If you want an accurate blaster the Derrek's resin action is the way to go. What I like about my hyper firm is that I can literally throw it around. I was once trooping and a special needs girl was excited to see us but freaked out at the sight of our guns. I tossed it immediately away down the sidewalk and she was all smiles after that. No way I could do that with a resin blaster. I say if you can afford it get both. I've also lent out a spare blaster now and then which makes me happy. -Eric Sent from my iPhone using Tapatalk
-
I am replacing my Hasbro with this one for now Sent from my HTC0P4E1 using Tapatalk
-
E-11: Questions from scratch to lights
charlesnarles replied to Professor Why's topic in ANH BlasTech E11
You can get a metal or even pvc pipe and drill all the holes yourself, then get a pipe build resin completion kit from any number of sources (doopydoos.com, PhoenixProps here, etc.). Then add electronics from a toy (Disney, Hasbro), or a specialized board you can customize (arduino). All sorts of options at different price ranges. That what you meant? -
Yep. Another Doopydoos build! I've been waiting a year and a half to upgrade from the partially modified Hasbro I built a decade ago, and I finally made the plunge. Just over 2 weeks after ordering and the little brown box came today! It will probably take a few days to get started here. But had to start with the arrival of infamous package. Pics to come soon. Sent from my XT1080 using Tapatalk
-
I started this project myself with the SW rebels NERF blaster.... Needing a smaller then average speaker for the hasbro sound card witch does not really fit well inside this blaster.. what size is your blaster compaired to the nerf blaster?
-
As I wait for my Anovos kit to come in, I've begun doing research on how do go about making my E-11, and right now I'm deciding between doing a Hasbro/Disney conversion and a straight resin Doopydoss kit. I'm worried about the 'troopability' of a full resin kit...knowing that resin would break easily if dropped, I've seen many people post that they opt for other methods, however no one is saying NOT to do it and there continue to be doopy build threads. I suppose what I'm getting at is the consensus seems a little wishy-washy to me, with nobody saying outright "don't do it" but no one saying "go ahead, it's perfect." I'm [mostly] confident in my own ability to handle a resin replica, but I worry about the tiny spazy hands of an excited kid who may want to hold it...thoughts from you guys?
-
I think you will find that there are hundreds, if not thousands, that troop with full resin E-11s, (myself included). You just have to be selective about who you let hold it. I try my best to be obliging, but on occasion I have had to say nicely "I'm sorry, but it's against Imperial regulations" if I think it may hit the ground at some point. You can also go for a Hyperfirm, like the ones slavefive makes,which will just bounce! Also, if you are shooting for Centurion level, the Hasbro conversions are not allowed.
-
Rubie's Yet Again: Astyanax's E11 Conversion
Astyanax replied to Astyanax's topic in ANH BlasTech E11
Thanks very much. My build will be taking a whole heckuva lot of inspiration from yours, but there is no way I'll be doing as much with mine as far as accuracy. Just the existing blaster and the Doopy Hasbro kit. And maybe one or two of CFP214's new Shapeways add-ons. How about "Doofy"? You know, like Goofy? -
Rubie's Yet Again: Astyanax's E11 Conversion
Astyanax replied to Astyanax's topic in ANH BlasTech E11
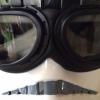
11. SAFETY CAP Since this project was originally intended for kids, I wanted to have an easy way to add or remove an orange cap, in case taking the blaster out in the real world requires it. The cap had to fit snugly so that it doesn't fall off easily, but also not damage the paint after repeated uses. First step, I went around the house trying different caps and lids from different products. I landed on the perfect size with this room freshener: The cap fits ever so slightly loosely, so it will easily fall off. But my strategy was to line the inside of the cap with something soft, thus making it a tighter fit. Silicone! Before applying any silicone or paint, the cap need a good sanding, inside and out. This is VERY important, or else the silicone and paint will not adhere to the cap's smooth finish. I used 80-grit sandpaper very aggressively. Then, nitrile using gloves, I applied a thin layer of silicone to the inside of the cap and let it dry overnight. After this, I found some orange-ish acrylic paint lying around the house and brush painted about 4 coats on the outside. Spray works fine too, but why pay a few extra bucks for such a quick paint job? I went with orange, not fluorescent orange. The cap is supposed to disrupt the "dangerous" look of the blaster, not draw lots of attention. The silicone worked perfectly. The cap goes on really tightly, but the silicone's soft surface protects the paint. Done! I fully believe this is approvable for basic admission to the 501st. Now I think I've learned enough to take some of these skills and modify the new Disney blaster with a DoopyDoos Hasbro kit. I'll post a link to that project in my signature when I'm ready to post something. Thanks for reading! Bill -
 OK, stating right up front for the record: this is not going to be a massive 20-page, 100% accurate, super realistic, moving parts (well, except for one) build. I'm making a blaster to the level that I feel comfortable trooping with, that I wouldn't be crushed if something happened to it, but also to the point that anyone looking at it would say "hey, that's better than a Hasbro toy gun." With that caveat out of the way... Step 0: Get yourself a flexible arm for your Dremel, and the most genius idea ever, a sewing machine foot pedal! The foot pedal has two cords coming off it. One plugs into the wall, and the other has an outlet that you can plug your Dremel into. Do that, and turn on your Dremel all the way, and then as you press your foot on the pedal harder, it spins faster. Take your foot off, and it stops. Never have to fumble around with the speed switch or anything like that ever again. Saw that setup at a sewing machine repair shop, guy had his multitool set up to a foot switch, and I was like "HEY!" Alright, take all the parts out of the box, inventory, wash with soapy water, and then get to sanding. I used 160 grit sandpaper for this first step, removing flashing, extra resin, all that fun stuff. Then I basically started attacking parts at random. Bottom holes in the barrel: A 3/8 inch drill gets it almost all the way there. I may clean it up with the Dremel later, but since they're all covered by the stock, no biggy. Free/Lock screw: Using EJay's kit as a guide, I drilled out the molded in screw head, then drilled straight down enough for a little bit of the screw's shaft. Bolt at the bottom of the grip: Used an appropriate-sized drill bit to take out the molded in bolt, then drilled enough for the shaft of the bolt, and dropped in the replacement. No glue needed here, it's tight like a tiger. (and out of focus, sorry) Gazmosis's magazine: Cut off the last inch of magazine, then trimmed around the inside of the magwell until it fit together, down to the cutouts. Front sight: I Dremeled out the side windows. I'll stick a flattened screw in the middle later for the actual sight pin. \\ Trigger: The one moving part (well, other than the D-ring, I guess).. Fit the trigger in, penciled where it fits in its well, then transferred that mark to the outside. Drilled with a 1/16th bit through both at the very top of the trigger... Took it out, found a sacrificial ballpoint pen, measured the spring, and drilled a hole at the bottom of the trigger into the grip long enough for about 2/3 of the spring, so the rest would compress. It does the thing! So yeah, that's where I'm at. Also vacuumed 17 lbs of resin dust, because man, that goes everywhere!
 -
Got my 2 blasters taken appart and how.. the disney rebels blaster's orange caps just pill right off.. not like my hasbro that was stuck like a bear.. Got them gutted and pics taken, posted in my FB album and found out I may need a smaller speaker. Not sure if I can go smaller and still have the sound volume I need.
-
i have those SWR E11 bec I like tho use them for blast a trooper. They are way smaller than the hasbro. Not sure if its worth the conversion, IMO.
-
imho, a good option for a beginner is a Disney blaster ($25 w/out cast discount) with a Hasbro doopy kit ($40 incl shipping to CA). Spend maybe a week gluing and painting and you're all set. After that, modify it at your leisure and to your heart's content 😉
-
Hello, I just acquired an Hasbro and Conversion kit but realize (i should have read first...) that it's not suitable to be approved. What are the good options to get a full approved E11 blaster ? Does this kit is the good one ? http://www.doopydoos.com/stormtrooper-e-11-complete-anh-e-11-blaster-kit-offer-2685-p.asp It seems out of stock, is there any other supplier for it ? Thank you for your help.
-
for basic approval you just have to paint the hasbro blaster black.
-
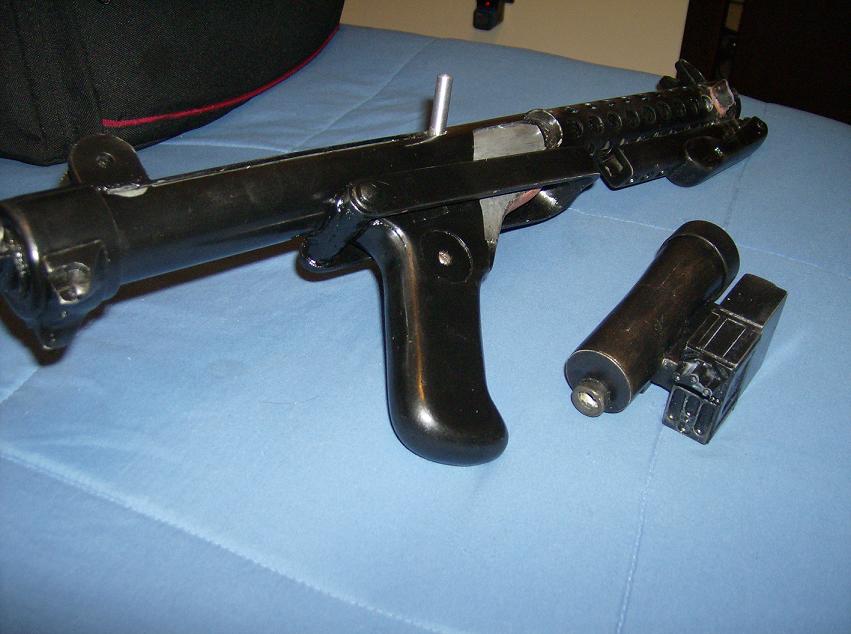
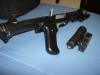
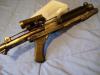
Yo, I am also a soon to be Anovos TK. I went for the doopy doos conversion of my E11 and I would recommend it. It was fun. Set me back about £45 which is as cheap as I am going to get it in the UK. Unless you already own the Hasbro blaster then your half there, I had to buy mine. Found loads of tutorials on the conversion process on the forums. Its pretty easy. If I had a spare blaster like you I would build both and sell one for a nifty wee profit Id imagine there will be plenty of anovos guys looking to buy it. I made mine as soon as I could because I couldn't wait, plus thats part of the building process out of the way before I get my armour. Anyway heres a photo of how mine turned out: --------- If I could redo mine Id probably be more patient with the process but I think its fine for now. Probably will re-spray paint it soon, i kind of rushed it, but its not beyond perfecting. Ive looked around for other conversion kits but Doopydoos seems to be the only reliable source at the moment. Its a pretty damn good kit. they took a while to dispatch mine plus if you live not in the UK then be prepared for some waiting time. If you want any tips or pointers just ask I am happy to help. ive researched the shucks out of this, not that im an expert in any way, this is the first "movie prop" thing ive ever made, im still a newb like you Goodluck!
-
I used the CRL on the 501st website as a referance. But to be honest....i just looked at a lot of pics and went from there. I had some spare lamp parts from when i worked at a lighting store, so i;m sure i can make some power cylinders that are close. best advise is to go to a local hardware store (one that sells nuts and bolts and other stuff in small quantities) and try and find things that look close enough to what is on the gun. The Rubies is better than the hasbro, because it has the scope, the butt stock and the T tracks and the counter as well. I'm still working on mine and have a few more ideas on how to mod it. Keep checking by thread every once in awhile for more ideas. Also you did the right thing by posting a build thread. Everyone here will give you great advice and feedback!