Darth_Nickel
-
Posts
382 -
Joined
-
Last visited
Content Type
Profiles
Forums
Gallery
Articles
Everything posted by Darth_Nickel
-
Expert advice required, fitting lenses
Darth_Nickel replied to mrfurious's topic in Hard Armor (General Discussion)
Check out page 2 of this thread by TK4205. It's a sweet design (I did it - not as well, but it works) RT MOD -
Closeup requests please
Darth_Nickel replied to mrfurious's topic in Hard Armor (General Discussion)
I would suggest hobby pinstripe tape vs the blue painters tape. I just seem to have had more success keeping good clean lines with the hobby tape. -
Don't worry too much about the bucket man.... it can be done.
-
Well said Scott. Those strips are very important. I think I ended up using like 6 on my TK. I had to pick up a couple extra for all the snaps, and goodies. Wish I would have started with a canvas belt which would have freed up 2 of the strips, but.... now I have more for my TD build.
-
personally I recommend the Dremel Stylus. Sweet for detail cuts, yet easy to use for large cuts. It has a variable speed as well.
-
looks good man. I can't wait to see a pull. I'll watch with interest since I too am a "big guy" I would love to get some larger pieces. Please keep me in mind and up to date on the progress!!!
-
DAMN. Error number 10,000 on my armor. Where was this site when I was building last year??? WHERE???? I ask you WHERE. Great info. Looks like I am doomed to have to replace my chest and back eventually so I will keep this thread in mind when I get the eventual damage....
-
FX Stunt - Work in progress
Darth_Nickel replied to Darth_Nickel's topic in Assembly, Mods, and Painting
little update. I'm waiting for some new paint for the frown and traps, so I can only weather parts.... but it's has begun. Let me know what you think.
-
We did a nice parade yesterday. It was a blast. There were TONs of people and the dark side felt VERY strong. It's amazing how many people get excited to see a TK and Vader. People were running out to the street to try and get pictures. The highlight for me was seeing my son (2) in the huge crowd clapping (he's not been able to see me outside in my TK. sure he's seen parts in the house etc...) He was all excited. I was able to break formation and walk over to him and touch his hand. My wife and parents said the people around them were going crazy when I walked over. So much fun!!! I'll remember that for a while
-
FX Stunt - Work in progress
Darth_Nickel replied to Darth_Nickel's topic in Assembly, Mods, and Painting
"underwear durge".... interesting.... now THAT would be going "dirty".... I did a couple of layers of paint and scratched it. Started with Gray, then added Siler Highlights, Toothpaste some weathering, Black overcoat. Scrub off the toothpaste, added some "iron" paint and a rusting solution - let it sit so rust could "grow", Light sand/scratch, top coat. It kind of looks "muddy" (as someone else pointed out to me) vs dirty. So perhaps I'll try to get it more dusty before it's finished. -
FX Stunt - Work in progress
Darth_Nickel replied to Darth_Nickel's topic in Assembly, Mods, and Painting
Here is my latest work. You can kind of see where I'm going. I guess I'm now at the wrong site, but I just love it here... I'll move along to MEPD to continue unless everyone here wants updates as well. I was planning on using this as a base to the weathering (toothpaste this then put another coat of black on) but I'm not sure... I can't decide if I like it this way or not. I'm leaning toward too much, but then... can there really be too much??? Let me know what you think. Or I guess.... I could just start over...

-
I've been working on my stunt FX. I decided to try and put it together a little differnetly. I never liked the FX seams, so that's what I've been working on. I know it's a FX bucket, but I'm a bondo rookie, and thought it would be good practice for future projects that I have. Please ignore the frown paint, I just used it as a reference for the frown as I worked. I still have some work to do (minor filling and sanding) Hit the entire bucket with some primer, final coat, trim it out, then start to get it dirty (since I've already got my proper clean gear... ) Let me know what you think for a new bondo user.
-
Progress report on "XLTK"
Darth_Nickel replied to Dirty White Boy's topic in Build Threads Requireing Maintenance
looks great Kent. I'm a big guy (not as big as you) so it warms my heart to see more big guys in armor. You look fantastic!!! -
[speechless]WHAT.......... THEY TOUCH????? Man. man. I don't even know what to say... man. Here I am trying to figure out how to close my 25 foot gap.... man [/speechless] Very cool for you man. Definitely take the time to check out the requirements section (which has some pictures and great explainations), some screen shots and do it up sweet. That's a heck of a good problem you have there. Please get us some pictures.
-
Rob, Take your time with the bucket man. That's my biggest piece of advise. If possible (and it's hard to do) DON'T put it together first. Try some other smaller parts to get use to the glue you are using and a feel for the plastic. I know it sounds odd, but a little time getting glue on your fingers and how the plastic all goes together will save you a lot of heart burn when putting the bucket together (which I thought was the hardest part) Masking tape will be your best friend. For a glue, I would suggest a CA (Zap-a-Gap, Jet, something like that) and an Accelerator. Be sure to get the pump vs the aerosol. Be careful with it, it can turn the plastic yellow if you get glue and accelerator all over the place. Find your closest hobby shop and fabric store and make some new friends... You'll be seeing them a lot All in all, it's not to bad to put together, just take your time and have some fun. BTW... it's great to see you here too.
-
Thanks for all you have done Paul. I'm a newer guy, but I have to say this place is great. I spend a lot of time here, and you should be very proud of what you have done. Ed welcome to your new role man.
-
I have a hyperdyne pro trooper and a skullworx unit. I like them. The skullworx is sweet. The only thing I don't like about the hyperdyne is that it take time to adjust when you first get it (hell, I still have to get mine right, and there is no hard ox for it. I had to custom fab a project box. I know some people don't mind, but I really wanted a box (since it's going in the bucket)
-
If you are using the hardhat liner, you can add spacers behind the front clips. This will allow you to "push" the liner back and your face away from the front face plate.
-
Just an FYI.... for those interested. I have been working on getting larger leg molds made. The goal is to match the FX armor (since it is what I have after all) It's been slow, but I hope they will be complete soon. I HATE MY SHIMS. I too was referred to TK Big I'm 6'3" 250, and the new molds should be big enough that I have to trim a bit off for a good fit. They are also will be longer than the current FX molds. Not only do I HATE SHIMS, but I wanted to get rid of some of that extra black space. Like I said, I hope they are done soon, but it's already been a while so what's the hurry anyway.... ps. I have no skills, I'm having them custom made.... leave it to the professionals.
-
It looks like in the upper right hand corner I have -3 new messages? Does this mean I need to send 3 messages ASAP?
-
Purchasing Armor Kits?
Darth_Nickel replied to Gnarled Rex Dart's topic in Hard Armor (General Discussion)
Dan, Your best bet is to check with someone in your local garrison. They should be able to point you in the right direction and they may even be able to help you put it all together. Good luck man -
outside of the above changes, I would like to see the parts generally sized up. This would allow more troopers to use the armor with less shims, and smaller troops can trim away the excess. I would be MOST interested in the legs and arms, but in general, everything could a "little" bigger. I can't stand my shims.
-
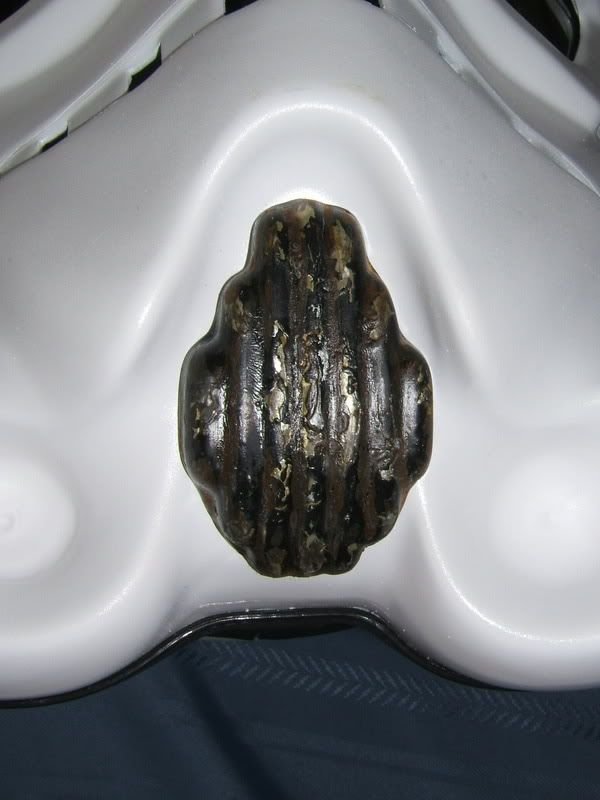
yea, another run would be good. Any info on how/where you need to dremmel our Keit's tips would be sweet. I don't want to mess them up since they look so cool as it is....
-
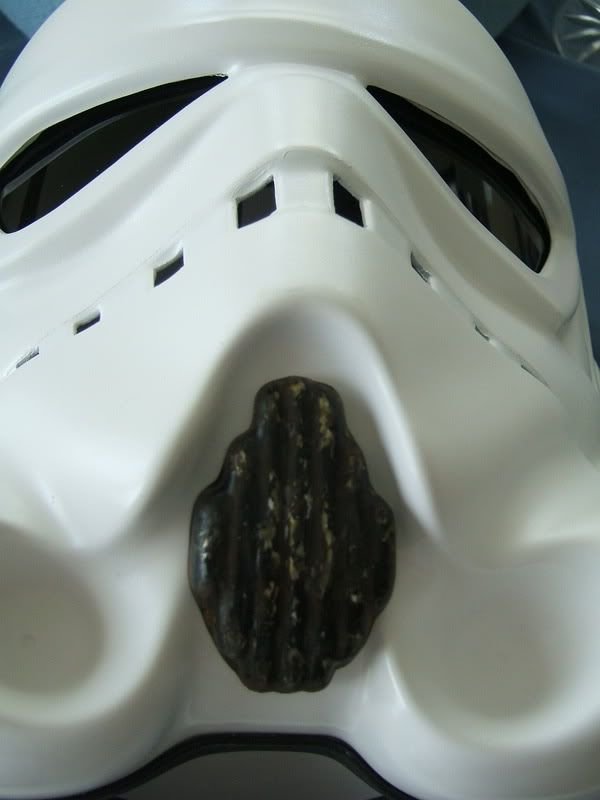
So how do you install them? I just got a set of Keith's mics (Which I only had a second to glance at in person, but they look awesome) They look like the have a recessed, tip (where the mesh is) but the "body" is solid. How do you get the mic inside the aerator with the wires? Perhaps Like I said, I didn't spend a ton of time looking at them yet, so perhaps I'm just missing how they do together. Sorry for the rookie question...
-
Your speakers won't fit in there?