Scott M.
-
Posts
1,386 -
Joined
-
Last visited
Content Type
Profiles
Forums
Gallery
Articles
Everything posted by Scott M.
-
Build your own armor mannequin (part 1)
Scott M. replied to Scott M.'s topic in Boots, Soft Parts, and other Accessories
Your wish is my command!!! Part 2!!! -
Build your own armor mannequin (part 2)
Scott M. replied to Scott M.'s topic in Boots, Soft Parts, and other Accessories
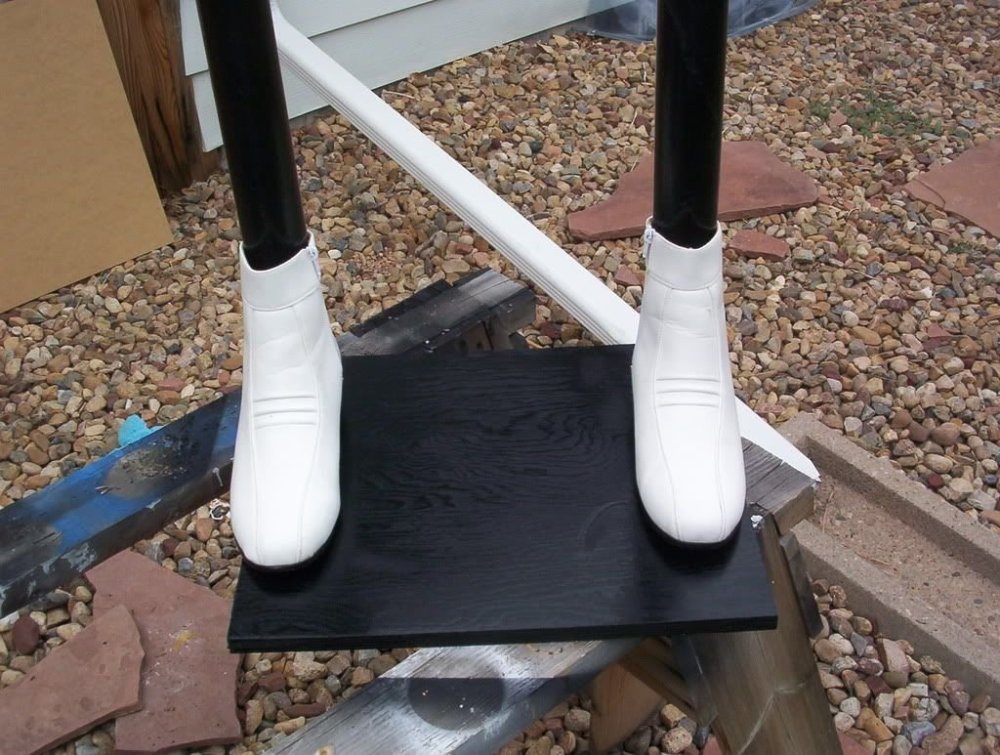
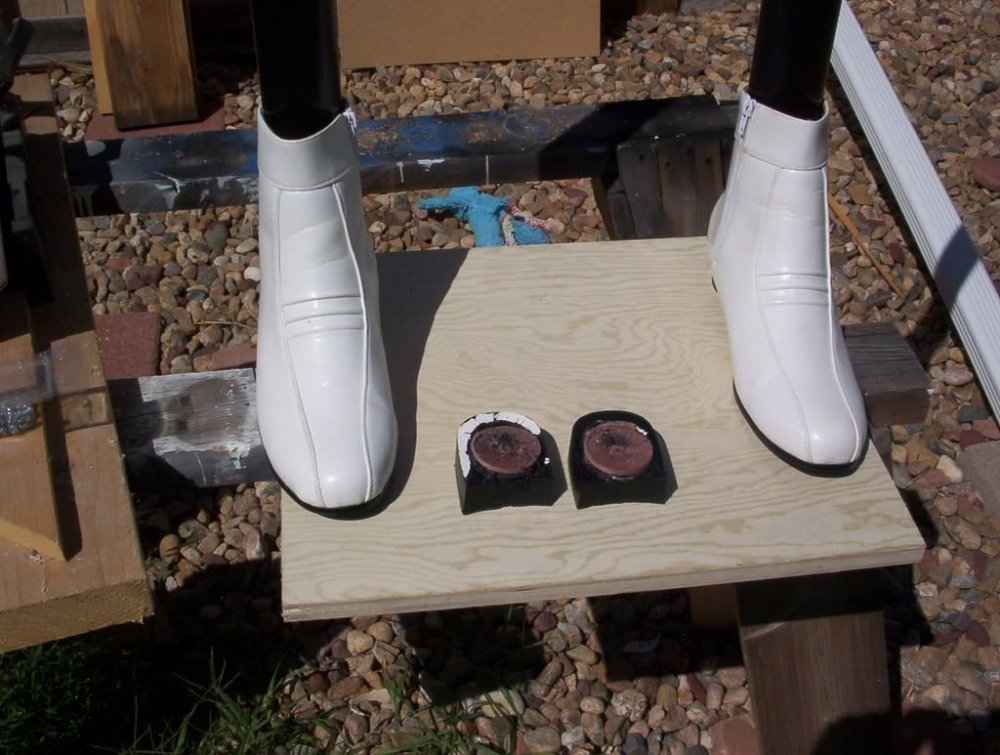
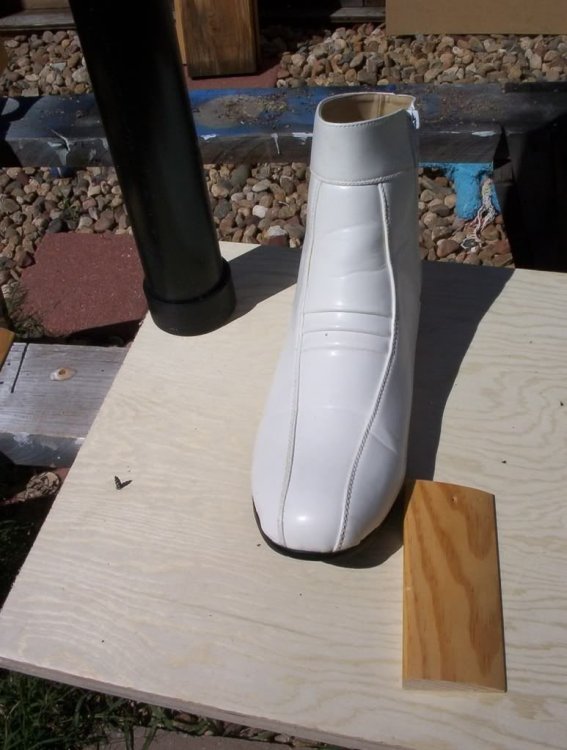
Actually, I drilled a 2" hole in the bottom of the boots at the heel, and then put a screw through the sole and wood near the toe. If you look at this picture, you can see the screw coming up through the wood base. I assume this is what you were referring to. I got them from a guy 6 months ago saying they were "official" stormtrooper boots, and they most certainly are not. I even tried to sell them at a garage sale fro $10, and no one wanted them. I decided to use them on my mannequin. You can pick up some cheap boat shoes at Wal-Mart for about $8 and use those if you want. The TK just looked off not having any boots, so I used the ones I got taken on as an example for me to remember. Hands coming shortly (only another $5), plus a suited shot before the night is done, so stay tuned.
-
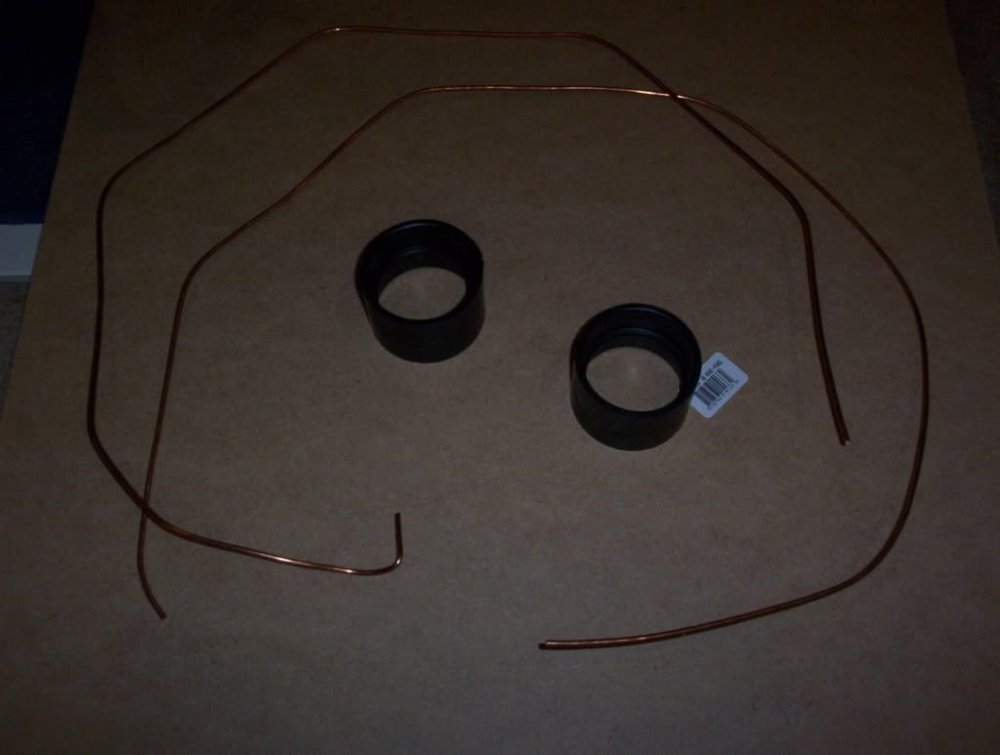
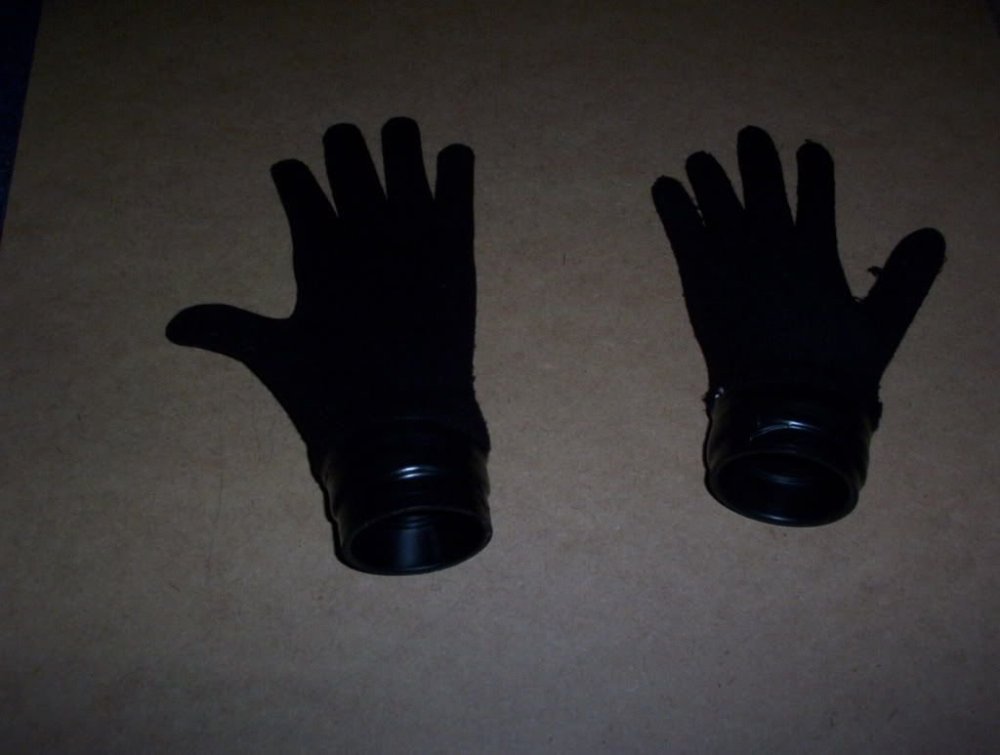
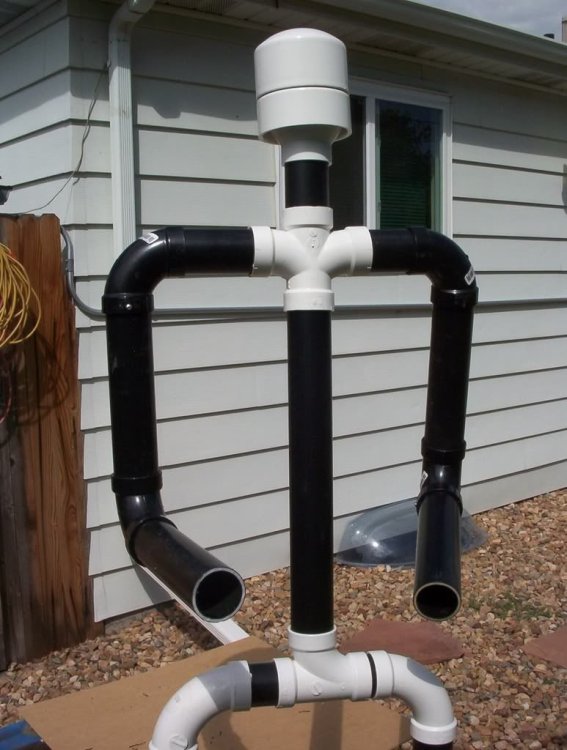
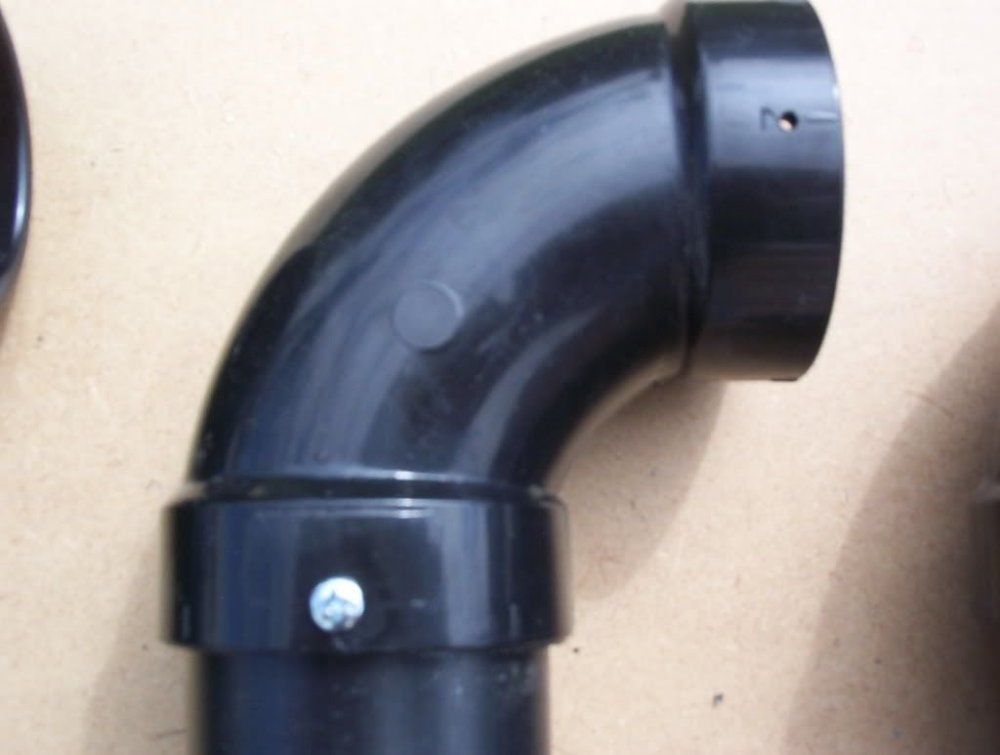
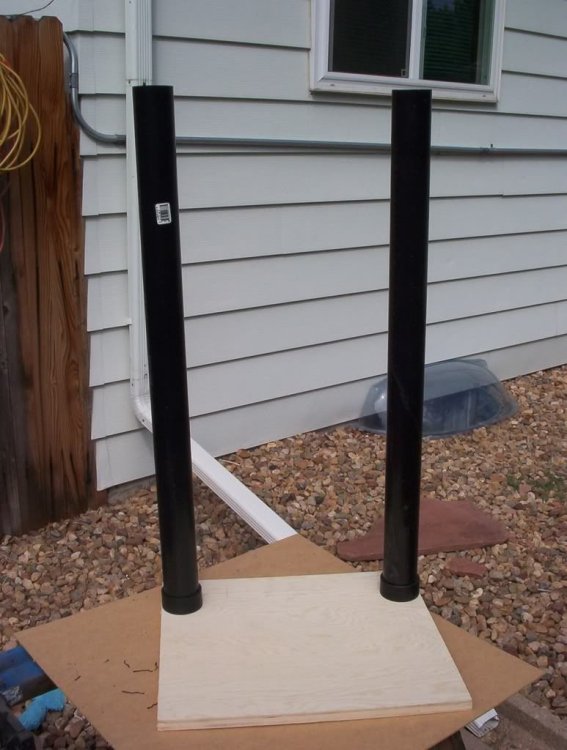
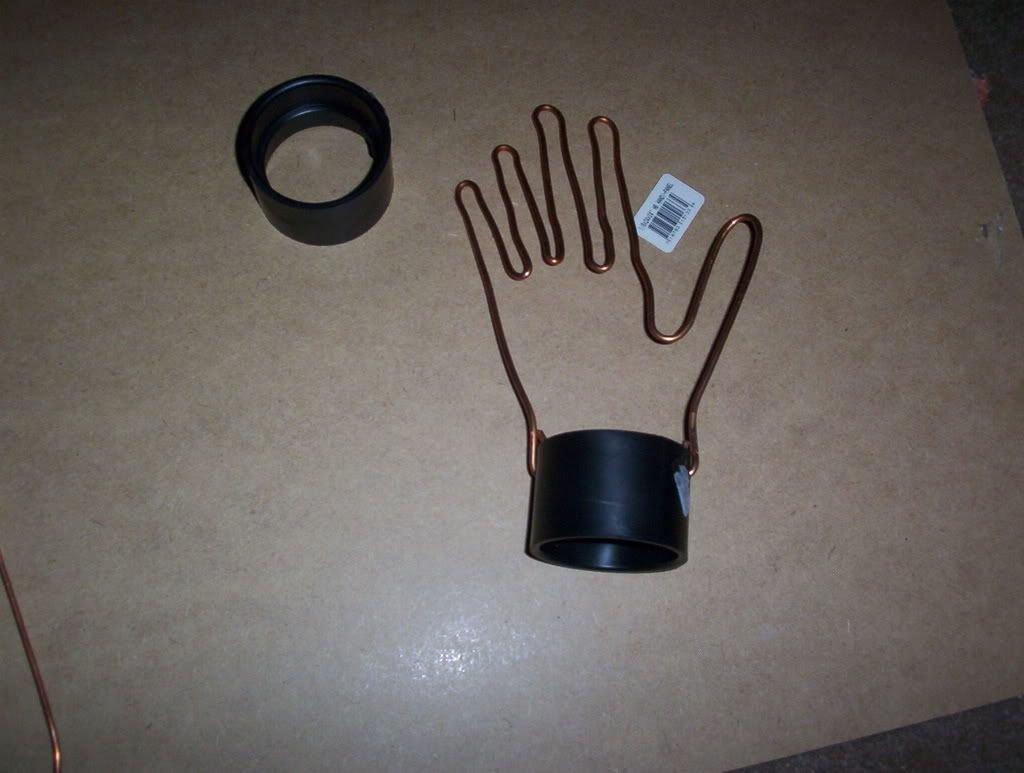
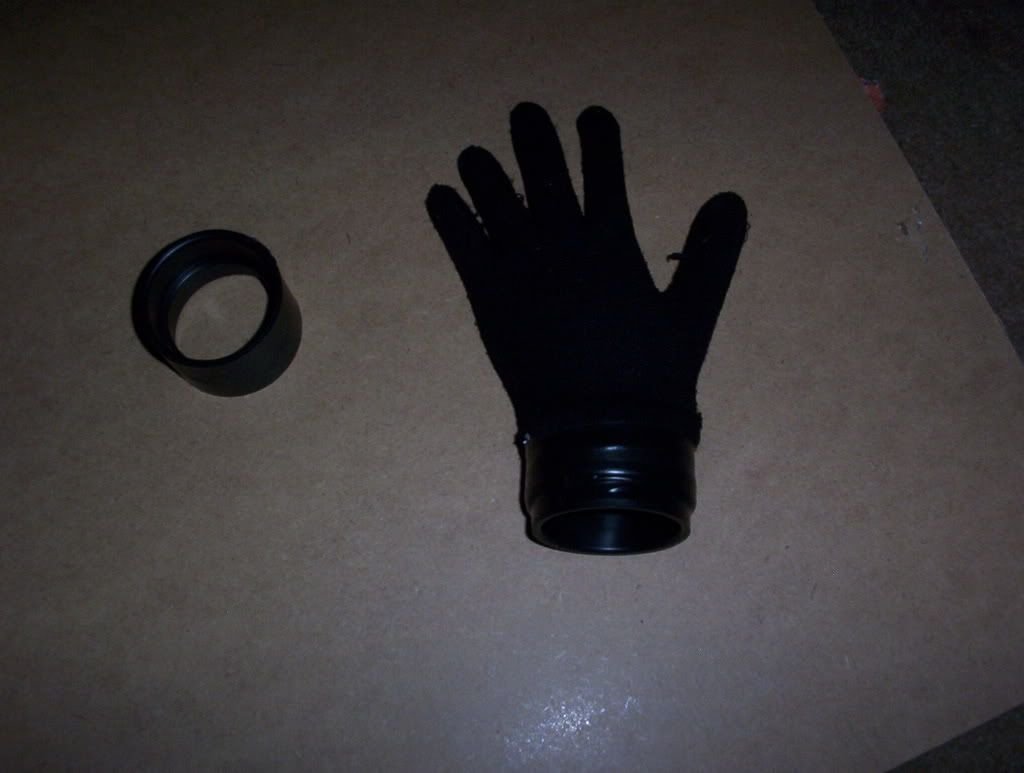
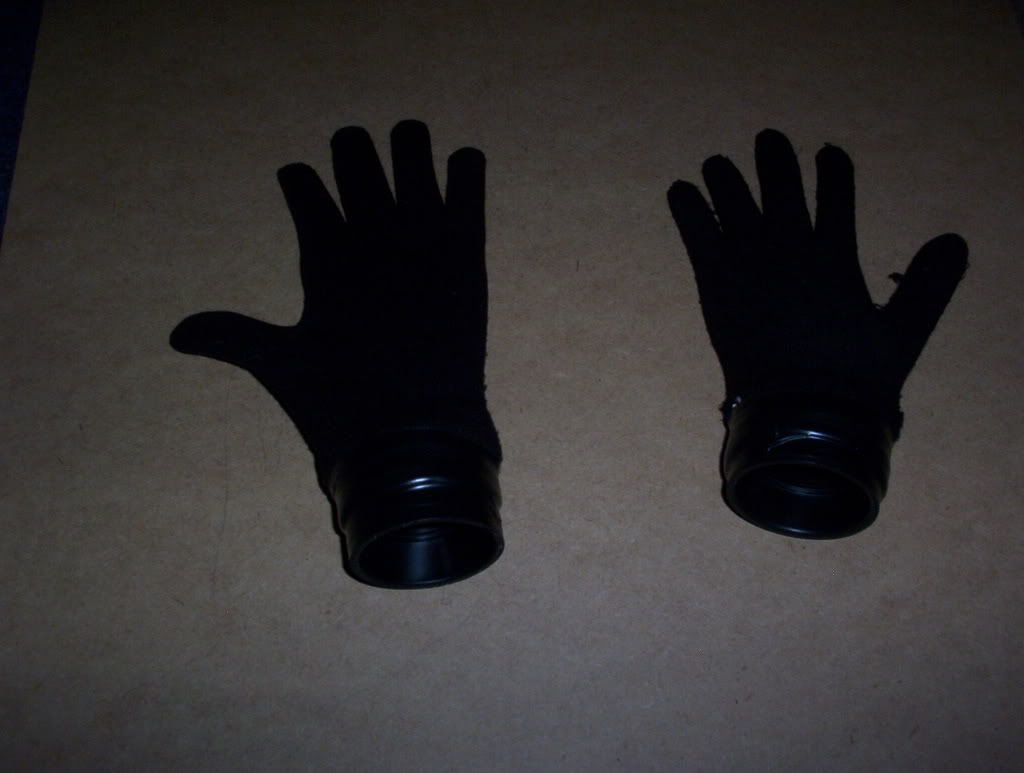
Place the upper body on the legs: And now add the arms and head: Once the arms are where you want them, use the screws and holes to "attach" the arms so they do not move. You can also use this to remove the lower part of the arms in order to get the armor on. Now, I decided to do a little more, and add shoes and paint the base. I once bought the "wrong" boots, so I drilled out the soles to put them over the legs The 2" black caps really make it look like the boots have heels: I then just used a couple pieces of wood inside the boots and screwed then boots to the base from underneath. Finally, I painted the base, and put the boots back on: At this point, you are all set to display your armor. In all, this might take you a few hours total to do, and if you use only screws, it will take even less. I do recommend gluing the cap, since screwing it just might not work. For the hands, I spent about $5 at Home Depot, and I purchased 2 2" couplers, and 6 feet of 8 gauge copper: I drew an outline of one of my hands, and simply bent the wire using pliers to model the outline the best I could: I drilled 2 1/8" holes in the coupler, and bent the wire so it went into the holes, and was bent around and back. After this, I just took a black glove and put it over the wire and taped it on using electrical tape: Now you are ready to suit him up!!! Please let me know if you have any questions or suggestions. Thanks for looking. Scott


-
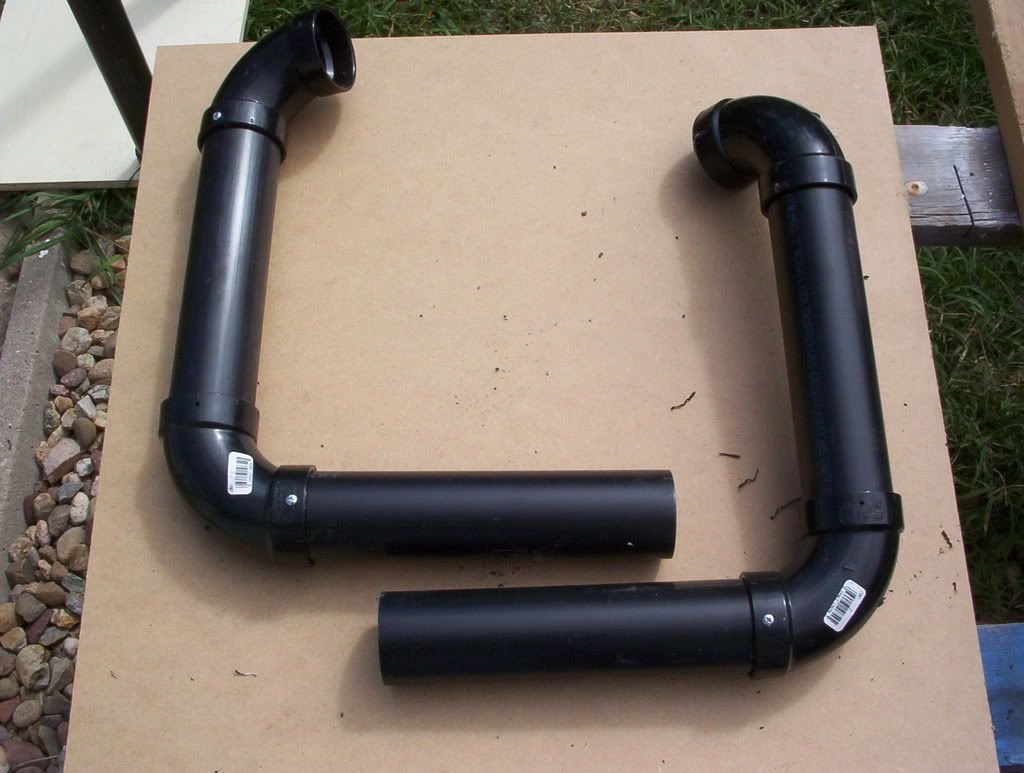
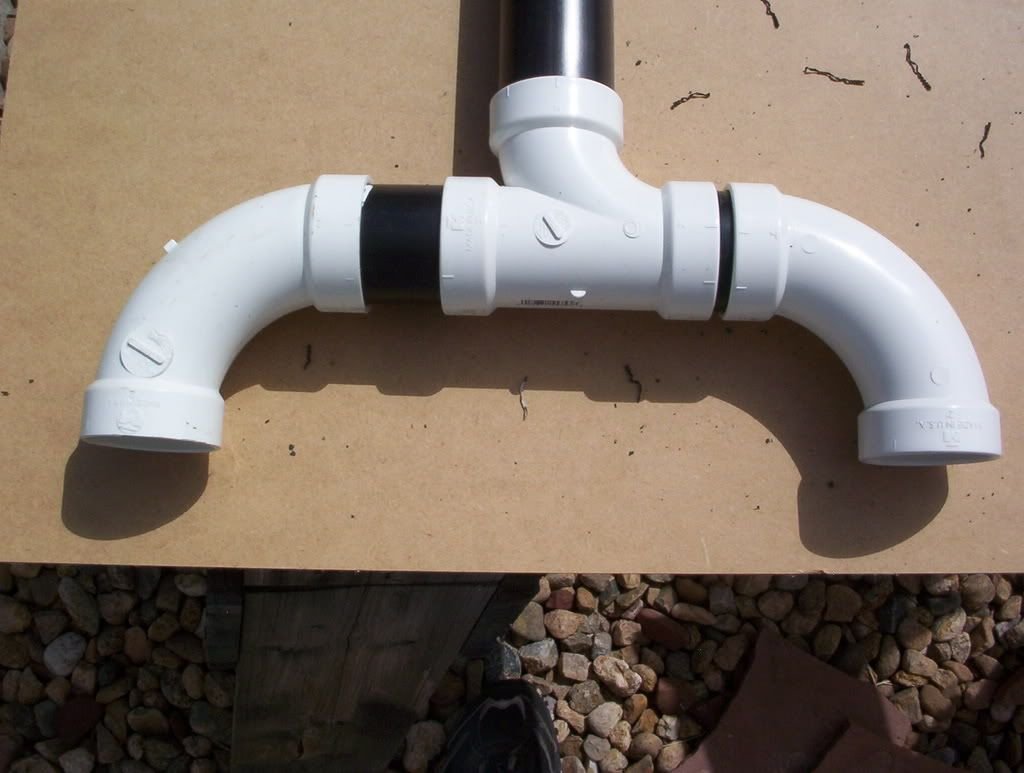
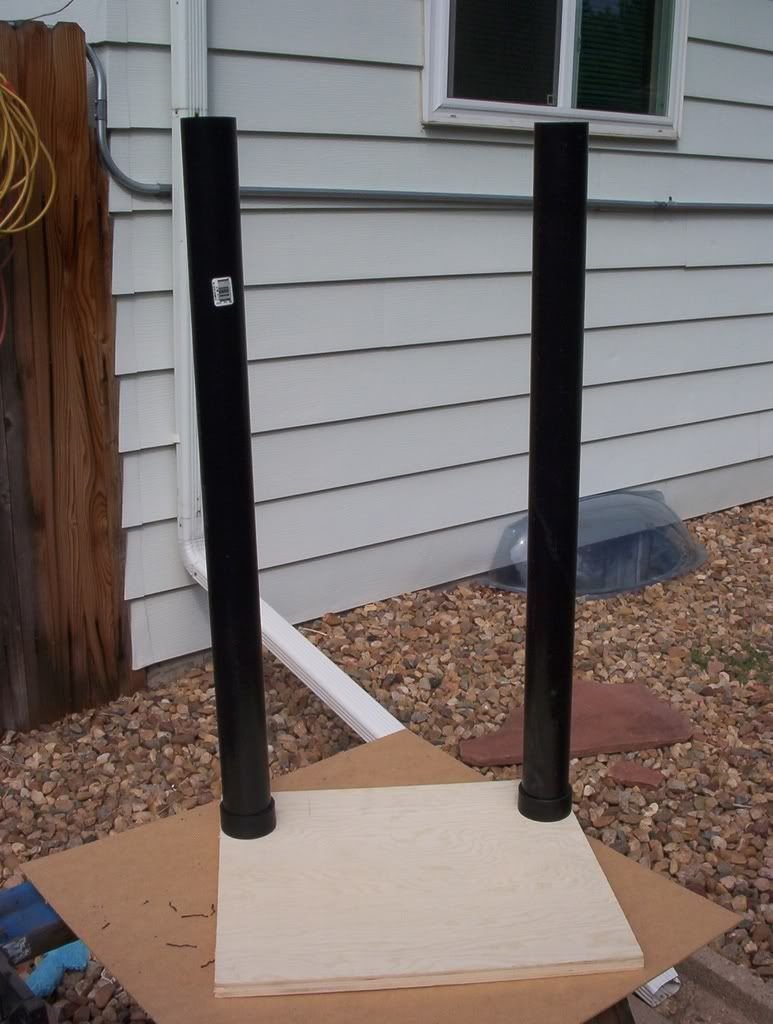
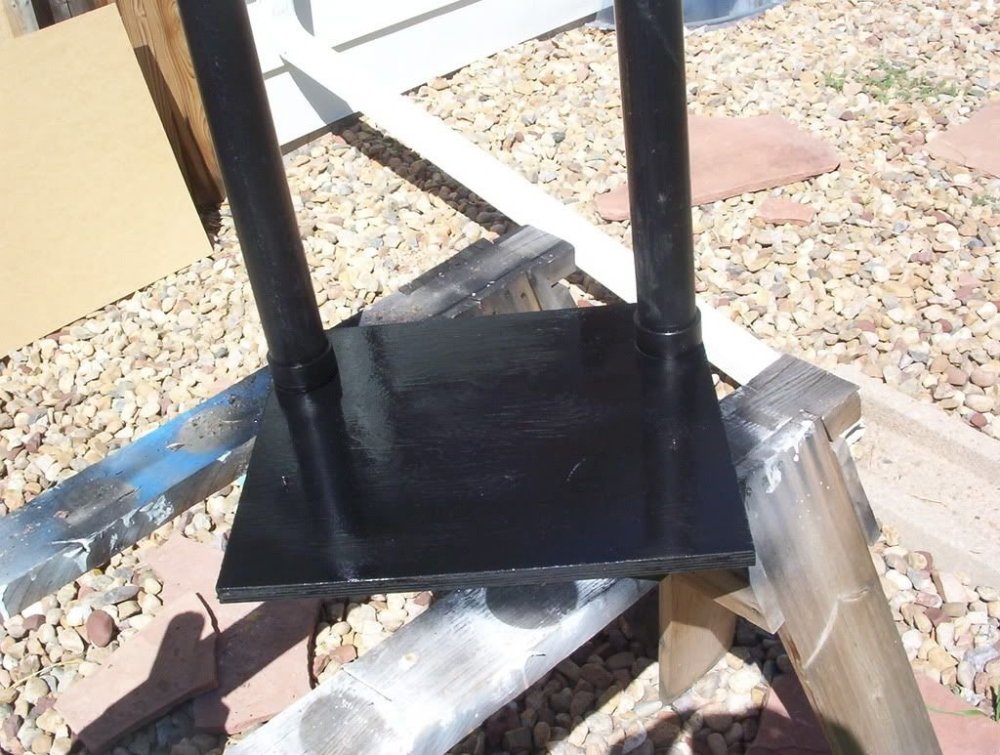
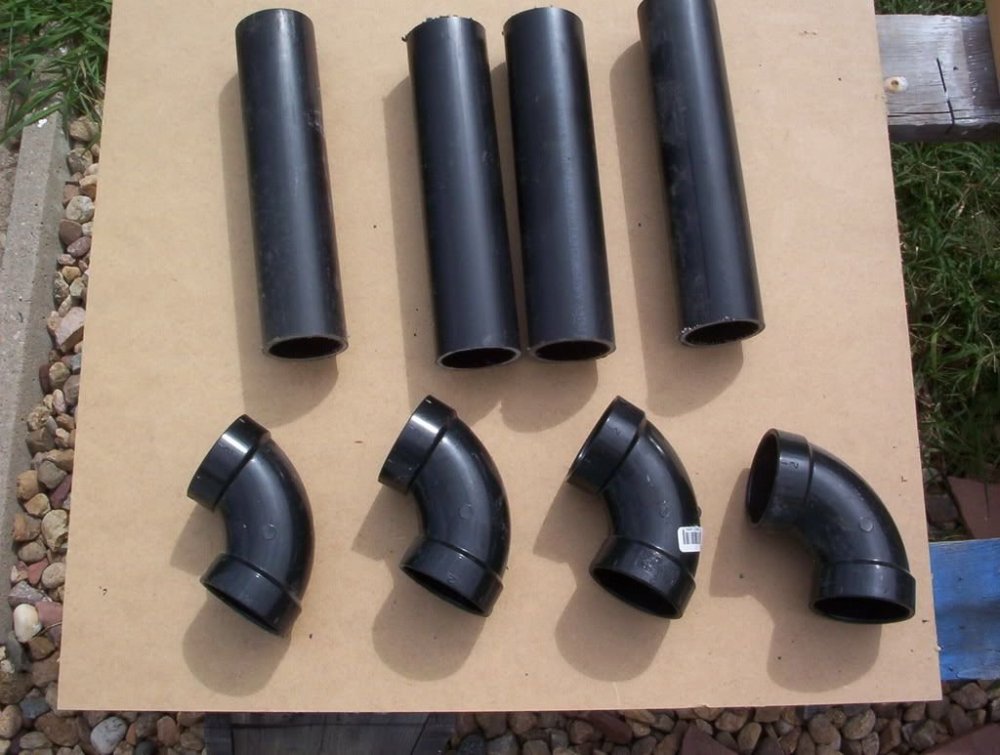
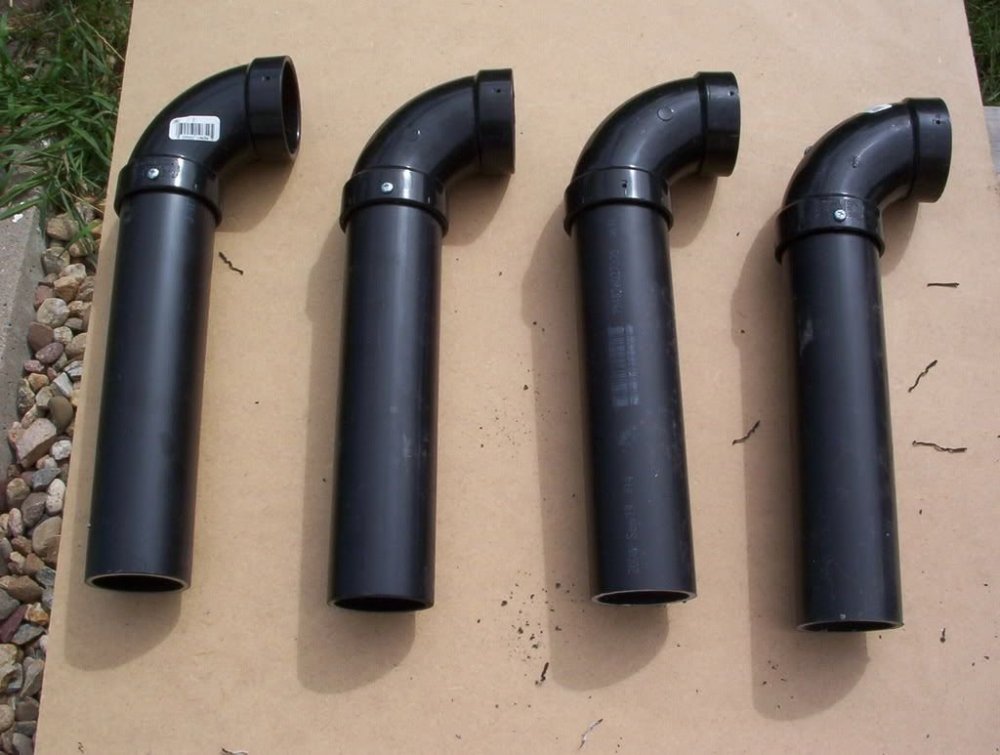
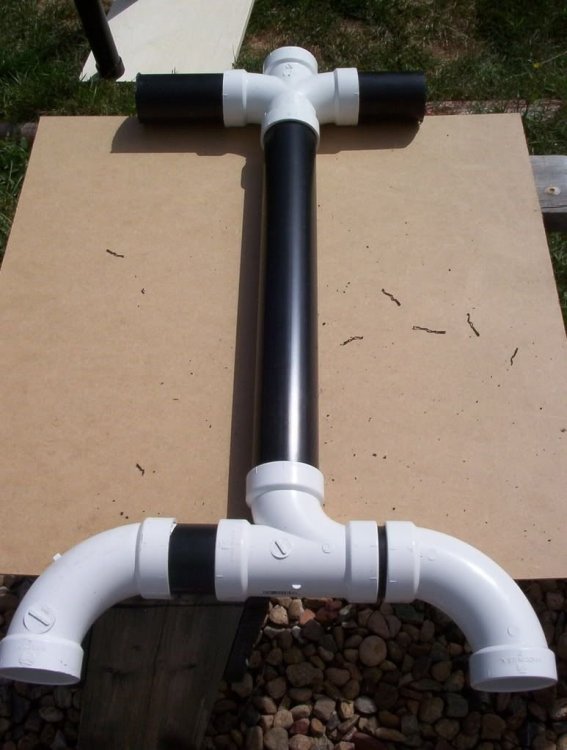
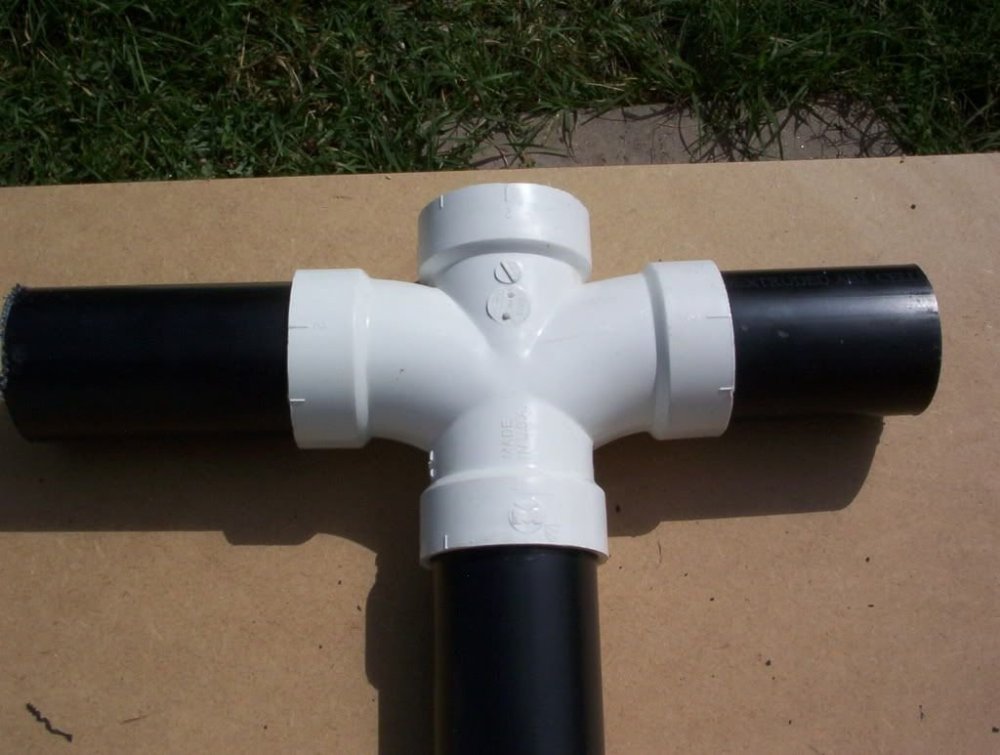
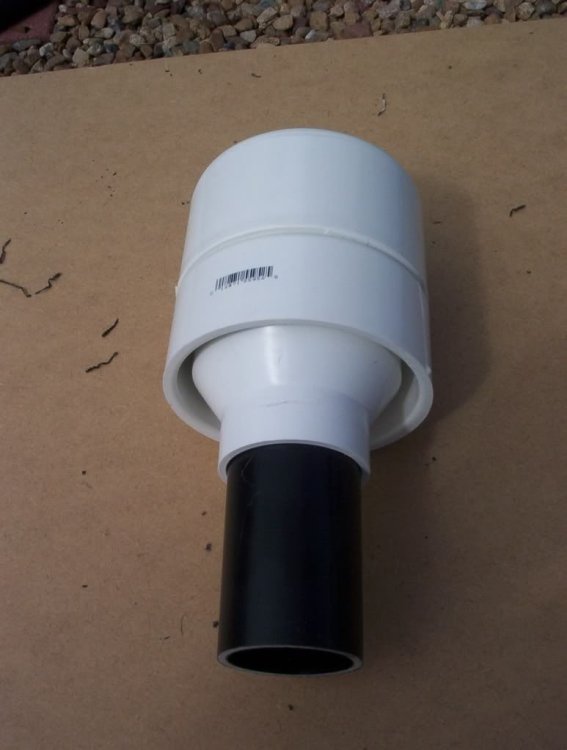
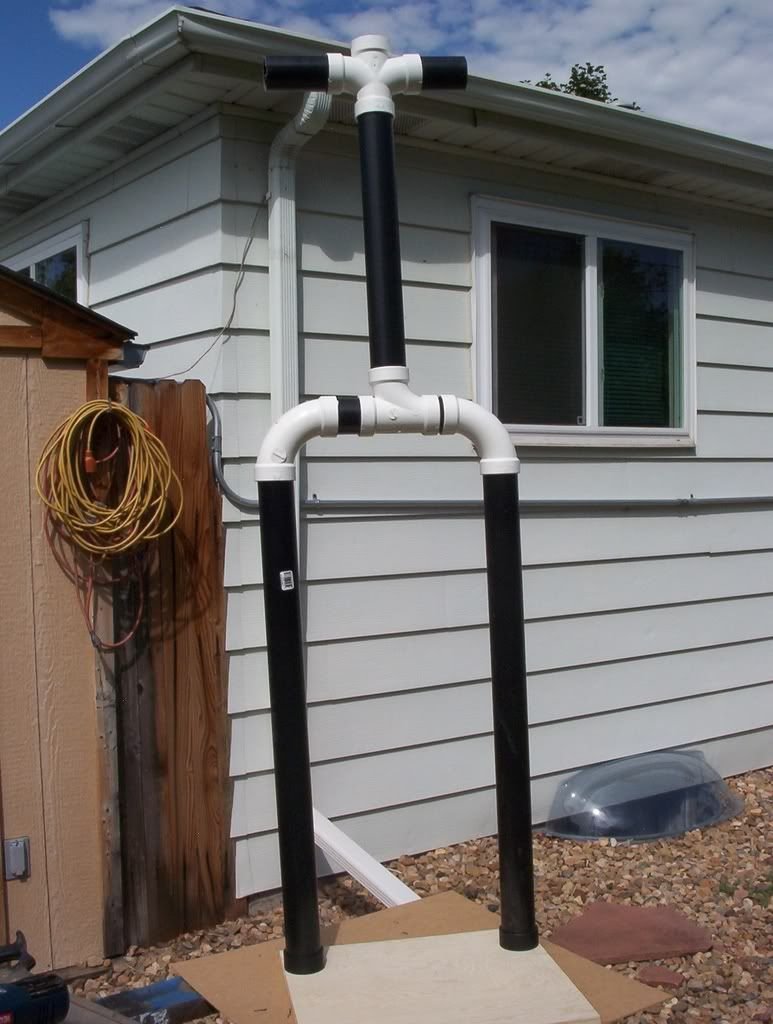
Here is a way to make a stand for your armor for cheap. This assumes you have some VERY basic tool knowledge, and a few things; like a saw, screwdriver, screws, a scrap of wood, and a tape measure lying around. Since most of us work and build armor, I think I am safe. What to buy: 1) 2 eight feet sections of 2" ABS pipe. Since it is black, I thought this worked best, but you can use PVC if you want. 2) 6 90 degree bends. 3) 1 three-way connector 4) 1 four-way connector 5) 1 3" to 2" reducer 6) 1 4" to 3" reducer 7) 1 4" cap 8) 2 2" flat caps You can use extra ABS cement lying around (if you don't have any or know what this is, stop reading now and proceed directly to the latrine for cleaning duty). Take the two reducers and reverse install them so the 4" section sits on top of the 3" section. This will be covered with the 4" cap, to be used for your bucket. Here is a picture of the finished product. You can also use just the 4" cap, and glue it to a longer piece of 2" ABS pipe if you want. Next, cut out your ABS pieces. You will need four 10" pieces (arms), 2 32" pieces(legs), 1 18" piece(torso), 3 4" pieces (neck and shoulders), and 2 short pieces for hips. These may need to be different, depending on your 3-way connectors. Attach the shoulders and torso to the 4 way connector, using ABS glue or screws. Now attach the 3-way connector to the bottom of the torso, and the hip pieces to the other two ends of the 3-way. This picture also shows the 90 degree sections, as well as the difference in the two hip sides, in order to make the torso in the center. (This is not needed, since the armor will cover it up) Here is what your piece will look like now all together: At this point, you can measure how far apart the legs will be, so you can install the 2" flat caps into the wood, and attach the legs using screws into the wood, and ABS glue for the legs into the caps. Take your 10" pieces and remaining 90 degree bends to make the arms. Attach a 90 degree to each of the 10" arm pieces: I drilled a hole in each side of the elbow, and then used screws to attach them: You should now have 4 pieces that look the same to make the arms: Now put them together to look like two arms: (Continued. See part 2 for the rest of the story) Please let me know if you have any questions or suggestions. Thanks for looking. Scott
.thumb.jpg.d65cee64b9195066f1b1d416ba8f4ab1.jpg)


-
I will chime in here briefly to point out why these types of thread get "edited" so much, and we on the command staff get tired of these types of conversations. This is an example of plain old unnecessary posting. Matt, if you want to note Jez's comments fine, but then you have to follow up with the insults. You could have said the same thing, without making everyone (or almost everyone), mad as heck at you personally with a few words. An alternate could have been: Now, if I was Jez, I would respect your products AND you with this. I'm not saying we have to be rainbows and sunshine, but does this discussion always have to become a mud-slinging competition between 12 year olds? Most of us are much older than that, but you would not know it by reading this dribble. Please continue.
-
Request suggestions on Polishing
Scott M. replied to huttman's topic in Assembly, Mods, and Painting
I will try to get some done this weekend, and just start a new thread. Don't want to de-rail this one. -
Those gaps are normal. Jesters were over an inch if I remember the pics correctly.
-
Request suggestions on Polishing
Scott M. replied to huttman's topic in Assembly, Mods, and Painting
Two things to note here: 1) I have heard that light can dull and even break down ABS over time. Only had my FX a few months, so I cannot say I have experienced this, only that I have heard it. 2) Why not spend $20 and make one yourself? I bought some 2" ABS pipe from Home Depot, added some 90 degree bends, a few three way connectors, one four way, and made a stand myself. Once the armor is on, you can't tell. And you can just add the gloves and there you go. I also saw a friend of mine put 90 degree bends for the elbows, and make a set of hands using 14 gauge wire. It bends well, and holds it shape. Now his TK holds his blaster as well. Leave the upper side of the shoulders loose, and you can pose it all you want. I can post pics later if someone wants to see how I built mine. -
Very nice. Looking good!!!
-
Not that I am promoting this site AT ALL, but you could try here: Ab plate kit
-
What are you trying to say?? My "gap" is too big???? :lol:
-
I actually found a white vinyl trash can at Wal-mart for $3. It works rather well, and only has a slight color variation of the ABS. The right side shows the color a little better, but as you can see, depending on the angle and distance, you cannot even tell. Here is a pic with me on the right, and a really skinny TK on the left. He doesn't need the filler, and I do: I used E6000 plus a couple of white rivets to hold it to the back plate, then used Velcro inside the ab plate. The industrial Velcro holds OK, so I added a few rivets and it works great.
-
Thats why the best way to go is 180 degrees (The opposite way!!!) Keeps ya cool, and no hair to catch in the fans!!! Bald troopers are da best!! (My wife's opinion, anyways!!!)
-
It is a great book, and a great read!!! I was AMAZED at the number of things GL used in the new films from his original thoughts, like: Padawan Mace Windu (was Mace Windy in the 1974-1976 writings) Utapah (sp?) Vallorum Allderan as the Galactic Empire There are several other I am leaving out, but it was really cool to see some of his thoughts from the 70's make it into the films (all be it in another form) in 99 and beyond. Great stuff!!
-
Deployment Name poll
Scott M. replied to Scott M.'s topic in FISD Expert Infantry Badge (EIB) Requirements
28 votes??? 28 votes??????? 28 votes???????????? Come on guys? Take 20 seconds and vote on your choice for YOUR Deployment Name. -
Riddell Mini Stormtrooper Helmet
Scott M. replied to Jehudah Design's topic in Hard Armor (General Discussion)
Very true. I was just not sure if that was "OK'ed" by Lucasfilm to use in the dictionary; thus close to the concept, or if the Riddell helmet was what Lucasfilm approved, or both (Man, that was a lot of commas!!! ). Anyone know, or is it just go with what you think looks cool. It would be nice to have a direction, but sometimes in this line of hobbies knowing which direction is the right one is almost impossible. -
Riddell Mini Stormtrooper Helmet
Scott M. replied to Jehudah Design's topic in Hard Armor (General Discussion)
I would also be interested in the pics. I have seen the SW visual dictionary that has a cut away, but it has been a while. What a cool mod to have a screen accurate bucket outside, and a visually accurate bucket on the inside. Post away!!!! -
TE2 vs AP Armor - Any clear winner?
Scott M. replied to makerofthings's topic in Hard Armor (General Discussion)
Just to throw my $.02 in here (and I may owe people some change), I already asked on post #2 of this to keep it clean and appropriate. I really have no personal knowledge of any of this, and however much anyone wants to get nasty, it is really a distraction from the thread topic. If anyone wants to share info, as has been done in this thread regrading the differences between the two sets of armor, please post it. As a fairly new TK (less than a year), the education that can be gleaned reading all the threads and discussions can be very helpful in deciding which armor to look for and purchase. That is the purpose of this thread. Since it is probably impossible to expect anyone to know everything, we need to rely on facts and statements that can be backed up or verified. Again I realize all I can claim is that I saw the films a zillion times (exaggeration intentional) and love the way the TK's look. Can I tell a difference between TE2 and AP armor from a distance? NO, thus my interest in the thread. The posts that have been removed and the edit done are warranted, if for no other reason than they are NOT part of the discussion and do not add to the discussion. This goes for all who post, not just one person. Keep it clean; keep it constructive; keep it educational = keep your posts unedited. As you were. -
Looks great!!! I am reminded of my 1995 TK that Hasbro/Kenner did, when every figure was a bodybuilder, including the TK's!!!! I was looking at it on my desk, and I said, "that is Craig!!" Keep up the good work, and thanks for posting pics!!
-
Looking good, and I agree the screws need to be white. As for this picture, if you enlarge it, you will see the brow trim is straight horizontal, and the angle of the shot gives it that slanted look. This is Han and Luke, thus these are both Hero helmets. The slant is due to the brow trim being something similar to window trim, and has a flat metal edge on the "bottom", and both side pinch towards the center. Since the plastic used for the helmets is much thinner than the window or metal material the trim was intended for, it bows inward, giving it a small curved look when viewing from an angle. If you zoom in on the pic, you can see on Luke's helmet, (the one closer to the camera on the left), it stops just before the from gray trap, but does go straight up and down Han's looks angled due to the camera angle, but is also vertical. Certainly not worth starting a war on, I have just come to notice things like this much more since I did when I started. Great lookin' bucket!! Can't wait to see it when you are done.
-
TE2 vs AP Armor - Any clear winner?
Scott M. replied to makerofthings's topic in Hard Armor (General Discussion)
In the interest of keeping this civil and sane, as well as avoiding having to moderate this to death... KEEP IT CLEAN AND APPROPRIATE. No flaming and no inappropriate posts. If you have an opinion, post it. Don't get into the name calling here, for it will be removed immediately. Now, the civil and humble discussions may begin (but we are watching you!!!) <_< -
I picked it up at my local comic book shop. They know I am a huge Star Wars fan, so they order stuff like that just to bait me I will have to check and see if the tag has any info. I get a few looks with it on, mostly those looks, but every once in a while someone recognizes it and does the same "cool shirt" point or comment. Beats someone asking what with the big red flower on your shirt.
-
FX Armor from COSTUMEJUNKIE
Scott M. replied to huttman's topic in Build Threads Requireing Maintenance
Ditto. I am sure some of this was available when I started, I just wish I would have found it sooner. Excellent info, and thanks for keeping us up to date on not only the bad, but the good stuff. It takes 10 positive actions to equal the impact of one negative action. It would be great if we all kept that in mind in our daily lives, in our posts, in our conversations, etc..... -
I would certainly paint the mesh. Another option is you could get some screen door mesh, layer it a few times, and replace the stuff all together. My concern on painting this (and heads up Joey!!!), is that it might not stick very well, and then scratch off. I was thinking about this last night, and the amount of effort required to paint it might not be worth it. Any other thoughts guys??
-
Go before your troop :lol: Some guys have a zipper installed, but you need access, so that is where the split cod piece came in. I will say that in my trooping experience so far (which is not much), I have yet to have to go while in armor. I think Celebration IV I did 8 - 10 hours a day several days, and because of the extra effort you expend and heat your body produces, most water is used up, thus no need to pee. I did keep myself hydrated, just never needed to go.


.jpg.24607c70fc8f1fecfe1d60d3a2af8067.jpg)