

11b30b4
-
Posts
390 -
Joined
-
Last visited
-
Days Won
6
Content Type
Profiles
Forums
Gallery
Articles
Everything posted by 11b30b4
-
11B30B4’s Black Series Helmet Mod Given that many of the pics from some of the BS mod threads are no longer accessible I have decided to post this thread to hopefully help others looking to do this mod. It should be noted that I have a full set of ROTK armor from Jimmiroquai along with his helmet and I am convinced that his helmet is a near copy (ahem) of the Black Series helmet. Regardless, using Jimms helmet as a reference of what the finished product should look like helped me a good bit. My complete ROTK build can be found here: https://www.whitearmor.net/forum/topic/44463-11b30b4’s-rotk-build/ Jimmiroquai and several other companies as well as a few members here on FISD are selling ROTK helmets and anyone having trouble deciding to buy a helmet or modifying a BS should seriously consider buying a helmet if they are not comfortable with the work required to complete this modification. The following modifications were performed to this helmet to ensure it met level 3 FISD and 501st approval. 1- Cover and blend the rear battery box and speaker openings. 2- Lower the brow trim so that gap between brow and eyes is approximately 1/8”. 3- Extend the jawline of the helmet to allow for proper placement and exposed gap of Vocoder. 4- Fabricate replacement Vocoder. 5- Replaced the Hovi Mics Ok, for this modification I used the following: BS ROTK helmet Apoxie Sculpt 2 part epoxy putty PC-7 2 part epoxy putty (I put that $h!t on everything) CA Super Glue CA Glue Accelerator Flex Seal Black liquid rubber 3mm Sentra .09mm High Impact Poly Styrene (HIPS) Various needle files Dremel with lots of accessories Heat gun Bondo Automotive glazing putty Black breathable fabric French Blue breathable fabric Correct Hovi mics Dark Grey plastic window screen mesh for frown Painter’s masking tape Various small clamps. 5/8” U-shape rubber seal Rust Oleum 2X grey primer Rust Oleum 2x White Gloss spray paint 5” section of 2” x 4” Petroleum Jelly Baking soda 100 grit sandpaper 150 grit sandpaper 220 grit sandpaper Airbrush Grey airbrush paint Black airbrush paint Step 1 Disassembly Disassemble the helmet completely and remove all the electronics. Step 2 Chop shop First, using a knife and then a sanding drum on the dremel, I removed the rubber neck seal on the front half of the helmet. Next, I cut out the Vocoder with the Dremel. You can also see I filled in the Hovi mic holes with PC-7. The neck seal on the back is not molded into the plastic and can be removed by hand. Next, I cut out part of the rear insert so that adding an actual neck seal once the helmet is assembled won’t be an issue. Step 3 extending the jaw line First, I cut a piece of HIPS to fill the Vocoder gap. I used a heat gun to shape it then glued it in place with superglue. The superglue is used to just hold it in place until we can weld it in place with PC-7. Once the rubber neck seal is removed from the inside and outside of the front half, you will have a nice trench on the inside edge to rest the HIPS in. I made a pattern with a sheet of paper of how I wanted the extended jaw line to look then cut pattern out of HIPS. I then used the heat gun to shape the piece and then super glued it in place. Once the inside was glued in place, I taped on the original paper pattern to the outside and traced the original jaw line then cut it off the pattern. Next I cut another piece of HIPS, heated and shaped it then superglued it to the first piece and used clamps to hold them in place. Repeat this process for the other side. It should be noted that doing this modification will cause (at least in my case) the bottom of the helmet to hit the shoulder straps and chest plate of the armor. With some 150 grit sandpaper rough up the HIPS, front jaw line, and Vocoder sides to allow the PC-7 to make a good bond. Next, mix up some PC-7 and apply it to the front jaw line/ Vocoder area and the inside of the helmet. With wet fingers smooth the PC-7 out and sculpt the jaw line area. Do not worry about extending the seams on the sides from the mask part to the face. We will use a file to sculpt it later. The PC-7 will need 24 hours to cure. Step 4 Vocoder There are a few ways to do this mod. I could have simply made a mold and re-cast the Vocoder that came with my Jimmiroquai helmet but that would have been re-casting, something I do not choose to do, so I decided to make a Vocoder from scratch. First, I made a sculpted surface that would support the sculpted vocoder. I made the “rest” surface out of a piece of 2 x 4. Next, I mixed up some Apoxie Sculpt and then rolled 7 pieces approximately 3/16” in diameter. I laid the pieces on the rest and pressed them into each other to make sure they would all be bonded into one piece. Wet fingers and some sculpting tools may help. Once I had the Vocoder shaped, I removed it from the rest and covered the rest with petroleum jelly to prevent the Apoxie Sculpt from adhering to the wood then placed the Vocoder back on the rest and let it sit for 24 hours. Step 5 Ear Cap Button Once all the electronics have been removed, I super glued the ear bump button inside the ear cap and then applied a layer of PC-7 on the inside to fuse the ear bumps to the ear cap. Step 6 Battery box and speaker openings After all the electronics have been removed, I filled the inside of the battery box with PC-7 then super glued the battery box cap on. I used PC-7 on the inside of the speaker openings and pressed it through to the outside. With wet fingers I smoothed the speaker openings on the outside. Initially, I used PC-7 on the outside seam of the battery box; however, I forgot to rough up the surrounding plastic with 150 grit sandpaper so even after the PC-had cured, it pealed off. I later realized that for this thin seam, the best option would be to fill the seam with superglue and apply baking soda over the super glue. The baking soda will cause the superglue to instantly solidify and the mixture of the baking soda and super glue is basically plastic. This can be sanded and painted. However, the mixture is slightly porous and will require some glazing putty later. In this picture I had not removed the PC-7 around the battery box yet. Step 6 cutting vents (optional) So, like my Jimmiroquai helmet, I wanted to vent this helmet as much as possible. On the inside of the helmet, there are some structural supports that lay on top of the areas I want to vent. In some places I removed the supports and, in some areas, I cut around and reinforced the supports. On the dome I added a piece of HIPS for the insert to rest on. I used a Dremel with a very small diamond wheel point bit (#7134) to rough cut out all the vent holes on the side tubes, tear traps, and rear. I had to clean the melted plastic off the bit between cutting each vent line. Once the vents were rough cut, I finished them with needle files. Step 7 Brow Trim The brow trim has a rubber seal that is molded into the plastic so again I used a knife and then a Dremel with a sanding drum to remove the rubber trim. You will notice that the plastic is not flat once the rubber is removed. This is not an issue because we will be incasing the existing plastic brow with sentra. First I cut a strip of 3/16” wide piece of sentra and then super glued this strip under the existing brow. Next, using the Dremel and sanding drum I ground down the existing brow trim to be even with the sentra. Next I cut a piece of sentra 5/8” wide and super glued it over the brow and even with the bottom strip of sentra. Next, I filled any gaps with super glue and baking soda. Lastly, I sanded the top of the brow to be even with the top of the front half of the helmet. Step 8 Sanding Sanding is a process, if you just go at it with 100 grit sandpaper and not crisscross your strokes you will end up with sanding lines. You should tackle every part of sanding starting with 100 grit and alternate your strokes then move up in grit to 220 grit alternating every stroke. I would suggest you not apply a lot of pressure, and wet sanding is way more effective. Do not go any finer than 220 grit or your paint may not stick to the plastic. If you are truly looking for that automotive finish you will want to use automotive primer and paints and sand between each layer of paint and clear coats; however, for this helmet I will be using spray paint so I will not be going that crazy with sanding. Four my purpose, I simply want to even out most of the modifications I performed. After I get to the 220 grit, I spay a layer of primer on to expose any issues. In some of these pictures, I circle the problem areas with a sharpie to re sand or fill with Bondo or glazing putty. Also be advised that there is a molded seam on both sides of the front half (outlined in red) of the helmet that you will want to sand away. You will want to sand all of the external parts of the helmet to make sure the paint will stick. I forgot to mention that I used a needle file to extend and define the seam from the chin section to the edge of the neck opening. Step 9 Priming and painting Once everything is sanded, wash all the parts with warm water and a few drops of dish washing detergent. Rinse the parts and let them hang dry. Once they are completely dry, hang then and apply the primer per the directions on the can. An hours later apply the white gloss per the directions on the can and let the parts cure for 48 hours. After I painted the parts I noticed a few issues. The battery box had a small issue (yellow circle) as well as one place that I did sand away a super glue drip (yellow circle) but I guess I did not do a good enough job. These are not big issues for me since I will be making a sandtrooper with this helmet but someone striving for TK level 3 may want to address these issues. Sand, fill sand again, and repaint. Next, I sanded and primed the Vocoder. I sprayed the Vocoder with flex seal, I think the paint on flex seal would have turned out better. In all honestly, the Vocoder on my Jimmiroquai helmet is painted semigloss black and not rubberized. This is how far I got this past weekend. This week I hope to finish the helmet. Thanks for the interest.
-
Well Crap MMcFett, If I had seen that RO E-11 back when I was doing my build I would have grabbed it. I purchased an ANH E-11 3D print from Blaster Master before he shut down his store. Lots of awesome reviews of his E-11s and he was a great guy to talk with. I planned on building the ANH E-11 and converting it to RO standards but I have never gotten around to doing it. GandalfTheImperial, that bucket looks nice. I have a Prusa I3Mk3 so I would need to print it in parts and then glue it together. I like the size options as well and 30.00 bucks for the model seems like a steel. I have a black series bucket that I am planning on modifying for my RO 850 AW build but I am not sure which would be easier, 3D print this one or mod the BS. The only thing I would do differently if I had modeled this would be to have the tears and rear boxes be separate parts. This would make painting and detailing easier. I know there are some 3D models of the armor out there but I have no idea where and obviously no clue about price and quality. Thank you everyone for the updates.
-
Ukswrath, thanks brother. I also found another RO E-11 maker. I will add them to the list.
-
Crap, grabbing the B-Grade anything was like getting next to new stuff for 1/2 price. OP corrected again.
-
MMcFett, you are correct. i thought they were doing a helmet at one point but that was HSP. I have corrected the OP.
-
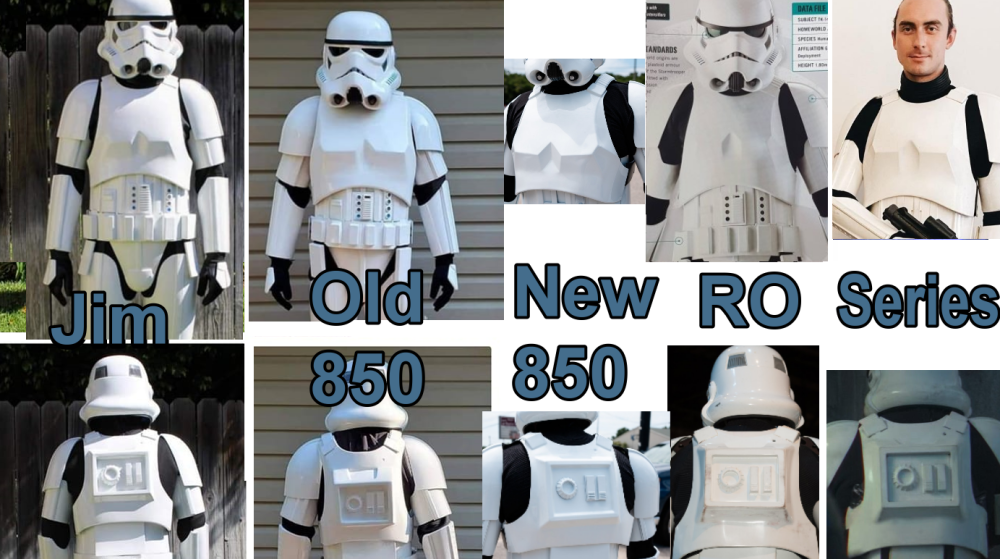
Rogue One TK Sources (updated 8-10-2020) Since I keep seeing these questions popping up from time to time, I figured I would make this simple for everyone. I do not have experience with some of these sources so if any of you do please chime in. Further, I am not pushing or supporting any of these sources, I am just providing you all the list and what they provide, and you choose who and what you want to go with. Lastly, If I do have experience with a specific source, I will note that and my overall experience with them. I am not pushing any sources, rather supplying you a list to work from if you are having a hard time finding stuff. Please feel free to add to this or provide "creative" comments. ROTK Sources Jimmiroquai Armor, Helmet, Under Suit [email protected] Jim was the first source for ROTK armor and is considered very accurate. The armor is flexible fiberglass and requires painting. I have a full set or armor, helmet, and under suit from Jim and I like everything. 850 Armor Works Armor, Helmet, Under Suit https://850armorworks.com/ 850 AW is offering vacuum formed ROTK armor. They produce this armor in ABS and it looks accurate from the pictures I have seen. They also offer a resin helmet and undersuit now. Helmet Nico Henderson Helmet 3D print files https://www.facebook.com/nico.heath Etsy Nicolai DesertFareCosplay https://www.etsy.com/au/listing/784808040/rogue-one-stormtroopersolo-mimban Nico designs extremely accurate helmets, his Shoretrooper helmet is considered the most accurate available and now he has designed a ROTK helmet that is extremely accurate and all the greebles are separate so you can print and paint them before attaching them. You will need to message him on FB. I have his ROTK helmet files and find them to be outstanding. Suggested print orientations https://www.whitearmor.net/forum/topic/53519-recommended-printing-positions-for-nicos-tk-helmet/ Updated files TKModder421 https://www.whitearmor.net/forum/topic/53406-modifying-the-nico-helmet/ OxProps https://www.thingiverse.com/thing:4227844 Lenses Green Rogue One TK lenses to fit the Nico Henderson helmet Mr Paul's Shoretrooper Build https://www.facebook.com/totalgrunt Armor akira-yuming Armor 3D print files https://www.cgtrader.com/3d-print-models/art/other/star-wars-rogue-one-tk-first-imperial-stormtrooper-armor ( Build thread Jason @BigJasoni build thread https://www.whitearmor.net/forum/topic/49826-the-bigjasonis-rotk-3d-print-build-thread/ Updated 3D files Jason @BigJasoni updated kidney plate https://www.whitearmor.net/forum/topic/52974-rogue-one-new-generation-eib-centurion-kidney-plate/ Jason @BigJasoni updated belt boxes https://drive.google.com/drive/folders/19k-95YPTsiBJzHGIumsGLYQjQlx_S0p4 Jeff @11b30b4 updated ab greebles https://www.thingiverse.com/thing:3973969 Jeff @11b30b4 updated handplates https://www.thingiverse.com/thing:3910278 (issue with sides of model) Ox Props hand plates https://www.thingiverse.com/thing:3750366 Shoulder Strap 3D files printed in TPU https://www.whitearmor.net/forum/topic/57810-rogue-one-tk-shoulder-straps/ Hasbro Black Series Helmet Amazon and others Very nice helmet that will require significant alteration to be 501st approved. I have one and I am planning on altering it for use with my 850 AW armor. Build threads updating Jeff @11b30b4 updating Black Series helmet https://www.whitearmor.net/forum/topic/48054-11b30b4-tutorial-rotk-black-series-helmet-mod/ Colin @OddViking327 updating Black Series helmet https://www.whitearmor.net/forum/topic/52589-modifying-a-black-series-helmet-for-accuracy/ Updating Colin @OddViking327 vent/traps updated 3D files https://www.thingiverse.com/thing:5455582 Please Note HeadShotProps is temporarily suspended as a recommended vendor, until they are back to normal and gain positive feedback from our members. HeadShotProps Armor, Helmet https://www.etsy.com/listing/830810037/rogue-one-stormtrooper-armor-kit?ref=shop_home_feat_4 The armor is vacuum formed and looks very similar to 850AW, although the TD looks better in the pics than the 850AW TD. The helmet looks to be a nice pull, this helmet is roto cast with greebles Soft Goods Other than the previously noted sources many of the soft goods are available from these sources: Dark Side Closet Under Suit https://www.facebook.com/TheDarkSideCloset/ I have messaged them for pricing and shipping, and they are very responsive. Geeky Pink’s Gaskets Under Suit https://www.facebook.com/GeekyPinksPhantasticGaskets/ You will need to message here and provide specifications. Keep Trooping RO Boots, Gloves, Strapping https://keeptrooping.com/ I have a set of boots and gloves from IB. I love the boots, the gloves are not the highest quality. Endor Finders RO Gloves https://www.endorfinders.com/ Gloves no longer available I have a set of gloves from EF and I love them. Katarra8 RO Pauldrons https://www.etsy.com/listing/150178963/classic-star-wars-stormtrooper-shoulder?ref=shop_home_feat_3&frs=1 I have a RO Orange Pauldron from Katarra8 and I love it. Veeds Pauldrons RO Pauldrons https://www.facebook.com/pages/category/Product-Service/Veeds-Pauldrons-305552456469495/ I do not have any of Veeds’ Pauldrons but he is highly reviewed and respected. Sheev's Emporium RO Undersuit and Gaskets https://www.facebook.com/sheevsemporium I do not have any of Sheev's goods but I do know they have been very active in the Shoretrooper community and the quality seems to nearly screen accurate. Due to several memeber complaints we advise caution with this vendor. Make sure you get clear time lines for when goods will be available and persue good communication. Use paypal or a safe refundable form of payment. Crow Props RO Boots https://crowprops.bigcartel.com/product/fo-r1-tk E-11s Bryan @trooper96 3D print files https://www.printables.com/model/155855-st-sterling-l2a1-aeg-and-rogue-one-e-11-conversion Sterling conversion https://www.printables.com/model/168104-rogue-one-e-11-conversion-kit-for-sterling-smg-mk4 Hyperfirm Weaponry (HFx Productions) GOING OUT OF BUSINESS, NOT TAKING ANY NEW ORDERS RO E-11 https://www.facebook.com/HFx-Productions-1669859386576227/ I have a B-Grade RO E-11 from Hyperfirm and love it. Praetorian Blasters RO E-11 https://www.facebook.com/BlasterMaker/ I do not own a PB RO E-11, but it looks awesome. S&T Full Metal Airsoft Sterling E-11 RO E-11 https://www.evike.com/products/61969/ While most of the E-11s used in RO were made using the S&T Full Metal airsoft Sterling, this E-11 is not very accurate for RO. The scope, counter, and power cylinders are all wrong and there is not a light rail or tactical light. DoopyDoo’s RO E-11 parts https://www.doopydoos.com/star-wars-props-31-c.asp It has been noted that some of the E-11s used in RO were equipped with a DoopyDoo cast of the M.H.R. Co. M38 Telescope from Sherman M4 Tank (1943 version with wide front foot). War Machine RO E-11 parts http://www.warmachinepaintball.com/online-store-replicas/ If you are looking to make a full “all metal” RO E-11, look no further. War Machine makes everything you would ever need. Bulldog Props RO E-11 parts https://www.facebook.com/BulldogPropsJapan/ Brian makes resin casts of the M.H.R. Co. M38 Telescope from Sherman M4 Tank (1943 version with wide front foot) that are completely accurate and disassemble-able. I own one and love it. I have done a full review of it on FISD. Shear Tech RO E-11, Rubber RO Hand guards https://www.facebook.com/sheartech/ I am not real familiar with these guys but the E-11 looks nice, and the rubber hand guards are nice as well. Picatinny Rail ROTK / FOTK E-11/F11D Picatinny Rail - (evike.com) - Link (purchase) E-11/F-11D Picatinny Rail - (justloseph63) - Link (purchase) E-11/F-11D Picatinny Rail - (m416gelblaster) - Link (purchase) F-11D Picatinny Rail - (themaninthesuitcase) - Link 3D files E-11 Picatinny Rail - (TK14082) -Link Part of Rogue One 3D files While there are a lot more sources out there this is a fairly good list for anyone to work from. I did not include sources like static burst communication kits or urethane rubber shoulder straps sources, but they are out there and if you are looking for that stuff you should be able to find them. I hope this helps those of you who are looking to embark on your ROTK journey. Rough comparison Chest / Back
-
Hey guys, i did some research on this a while back. The slide show that Pablo Hidalgo was showing was before the visual guide was actually published. This picture was replace with the Crystal Patrol Duty pic. There was a plan to have two spacetroopers in RO but someone stole one of the backpacks the morning of shooting and so they were dropped from shooting. If you listen closely to Pablo, he explains this.
-

Rogue One TK build, 850Armorworks Kit
11b30b4 replied to Twelveravens's topic in Rogue One Build Threads
outstanding job brother -
Shin armor stress crack suggestions, as promised… Ok, while at DragonCon I ran into Plainsrunner from the Alabama garrison in his Mimban Trooper, his wife came up with a unique and simple solution for the shin armor to prevent cracking. As we know, the two halves of the shin armor clam shell together nicely. Note this picture and see how the right side is on the outside along the front seam. The cover strip is molded into this half. The left side butts up to the right side edge and has a piece that is overlapped by the right side. So what this enterprising lady did was leave the two halves separate and added 2 strips of elastic on the inside of the armor to hold the front closed but allowing for flex and spread. This method would mean that you would need to hard mount the knee plate to only one side of the shin armor and then possibly add some Velcro on the other half but when he was wearing the armor, it looked great and prevented cracks. Here is a graphic I made to explain this method. This is the inside of the shin armor. Side A has the cover strip and is on the outside of the front seam. Side B sits inside of Side A and has the internal overlap strip. Note the placement of the two 1” elastic straps. Another method a a friend of mine used was a product similar to Velcro and made by 3M called Dual Lock which was attached to the inside of both halves and then locked in place before putting the armor on. I hope these options help you all out. I will get back on the tutorial soon.
-
napalmseth, I did the automotive paint myself but if you are not set up for it (and it ironically may be cheaper) to have someone do the paint for you. There is always the option to just rattle can it but I can not say how it will look. The advantage of rattle can is touching up scratches and dings. I have used nail polish and touch up pens for any touch ups I needed to do but its noticeable. LTM, thanks brother. See you soon.
-
Until I get my hands on an 850AW kit, it seems to be the definitive best choice. At the time that I did my build it was also the only choice. Honestly, I do not know if the ABS kit will fair any better. I would really like to make my own bucks and vacuum form my own kit and then have the ability to replace parts as needed; however, I do not have the time to make the bucks so ordering a kit is the only option for the foreseeable future. Besides, even with all the cracks and problems with Jims kit, it still looks great and I get a ton of complements form OT TKs every time I wear it.
-
OK so I had the opportunity to test out the “new” product and hell yes! In the picture above you can see the version 1 (on the right) of the shoulder strap that connects the chest to the back armor. The side strap is to connect the shoulder bell and the soft Velcro is intended to adhere to the underside of the kit included fiberglass shoulder straps or the urethane shoulder straps I make. Version 2 is on the left and was made from the new elastic/Velcro webbing. I also decided to make a version 3 which is the same as version 2 but the shoulder bell elastic/ snap is velcroid rather than sewn on the shoulder strap. This allows the wearer to adjust it on the strap for best fit. Going forward I pan on making the strapping kits available for purchase at $110.00 shipped to CONUS and will include the version 3 straps in that kit. I am still working some of the details for the kit and will post a link to the sell them once I have ironed everything out. This also means that if you have are planning on buying the urethane shoulder straps you should order them with the hard Velcro on them is you also are considering buying the strapping kit once its available. Ok so here are some pictures of the version 3 straps in full kit. They performed even better than the version 1 straps. I will continue the tutorial and refine the cut list in the coming weeks. Thanks for the interest.
-
Hold on...Yesterday I discovered a product that will most likely make the shoulder straps between the back and chest armor wayyyyyyyy more simpler. Standby for an update on that product as I need to fully evaluate it. Everything I have posted up to this point is still correct and the only modification if this works out will be to the following materials: Quantity Length Width Use 2 15” 2” Elastic Webbing Shoulder straps for chest to back armor 2 10” 2” Velcro hard side Shoulder straps for chest to back armor 4 #24 4 part snaps Shoulder straps for chest to back armor 2 3” 1” Elastic Webbing shoulder armor to shoulder straps 2 #24 4 part snaps shoulder armor to shoulder straps
-
Plainsrunner, you hit on the point I was trying to make in the previous post. I permanently closed off the front side of the legs and arms and used Velcro to close the back seam and this has caused stress cracks. My suggestion was to experiment and see if its possible to keep the two halves of the armor separate and close both the front and back with Velcro. I can not do this since I have already welded the two halves together on the front seam on my armor but you or others can try the suggested method and see if it works before going the route I did. Before we get started I wanted to add some helpful information. I recommend you use a hot glue gun when folding the webbing before stitching. Also, I recommend you use a soldering iron to melt the holes in the webbing for the snaps. First, I need to cover a few quick notes. I do not know what level of sewing you (the reader) have so lets hit some basics. Start and end all stiches with a lock stitch. That is when you run a line for 3-5 stitches then reverse over the 3-5 stitches, then resume the stitch going back over the 3-5 stitches. All sewing machines have a reverse level or button, and this is what it is meant for. This ensures the stitch is locked in place and will not pull out. Next, when possible (meaning if you have the available area) do a box stitch. This is where you stitch a rectangle then two crisscross stitches in the center. In the pictures below, look at how I sewed the Velcro, that is a box stitch. Lastly, the 4 part #24 snaps can be a bit confusing if you have not worked with them before. In the picture above from left to right you can see the 1-cap, 2-socket, 3-eyelet, 4-stud. To the left of these 4 parts is a cap and socket correctly assembled but not struck, and right of that is a eyelet and stud correctly assembled but not struck. It is entirely possible to mix these up and assemble the snap incorrectly. Also, note below the snaps are the two tool you will need the two sided anvil (seen here with the cap side up) and the punch. The next picture shows the anvil with the eyelet side up. Ok, so today I will try to explain how I made the two primary shoulder straps for the abdominal armor and the two back straps that close-up the abdominal armor. The sole purpose of the shoulder straps are to support the abdominal armor. On my armor I made these straps out of 1” wide nylon webbing but in this tutorial, I recommend you use 1.5” wide nylon webbing. I honestly do not know if it will make a difference, but I believe it would be more comfortable. My 1” straps are not uncomfortable but if I am doing this again, may as well do it right. If you do your strapping like I did you will end up having three sets of straps on your shoulders. Base layer is the straps I will demonstrate today. The next layer is the shoulder straps that connect the chest and back armor and support the shoulders. The top layer is the exposed shoulder straps that come with the armor and are made of fiberglass or the urethane rubber straps I make. If you look at the list above, you see we will need the following for the Abdominal shoulder straps: Quantity Length Width Use 2 31” 1.5” Nylon Webbing Abdominal Shoulder Straps 2 #24 4 part snaps Abdominal Shoulder Straps 2 1.5” Plastic loop Abdominal Shoulder Straps 2 4” 1.5” Velcro (both sides) Abdominal Shoulder Straps 2 5” 1.5” Nylon Webbing Abdominal Shoulder Straps After cutting all the materials this is what I have. Note: I did not have any black plastic loops in 1.5” so they are green in this picture. Next, I fold the two 5”x 1.5” nylon straps over one end of the plastic loop and use hot glue to hold the nylon closed. Also, I expose the sticky back of the Velcro and apply a 3” hard piece at the end of the 31”x1.5 nylon webbing. I space (the white chalk X) 1” then apply the 4” soft Velcro. Next I sew the Velcro on the 31” straps using a box stitch. I sew the 5” strips closed; however, I do not use a box stitch because we will be punching a hole inside the sewn rectangle for the snap. Next using soldering iron, I melt holes in the 5” nylon webbing. Next I mount the cap and socket set of snaps to the 5” straps. I use a drill to make the holes in the armor and mount the eyelet and stud set of snaps. You will want to be careful to not crack the armor when doing this. I placed the armor around a board I suspended with a vice and hammered the eyelet/stud set closed. The two holes for these snaps need to be on the front of the armor close to where I have them in the first picture of this thread (my armor hanging). Next, I run the 31” straps through the loops and you should have two assembled straps like this. The Velcro we sewed on the front end of the 31” straps allows me to adjust the straps a few inches to get the best fit. The back end of the 31” straps are adhered to the inside of the abdominal armor along the back opening. How you adhere the straps is up to you and you should test fit them and cut any unneeded length of the 31” straps from the back end before finalizing how you mount them. Once the back end of the straps are adhered to the armor, the front side should snap like this. The straps should crisscross in the back. So I hope that was somewhat clear… Next, we will make the two straps that close-up the back of the abdominal. For these straps you will need the following: Quantity Length Width Use 2 7” 5/8” Nylon Webbing Abdominal Back Closure 2 5” 5/8” Nylon Webbing Abdominal Back Closure 2 5/8” Plastic side release buckles After everything is cut you should have a set of parts like in the top of this picture. The bottom strap is a completed strap. There are two sides for plastic side release buckles and some buckles are slightly curved to fit a contour. These 5/8” buckles are curved so how I sew them is important but most of the time any logo or residue mold marks are on the back side. I wrap the 5”x5/8” strap around the female side of the buckle and fold it in half. Again, I use hot glue to hold the webbing closed for easy stitching. On the 7” strap I fold one end twice and run a stitch the width of it. This creates a finger hold to better tighten the strap down and it also prevents the strap from coming out of the male end of the buckle. Note how the strap is threaded. If you thread it incorrectly it will not hold tight when you cinch it down. These two straps are mounted to the inside back of the abdominal armor and should look like this. I made sure I could reach behind and access them so I could put my armor on and take it off myself but it does make life easier if you have someone help you put the armor on. How you adhere these two straps inside the armor is up to you. I permanently adhered these straps and given how tight I cinch these straps, I do not recommend using Velcro. Since the back plate covers this area, you could consider rivets but I felt that would stress the fiberglass. I used PC-7 putty to adhere my straps. See my build for more details on the PC-7 method. Well, I hope this is a good start. Please let me know if this tutorial is unclear or requires more detailed pictures, etc… I have more webbing and Velcro on order so it will be next week before I continue this. As always, thanks for the interest.
-
TheRascalKing's Anthology Jimmiroquai TK Build Thread
11b30b4 replied to TheRascalKing's topic in Rogue One Build Threads
Oh my.... thanks for the plug and wow you guys are doing 7 kits! I just want to through out that if yall get asked to do some stand in roles for Season 2 of the Mandalorian or any other SW projects, yall need to reach out to me so I can take time off, fly in to CA, and stay with one of yall to participate. Best of luck on the builds. -
I have started a new thread in the in the Rogue One builds as a tutorial on how I strapped my ROTK here:
-
NOTICE- see my 10-1-2020 comments. This thread will not continue to update, you can follow Kyle's WIP thread to see how we are strapping his ROTK. Because I have been asked numerous questions about how I did my strapping, I am making this tutorial on how I strapped my ROTK. First, you need to decide on two things before you do anything with your kit. 1. Do you plan on lining the inside of the armor? I chose to line the inside of my armor with flex seal liquid white that was applied with a paint brush. The decision to line the inside of the armor was made for two reasons. One was that the armor is fiberglass and was very abrasive on the inside. The second reason was because I paid for the under-suit and wanted to prolong it wearing out. 2. How do you plan on attaching the strapping? In most places I adhered the straps to the armor with PC-7 putty. Normal TKs adhere their strapping with Velcro. I was not comfortable with how well this would work so I went with a permanent PC-7. The Velcro may work just fine; however, I cannot attest to this. So, if you plan on lining the inside of the armor, you will want to mask any area you plan on applying Velcro because the Velcro will not stick to the flex seal and removing the flex seal is damn hard. It embeds into the fiberglass and even after sanding and using chemicals, it still was not receptive to apply Velcro. This should also be considered when you are planning out the Velcro to hold the leg and arms pieces closed. While I am talking about this, I would like to suggest that you attempt to use Velcro on the front and back of the lower leg armor. I did not do this, instead I permanently closed the front side of the leg armor and used Velcro for the back and this has caused stress on the leg armor when putting it on and taking it off. This has led to cracks. If I get around to ordering another set of RO armor, I will try to close the legs on the front and back with Velcro, so just a suggestion. I digress… so once you know if you are lining the armor and what attachment method you will go with you will need the following: Note: everything is black unless noted and all Velcro is 3M industrial sticky back Velcro except the drop box Velcro, its 1” “sewn on” Velcro with no backing. Quantity Length Width Use 2 31” 1.5” Nylon Webbing Abdominal Shoulder Straps 2 #24 4 part snaps Abdominal Shoulder Straps 2 1.5” Plastic loop Abdominal Shoulder Straps 2 4” 1.5” Velcro (both sides) Abdominal Shoulder Straps 2 5” 1.5” Nylon Webbing Abdominal Shoulder Straps 2 7” 5/8” Nylon Webbing Abdominal Back Closure 2 5” 5/8” Nylon Webbing Abdominal Back Closure 2 5/8” Plastic side release buckles 2 6” 1” Nylon Webbing Abdominal connecting Posterior Armor 4 #24 4 part snaps Abdominal connecting Posterior Armor 2 5” 1” Nylon Webbing Abdominal connecting Posterior Armor 2 1.5” 1” Velcro both sides Abdominal connecting Posterior Armor 3 5” 1” Nylon Webbing Abdominal connecting Cod Armor 6 #24 4 part snaps Abdominal connecting Cod Armor 1 5” 1” Nylon Webbing Connecting Cod to Posterior 1 11” 1” Elastic Webbing Connecting Cod to Posterior 1 #24 4 part snaps Connecting Cod to Posterior 2 12” 1” Nylon Webbing Abdominal to Legs 2 6” 1” Nylon Webbing Abdominal to Legs 2 1” Plastic side release buckles Abdominal to Legs 2 2.5” 1” Elastic Webbing retention loops Abdominal to Legs 2 15” 2” Elastic Webbing Shoulder straps for chest to back armor 2 10” 2” Velcro hard side Shoulder straps for chest to back armor 4 #24 4 part snaps Shoulder straps for chest to back armor 2 3” 1” Elastic Webbing shoulder armor to shoulder straps 2 #24 4 part snaps shoulder armor to shoulder straps 2 5” 1” Elastic Webbing Shoulder Armor to Bicep Armor 4 #24 4 part snaps shoulder armor to bicep armor 2 6” 1” “Sewn on” soft Velcro drop boxes to box belt 2 6” 2” Velcro hard side drop boxes to box belt So all of these parts considered, this is your shopping list: Quantity Length Width Description 1 72” 1.5” Black Nylon Webbing 1 24” 5/8” Black Nylon Webbing 1 78” 1” Black Nylon Webbing 1 32” 1” Black Elastic Webbing 1 30” 2” Heavy Duty Black Elastic Webbing 23 #24 4 part snaps 2 5/8” Black plastic side release buckles 2 1” Black plastic side release buckles 2 1” Black plastic loops 1 box 15’ 2” Black Industrial Strength sticky back Velcro 1 12” 1” Sew on black Velcro In addition to these materials you will also need the following: Sewing machine (preferably an industrial machine but most of this stuff can be sewn with a standard sewing machine). Black bonded nylon thread, I use #69 bonded nylon thread, but I also have an industrial machine, if you are using a standard sewing machine just get some black nylon thread general purpose. Webbing hot knife/ cutter. You can just cut the webbing with a box cutter or scissors and the melt the end with a lighter but this can be tedious if you are cutting a lot of webbing. I use a hot cutter like this one for $74.99 https://www.ebay.com/itm/Electric-Rope-Cutter-For-Paracord-Cord-Webbing-Belting-and-Blade-/293128089661 Snap setting tool and a hammer. You will need the anvil and the punch set. The anvil should be double sided to accommodate the cap and the eyelet. I recommend this tool set found on Amazon. https://www.amazon.com/Snap-Setting-Snaps-Vaughan-Bros/dp/B074HKBBW1 Most of these materials can be found at Joann’s or a similar craft stores but I would suggest that you purchase these materials from Amazon or webbing supply stores. On amazon you can order smaller rolls of webbing like 10’ in length; however, most webbing supply stores will require you to purchase full rolls which are often 1,000 yards and quite costly. Additionally, you can use polypropylene webbing instead of nylon webbing which is often cheaper but does not have the abrasion and strength of nylon webbing. Ok so that is the list of materials and tools needed. In my next update, I will cut and assemble the straps and show where they go and what they do. Thanks for the interest.
-
Well since California Garrison is doing a rather large ROTK build, I guess I will knock out that overview of the suspender system. Stay tuned guys...
-
RascalKing, I made the harness myself out of 1" nylon webbing and some 2" elastic. Kind of made it up as I went along. If I had it to do over, I think I would have gone with 1.5" or 2" webbing but the 1" is what I had on hand at the time. As time permits I may do a more detailed breakdown of the suspender system.
-
For the armor I used Automotive primer, paint, and clear coat. I shot it all with HVLP gun. the color I used was Ford Frozen White. See page four of my build here: here are my paint guides
-
Tsongololo, I just messaged with Kevin Merritt from 850 AW. I have a set on standby, i need to pay the ballance and i plan on doing that after DragonCon this year. I would recommend you message him on FB. He seems quite responsive and they are now forming in white ABS which is awesome news. The pulls he posted on the Star Wars Rogue One TK Stormtrooper Page on FB look great.
-
BTW Yosh, what did the shins cost from AW?
-
Great job on the black series helmet. I have one waiting on my second set of RO TK armor to build and sandy but I am skeptical about 850 AW ever getting the armor done.
-
Damn, I am off the forum for a few months and look at what you have gotten into. Awesome job on the new shins, I am still waiting on 850 to get me my ab plate and belt box. Anyword on when they will have the TK available?
-
Update, Ok so I was concerned that the Sentra that I chose to use for the base of the shoulder strap master mold would be too porous so I made the base from ¼ thick plexiglass and used the styrene half rounds. Once I had this completed I made the mold. Once the mold was cured, I sprayed it down with release agent and molded another set of shoulder straps. The results were the same, the cured rubber was not smooth and was pitted. So, I cleaned the mold and made another set without the release agent and man did that make a huge difference. So at this point these are as good as I can get them until I can find a supplier that produces ¼” half round plexiglass or acrylic rods at a decent price. Here are the pics: If you are interested in a set, I have created a sale thread here: As always, thanks for the interest.

