

11b30b4
-
Posts
390 -
Joined
-
Last visited
-
Days Won
6
Content Type
Profiles
Forums
Gallery
Articles
Everything posted by 11b30b4
-
 Requesting 501st access http://501st.com/members/displaymemberdetails.php?userID=28607
 -
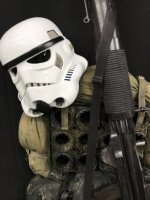
Big Deal, the mouth mesh was cut about ½” larger than the mouth then hot glued in place. The chest and back are supported by the shoulder straps and side plates. Think of them at the 4 supports that connect the back and chest. This assembly then hovers over the abdomen although, hover is not really the best word. It fits snugly over the abdomen. See if these pictures helps any. Darthcue, thank you for pointing out the two end teeth. I should be able to correct that this weekend. Ok guys, I need your input… Other than the two outer teeth need paint on the helmet, please look over these pics and let me know if I am ready for EIB and Centurion approval. I think I have met all the requirement for both categories. Pending your input here, I will paint the two teeth Darthcue noted and re-shoot pics of the helmet and submit my applications for EIB then Centurion. I await your comments. Thanks for the interest.
-
Ukswrath, thank you. Sskunky, thank you for the compliment and I agree, I am also looking forward to seeing how this kit will hold up for troops. Update, So last night I finished getting the helmet squared away. After close examination I did notice a faint line on the back panel sections. I am guessing that I must have applied more primer to this area than I had thought and almost filled them in completely. Anyway, I masked off the back panels and painted the lines black then shot them with flat clear. I think they came out well for barely not being visible. Next, I glued in the tabs that hold all the fabric screens in place. This will be a semi-permanent mounting where I will need to break the tabs off to remove the screens and I will need to make new tabs to reinstall them. I glued these tabs in place with three different methods because for some reason one method would only work in certain areas of the helmet???? So I used hot glue, 2 part loc-tite 1 minute epoxy, and superglue with activator and/or baking soda. Anyway, between these three methods I got all the screens mounted with the tabs instead of using tape. After that I installed new Velcro, the lenses, padding and fans. Here are some pics of the completed helmet. Oh, and why would I be taking these other pics? After that I started lining the transport box and making individual protective bags out of thin fleece blankets I got from Walmart for each armor part. I have another AP tonight so I am hoping to cut down the abdominal armor sides. I have not shot the glossy clear on the side plates yet but I am in no rush to do that until after the AP. Thanks for the interest.
-
OHHHH me likely. Awesome gob on this kit.
-
Thumpy~ thank you. Ukswrath, thank you, I will be contacting you at some point for an icom static burst setup. Darthcue, The side plate looks satin or semi-gloss but not glossy to me but, I am fine with reshooting mine to be glossy. What is with the side plate in the pic you posted? I have noticed it in a that pic and a few others. Looks like they are two parts and velcroed together. Oh well, Jim couldn’t get all the armor exactly as the screen used sets since his access to images was very limited at the time when he cast this armor set. Big Deal, yep you can cut them. I like how Yosh did his where he snaps them to the back plate and velcros them to the chest plate. I wish I had done that so I could detach them but I was not thinking when I hard mounted them to the back plate. No worries on your progress, I just wanted to prod you so that you can be the next approved ROTK. I also agree with all the detail in the kit, weathering will look great. Update, I realize that in my previous post I eluded to talking about the flexible fiberglass vs HIPS and I never got around to actually doing that so I will do that first. The flexible fiberglass that Jim uses is cool stuff but it has its issues. For that matter, any material uses to make costume armor has pros and cons. I have experience with HIPS since I molded and Vacuum Formed (VF) my Mandalorian armor. When I first considered doing a TK, the only kits I was aware of where HIPS kits. As several people have noted, the ROTK has more detail and getting that detail with VF is very difficult but not impossible. From working with this kit and not even performing a troop yet, I have noticed several cracks at stress points where I use Velcro to close parts. Consider the lower leg armor. If you permanently attach the two parts along the front seam and use the back seam to open and close the armor, you will most likely get cracks along the top of the armor closer to the front seam since you must open the armor enough to slide your leg into it. The thighs and biceps can be closed with Velcro as is required by the CRLs but you may never need to open them again since they can be slipped on over the limbs. So VF HIPS can crack as well but its way more flexible than this fiberglass in my opinion. Another issue with the fiberglass is that it must be painted and given the need for the armor to be flexible, the paint and clear coat needs to be somewhat flexible so it will not crack and flake off. This is why I chose to go with an automotive paint. Think about a door panel on a car. You can push on it and allow it to flex an inch or so. The paint will not crack unless you really bend it. Even serious dents will often not crack the paint. I just don’t think you can get that kind of resilience from spray paint. Alternatively, with VF HIPS, glossy white is widely available and would not need to be painted. Lastly, since fiberglass is rough on the inside, it needs to be coated with something to create a barrier between the undersuit or your body and the armor or it will wear holes in the undersiuit and be very itchy. VF HIPS does not require an interior coating. So the differences between the ROTK and the OTTKs seems to boil down to the helmet, Abdomen detail, and back plate detail (OII). Most of the other parts can be modified from a standard TK kit, at least enough to be within the CRLs for basic approval; albeit, lacking in the level of detail that you get from Jim’s kit. So considering these pro’s and cons, I think that each person needs to decide which route they are willing to go with building a ROTK. Like I said in my previous post, seeing what NaturalBornDT has done with his VF abdomen I am really intrigued with the idea of a VF ROTK possibility. And now back to the update. Last night I shot the black flex seal on the helmet opening trim. It came out nice. I do not know how resilient it will be but it looks good and should help to prevent scratching the bottom of the helmet. My only concern is that it will mark the shoulder straps where the helmet hits them when worn but I cannot determine this until I wear it and see how its does. Here are the shoulder straps after I sanded, primed and repainted them. This is before the clear was applied. And this is the bicep after painting and before clear coat. Lastly here is a good shot of the flat clear applied to the brow trim, tears, and temples, etc… I will reshoot the side plates with gloss tonight and get to work on reinstalling everything in the helmet. I am hoping for some updated pics of the full kit before this weekend with the corrections listed previously. Thanks for the interest.
-
Devolver, Thanks and I am planning on going for EIB and possibly Cent. The helmet opening trim keeps getting scratched up even though it’s clear coated so I am considering masking it off and painting it with black flex seal. If this comes out nice I may do the same with the brow trim. Brain, Thanks brother. I have some thoughts about the flexible fiberglass vs HIPS that I will talk about later in the post. Darthcue, it looks to be about 7 but there may be some people who have built one and not reported their progress here in FISD. I was paging through several of the build threads and noticed several people (Big Deal) have started their builds but not finished them and Most of them started before me...So I think we should be hitting up these guys and pushing them to complete their ROTKs (ahem, Big Deal). Also, as I was looking at the build threads I found NaturalBornDT’s thread. This guy is scratch building the abdominal armor for his build. Reminds me of Yosh’s build and I am really impressed with his progress. Darthcue, thank you for the reply about the flat vs glossy. Are we sure the sides are glossy? I have already sprayed them with flat clear…… Update, Alright, so like I stated previously, the nuts in the shoulder straps keep coming loose. I removed them completely and filled in the holes with PC-7 and let it cure for 24 hours. I stopped at Ace hardware and spent an hour in the specialty hardware looking at various parts and thinking of ideas when I found these threaded inserts. I snagged a few of them and tested this out in a piece of wood. Once I was fairly confident this would work, I drilled ¼” holes all the way through the shoulder straps where they matched the holes of the back plate. I screwed-in the insert and then test fitted the whole thing on the back plate. The small crack you see next to the left hole is only a cosmetic crack in the paint. But this does bring up my only real concern about using this method. Given how the fiberglass has cracked in other areas I am hoping that it will be strong enough to hold the threaded inserts and no crack or break. Ok, so I used a ¼” hole punch on some painter tape and made some small ¼” circles that I placed insde the top of these holes to prevent anything from getting on the threads then filled the holes with Bondo. While the Bondo was curing, I need to add a metal D-ring to the end cap of my HFX E-11. I had a sling ring in my gun junk bin that closely matched the actual D-ring. Ok it’s not exactly oval but close enough and I needed something for EIB. I masked off all the stuff that needed to be sprayed with the flat clear and sprayed this stuff. I did this before seeing the post from darthcue telling me that the side plates are glossy. I can sand them and go back and reshoot them with clear. Once the Bondo was cured on the shoulder straps, I sanded them and applied a layer of glaze putty then sanded again. I mixed up a small amount of the white base coat and sprayed them. 45 minutes later I clear coated them. I did have a spot on one of the biceps where I removed some Velcro and it pulled the paint off the bicep. So I masked it, sanded the primer and reshot paint and clear on it as well. And that is it for the update. Thanks for the interest.
-
LTM, thanks for suggestion. I am not sure which way I will go but I will keep the rubber gun in mind. So I forgot to mention that the nuts keep coming loose from the underside of the shoulder straps. I have removed them and filled in the drilled holes with PC-7. I am wondering exactly how you guys attached your shoulder straps to the back plate? My concern is the Jedah patrol pack will knock them loose if I just use Velcro.
-
TK-20980 reporting for duty. Approved and I got the shirt ordered last night!!!! My GML has been watching this build thread and echoed what you guys have said here for me to correct, but I am approved and a full-fledged member of the 501st now. Update, As I stated earlier, I have already adjusted the drop boxes so they hang just shy of ½” and I altered the straps that the shoulder bells hang from so that they are about ¼” from the shoulder straps. I held off on cutting down the ab plate until I get a second set of hands to mark them (most likely Thursday). As Big Deal had pointed out previously and darthcue stated here, the gloss over the painted parts on the helmet should not be glossy. I will grab a rattle can of flat or sating clear tonight and mask off the areas to be coated. So I need to know if the other areas that were painted need to be flat as well. Specifically the thermal detonator and the black side plates? Other than getting approval, reclaiming my workshop has been one of my primary motivators. I also redid the inside of my helmet. I used a combination of Army combat helmet pads and some floor foam to make the harness. It is way more comfortable and provides for better air flow. I went ahead and built my two fan system and installed it along with the power pack. I will continue to use tape to hold the vents in place until I come up with an effective method to mount them. I will not be apply flex seal to the inside of the bucket because I do not want to add anything that will help insulate the helmet and make it hotter than it already is. Flex seal application has gone well and mostly everything is coated and drying for the next 24 hours. So let’s discuss where I go from here. I will be building the Jedah patrol pack and a T-21 then weathering my TK to get TD approval. None of that will be finished until after DragonCon so I should get one or more troops under my belt before apply for TD approval. So for the T-21, I am considering two different approaches and wanted to get you guys input. The first option is to order a cast version of the parts from someone casting them either here on FISD or MEPD. This will include everything except the barrel which will be made from PVC. I think this kit sells for 100+ dollars. The second option is to order the completely disassembled 3D model from a guy on Etsy for 50.00. I can print the parts I need and still make the barrel from PVC. What do you guys think? I will be starting a build thread over on MEPD for these parts and I will link it here once I make that move. I will continue to update this thread until the TK is completely done. I wanted to thank you all for the support and assistance you guys have provided me here. FISD will always be my first home for my first 501st costume. Well that is it for the update. Thanks for the interest.
-
Guys thanks for the input. Based on your suggestions, I have already fixed the shoulder bells and drop boxes, I can cut down the ab plate tonight. I have already started applying the flex seal to the inside fo the armor so I wont be able to put anything on for another 24-48 hours.
-
Ukswrath, Thank you and I am happy with the kit overall. I just hate the imperfections but I will fix them or learn to live with them. Update… Today has felt like a horrific Chevy Chase comedy. Well let me back up. Yesterday I finished masking off the helmet and then painted it. Masking those teeth was a real pain but I got it all done. After that I pulled all the masking off and went back in with a small brush and did the outline of the tears and the boxes above the eyes. I didn’t see score lines around the two boxes on the back so I guess they don’t get the outline. Next I put all the stuff that needed another layer of clear in the paint booth and took all the other parts out. Then I shot the clear on these parts. At this point I realized that I could go for GML approval on Saturday and I may actually make the 11pm Sunday racing shirt cut off. I would hold off on doing the flex seal on the inside of the parts until after approval. So, while the newly coated parts were curing I started to assemble the other parts and putting Velcro on them. So Saturday I got up and took my dog for a walk and got my Starbucks on. I came home expecting to finish the helmet and when I pulled the cured clear coated parts out I discovered that the clear coat did not like the black airbrush paint I used. Here you can see the side plates are heavily pitted. The brim on the helmet was just as bad. OK, Don’t panic… Just mask off the black areas, sand them with some 600 grit and recoat. Yes this will push your timetable back but you can do it. So I did just that and it did help somewhat but the pitting is still there so I had to run with what I had. Luckly, the clear coat is dry to the touch at 90 minutes and cured after 8 hours of air drying. So when the helmet was dry enough to handle, I put the screens inside and secured them with tape. I cut up a construction helmet and used the harness inside my helmet. I attached the Hovi mics and the lenses. Lastly, I superglued front pipes thing and the helmet was done “for approval”. Next, I emailed my GML and let him know to expect pictures by 9pm “ish”. I put on my kit and tried to take some pics but the damn reverse “selfie” camera kept washing all the detail out. Here is an example. Up close it works fine. So once again the universe was doing everything it could to prevent me from getting that damn racing shirt. I stopped working on this crap and got something to eat. Then I ask my wife to take the pics for me and they came our great. So I sent the pics to the GML and we will see if I get approval and a racing shirt tomorrow. As for the kit. I will re-think the inside of the helmet and start applying flex seal to the inside of everything. If I still have time before DragonCon, I will fix the back plate and possibly redo the black helmet brim and side plates. I wish I had time to build the T-21 and the Jedah pack but I just don’t thing I will have time to complete them. Well that is it for the update. As always, thanks for the interest.
-
LTM, great meeting you last night at the Armor Party and I love that E-11. Brian, thanks buddy. I think I will end up fixing the back plate after approval if it doesn’t become an issue for approval. Other than that, the rest of the armor will stay as is since I will be weathering all of it at some point to make the TD for Rogue One Jedah Patrol. Besides, coming from the Mando side of things, I prefer weathered and used look anyway. Devolver, thanks and I agree, unless you really got up close, you would not notice it. One thing I learned a few years ago is that a costume really only needs to be accurate at 3 feet distance. Anything more is just for your own interests. Regardless, I do know the issues are there and that bugs my OCD. Ok just a quick update. Yesterday, before the Armor Party I knocked out the Thermal Detonator and tube front face thing. I also took a pic of the sides of the back plate. I have started to mask the helmet and should get it painted tonight then clear coat all these parts once more and get to work on the Velcro and straps. Hopefully, I can submit for approval by Sunday. Thanks for the interest.
-
Big Deal, thank you for the compliment on the paint guide. I will have more to say about it below. As for the airbrushed sections you bring up a good point that I must have forgot to mention in my previous update. Once all the airbrush is done I will apply two more layers of clear coat to the parts that were airbrushed. This will make everything glossy and uniform. I am not sure if these areas were glossy on the actual props but since I have no other reference that can closely detail if they were in fact gloss or flat, I will go with glossy and can always buff them with some sandpaper later to dull them if needed. Update….a big one Ok so I love it when a plan goes well and hate it when it does not. The painting is the latter but not a total disaster. I have already stated that I only have one previous experience with automotive paint so that factored into this issue. As I write this, it is Thursday and a lot of stuff happened on Sunday and Monday so I will try to keep this coherent. So some of the issues I ran into may have been caused by using the non-automotive primer on the armor during my sanding phase but I do not think this is the case. Another option is that the automotive primer may have had a reaction with the flexible fiberglass and I think this is more likely. I will detail what problem I ran into further along. Sunday 08:00 my buddy arrived and everything was ready to go. We mixed the primer and tested it in the smaller spray gun but it was too thick to flow in that gun so we went with the larger gun and it flowed well. We test sprayed some paper and got good color and flow and assumed all was well, it was not. After my buddy had sprayed several parts he notified me we had a problem. Apparently we had the air mixture on the gun too high or the paint flow too low. The air pressure from the compressor was good at 39 PSI. The primer went on these parts like it was powder coat. Here you can see the back plate and how rough the primer was. So me being more familiar with my spray guns, I went into the booth and got the mixture rate correct but the damage was already done. These parts would need to be sanded and this pushed everything back. We pulled these parts and I started sanding them while my buddy sprayed all the other parts. Sometime later all the parts had been primed. After the messed up parts were sanded, washed and dried, they were re-sprayed. We used all the primer so, a note to anyone else doing this, get more than 1 qt of primer. I will include this in my list of lessons learned at the end of this post. Next we inspected all the parts and I must admit that I did a piss poor job of this, there are a lot of things I should have observed and corrected but I didn’t and these became issues later. SOOOO if you are doing this, make sure you inspect everything after primer and correct all the mistakes before you move to apply the paint. One thing for sure that I should have done but did not was to sand everything with 800 or 1000 grit sandpaper. Why didn’t I do this? Well first, I was concerned with all the instructions for the paint and primer and the specified times between primer and paint to ensure adhesion. That time window was closing quickly. Also, that is a lot of armor and most likely two days of sanding, two days that I didn’t have. However, if I had sanded I would noticed a lot of issue and could have saved myself some time and trouble in the end. My other concern is if I sanded the primer to 800 or 1000, I was concerned that the paint would not stick to the primer. I should have considered using 400 or 600 grit and I would have been ok I think. Regardless, I didn’t do any of this and went straight to painting. The paint and also the clear coat are much thinner than the primer so the flowed out of the smaller and more controllable gun just fin but this also meant that we mixed smaller batches of the product and we had to do this more often. I do not know if the larger gun would apply the paint and clear as well, I suspect we it would have come out heavier and would have been more likely to run. Anyway, we sprayed at least one layer of paint on most of the parts before we ran out of paint. I only had a pint of the paint and that went fast. Again buy more than you think you will need. So we ran out of paint and these parts did not get any paint. Sooo Monday I hit the automotive paint supply store again and dropped another $150 on more paint, and I decided to double down on the clear coat just to be sure I had enough. This time I got a whole quart of paint instead of another pint. I wanted to apply another layer to all the parts and that was a good idea. The instructions for the paint stated that the clear coat must be applied between 45 minutes and up to 24 hours after the paint. Any longer I would be required to sand everything. However, I figured out a way to extend this. I would just apply the second coat of paint just before the 24 hours and that would give me another 24 hours. This was good because I found all the issues I had eluded to previously. So let’s talk about the helmet. Painted with compressed air is a tricky thing. You must maintain the proper distance from the item being painted or you will get too thick and end up with runs. But if you get too far from the part you will end up with a powder effect similar to what we experienced with the primer. On the helmet we had these issues with the primer and the paint did not cover them up. First, in these pictures you can see all the yellow circles identify what I found. The area around the teeth was very rough and would need to be sanded. The seam between the front of the face and the mouth was very powdery and would need to be sanded. There were rough areas inside the openings where Hovi mics go and the inside edges of the tears were rough. We had a run under the left eye. I also noticed wherever I had masked an opening such as the eyes, the primer and/or the paint got very rough. I assume from blowback of the product hitting the masking. So all of this (other than the run) would have been apparat if I had inspected better after the primer. Anyway, I had more paint so I could fix all of this with sanding and removing the masking, then repaint everything. The only thing I would not be able to do is re-prime but as long as my sanding was not too rough, I could take the roughness down with some 600 and 800 grit and not remove the primer. I ended up sanding the whole helmet with 800 grit and got everything nice and smooth then re-painted it. The other two issues I found after painting was an insane number of pin holes on a lot of the parts and some of the detail lines along the cover strips were filled in or not deep enough. In this picture you can see what I am talking about. Notice the detail lines along the cover strip and also all the small pin holes. The weird thing is that none of these pin holes were evident when I had primed with spray paint primer and sanded everything two week ago. I can only assume that this is the reaction with the fiberglass that I mentioned previously. As you can see from earlier pictures, most of the spray paint primer was sanded away so I do not think it is a reaction between the two primers. This leads me to believe that the automotive primer reacted with the fiberglass. Again, if I had done a better inspection after the primer, I would have seen these issues and corrected them. Instead I raced to paint and now I was stuck with them. So how to address at least some of these issues. First I applied very small amounts of glazing putty in the largest of the pin holes. I would not be able to prime over the putty so I hoped that the paint would stick to it and it did. I also took a razor blade and rescored some of the detail lines on some of the parts and re-painted them as well. After everything was repainted and I waited the obligatory 45 minutes, it was time to clear coat. The clear went on thin just like the paint. Everything got to layers of clear and that was 1 whole quart of clear. Luckily I have another quart so applying more clear after the airbrush won’t be an issue. It was at this paint that I found a few areas where the paint had separated from the primer or cracked. Most of these areas are very small and not noticeable unless you really looked for them but one area that was noticeable was the back plate. In this picture you can see the paint had cracked on the sides of the cog wheel. I think this occurred because the paint was so thick here as I tried to get the sides of the cog wheel. Again this is an issue with me not properly inspecting after the primer and noticing how rough the primer was on the sides of the cog wheel in all those recesses. I have decided to let this stay for now and I can come back later and mask this whole area off and sand and redo everything inside the square. So Wednesday, after 24 hours of letting the clear coat cure, it was time to mask and airbrush. I started with the back plate by masking most of it and lightly dry sanding the side plates with 220 grit to ensure the airbrush paint would stick. I removed the sanding dust with a damp tac cloth. Sorry, I forgot to get a pic after the black was applied. Next, I masked off the abdominal armor on the sides and sanded them with 220 grit. I measured the circle on the front of the abdominal armor and came up with a diameter of 9/16” so I made some vinyl masks on my vinyl cutter and applied them. I lined them up as best as I could. I also masked the small square area as well. Then I masked the rest of the part off but its not in the picture below. Lastly, I sanded the areas to be painted and hit them with the tac cloth. I also masked off the thermal detonator and sanded it then set aside. Here is the painted abdominal armor. It still needs another layer or two of clear but otherwise it’s good to go. Lastly I started sanding the helmet in the areas that need to be masked and painted. There are a lot of them since the brown trim and neck trim are molded into the helmet. The teeth, tears side ears, back square things, and the separate tube things. I will mask it off tonight but I do not think I will get to paint it until Friday. So you may be wondering just what were the ramifications of the pin holes that I did not fill in? Here is a thigh plate and in the reflection you can see the unevenness of the clear coat. Here is a closer picture. As you can see, it is noticeable but not the end of the world. If I really want to fix it, I can sand the clear coat smooth with some 800 or 1000 grit then apply another layer of clear but I am going to let this go since my end goal will be TD and there will be considerable weathering later on. Ok so for everyone who decides to go with the automotive paint process, I will share my lessons learned. I do not know if you could avoid a lot of this stuff but just using rattle can spray paint but I have had mixed results with spray paint and seen a ton of issue with spray paint clear coats cracking and orange peel. My other concern was the flexibility of spray paint and spray paint clear coat on the parts that need to flex just to be put on such as the lower leg armor. At a minimum you will need to following amounts of primer, paint, and clear. Keep in mind the listed mixture rations for the products I used. You may need more or less of a product if the mixture if different. Primer 4:1 mixture- you will need at least 1qt, I recommend 1.5 quarts. Paint 1:1 mixture- you will need at least 1qt, I recommend 1.5 quarts. Clear 4:1 mixture- you will need at least 1qt, I recommend 1.5 quarts. You will also need a ton of mixing cups, like 20-30 depending on the size of your spray guns, otherwise you will be cleaning mixing cups to re-use. You will need a ton of screen, like 30+. You will need a ton of mixing sticks, like 50+. The color I used was the Ford Frozen White and I thinks a great choice. Lessons learned: Prep is the second most important part of painting. Inspections and correction after primer is the most important part of painting. Test your spay materials every time you refill the gun on plastic not paper to make sure you have a clean and good flow. Unfortunately, the pot life of most of these products is fairly short (30 min – 1 hr) so only mix what you use each time. If you are spraying primer for more than a few hours, you need to stop and clean the gun or it will clog. DO NOT LET PRIMER SIT IN THE GUN, it will become a solid mess and you will need to toss the gun in the trash. Watch lots of videos on YouTube on how to paint cars to understand the process and how the layers would be sprayed and what the “wet look” should look like. When things go wrong, and they will, don’t get pissed, fix them then if you can but also understand that you need to keep your momentum going or you will get more frustrated. This is the main reason I did not fix the back plate cracking when I noticed it. I can fix it later and I kept my momentum up to get to the end of the tunnel. Ok so that is the update, more to come soon. Thanks for the interest.
-
Brian, thanks. Having a basement for a workshop was a mandate to my wife when we bought our house. Her mandate for me in the next house is a detached workshop so all the fumes from paint and fiberglass do not make the house smell like a body shop. Update, I am back from my work trip. Man, being away for a week has killed me but I am back and today I tied up some loose strings in preparation for paint tomorrow. First, I reworked all my air compressor lines and re-dehydrated the desiccant for the filter. I replaced the inline disposable filter and got some new hose. All that sorted out, I hung two more hard mounted wire hanging contraptions to hold the armor being painted. I also added the last cheap A/C filter to paint booth so it now has 4 20 x 25 A/C filters. The negative pressure inside the booth is better managed now and less likely to collapse the drop cloth walls. So here is how the booth looks now. I have staged the primer for mixing. The paint and clear coat are also ready to go as well. These are the paint guns we will be using. So the plan is to start painting at 08:00 tomorrow. I will have the assistance of a fellow Mandalorian Merc who has more experience in painting automobiles than I do. He will do most of the painting and I will mix the paint and mostly stay on the outside of the booth helping when needed. We hope to get two or three layers of primer on the armor. This will depend on how the first coat goes. After the first coat we will deal with any issues with the armor to ensure a smooth surface. For this I have staged a ton of sand paper ranging from 100 grit through 2000 grit. After we get all the armor primed, we will apply two or three coats of the white base coat. After another inspection and addressing any issues we will apply two clear coats. At that point we will remove any of the parts that get airbrush color added. Then we will spray two more clear coats on the remaining armor. I will let all the armor cure for 24 hours then being to mask the parts that need airbrushing. These parts will be the helmet, thermal detonator, abdominal, and back plate sides. I have looked over the “Rogue One Paint Guide” here on FISD and went a step further, I made some graphics to better outline what needs to be painted and what colors to use. So basically I will be using three colors; French Blue, Black, and Medium Grey. For this I will be using flat acrylic opaque airbrush paints. The French Blue and Black are US Art Supply “airbrush ready” (meaning they do not need to be thinned) and the Medium Grey is a Tamiya acrylic that will need to be thinned for the airbrush. Once I have masked the parts, I will airbrush them and then remove the masking. Then these parts will get two more coats of clear coat round them at a total of four coats just like the other parts. The airbrush I will be using is an Aztek A7778 kit that has 9 interchangeable tips. While these last four parts are curing (for 24 hours) I will apply the flex seal white rubber paint to the inside of the other parts. These last four parts will get the flex seal after the 24 hours curing. After another 24 hours to cure the flex seal, then I will add all the Velcro and straps, and the lenses and vent covers in the helmet and lastly do a test fit. Hopefully, I will be updating this thread throughout with what I experience and more pictures. And that is the update, thanks for the interest.
-
Brian, thanks for the support. I know it will be close but I will not know until the witching hour. Updates… Sanding is finally done (I hope). I knocked out the last few items earlier this week. I am still not happy with the thighs but I am hoping that the primer will do the job (fingers crossed). Next I built the paint booth. For this I used ¾” PVC. Lessons learned from my previous paint booth are as follows: 1. Buy a lot of “T’s”, you will still run out and need to go to Hope Depot but buy more than you think you need. 2. Ventilation, buys some cheap A/C filters and use them to filter air that is being introduced into in openings of the booth to equalize the pressure. 3. Figure out a way to prevent the sealed booth from collapsing due to negative pressure from vent fan. 4. Anchor the floor tarps so they don’t pull up from negative pressure. So I don’t recall exact measurements but I started out with a 10’ x 12’ x 80” tall booth and eventually made it 10’ x 10’ x 80”. I used more cross members and supports than I did on my previous booth to help in making the booth more resistant to the negative pressure. Once I tested the booth, I added some tables and hanging wires to hold the armor being painted. Since the hanging wire was an afterthought, I hard mounted it to the ceiling in my basement. This meant I needed to cut holes in the clear tarps and then reseal them. Due to a mistake on my part, I ended up adding another filter to one of the holes which will help in equalization. I did put some hanging wires on the PVC pipes but it will not support a lot of weight so this is for small stuff only. The blower is a 12” unit with exhaust hose I got from Northern tool. I already had an 8” (same model just smaller) for my smaller paint booth but I wanted something more effective. The motor is completely sealed so no issues with using it to vent flammable fumes. Running on low it does a great job for the paint booth. I think running it on high will be too strong for this paint booth. So, once everything was set up, I masked most of the armor and hung it in the booth. I still need to mask the helmet and then I will be ready to paint. Unfortunately, I will be working the next week so everything will have to wait until I am done with work. And that is the update, thanks for the interest.
-
Ukswrath, sanding has got to be the most monotonous part of this build. I had a lot of sanding to do when I built my Mandalorian armor but nowhere near this amount. Mostly because the finish of this armor is required to be sleek and shiny. Thumpy, thank you for the suggestion. I will look into the Sky Trooper and see what all is involved. After all, you guys know that once you build one costume, that is never the end, rather, only the beginning of your collection. Brian (Bulldog Props), you are most welcome. You deserve recognition for the awesome product you make. It will most likely be sometime in early 2019 before I get around to building the new Rogue One E-11 and adding the 1943 M38. I still need to source the Hengstler and power cells but I am slowly collecting all the necessary parts. I will post the build here and/or in the Rogue One E-11 thread. Updates, Well I did sand all the remaining parts but the once-over was not enough for all the parts. The thighs are giving me a real hard time. Here they are sanded and at first glance, they look good but a closer inspection reveals numerous issues. Because of all the issues I found with them, I re-coated them with primer and now you can clearly see the problem. While I waited for the primer to cure, I finished sanding the remaining parts. Here is what is ready for masking and painting. So the parts remaining are the two thigh pieces and the thermal detonator. I glazed the larger pinholes in the thighs and will sand them again. As you can see in this picture (yellow arrow) there are large areas on both sides of the thighs that are look very rough. The feel smooth but the primer brings them out. I am hoping that the next sanding will smooth some of this out and then the three layers of automotive primer will bring it all together when I actually start painting. I cannot sand them any finer than 220 grit or the primer and paint will not adhere properly. The thermal detonator is a completely different issue. There is a seam that runs along it lengthwise where Jim must have made it in two parts and sealed it together. The seam is very thin and I have sanded through it in a few areas. I have backed the inside of the seam with PC-7 and then glazed the outside but it need to set for 24 hours before I can sand on it. I may be obsessing a bit and seeing issues that will be covered by primer and paint but I would hate to paint everything and then realize I needed to redo these parts. So, my garrison has a racing shirt run that ends on July 22nd. I really wanted to finish this build in time to get approved and order the shirt but I do not think I will make the cut off. I also do not want to rush anything and end up with a less than centurion level set of armor. Adding to this time constraint is the fact that I will lose a whole week in July due to work. I am not a happy camper but I will persevere. I plan on finishing the sanding tonight and clean up my workshop and begin construction on the paint booth. I will need to get creative on how I will hang everything inside the booth but I have a few ideas on that front. The saga continues… Thanks for the interest.
-
Parquette, you have been updated.
-
Mikelbrierly, that was an awesome statement. Had to laugh. Nope it’s not my job, although I think most of us would gladly take high paying jobs on the Star Wars creative team. Anyway, since I asked Brian to make the 1943 M38 scope for me, the least I could do was properly review it. Ukswrath, thank you for your compliment. Update…. Wait for it…..yep, more sanding… Done and waiting for masking and paint. And this is all that is left to sand. Note the metric ton of glaze on the thighs, that will be fun to sand. Anyway, if I am lucky and dedicated, I may have all the sanding done by Sunday. I am not promising anything but it is possible. Thanks for the interest.
-
Ripper_L, thank you. Parquette, I apologize. The only information available to me at the time was everyone's build thread and you never stated in your thread that you finished and got approved. Please let me know the approval date or close to it and I will correct the table to reflect your status.
-
Brian, you are most welcome. Thank you for making the scope for me and everyone else who wants one. I finished my review and will post it here after my update and I also posted it in the E-11 Rogue One thread. Ripper_L, thank you for your comments. No worries on moving the thread. Somewhere on page one I mentioned that I just noticed the build section on the board and I did not see that section when I started the thread. Ok update…. Sanding… More parts completed and ready for masking and painting. I also added a ton of glazing to the thighs, they were very rough on the sides. All I have left here is to finish the sanding and then its on to the paint booth. Bear with me… Also I finished my full review of Bulldog Props Resin 1943 M38 Telescope. Here it is in total and I apologies for re-hashing part of it. I contacted Brian Hall owner of Bulldog Props in Japan through his Bulldog Props Facebook page on May 9th 2018. I was familiar with his products from his post here in FISD and on RPF. I knew Brian made resin cast versions of the 1942 M38 scopes used on E-11s in the OT; however, these were not just a cast of the outside of the scope (like DoopyDoo’s). These were a complete reconstruction of the entire scope in resin parts. The scope can be completely assembled and disassembled and the price is less than $50.00 shipped. Anyway, I contacted Brian on May 9th inquiring about him making a 1943 version like the ones used in Rogue One. In our conversation Brian pointed out that they used the 1943 resin scope made by DoopyDoos for the film. I found his honesty and candor refreshing and asked him if he could make a version of his 1942 into a 1943. He advised me that he could not alter the 1942 model but he did have a 1943 scope and would be happy to attempt to cast it. Casting these small parts is very tricky given the level of detail in the threads and how the parts fit together. Timeline: 05/09/18 Contacted Brian with request 05/12/18 Disassembly began on the original scope 05/27/18 Mold Making 06/05/18 Molding 06/08/18 Mold Complete 06/09/18 First Casting 06/17/18 Completed and shipped 06/25/18 Received and reviewed After receiving the package sooner than I had expected, I examined it and determined the packaging was well protected and professional. Once I removed the outer wrapping and bubble wrap I expected a simple box with the scope inside wrapped in bubble wrap since this was the first cast and not a production item. I was surprised with the presentation. I recalled Brian testing out ideas on how to package the 1942s and M19s on RPF and I thought his advertisement sheets and packaging were first rate. Well, not only did I get the scope which looks awesome but also two sets of instructions on different types of paper. These were not an extra set of instructions from a 1942 scope but a 1943 specific instruction sheet. Apparently Brian is all set to produce and sell these 1943 scopes. All the small parts were packaged and wrapped in protection then neatly secured in the shipping box under the scope. Brian put some serious thought into how he would package these scopes and parts. Once I unwrapped everything I discovered just how detailed the scope was and how much time and work Brian put into this. All the parts are a resin plastic that is slightly flexible and less rigidly shatterable if that makes any sense? In other words, I do not think it would shatter if dropped and you are more likely to scratch and dent it than you are to crack it. For anyone who 3D prints, its more like ABS than it is PLA. This is also a pleasant surprise for me because I was concerned just how fragile this scope would be to drops and trooping. All my concerns are now set aside for basic trooping. Anyway, the lenses are crystal clear and two of them are convexed on one side. The screws are all machine thread and look to be near perfect matches for the original screws in the original scope. So what to expect from a resin cast scope. The small thin parts (like the locking rings) are brittle and cannot take a lot of force. They don’t just break like a rigid plastic would, instead the plastic will deform and peel away like nylon would if you forced it with a tool. Once Brian finished making the first scope, Brian notified me that one small ring not screw into one of the lens subassemblies properly but that it would most likely not be needed. Brian even included a few extra rings in case I damaged some in the assembly process. This is obviously one area where actual metal parts win out but it was not the goal of this product and I did not want a metal version of the scope. Regardless, this is the first version of this product and I do not know if Brian will make an attempt to address this issue. Even if he does not, I am very happy with the results. Next, due to the molding and casting process, most of the screw holes need to be drilled out. For this you will need some very small bits (which you can get at harbor freight or in Dremel kits). Brian notes this in the instruction sheet and suggests using a bit that is slightly smaller than the screw. The only difficult part in drilling these is making sure they line up properly with the parts. There are a few screws that pass through two or more parts and must be aligned properly. Once you get one drilled, the rest are fairly simple. Lastly, the prism cell is a cast part and does not have any reflectivity, so actually looking through the scope is not possible unless I alter the prism. This is because the objective lens is not aligned with the eye piece. I will toy around with some mirror vinyl when I have time and see if this works but to be honest I wanted this scope to add a reticle and LEDs and possibly the small micro display made by Trooper Amps. Looking through the scope was never my intention. So far the only issues I have found are the two things that Brian told me about before I agreed to purchase the scope. There is a small bubble defect in the Eyepiece Mounting Plate which is an internal part and will not be seen and does not affect the scope in any way. The other issue is the Ocular Lens Retaining Ring not screwing in properly. So to address the Ocular lens subassembly I put a piece of aluminum tube on my lathe and machined it to fit inside the subassembly. This is necessary because the actual lens from the original scope is thicker than the one furnished by Brian. Once I milled the sleeve (yellow arrow), I cut it to fit inside the subassembly and then screwed in the retaining ring. It will only screw in three or four threads but that is all that is needed to hold the sleeve and lens in place. After that I finished assembly and I am very pleased with the results. So I wanted to also compare this scope to other options available. For a 1943 scope like the ones used in Rogue One and Solo, there are only three other options that I am aware of: 1. DoopyDoos resin cast scope which is only the outside of the scope. I believe it is solid and most of the builds I have seen, people have drilled out the scope to add lenses. It sells for 9.99 British Pounds or $13.08. This is not including shipping to the US. Also keep in mind that it would still need to be sanded before painting. 2. An actual 1943 M38 Sherman Tank Sight Scope if you can find one for sale goes for about $185.00. 3. A 3D print of the scope, I found one version on Shapeways for $32.00 and I do not know if that includes shipping. With some time I could probably find a free version of the model but like this paid version, it is just the outside body like the DoopyDoos; however, it is hollow and modifying it would be less work in my opinion than the DoopyDoos. Also keep in mind that it would still need to be sanded before painting. The other available M38 scopes out there are 1942 versions like the ones used in the OT. There are some really nice options for the 1942 versions made in brass and aluminum ranging from $169.99 for the brass version, $105.00 for a hybrid version of aluminum and brass parts, or 79.00 for the all-aluminum version. All of these are completely assemble and disassemble capable; however, I have not found a 1943 version of these and there are enough differences that for a Rogue One or Solo build, you really need the 1943 version. Overall, I am very impressed and pleased with this product. Personally I feel for the price and the detail, you cannot beat this option. Last month I asked Brian to make something new. Something he was not already making and had no way of knowing if it would sell. This scope was a special request to fit my needs and Brian achieved this. I appreciate his willingness and professionalism. I recommend this product and doing business with Bulldog Props. I have been in contact with Brian and we have discussed many of the things I have mentioned here. I also suggested that he make a video and post it showing the assembly for those people who are not as mechanically inclined as he or I am. Brian has been very receptive and open in our conversations. Full review here: https://www.whitearmor.net/forum/topic/45138-bulldog-props-1943-m38-scope-review/ And that is it for this update, thanks for the interest.
-
Bulldog Props Resin 1943 M38 Telescope Review I contacted Brian Hall owner of Bulldog Props in Japan through his Bulldog Props Facebook page on May 9th 2018. I was familiar with his products from his post here in FISD and on RPF. I knew Brian made resin cast versions of the 1942 M38 scopes used on E-11s in the OT; however, these were not just a cast of the outside of the scope (like DoopyDoo’s). These were a complete reconstruction of the entire scope in resin parts. The scope can be completely assembled and disassembled and the price is less than $50.00 shipped. Anyway, I contacted Brian on May 9th inquiring about him making a 1943 version like the ones used in Rogue One. In our conversation Brian pointed out that they used the 1943 resin scope made by DoopyDoos for the film. I found his honesty and candor refreshing and asked him if he could make a version of his 1942 into a 1943. He advised me that he could not alter the 1942 model but he did have a 1943 scope and would be happy to attempt to cast it. Casting these small parts is very tricky given the level of detail in the threads and how the parts fit together. Timeline: 05/09/18 Contacted Brian with request 05/12/18 Disassembly began on the original scope 05/27/18 Mold Making 06/05/18 Molding 06/08/18 Mold Complete 06/09/18 First Casting 06/17/18 Completed and shipped 06/25/18 Received and reviewed After receiving the package sooner than I had expected, I examined it and determined the packaging was well protected and professional. Once I removed the outer wrapping and bubble wrap I expected a simple box with the scope inside wrapped in bubble wrap since this was the first cast and not a production item. I was surprised with the presentation. I recalled Brian testing out ideas on how to package the 1942s and M19s on RPF and I thought his advertisement sheets and packaging were first rate. Well, not only did I get the scope which looks awesome but also two sets of instructions on different types of paper. These were not an extra set of instructions from a 1942 scope but a 1943 specific instruction sheet. Apparently Brian is all set to produce and sell these 1943 scopes. All the small parts were packaged and wrapped in protection then neatly secured in the shipping box under the scope. Brian put some serious thought into how he would package these scopes and parts. Once I unwrapped everything I discovered just how detailed the scope was and how much time and work Brian put into this. All the parts are a resin plastic that is slightly flexible and less rigidly shatterable if that makes any sense? In other words, I do not think it would shatter if dropped and you are more likely to scratch and dent it than you are to crack it. For anyone who 3D prints, its more like ABS than it is PLA. This is also a pleasant surprise for me because I was concerned just how fragile this scope would be to drops and trooping. All my concerns are now set aside for basic trooping. Anyway, the lenses are crystal clear and two of them are convexed on one side. The screws are all machine thread and look to be near perfect matches for the original screws in the original scope. So what to expect from a resin cast scope. The small thin parts (like the locking rings) are brittle and cannot take a lot of force. They don’t just break like a rigid plastic would, instead the plastic will deform and peel away like nylon would if you forced it with a tool. Once Brian finished making the first scope, Brian notified me that one small ring not screw into one of the lens subassemblies properly but that it would most likely not be needed. Brian even included a few extra rings in case I damaged some in the assembly process. This is obviously one area where actual metal parts win out but it was not the goal of this product and I did not want a metal version of the scope. Regardless, this is the first version of this product and I do not know if Brian will make an attempt to address this issue. Even if he does not, I am very happy with the results. Next, due to the molding and casting process, most of the screw holes need to be drilled out. For this you will need some very small bits (which you can get at harbor freight or in Dremel kits). Brian notes this in the instruction sheet and suggests using a bit that is slightly smaller than the screw. The only difficult part in drilling these is making sure they line up properly with the parts. There are a few screws that pass through two or more parts and must be aligned properly. Once you get one drilled, the rest are fairly simple. Lastly, the prism cell is a cast part and does not have any reflectivity, so actually looking through the scope is not possible unless I alter the prism. This is because the objective lens is not aligned with the eye piece. I will toy around with some mirror vinyl when I have time and see if this works but to be honest I wanted this scope to add a reticle and LEDs and possibly the small micro display made by Trooper Amps. Looking through the scope was never my intention. So far the only issues I have found are the two things that Brian told me about before I agreed to purchase the scope. There is a small bubble defect in the Eyepiece Mounting Plate which is an internal part and will not be seen and does not affect the scope in any way. The other issue is the Ocular Lens Retaining Ring not screwing in properly. So to address the Ocular lens subassembly I put a piece of aluminum tube on my lathe and machined it to fit inside the subassembly. This is necessary because the actual lens from the original scope is thicker than the one furnished by Brian. Once I milled the sleeve (yellow arrow), I cut it to fit inside the subassembly and then screwed in the retaining ring. It will only screw in three or four threads but that is all that is needed to hold the sleeve and lens in place. After that I finished assembly and I am very pleased with the results. So I wanted to also compare this scope to other options available. For a 1943 scope like the ones used in Rogue One and Solo, there are only three other options that I am aware of: 1. DoopyDoos resin cast scope which is only the outside of the scope. I believe it is solid and most of the builds I have seen, people have drilled out the scope to add lenses. It sells for 9.99 British Pounds or $13.08. This is not including shipping to the US. Also keep in mind that it would still need to be sanded before painting. 2. An actual 1943 M38 Sherman Tank Sight Scope if you can find one for sale goes for about $185.00. 3. A 3D print of the scope, I found one version on Shapeways for $32.00 and I do not know if that includes shipping. With some time I could probably find a free version of the model but like this paid version, it is just the outside body like the DoopyDoos; however, it is hollow and modifying it would be less work in my opinion than the DoopyDoos. Also keep in mind that it would still need to be sanded before painting. The other available M38 scopes out there are 1942 versions like the ones used in the OT. There are some really nice options for the 1942 versions made in brass and aluminum ranging from $169.99 for the brass version, $105.00 for a hybrid version of aluminum and brass parts, or 79.00 for the all-aluminum version. All of these are completely assemble and disassemble capable; however, I have not found a 1943 version of these and there are enough differences that for a Rogue One or Solo build, you really need the 1943 version. Overall, I am very impressed and pleased with this product. Personally I feel for the price and the detail, you cannot beat this option. Last month I asked Brian to make something new. Something he was not already making and had no way of knowing if it would sell. This scope was a special request to fit my needs and Brian achieved this. I appreciate his willingness and professionalism. I recommend this product and doing business with Bulldog Props. I have been in contact with Brian and we have discussed many of the things I have mentioned here. I also suggested that he make a video and post it showing the assembly for those people who are not as mechanically inclined as he or I am. Brian has been very receptive and open in our conversations.
-
Thumpy, thanks for the suggestion. Updates, more sanding but also some progress. Here is everything that is ready for masking and painting at this time. Once all the parts are on this table then I will begin building the paint booth. Ok so a small package arrived today and I am so excited. I will be doing a full review of this product in the future but here is a quick down and dirty. I contacted Brian Hall owner of Bulldog Props in Japan through his Bulldog Props Facebook page on May 9th 2018. I was familiar with his products from his post on RPF. I knew Brian made resin cast versions of 1942 M38 scopes used on E-11s in the OT; however, these were not just a cast of the outside of the scope (like DoopyDoo’s). These were a complete reconstruction of the entire scope in resin parts. The scope can be completely assembled and disassembled. If you are seeking a very realistic but low cost (less than $50.00) and extremely light weight option to an actual M38 then I urge you to consider Bulldog Props. Anyway, I contacted Brian on May 9th inquiring about him making a 1943 version like was used in Rogue One. In our conversation Brian pointed out that they used the 1943 resin scope made by DoopyDoos for the film. I found his honesty and candor refreshing and asked him if he could make a version of his 1942 into a 1943. He advised me that he could not alter the 1942 model but he did have a 1943 scope and would be happy to attempt to cast it. Casting these small parts is very tricky give the level of detail in the threads and how the parts fit together. On May 12 Brian began disassembly of his 1943 scope and completed casting on June 17th. He shipped it to me on June 17th and I received it on June 25th. So here is my open box review: The packaging is well protected and professional. Once I removed the outer wrapping and bubble wrap I expected a simple box with the scope inside wrapped in bubble wrap since this was the first cast and not a production item. I was surprised with the presentation. Not only did I get the scope which looks awesome but also two sets of instructions. These were not an extra set of instructions from a 1942 scope but a 1943 specific instruction sheet. Apparently he is all set to produce and sell these 1943 scopes. All the small parts were packaged and protected. Once I unwrapped everything I discovered just how detailed the scope was and how much time and work Bulldog Props put into this. So what to expect from a resin cast scope. The small thin parts (like the locking rings) are brittle and cannot take a lot of force. Brian had notified me that one small ring in particular would not screw in properly but that it would most likely not be needed. Brian even included a few extra rings in case I damaged some in the assembly process. This is obviously one area where actual metal parts win out but it was not the goal of this product and I did not want a metal version of the scope. Regardless, this is the first version of this product and I do not know if Brian will make an attempt to address this issue. Even if he does not, I am very happy with the results. Next, due to the molding and casting process, most of the screw holes need to be drilled out. For this you will need some very small bits (which you can get at harbor freight or in Dremel kits). Lastly, the prism cell is a cast part and does not have any reflectivity, so actually looking through the scope is not possible unless I alter this because the objective lens is not aligned with the eye piece. I will toy around with some mirror vinyl when I have time and see if this works but to be honest I wanted this scope to add a reticle and LEDs and possibly the small micro display made by Trooper Amps. So far the only issue I have found is the two things that Brian told me about before I agreed to purchase the scope. There is a small bubble defect in the Eyepiece Mounting Plate which is an internal part and will not be seen and does not affect the scope in any way. The other issue is the Ocular Lens Retaining Ring not screwing in properly. I will most likely make a sleeve insert that will hold this lens in place and again will not be seen or affect the scope. Overall, I am very impressed and pleased with this product. Yes you can purchase a brass 1942 version and/or an aluminum 1942 version but if you need a 1943 version of the scope for a Rogue One or Solo build the only options I am aware of are DoopyDoos and Bulldog Props. Personally I feel for the price and the detail, you cannot beat this option. I asked Brian to make something new to fit my needs and he achieved this. I appreciate his willingness and professionalism. I will do a more detailed review in the E-11 thread in the coming days. And that is it for this update, thanks for the interest.
-
Devolver, no problem. I wanted to get a list going anyways, so now it is done. Updates… So sanding……………………………………………………… Yep sanding, and here is what this stuff looks like after a 220 sand job. Note the areas where the primer is still on the part. Most of the time this is because I cannot get into those areas very well with the sandpaper. Other times it means that the primer is sitting on a depression on the surface. This is one of the reasons you apply primer, it shows you the faults. So in this case I run my finger over the surface and if I can feel the depression then I will fill it in with glazing putty. If I cannot feel the depression then I don’t worry about it since the surface looked fairly uniform when the primer was applied. In case you are wondering, the white bottle in the picture is the Evercoat brand glazing putty. You can get it online or a local automotive paint supply store like PPG paints. So most of the time I apply the glaze directly to a part that been primed and I can see holes or imperfections. In most of these armor parts, the seam where I adhered two parts together is a major area of concern. Also anywhere the cracks have become a problem needs to be addressed. Even after sanding, I may detect flaws in a part such as the depression areas. I normally circle these areas and when I have enough issues to warrant the mixing of glaze, I mix it and apply it. One lower leg done and one to go. Still waiting to be sanded. And, Das ist alles für heute, thanks for the interest.
-
-
Darthcue, are asking how I changed the color to white or are you implying that there is a forum rule that it must be black?
-
Rogue one TK builds Obviously, I have overhauled this roster. Please let me know if I am missing anyone or if anything is incorrect. Updated 7/5/2022 Forum ID TK ID # Date Started Date Approved Location Variant 501st Approved EIB Centurion Armor Brand Helmet Brand WIP Thread Jimmiroquai 82480 3/26/2017 6/11/2017 Philippines TK Yes Not Yet Not Yet Jimmiroquai Jimmiroquai Link THMAustin 6/28/2017 9/19/2017 Oklahoma TK Yes Not Yet Not Yet Jimmiroquai Jimmiroquai Link darthcue 35679 8/11/2017 12/25/2017 Philippines TK Yes Not Yet Not Yet Jimmiroquai Jimmiroquai Link Yoshix 42131 11/29/2017 1/29/2018 Florida TD Yes Not Yet Not Yet Jimmiroquai BS Mod Link Parquette 33130 9/26/2017 5/25/2018 Illinois TK Yes Not Yet Not Yet Ensemble BS Mod Link porg_executioner 24333 2017 6/1/2018 Puerto Rico TK Yes Not Yet Not Yet Jimmiroquai Jimmiroquai Link 11B30B4 20980 4/2/2018 7/22/2018 Georgia TK Yes Yes Yes Jimmiroquai Jimmiroquai Link Vader’s Wingman 12/24/2018 11/29/2018 Florida TK Yes Not Yet Not Yet Jimmiroquai Jimmiroquai ? CommissarGurka 23191 6/12/2019 10/13/2019 Michigan TK Yes Not Yet Not Yet Jimmiroquai Jimmiroquai Link Imperial Valour 16477 7/6/2019 12/1/2019 Texas TK Yes Not Yet Not Yet 850 AW HSP Link Roukie 1 10868 2/18/2020 7/28/2020 Germany TK Yes Not Yet Not Yet 850 AW BS Mod Link Twelveravens 61372 6/21/2019 9/10/2020 Virginina TK Yes Not Yet Not Yet 850 AW BS Mod Link Morgul702 91089 3/31/2020 WIP Florida TK Not Yet Not Yet Not Yet Jimmiroquai Jimmiroquai Link Kal Akaan 73105 7/1/2020 WIP Georgia TK Not Yet Not Yet Not Yet 850 AW Nico Henderson Link TheRascalKing 61490 7/17/2019 3/9/2021 California TK Yes Yes Not Yet Jimmiroquai Jimmiroquai Link NotRookie 55305 10/22/2017 WIP Florida TK Not Yet Not Yet Not Yet Jimmiroquai Jimmiroquai Link NaturalBornDT 42011 5/20/2018 WIP Florida TK Not Yet Not Yet Not Yet Jimmiroquai Jimmiroquai Link tsongololo 19155 2/15/2019 WIP California TK Not Yet Not Yet Not Yet 850 AW BS Mod Link TK 14166 14166 7/15/2019 1/4/2021 California TK Yes Not Yet Not Yet Jimmiroquai Jimmiroquai Link NapalmSeth 13821 8/13/2019 WIP Florida TK Not Yet Not Yet Not Yet Jimmiroquai Jimmiroquai Link Darth147 12714 12/5/2019 WIP California TK Not Yet Not Yet Not Yet Jimmiroquai Jimmiroquai Link SkepticalBoy 10268 4/15/2019 WIP Washington TK Not Yet Not Yet Not Yet Jimmiroquai Jimmiroquai Link Big Deal 10/12/2017 WIP Canada TK Not Yet Not Yet Not Yet Jimmiroquai Jimmiroquai Link Zeddy 4/14/2018 WIP Australia TK Not Yet Not Yet Not Yet Jimmiroquai Jimmiroquai Link cjkirk11 7/26/2017 WIP Unknown TK Not Yet Not Yet Not Yet Jimmiroquai Jimmiroquai Link Sascha9481G 5/22/2017 WIP Germany TK Not Yet Not Yet Not Yet Mod OT BS Mod Link TerribleBen 10545 2/22/2020 12/20/2021 Washington TK Yes Not Yet Not Yet 850 AW BS Mod Link DarthBiscuit 70017 4/20/2020 11/16/2020 California TK Yes Not Yet Not Yet Jimmiroquai Jimmiroquai Link Th3DarKn1ght 7/13/2020 WIP South Carolina TK Not Yet Not Yet Not Yet Jimmiroquai Jimmiroquai Link Nicker 6/10/2020 WIP United Kingdom Incinerator Not Yet Not Yet Not Yet 850 AW Nico Henderson Link MMcFett 7/6/2020 WIP New Mexico TK Not Yet Not Yet Not Yet HSP HSP Link Junos 1/18/2020 WIP Michigan TK Not Yet Not Yet Not Yet 850 AW HSP Link PaqMan11M 4/30/2020 WIP Florida TK Not Yet Not Yet Not Yet 850 AW BS Mod Link Battleborn Props 6/17/2020 WIP Nevada TD Not Yet Not Yet Not Yet 850 AW 3D Print Link NessD 30988 5/3/2020 6/27/2022 Germany TK Not Yet Not Yet Not Yet 850 AW BS Mod Link Zanzabar 1/14/2019 WIP Canada TK Not Yet Not Yet Not Yet Jimmiroquai Jimmiroquai Link BigJasoni 51923 8/9/2020 11/7/2020 Virginia TK Yes Not Yet Not Yet Akira Y 3D NFD 3D Link TC5800 5800 8/9/2020 WIP Pennsylvania TK Not Yet Not Yet Not Yet HSP HSP Link TK3373 3373 8/18/2020 WIP New Zealand TK Not Yet Not Yet Not Yet 850 AW BS Mod Link Cobratrooper 9084 9/13/2020 WIP Germany TK Not Yet Not Yet Not Yet 850 AW HSP Link CountCunning 30180 6/29/2021 WIP Canada TK Not Yet Not Yet Not Yet Jimmiroquai Jimmiroquai ?
