

TKZombie
-
Posts
389 -
Joined
-
Last visited
Content Type
Profiles
Forums
Gallery
Articles
Everything posted by TKZombie
-
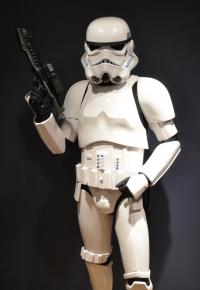
 Saturday was spent with the Canadian Garrison doing a visit at Ronald McDonald house for sick kids at McMaster Hospital. I'm the tall TK beside Vader. Chewie and I bringing smiles to a child. Sunday I got into some armor building, first up trimming! I used Lexan scissors for the almost all of the trimming, straight edges I'll used score and snap and very rarely a dremmel for difficult areas. After a piece is trimmed I sand all cut edges starting with 150 or 220, depends how rough the cut is and finish at 320 grit. I prefer to sand as I go as I hate just sanding everything at once, same for cutting everything in one go, either one is too much to do all in one go. I likely the closure of finishing a piece as I go. Plus doing all the cutting or sanding in one go would kill my fingers. The chest was first up... I draw pencil lines where to cut to guide me through to cut against. I use my french curves to draw clean sharp lines in some areas especially on the sides of the chest and back and along some of the return edges. Trimmed and sanded. On to the ab plate next. Need to take extra care in the corners to make sure there isn't any rough edges or micro tears as you cut inside corners as that's where cracks will likely form when pieces are under stress. Paul kindly installed the "Han snap" for me using the screen accurate Newey snap I asked for that. If you buy his strapping set you'll get all the original snaps and straps I didn't but Paul provided this one for me. Love these little details it says "NEWEY ENGLAND" Abdomen all cleaned up ready for wire strapping connection. The split rivets I own have a silver finish and this one in the bottom of the cod is suppose to be brass, so I've painted one brass but trying to source a single brass split rivet for here so I'll hold off on that till later. Ab buttons in the trimming phase, score and snap for these. Both button plates finished and placed and ready for button painting then gluing to the plate. The butt, really tight inner corners to be careful on as you trim. Lots of return edge on this piece, the top I left lots for the wire strapping but the sides I took down more I'll see how it is after its fitted and see if I need to take more off for comfort. Trimmed and the two male snaps installed. The kidney plate and those pesky notches what a pain to trim. All trimmed up! The back plate, forgot to take a pre-shot, it has a lot of thick flashing to cut off so it was a slower trim on this one. The neck edge I took down a lot. So that's the whole torso trimmed and sanded and ready for strapping...was going to start the shoulder bridges but my dog Sam decided he had enough sitting around watching me work and pulled out the E-11 Blaster so I had to shut it down. I'll try to get a few pieces done through the week but mostly this will be a weekend project.
 -
I'm in Canada a price yes AP would have been a very fit for being in Canadian dollars. But I still choose TM. I prefer the look of his molds. AP is fine it comes down to personal preference. It was either RS or TM. I prefer the personal one on one touch of dealing directly with Paul so TM won out.
-
The Grappling is listed under the Hero TK under optional: Grappling Hook/Comlink For 501st approval: Grappling hook and comlink. The grappling hook and comlink are substituted as a set in place of the thermal detonator. Not worn in addition to it. http://databank.501st.com/databank/Costuming:TK_anh_hero I agree Nagedzi it should be an option for Stunt and Hero builds since its used on both in the movie.
-
As this is a Hero TK the Grappling Hook and Commlink is an option instead of the Thermal Detonator. So that's what I'll be using instead of the TD. I ended up buying the Blue Snaggletooth Grappling set. Really beautiful build!
-
After my last build I decided to pre-paint all the TD pan head screws, split rivets, wire strap bolts and knee speed rivets. I know they'll get scratched on install but its easier to just touch that up afterwards. Painting the edges after their on the armor is such a pain this way that's all done.
-
The TD is all assembled and the e6000 drying for the control panel. The end caps were heated up for about a min with the heat gun at 450 degree on high and slipped on they are just held in place, the one cap was particularity difficult to get on and there some very small stress lines that formed on the edge you can see them in the left side cap near the metal clip their on the bottom so won't be seen, the heat looks like it deformed the edge a little there too.
-
Brattie's AP Build and Journey to The 501st
TKZombie replied to Brattie's topic in Build Threads Requireing Maintenance
You need to get Mark to finish you armour...put the pressure on!! -
All 3 offer building service. <br><br> As for which to go for? I've seen the RS on another member in our Garrison and it looks good, he's had it several years and has some cracks as its thinner than most US armor offered. I've also seen the AP and bought a few pieces for a TD build but didn't like them and resold them. AP is a little thicker than the RS but the chest was smaller and as we're the shoulders. Its a much brighter white to. I was going to buy AP but decided after seeing the pieces to buy a TM.<br><br> I just received my TM Hero TK kit this week and am starting building it. I have a build thread started if you want to see all the pieces. I have a AM 1.0 /2.0 TK currently so in comparison the TM is thinner and more flexible. The TM is more ivory in colour and very screen accurate in detail finish. Paul's great to work with and I'm excited to build this armor.
-
Trimming has begun but only on the TD, I won't have any time to do much till Sunday so I started the Thermal Detonator. I can use this on my AM kit as my AM TD is a old outdated model. Control panel trimmed and sanded, end caps have been cut and cleaned. I'll eventually use the TM clips but need to bend them still and need the garage warmer to do that. I have a set of evil boy clips for the interim their off by 1/8" in width but the holes for the clips are being placed for the TM clips so it will all work in the end. My drill bit was broken for this size hole so I need a replacement to drill the holes, hopefully that's tonight, and then gluing the control panel on. The TM ABS is real easy to work with compared to the AM trimming should be a breeze for the rest of the armor.
-
Strapping and elastic specifics with snaps
TKZombie replied to Curanthir's topic in Assembly, Mods, and Painting
I did all my armor with e6000 it works it holds and can be taken apart later. Slow as it takes a full 24 hours to set up so worth it. I used it on my nylon snaps plates too. You'll likely find you need to do fitting adjusted several times after wearing the armor out trooping. Nothing like a 8 hour troop to bring out bad fitting. <br><br> E6000 all the way! -
Armor Carrying Case Recommendations?
TKZombie replied to DrDataCenter's topic in Boots, Soft Parts, and other Accessories
Check Amazon, they have the Stanley and the DeWalt, the DeWalt is the biggest out of all of them and fits everything great! -
Nagedzi, Lucky you! You'll love the armor once you get it. Paul is really great to work with too. If I do another TK I think I'd do the 2mm version, I'm sold on Paul's armor after seeing it, just don't be expecting super crisp details and things are not symmetrical, but its screen accurate!
-
The Hero only comes with bubble lenses. So yes they are installed. Bright green bubbles. As long as you keep looking straight and turn your head to look left or right it's okay. If you turn your eyes and look out the sides it strains your eye.
-
I just finished my first ANH Stunt TK build last month and submitted it for approval on March 9th and on March 11th was approved. I've been out on 2 troops with the Canadian Garrison so far and its been an incredible experience. But while I was building that first TK I decided I really wanted a second TK. My first TK is a hybrid of used and new armour. I purchased a completed set of AM armour mostly because I was intimated by the building from scratch idea. The AM set needed to be heavily modified to fit me as the original owner is about a foot shorter than me. So that meant new helmet, thighs, belt, chest, back, biceps and shoulders as well as replacing all the strapping and padding to fit me. As I modified and rebuilt that kit I gained the confidence to tackle a brand new build from scratch and really wanted to have a fresh kit to build all my own; my way. So what kit should I get next? I searched around and consider another AM set as well as AP and RS but the one that really caught my eye was TM. The screen accuracy of his build is beautiful and everyone on the forum that has his kit loves them. I reached out to Troopmaster, otherwise know as Paul on Jan 28th and after a series of questions and discussions I was sold on Troopmaster as my next armor. Next I had to choose from the two versions of ABS kits that he offers; 1.5mm ABS and 2mm acrylic capped ABS. Below is Paul's description of the 2 versions: The 1.5mm is standard gloss ABS is the same ABS used for the movie suits. It is lightweight, flexible, with a nice gloss finish and a slight ivory white colour. The 2mm has an acrylic capping that makes it extremely glossy. It also makes it a lot more rigid which gives a hard armour feel that some people like. This has a brighter white colour to it. Please note: If you want to build a screen accurate suit with the strapping brackets then you want the 1.5mm gloss ABS. If you want to build a basic suit to look good for the public and like the snap strapping system, go for the 2mm. Snap strapping can also be used in the 1.5mm but I would avoid using the brackets on the 2mm. I loved the look of the slightly ivory white colour of the 1.5mm and really wanted to to build my next kit with the original wire strapping system so my decision was easily made for me. Paul also is one of the few builders who offers both the Stunt TK and the Hero TK as options. I love the look of the hero build and the hero TK also can carry the grappling set with commlink instead of the thermal detonator so those were the selling points on why I choose the Hero kit. I ordered and paid for a 1.5mm ABS ANH Hero TK from Paul on Feb 3. Paul's kits come with all the ABS body armour and helmet parts plus all the bits to build the helmet (lens, mic tips, rubber trims, rivets, screws - no decals), ABS joining strips and a grey detonator tube with metal belt clips. As well Paul also offers XL shins for taller people and most of his armor parts are longer the majority of the other kits available and being 6'2" this was a definite bonus for me! Paul offers original strapping bracket kits, these have everything you need to strap the armor like the originals in 1977 but I had already bought the Mr. Nostripes wire strapping set. Another option TM offers a full build option that includes a canvas belt, leather holster and rubber gloves. He does this using your body measurements for a guaranteed fit. But for me I wanted to build this kit myself so declined the full build but did take him up on building the Hero helmet for me. I've seen photos of his builds and his hand painted details are beautiful. So my TM Hero TK was ordered and now to wait! Thankfully it wasn't that long of a wait 2 months and a day from order to delivery, it felt way longer than it actually was and I've heard of people waiting 6 months to a year for a kit. March 30th Paul contact me that my kit was build and shipped out. April 4th FedEx called me that my package was ready to be picked up! So here is the necessary BBB photo when I got it home. I was worried that the box was a little mangled the top left side had been pushed in a lot and for a box marked fragile it certainly saw some wear! The contents were safely wrapped and thankfully all undamaged! Here is the entire kit in 4 bundles including a finished helmet inside there! The unwrapping and layout of entire kit. Well there it is...more to follow soon! I'll be regularly posting the build of this kit over the next 2 months. I'll get some good shots of the hero helmet up soon. Christina, TK 21421
-
LadyInWhite Phasma Build
TKZombie replied to LadyInWhite's topic in Build Threads Requireing Maintenance
Thank you for all you've gathered and shared. This is a huge asse!! This is going to be my next build likely starting in the summer or fall. Hopefully more parts will come available by then. I'm 6'2" so I'll be able to rock the Phasma build. <br><br> Christina -
So how did you end up making the finger part for the gloves?
-
Cricket's Hero Build (deep breath, let's do this!)
TKZombie replied to Cricket's topic in ANH Build Threads
Wow great job with the ABS paste. Looks like that was a ton of work. The ears look good, almost all helmets have slight gaps. <br><br> I had no idea on the hovi tips being green in some Hero helmets. Thabks for sharing. <br><br> My TM Hero TK kit is on its way and I had Paul assemble the helmet as I've seen his workmanship and its amazing I didn't want to risk messing that up. So good on you for building your own. -
Pyrates AP Build and Journey to The 501st
TKZombie replied to Pyrates's topic in Build Threads Requireing Maintenance
Oh I thought you were in Toronto! Oh well maybe one day will cross paths!! -
Pyrates AP Build and Journey to The 501st
TKZombie replied to Pyrates's topic in Build Threads Requireing Maintenance
I'm speechless! I'm so glad you've recovered and moved on from that horrible experience. <br><br> So glad to hear after your long build that you are ready to submit. I'm sure it will be a easy process!! Look forward to meeting you on a upcoming troop. If you can get approved in the next few days there is a Troop at Sick Kids at McMaster hospital next Saturday the 9th. I think it would be a great first troop for you. <br><br> Christina -
You have to be a approver 501st member to access them. They are available on the 501st.com website.
-
FBJ's ANH Hero Build [TM]
TKZombie replied to firebladejedi's topic in Build Threads Requireing Maintenance
Well I bought the TM, Paul's been great through the ordering process. He's a mountain of information. My Hero TK kit was shipped this week. I'll start a build thread once the BBB arrives. -
Pyrates AP Build and Journey to The 501st
TKZombie replied to Pyrates's topic in Build Threads Requireing Maintenance
That's a really intense build you have going on. You have some interesting ideas on your assembly method. The finish line is close but so far I was there myself a month ago finishing my AM TK. Best to get your TK finished and approved and then tweak it after. I've done 2 troops since and had to make minor adjustments after each. Feels like there's always improvements to make and most don't reveal themselves till you've trooped for 8 hours in your armour. <br><br> I'd did have a comment on you E11 looks like the Quest Designs Canada blaster. I have the same one but refinished and modified mine. There's an error on the build that seems like every Blaster they've made has. Its fine for basic approval but not for centurion. The rear sight is installed backwards on every build I've seen. The ridges are supposed to be on the back not the front. So you can add that to your to do list. I'm about to fix mine, I'll post pics on my E11 build thread on the correction once it's done. <br><br> Good luck finishing! <br><br> I have a 2nd TK ordered it's on its way it shipped this week. I bought the Troopmaster AHN Hero TK kit from Paul. So you'll have another Hero TK around. I'll start a build thread once my BBB arrives. -
Awesome, can't wait to order one!
-
<a data-ipb='nomediaparse' href='https://www.amazon.ca/gp/aw/d/B003X3UAMY/ref=yo_ii_img?ie=UTF8&psc=1'>https://www.amazon.ca/gp/aw/d/B003X3UAMY/ref=yo_ii_img?ie=UTF8&psc=1</a>
-
Brattie's AP Build and Journey to The 501st
TKZombie replied to Brattie's topic in Build Threads Requireing Maintenance
Looking good, after your first couple troops you'll end up tweaking things. My first troop was 2 1/2 hours and didn't reveal any issues other than mic placement needing adjusting, my 2nd troop was a 9 hour day and I was in armour the full time, I took breaks every few hours but only took off the upper armor. I had to make some tweaks based off 9 hours of armor wearing with the helmet and armor. All minor. Guess the next troop will reveal if those worked or not. Mic placement and amp volume level are a fine tuning experience indeed!
