

TKZombie
-
Posts
389 -
Joined
-
Last visited
Content Type
Profiles
Forums
Gallery
Articles
Everything posted by TKZombie
-
 I did 2 troops this weekend and unfortunately the stress of being in my armor for several hours over 2 days has impacted my previously dislocated rib, today I was in pain again and could feel the tissue and muscles around that rib inflamed so I'm not doing any troops for the month of May to let the area heal and its delaying being able to work on my armor as trimming and sanding strains the area. So more build delays which sucks! <br><br> I did get elastic straps glued to the hand plates done. Not very exciting but it's done none the less. I have white rubber hand plates glued to rubber gloves for photos and for when I'll submit for centurion status but for trooping I prefer Nomex gloves with the abs hand plates for comfort.
 -
Anovos kit vs completed ensemble
TKZombie replied to RTrooperAlex's topic in Hard Armor (General Discussion)
So not worth that price. $1150 assembly fee is ridiculous. -
arm strapping, what's the trick?
TKZombie replied to zemzero's topic in Assembly, Mods, and Painting
They are way to far apart. Put your undersuit on the forearm needs to come higher up with your glove and hand plate on I doubt there will be much of a gap at the wrist. -
The 1.5mm is more flexible than 2mm which is more rigid and has a heavier feel to it when wear, i.e. stiffer like armor. I have both kinds, the 2mm is more durable, the 1.5 is more flexible. The biggest difference is how you plan to assemble it, if you want to go with the original wire strapping method then you need to go 1.5 as the 2mm doesn't have the flexibility that type of connection puts on the edges and can crack.
- 1 reply
-
- 1
-

-
The 2014 What armor are you wearing poll
TKZombie replied to Daetrin's topic in Hard Armor (General Discussion)
It will be interesting to see how many Anovos suits there are in the legion has to be in the thousands. -
Cricket's Hero Build (deep breath, let's do this!)
TKZombie replied to Cricket's topic in ANH Build Threads
Hmmm I'm tempted to try that on the AB buttons. -
Well I'm still hindered by last weekends dislocated rib, so I'm only able to work briefly before feeling strain on the area and the muscles around the rib. Progress will be slower than desired. I was able to get the biceps cut and trimmed. The arms come as one piece so they need to be separated. The set of freshly freed biceps. Cut lines penciled in, likely you'll need to trim the armor down to fit you. I trimmed the long side along the edge but found afterwards it was easier to just draw a straight line next to the edge and cut that approx 1/8" from the edge. So you have straight clean edges for gluing together. The inner bicep pieces have the huge piece of ABS to cut away, I found cutting as much of that away made moving the scissors easier along the cut line when you cut the majority of that chuck of ABS away the plastic is much more flexible to help you conform to cutting you cut line. Once trimmed I taped these for fit and found I need to take approx 1/2" of each side, remember to line up the bottom so they are flush as these pieces don't line up so keep the bottoms in line. The tops will be hidden under the shoulder armour so you won't see them. Trimmed to size, note the flush bottoms and offset tops to be hidden under the shoulder bells. The one side top lines up the other doesn't. The bottom needs to be flush, need to sand these edges but the strain of cutting was all I could take so I'll get to those another day. The left trimmed and cut to size. Both biceps trimmed and cut to size. I'll have to wait to glue the cover strip as the cover strip you get for the thighs is also meant for the biceps so I'll have to trim, cut and assemble the thighs first then use the left over piece on these biceps. At least after sanding these will be ready for gluing. I think i'll move onto painting the trimmed ab buttons next and them attach the torso pieces with the wire strapping and let my rib/back heal more before tackling more cutting as the thighs and forearms have a lot more cutting on them so I need to recover more.
-
TD storage and traveling cae
TKZombie replied to DarthShinzu's topic in Boots, Soft Parts, and other Accessories
There is no case that will fit your armour and the TD pack. All the TD's I've seen use bungee cords and strap it down on top of their case. <br><br> I'm building my TD now and that's what I plan to do. -
I have my TM armor now, the extra long shins are great. Most of the pieces of armor are longer than other builds so I'd recommend the TM I'd your 6'4" my only question is where are you taller? Are you longer in the legs or do you have a longer torso? Longer legs is far easier to accommodate. If you have a longer torso you'll struggle to fit most armor.
-
They are green I think it's the florescent bulb I used that made them look blueish.
-
If you look straight ahead it's good. If you have to look left or right you have to turn your head not your eyes or you get distortion. I'm going to wear next weekend on a troop with my AM TK to give it a trial run and I'll update everyone after.
-
They are glued in. Don't look easy to remove. Hopefully they'll never need to be.
-
(Cheap) Helmet mods
TKZombie replied to The Anonymous Egyptian's topic in Hard Armor (General Discussion)
You need fans! Most troops are actually inside in a convention hall those can get hot with all the bodies present, be it hot or not you heat up once you are wearing a full suit of plastic over your body. Lenses fog super fast and then your very limited vision is zero. I have dual fans which great when its warm, and if its not warm I just run 1 of them and that air flow keeps the lenses fog free. -
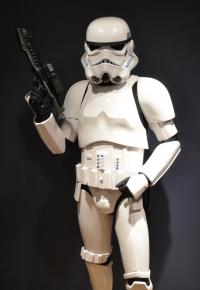
So here is the Hero helmet by Troopmaster Paul...Its slightly larger than my AP stunt helmet, so it fits my head better. All hand painted details. I should be able to get back on my armor building the dislocated rib is healed just have to take it slow to not stress it for a few weeks.
-
Brattie's AP Build and Journey to The 501st
TKZombie replied to Brattie's topic in Build Threads Requireing Maintenance
I wore my TK boots in the house for weeks after I got them. Mt 2nd troop was 8 hours so they got put thru their paces and thw feet were tired after. I tried insoles after that but found them too thick in the toe section. I have inserts just for the heels to try this weekend to see if it makes any difference. , -
Search any fabric store for 1/4" white elastic. <br><br> For the shoulder straps use 2" white elastic. I searched several smaller fabric store and eventually found heavy duty white elastic to use. <br><br> Same for the black 2" bicep to forearms straps, the 3" thigh straps and 1" shoulder bells and kidney to torso connection very dense heavy duty strapping way better than you can find at a Walmart.
-
Almost no progress this weekend sadly as I dislocated a rib and really couldn't do anything, its been put back in place and that hurt like hell. I only got the straps glued in the shoulder bells. Hopefully I can get a bit of work in this week.
-
I drilled in 1/4" into mine then I reached the fiber glass core.
-
Cricket's Hero Build (deep breath, let's do this!)
TKZombie replied to Cricket's topic in ANH Build Threads
Your stripes are on right. Same as on my helmet from Paul that he hand painted. -
Brattie's AP Build and Journey to The 501st
TKZombie replied to Brattie's topic in Build Threads Requireing Maintenance
I saw Mark posted photos of 4 AP kits he's building. I assume 1 of those are yours? -
HOW TO: Support pads for Mr NoStripes bracket system.
TKZombie replied to ukswrath's topic in Tutorials, Tips and HOWTOs
I'm considering this for my TM TK I'm currently building. I know it's not screen accurate but I want this to last for years nor the duration of a movie shoot. Sounds like reinforcing the holes with the glued in abs tab will prevent cracks from the stress on the holes. -
I'm 6'2" so tall indeed!! The TM armor is great for this as the pieces are longer than the average builders and the XL shins are going to be great.
-
Had a some free time last night so I pulled out the shoulders and shoulder bridges for trimming up! The shoulders have a lot of return edge on the bottom and looking through screen shots there is variations of no edge, to some, to lots so its really personal reference here. I personally prefer an edge, give the shoulder some thickness. My AM TK has a thin edge so I decided on a thicker edge for this build. Penciled in the cut lines I went with a 5mm edge along the bottoms and will see how it works, it can always be trimmed back later. Trimming away the excess with the Lexans. Trimmed up and sanded shoulders. Its great the Paul marks each piece of armor in the kit with L or R makes for no guessing. Shoulders done and onto the shoulder bridges, I penciled in a cut line and trimmed again with the Lexan scissors. Two sets, trimmed and sanded for action!I I got a extra set in case one breaks down the road. I went with a 3mm edge around the bridges. The cut off bag is slowly growing, keep your scraps!!! If you need to make repairs in the future you can melt this for ABS paste and the colour will match your armor. I bag each kits pieces and label them for if that time comes.
-
I weathered mine using a few paints, the body is flat black then painted dry-brushing with flat steel and aluminum. The scope was hollowed out painted black, then spray painted bronze then a semi gloss black lightly applied and wiped and worn off on some areas. The Tracks are semi-gloss black no weathering same for the grips. The replica hengslter counter was washed with an acrylic black. --------
-
Cricket's Hero Build (deep breath, let's do this!)
TKZombie replied to Cricket's topic in ANH Build Threads
I had no idea nail polish collecting was a thing! Interesting. I wear it all the time but just had no idea...<br><br> I also sold some toys I use to collect to help fund part of my TK builds. Great being able to repurpose things that don't interest you anymore for new interests.