

TKZombie
-
Posts
389 -
Joined
-
Last visited
Content Type
Profiles
Forums
Gallery
Articles
Everything posted by TKZombie
-
TK-32794 Requesting ANH Stunt EIB Status [ATA] [596]
TKZombie replied to DeathProof's topic in Request Expert Infantry Status
Looking good, I'd suggest shortening the should strap that will pull the shoulders up higher and if you move the connection point forward towards the chest it will also close the gap of black in the front. -
New update... Centurion approval was received today!
-
TK-21421 Requesting ANH Hero Centurion status [TM][243]
TKZombie replied to TKZombie's topic in Request Centurion Status
Woo-hoo! thanks so much! -
Racing Shirt Run final list. PLEASE CHECK.
TKZombie replied to justjoseph63's topic in Announcements
My 3 shirts are right but my last name is mispelled it's Christina Rotsaert not Rotasert. -
Finishing Touches on Anovos ANH Hero Build
TKZombie replied to TeslaMilano's topic in ANH (Stunt and Hero)
Both the biceps and forearms are too big. Did you trim them down at all or just trim to the cut line and attach them together? -
About to pull the trigger on helmet, AA or RS or?
TKZombie replied to AMGF's topic in ANH (Stunt and Hero)
The mess in the helmet is not screen accurate. So RS and TM don't provide it, nor does AP. You can add it if you want easy enough or just wear a belacava. <br><br> I have a AP stunt helmet and I have a full TM Hero TK helmet and armour. The AP is good the TM is great. <br><br> If you want a Hero helmet TM is one of the few makers of the Hero. There's 1 or 2 others in the US. -
TK-21421 Requesting ANH Hero Centurion status [TM][243]
TKZombie replied to TKZombie's topic in Request Centurion Status
I ordered from Hyper firm but delivered it to a member that lives in Rochester and he brings us Canadian folk the packages when he comes up for on Comic-cons every few months. I know of others that use a US address mail service and a broker to bring their items across too. -
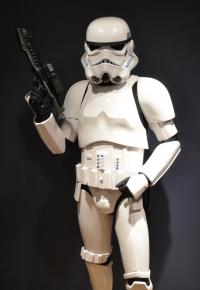
First troop in the Hero armour was Saturday at the Niagara Falls Comicon, everything went really well the armour was perfect, well near perfect a couple wear marks on my skin from the inner side of the chest plate edge; need to reshape a bit rounder there. I'm the first Hero TK in the Canadian Garrison. Providing guard duty at the Emperor's throne. Test driving the new SE14R blaster too! Out accompanying Lord Vader and the Emperor. I'm the TALL TK on the right, tallest in our Garrison at 6'2" Posing for some fans. Me out of armour testing out the throne...
-
TK-21421 Requesting ANH Hero Centurion status [TM][243]
TKZombie replied to TKZombie's topic in Request Centurion Status
Thanks for the compliments on the build. I set out to be as close to original screen accurate with this TK as I could. Only a few minor differences inside with connections. Most would never know. I followed Troopmaster Paul's build tread as my main reference and he was there to answer any questions I had along the build. I can't say enough how amazing his armour is to work with or how great he is. I highly recommend Troopmaster if you are looking for a high quality TK. <br><br> I also referenced a few others for build reference, UKSWRATH was one. I used his adding a reinforced abs scrap on the wire strapping idea. <br><br> Tons of research makes for a great result. There's no cutting corners. I put in tons of hours learning about various builds and techniques. It was my 2nd TK build so all the mistakes I made on that build I learned from for doing this one.<br><br> I have a build thread if anyone is interested in my specific process. <br><br> <a data-ipb='nomediaparse' href='http://www.whitearmor.net/forum/topic/36550-christinas-troopmaster-15mm-abs-anh-hero-tk-build-tm/'>http://www.whitearmor.net/forum/topic/36550-christinas-troopmaster-15mm-abs-anh-hero-tk-build-tm/</a> -
TK-21421 Requesting ANH Hero Centurion status [TM][243]
TKZombie replied to TKZombie's topic in Request Centurion Status
Phasma is next. Being 6'2" it's the perfect build for me. This falls project. -
Happy to say Expert Infantryman application was approved and accepted! http://www.whitearmor.net/forum/topic/37501-tk-21421-requesting-anh-hero-eib-status-tm588/ Centurion application has been submitted. http://www.whitearmor.net/forum/topic/37548-tk-21421-requesting-anh-hero-centurion-status-tm/
-
PERSONAL INFORMATION Name: Christina Rotsaert FISD Name: TKZombie Legion ID: TK 21421 Garrison: Canadian Garrison 501st Legion Member Link: http://www.501st.com/members/displaymemberdetails.php?userID=20845 MANDATORY INFORMATION Armor Maker: TM 1.5 mm ABS Helmet Maker: TM 1.5 mm ABS Blaster Type: E-11 Blaster by Quest Designs Canada with replica Hengstler Counter & DLT19 by Hyperfirm EIB REquest Thread URL: http://www.whitearmor.net/forum/topic/37501-tk-21421-requesting-anh-hero-eib-status-tm588/ OPTIONAL Height: 6'2" Weight: 170 lbs Boots Maker: TKBoots Canvas Belt: TKettle Hand Plates Type: White Latex by AP Electronics: Icomm & Aker 1506 Voice Booster Neck Seal Type: Veedox Hero Neck Seal Holster Maker: Custom by Andy Pegan ARMOUR PHOTOS Front Back Left - Arm Raised Right - Arm Raised Ab/Kidney Attachment - Button Orientation Butt/Kidney - Fixed: NO Hand Plates Shoulder Bridge Back Shoulder Bridge Front Back/Chest Connection Thigh Pack Attachment Knee Plate Drop Box Back Cod and Butt Plate Attachment Interior Strapping Kidney Plate Notch Wrist Side of Forearms Action Shot Helmet Front Helmet Left Side Helmet Back Helmet Right Side Helmet Hovi Tip Detail Helmet Lens Colour/ Bubble Lens Helmet - Strim Neck Seal Grappling Hook/Commlink Holster Attachment Blaster Left Blaster Right Blaster D-Ring DLT-19 Left DLT-19 Right DLT-19 T-tracks DLT-19 Ejection Port Cover and Small Disk Thank you for my Expert Infantryman approval! Here is my Centurion application for your consideration. Christina
-
TK-21421 Requesting ANH Hero EIB status [TM][588]
TKZombie replied to TKZombie's topic in Request Expert Infantry Status
Woo Hoo! Thanks for the compliments and EIB approval! I have to say the Troopmaster armour makes a huge difference its such an amazing set to work with! Paul's sculpt is beautiful and thankfully my body fits it like a glove! Centurion submission is going up this afternoon! -
Here's some detail pics of the black strapping painted to emulate the Stelmax glue used on screen armour. Thigh straps Bicep to Forearm straps Shoulder bells Onto the shins, a few close ups of the Newey size 4 bra hooks sewn into white elastic strapping. When lying these up the end of the hook is placed just over the inner edge of the armor not near the out edge of the cover strip. This pulls them tight and closed. you leave about 1" loose at the end too. The commlink, needed to glue the metal bracket as it kept turning. I also found the commlink easily gets knocked out. I solved this by addign a small black hair elastic over the clips keeps it secure and you can't even see it. I'll post a pic of it this weekend.
-
TK-21421 Requesting ANH Hero EIB status [TM][588]
TKZombie replied to TKZombie's topic in Request Expert Infantry Status
Thanks Sly and Ukswrath. I followed Pauls instructions to build this as screen accurate as possible with Centurion approval in mind. -
Expert Infantryman submission submitted and awaiting... http://www.whitearmor.net/forum/topic/37501-tk-21421-requesting-anh-hero-eib-status-tm/ Have to say I love the bicep hooks I added. they keep the biceps in place, with my longer arms they kept sliding out from under my shoulder bells, the added hook holds them perfectly in place. I received the fabric print to add to the screen accuracy look of the glued black straps. They have all been painted and look great pics to come tomorrow! I have a full day troop on Saturday at a Comic-con so that will be the real test of the armour and its comfort level. So I'll see what needs adjusting and tweaking after a day in armour, so far I had to re-position the left shin upper bra hook as it was too loose, easy tweak.
-
PERSONAL INFORMATION Name: Christina Rotsaert FISD Name: TKZombie Legion ID: TK 21421 Garrison: Canadian Garrison 501st Legion Member Link: http://www.501st.com/members/displaymemberdetails.php?userID=20845 MANDATORY INFORMATION Armor Maker: TM 1.5 mm ABS Helmet Maker: TM 1.5 mm ABS Blaster Type: E-11 Blaster by Quest Designs Canada with replica Hengstler Counter & DLT19 by Hyperfirm OPTIONAL Height: 6'2" Weight: 170 lbs Boots Maker: TKBoots Canvas Belt: TKettle Hand Plates Type: White Latex by AP Electronics: Icomm & Aker 1506 Voice Booster Neck Seal Type: Veedox Hero Neck Seal Holster Maker: Custom by Andy Pegan ARMOUR PHOTOS Front Back Left - Arm Raised Right - Arm Raised Left Side Detail Right Side Detail Abdomen Details Action Shot Cod and Butt Plate Attachment Interior Strapping Helmet Front Helmet Left Side Helmet Back Helmet Right Side Helmet Hovi Tip Detail Helmet Lens Colour/ Bubble Lens Neck Seal Grappling Hook/Commlink Holster Attachment Blaster Left Blaster Right Blaster D-Ring DLT-19 Left DLT-19 Right DLT-19 T-tracks DLT-19 Ejection Port Cover and Small Disk Thank you for considering my application! Christina
-
Well my submission photos were sent in and happy to announce approved...up next is submission for expert infantrymen then onto centurion approval. Front Back Left Side Right Side Helmet off Action Shot
-
Well here is the final assembled armour all laid out. 7 weeks from start to finish. Delayed a couple weeks by a dislocated rib and a fall down a flight of stairs. Submission photos taken and sent for 501st approval. More to follow very soon!
-
So this weekend was a lot of final gluing and assembly. This wraps up the thighs with this gluing. The final gluing on the shin. Sniper knee plate added. White rubber handplates from AP added to rubber gloves, I used LePage 2 stage super glue to attach these. I've tried e6000 and zap-a-gap in the past and they didn't hold but a fellow TK tipped me off on this glue it has a activator you use on both pieces then after a minute add glue on one side and set and hold for 30 seconds and they are done. My arms are long and because of this my biceps sit low and kept popping out from under the shoulder bells so I added the biceps hooks to keep them up and under the biceps. Works great and a easy mod to make with some scrape ABS 20 mm wide. Installed The shins needed the bra hook closures added. Paul provided dimensions but those were for standard size shins and I have Pauls XL shins so I used the top 30 mm and bottom 40 mm hole placement and then eyeballed the middle hole as close as it is on a standard shin which turned out to be 210 mm from the bottom of the shin top lip. When I marked the holes to drill I drew a circle the size of the hole and tested to make sure when closed the cover strip hides it. So these range from 5-8mm from the edge of the armour to the edge of the hole. Clamps and magnets hold the straps while drying. Back to the belt to attach the holster. 4 Chicago screws hold the holster in place. Onto the thigh ammo pack. You can mount it two ways center the middle pack under the cover strip or offset with 2 packs on the outside and 3 on the inside. I choose the later. Marked the end and drew the curve to cut then attach with cap rivets. I don't want to discuss the frustration of these cap rivets but OMG that was the worst thing I've ever done. First testing fitting just a few tweaks after this.
-
One more shin front to glue together then all the armor is together! Sniper knee goes on tonight! And thigh straps get glued in place tonight too. I think I need to add biceps hooks the biceps sit low on my long arms and right at the edge of popping out from under the shoulder bell, so going to try making one and see, if I do need them I'll likely need to replace the shoulder elastic as its fairly tight and will need to hang a little looser to get the bicep in the right spot. Minor tweak but still a pain... I've ordered this fabric paint to paint over the black elastic straps glued on the armor like in the original where the white glue used on them left them white, Paul recommend this brand, its due to arrive next week from the UK. A extra finishing touch to the screen accurate look.
-
Well the end of the build is in sight! Helmet, torso, belt, shoulders and arms are fully finished. One thigh and one shin are completed, the other two are in the gluing stage. Once those are done on Friday it's just attaching the shin bra straps, the sniper knee, thigh ammo pack and gluing the leg elastic straps on and then the build is done! I'll need to do a cleanup pass on any leaked out e-6000 and probably a sanding of a few spots along some edges. Then it will be giving the armour a cleaning and polish to get ready for photo submission for approval. Next Saturday the 4th there is the Niagara Falls comic-con that I plan to premier the build at so no time to waste in finishing this build, ti will be a busy weekend! Then I can rest for a bit before tackling my AM stunt TK conversion into a Sandtrooper TD.
-
Supposed To Be Able To See Eyes Through The Helmet?
TKZombie replied to Cladius's topic in Hard Armor (General Discussion)
Search dark green grinding shield on Amazon. That's what a lot of people use. -
Interesting! Can't wait to see more!
