


justjoseph63
-
Posts
12,745 -
Joined
-
Last visited
-
Days Won
326
Content Type
Profiles
Forums
Gallery
Articles
Everything posted by justjoseph63
-
Some really good advice from Scott there, Connor. Yes, you can have someone build it for you, but I think you'll find it's a LOT less than if you built it yourself, even after purchasing all the needed tools/supplies. Does it take some time? Yes. Is it difficult? Not overly. The benefits of doing it yourself are that you know it will fit you perfectly, and what you learn while doing it will help you down the road if when it needs repairs. My suggestion would be to start reading up on the various build threads here, and then start your own when you receive your kit. This way, you can ask all of your questions in one place, keep track of your progress easily, post photos of any problem areas, (we LOVE photos), and show off your build! Also, like Scott suggested, stay in touch with your local Garrison or Squad. Many of them have "armor parties" that are designed to help with builds.
-
If you Google Mouse Droid Plans there are a ton of them, including a whole Youtube series.
-
 Good call, Jeff... I forgot about the holster!
 -
Supply list for your OT TK build....
justjoseph63 replied to justjoseph63's topic in Getting Started - Read this First!
I suppose in theory it could be done, Adam, but to be honest, it would probably be more trouble than it is worth. You would have to seal the edges of the cut strips to keep them from fraying, and I am not certain what this would do to the integrity of the elastic. You can pick up the 1 inch wide elastic at any craft store, such as Michael's, Joanne Fabrics, or even Wal-Mart for fairly cheap, as you are not going to need a lot of it. I would seriously recommend the soldering/wood burning gun I listed on the post to put the holes in it, though. It not only seals the edges of the holes, but makes them wide enough to put the snap centers through. Hope this helps, and if you have any more questions, just let me know. As for any left-overs, you can always offer them up to others on here who may need some... "Troopers helping Troopers". -
TK-19979 Requesting ANH Stund EIB Status [TM] [505]
justjoseph63 replied to VulpX's topic in Request Expert Infantry Status
Way to go, Richard.. This has got to be some sort of record, going from basic to Centurion in less than a week! Great job! -
TK-88088 Requesting ANH Stunt EIB Status [NE]
justjoseph63 replied to KaineT's topic in Request Expert Infantry Status
Good call, Scott. To remove the existing snap, you could use a drill with a metal cutting (Titanium or carbide) bit and drill out the center, but you would have be VERY careful doing this so as not to split or crack the ABS, then pry the rest off from the inside with a pair of needle-nose pliers (from the inside, to prevent scratches on the outside) ... Probably best to actually attach a snap to a spare piece of ABS and practice on that first. The only problem is that the hole may then be too large for a normal split rivet, but hopefully not. -
For soft parts, the main things you will need are boots, (available at TKboots.com or Imperialboots.com), a 2 piece black compression suit, (Amazon, etc.), neck seal, (several sellers on here), gloves, white canvas belt, (several sellers on here). Here is the link to the For Sale thread: http://www.whitearmor.net/forum/forum/16-ongoing-sales-project-orders/
-
Helmet Stencils?
justjoseph63 replied to 7w1n9m4n7's topic in Boots, Soft Parts, and other Accessories
Try this, Timothy.. https://trooperbay.com/trooper-helmet-masking-templates.html If you drop me a PM, I can give you some instructions on how best to use them. -
Buying A Costume vs. Making One?
justjoseph63 replied to killer161429's topic in ANH (Stunt and Hero)
Absolutely spot-on advice from Ian there, Sean, especially the part about avoiding the first two makers you mentioned. -
TK-19979 Requesting ANH Stunt Centurion Status [TM] [196]
justjoseph63 replied to VulpX's topic in Request Centurion Status
Wow, Richard, this a really nice, clean build! I especially like the paint job and the perfect sniper knee plate attachment. Great eye for detail, sir, and a job well done! -
TK-88088 Requesting ANH Stunt EIB Status [NE]
justjoseph63 replied to KaineT's topic in Request Expert Infantry Status
I agree with Jason that the Velcro on the shoulder bells will more than likely need to be removed for EIB certification. The rivets and 45 degree cuts are only required for Centurion, though -
I would be wary of anything coming from China, since E-6000 is manufactured in Pineville, Louisiana in the US. There was a thread a while back from someone who purchased some "bootleg" E-6000 which was total garbage, and did not work well at all.
-
Kit transport box recommendations
justjoseph63 replied to Millar007's topic in Boots, Soft Parts, and other Accessories
One thing I would recommend for this type of bin is to pick up some 1 inch thick foam "chair seat cushions" from Joanne's fabrics (or similar) and glue it to the inside walls. (You will have to cut it down in the area where the lift-out box fits in, though). It just helps protect your armor from getting possibly broken from loading/unloading your bin. Side note: If you pull the extension handle out just enough, the lift-out box fits nicely inside it. -
You might want to hit up Tim, (Dark CMF) on here... He also has the classic strapping system, and uses a certain size suitcase for transport/storage. He would be happy to give you the dimensions or maybe post a pic of his.
-
Your ingenuity seems to be never-ending, Ben. Great job!
-
Kit transport box recommendations
justjoseph63 replied to Millar007's topic in Boots, Soft Parts, and other Accessories
I use the same type, but the Husky brand. Available at Home Depot for about $65.00.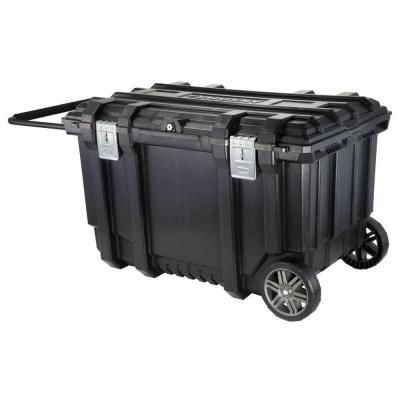
-
Tatertrooper's ANH Stunt TM TD Build
justjoseph63 replied to Scarlet Trooper's topic in Build Threads Requireing Maintenance
REALLY nice work on the butt stock, Amanda! -
Thanks for posting that, Steve, and great idea, Jonathan! Looks like we are up to 12 or so, including the five I would buy. It does surprise me that more HWTs haven't weighed in yet... I emailed the 501st LMOs, Scott and Lesley, and will keep this up to date. Fingers crossed!
-
Holy crow, Mark, great job!!! I think you missed your calling!
-
Your'e almost there, Justin! I think Tony or Andrew may address this in the "Centurion suggestions" part, but I thought you might want a heads-up.. How wide is your thermal detonator? The caps look like they may have to be trimmed to meet the maximum 7 1/4 to 71/2 inch width, (it may just be my failing eyesight, though).. Also, you will need to have the outside of your drop boxes lined up with the edge of your ammo belt. You may just need a safety pin or something similar to keep em' in place. I forgot to mention this in my last post, but damned fine job on that scratch built E-11!!
-
So who here wears their armor like, every halloween?
justjoseph63 replied to gunner's topic in Off Topic
I thought about it, but it would just be too difficult to carry a T-21 and a candy bucket... -
My first bucket! LOOK LOOK LOOK
justjoseph63 replied to 7w1n9m4n7's topic in Hard Armor (General Discussion)
Excellent paint work! -
abb/kidney strapping rivits.
justjoseph63 replied to n1nthcloud's topic in Assembly, Mods, and Painting
That is what I did, James, and yes, it will get you to Centurion just as Vern said. Glad to hear you are shooting for for the top! -
I used the "dry brush" technique, Chris. I watched this video on Youtube, but scaled it back quite a bit to make it more subtle, as he went a bit heavy for my particular liking. I used silver paint, and mixed a tiny amount of black in with it, and used a slightly larger brush. You can experiment a bit, and if worse comes to worse, hit the areas with the black spray paint again. For the scope, you can purchase the Testors or Humbrol brass color, and use the same method. Just don't go too heavy on any of the weathering.
-
E11 and movie theatres
justjoseph63 replied to ProjectFirestart's topic in General Weapons Discussion
Just signed up for 3 troops at the local Cineopolis theater. Their official corporate policy for these events is that (prop) weapons and full costume are allowed while "working", but that weapons shall not be pointed at anyone at any time, including those taking photos. (Common sense). Helmets/masks must be removed inside the theater. As a bonus, they are setting up a charity drive at our location! The only bad part about these troops is that with 11,000 people expected, I may end up having to park in a different area code.
