


TK bondservnt
-
Posts
7,196 -
Joined
-
Last visited
-
Days Won
5
Content Type
Profiles
Forums
Gallery
Articles
Everything posted by TK bondservnt
-

t-21 according to panda
TK bondservnt replied to bigkilo's topic in Build Threads Requireing Maintenance
Nice work! -
TM hero lid build thread
TK bondservnt replied to TK bondservnt's topic in Build Threads Requireing Maintenance
it's not a sandtrooper lid, sorry! lol -
TM hero lid build thread
TK bondservnt replied to TK bondservnt's topic in Build Threads Requireing Maintenance
people are strange... it's a thread. and it will have photos starting with a brown box just like usual. in this instant gratification cell phone world we all have to wait for it! -
TM hero lid build thread
TK bondservnt replied to TK bondservnt's topic in Build Threads Requireing Maintenance
I am enjoying the wait just as much as you all are! paul is shipping this week. so it will be a little while. -
TM hero lid build thread
TK bondservnt replied to TK bondservnt's topic in Build Threads Requireing Maintenance
# 501 of the bro code "wait for it" -
WAIT FOR IT
-
I think mark should be given credit to have spoken up. no matter how the water boils... he filled the kettle. I stand behind mark's comments, as he should know... he was there before most of the participants of this thread.
-
Albuquerque Storm Trooper Helmet Mold
TK bondservnt replied to Elumusic's topic in The Foundry - Armor and Prop Making
take note of the angle the slope on the front and the air holes inside the detail parts f you let the plastic cool completely you can cut the helmet off the mold. then blow air backwards though the plastic. if you don't allow it to cool completely it will warp see how the front of the mold has a slope on the right? this is to get the proper layoff to reduce webbing. good work so far! also take note the holes in the face, and the front layoff block -
Chookaboom's Walt80 ANH Stunt Build
TK bondservnt replied to Clamps's topic in Build Threads Requireing Maintenance
love this thread! -
I use loctite super glue to attach handplates.
-
Deac L2A3 Sterling Restoration
TK bondservnt replied to Plasticarmyman88's topic in Build Threads Requireing Maintenance
exactly. the british sterlings used in star wars were bumpy. and other versions of sterlings made in other nations were not made according to the ministry of defense specs. police carbines, and indian versions for example did not have a bumpy finish and the versions made after the 60's outside of britian were made smooth. if you see the serial numbers as an indication my point is that the sterling in a non british MOD version will have a different finish than the ones used by bapty on screen in the film. after the MOD stopped using surcote/suncorite paints purchased in russia people have had to use "crinkle" style paints instead. the original british paint did primer, parkerization and anti-shine in one pass. there are many makers of sterlings, and it's my opinion that there were bumpy versions used in the film and crinkle modern painted versions used as well... so any smooth versions would not in my opinion be 'replica' capable for a prop in the film. it's like having shaver wires with 10 loops on them... we do it... but it's not the way it was done. it's part of the fun of being as accurate as we can and letting people decide for themselves. -
it is fun fact that most star wars scopes are mounted backwards on some blasters. Int the case of the e-11 the sight direction is wide on the inside, and thin on the outside in the tank application the offset from the thin direction with a smaller outside. the optics were designed for a low profile, with a smaller chance of through site fragments. I've owned the type of scope you have and it's been fun to learn where they came from. I have 4 scopes right now. and they work wide end to small end with no focus ring. the purpose of the reverse optic with a focus ring is a longer and wider FOV (fields of view) just sand down the texture on the end with the numbers and keep the texture bumpy don't really have to remove all the paint. remember to have fun!
-
Ive owned one of these before. it has been repainted with a modern finish. this type of scope was not used in sherman tanks... it was used on mobile guns and has a different lensing system. on a sherman tank azmuth finder you look through the large end and the focus is adjusted via the mounting system inside the tank. this appears to rangefind backwards from the small end to the large end, backwards. I believe this system was used on towed heavy guns, and was not the type used on e-11's due to the reversed optics. -------------- here is more about the infra red night sights and mapping systems used in tank warfare http://worldoftanks.com/en/news/21/The_Chieftains_hatch_Desert_M4/
-
Full resin E-11 from DoopyDoo's with some modifications
TK bondservnt replied to T-Jay's topic in ANH BlasTech E11
the white crayon mod! I did that 4 years ago... but the front sight mod... AMAZING! -
nice work!
-
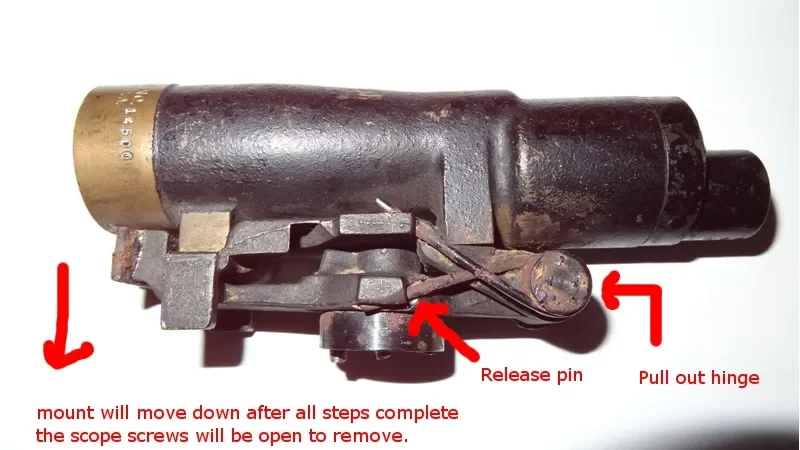
when you remove the front wires from the lips, then take out the pin that the wire coils around, then you simply remove the entire base, exposing the screws at the bottom of the scope.
-
hello lucas we've been missin you too buddy! glad to see you back in action.
-
step 1 using pliars bend the wires out of the support where in the photo it says 'release pin' step 2 pull out the hinge at the front by pushing sideways step 3 assembly will now hinge out and away from the base step 4 remove base screws pull the cotter pin wires away from their bases, this will allow the base to swivel after removing the pin. then you will be able to see the screws that are under the main support. can I ask that staff put this on the tutorial section?
-
one helpful way is to pilot drill a small hole the size of the shaft of the screw, and then let the screw itself tap the threads. you can remove the tab at the bottom or leave it on, depending upon the depth of your inner support.
-
ANH hero thermal detonator measures
TK bondservnt replied to Darth Adame's topic in ANH (Stunt and Hero)
7.5"long tube 68mm pipe -
usually the term spot on is reserved for modern formats. not only would you have to get a new knee plate, but you'd have to put cap rivets on the thigh. spot on for 2008.
-
set your delorian to 2008 doc and marty discuss TK armor building... the heat generated by pop rivets is almost 1.21 gigawatts of power.. at least enough to destroy a GML's brain. darth vader from the planet vulcan sure knows how to hook it up!
-
ok now everyone has had their fun... most of all the old timers know that mark is a veteran. I actually have to laugh at some of the comments above...? so we all who have been here for several years know that pop rivets are not used on the parts you show... so tell us kind sir... why did you add them...?
-
good to see you posting mark. I like the capped ABS. my only faint hearted aspect are the rivets... oh well! so very 2009! in any event it's good to see a tight RS build.
-
ESB Build WIP (OGA)
TK bondservnt replied to ShavedWookie's topic in Build Threads Requireing Maintenance
you should wear a face shield. not just glasses... unless you like face scars.