

Cantina Security
-
Posts
589 -
Joined
-
Last visited
Content Type
Profiles
Forums
Gallery
Articles
Everything posted by Cantina Security
-
TM Helmet Build ( ANH )
Cantina Security replied to Cantina Security's topic in ANH (Stunt and Hero)
Thank you guys. Fun stuff. -
Started one of the Scootch Lids, Painting. Blasted a couple nice coats of primer.Sanded with some beat up 320, then wet sanded with 400. Feeling good. Had to make a temporary paint pole. Works... Helmets For Days....
-
TM Helmet Build ( ANH )
Cantina Security replied to Cantina Security's topic in ANH (Stunt and Hero)
Got some of the painting finally started. Very nerve racking painting by hand, but also very rewarding. I will get some better photos next time after i paint the tube stripes. -
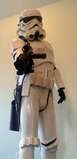
So, Then I started painting the TM. Nervous i was, not wanting to tarnish these straight lines, Turned out pretty good, still waiting on my tube stripe templates, and the trap strip templates. Everything else painted free hand. No One Can Resist The Stormtrooper Selfie.
-
added a little glazing putty and sanded it down. good to go...
-
Ok, so here is a little bit about my ear conundrum. Just being picky about some minor gaps, i thought i would try the paste trick. Although i was advised against it i had already put the plan in motion before i got final word via PM. any how, It didn't turn out bad, there was very little acetone on the paste when i applied it, i actually brushed a bit more on to help adhere it to the inside of the com. Honestly this would not work if the gaps were over an eight inch. my gaps were from my scissor went too deep, and i had to fill in that area, as well as some minor adjusting. I pressed the playdoh like worm onto the back side of the curved portion on the com pad, and simply pressed and needed it into position, used the force if you will, well used my fingers actually. here are some photos, first the worm, then the inside of the ear showing it adhered to the HIPS, finally some shots of the fitted pieces.
-
Hero Frown and Bicep Question [AP]
Cantina Security replied to usaeatt2's topic in Assembly, Mods, and Painting
Wow nice work with the iron for sure... TM does have a killer Hero Kit. I like your approach and determination. I would imagine the Cap back wouldn't be too expensive, go for it... -
Thanks Matt , I am going to be putting in another hose around the one I have in here, to cover up a bit more of the opening. Add a few more wires hanging. The paint is really going to set this kit off.
-
Thank You Sir, I think It Looks Smashing As Well...
-
Yes, thanks Germain , I knew they were a bit on the thick side, I was literally holding my breathe while painting. All along my research I learned of troopers painting the black first, and it didn't make sense, now that I've painted one, I understand why. I will post a few pics of the ear patches . The gaps were " tolerable " but in my quest for better, I chose to tidy them up. I ended up doing it with both the Cap-W lids. Thanks for the feedback Colonel.
-
Cool, nice photos, huge...lol, thats good. Good luck buddy.
-
Going to try for EIB, my darn E-11 Is not right for ESB, so... looks like i will need to find another.Anyway, here are some of my possible submission photos. Any Feedback is greatly appreciated as always. My GML Tom Gardner has been extremley helpful, and supportive during this process. Let me tell you, nothing gets by that fella....Thanks Tom... Your awesome... TM Is beautiful armor, isn't it?
-
Bobby The Cat Looks Pissed...lol
-
Next up, The TM and the Scootch Lids...
-
Ok, call me crazy , but i am adding a Shadow Trooper to this build... Cap-W The White faceplate was an extra from RS that ws distorted on the bottom of the tubes, i Guess was from their original, nevertheless, they sent me a new one for the build, but why waste this plate? I will be doing something different with this for an art show in April..
-
Ears, i have done 7 pairs in the last two weeks. First set, turned out great... second set, not so great. Good thing i need a pair of ears with gaps for my SWAT application on MEPD. Anyhow, I found on Scootch's Helmet Build thread a fantastic idea. Mark the mould lines, and mark another line about a quarter inch from the mould line. i added a third line for rough cutting, and also used a set of ears from another helmet for fitting and reference . I had asked Scootch about using HIPS to make a paste like ABS paste, he said probably would not work, well before i recieved his message, i tried a bit on one of my ears, and it did work. i used a bit of the HIPS sludge, rolled it into a play-doh like shape noodle, and pressed it onto the curve of the ear, it cured over night, sanded, and it fit like a glove, err, ear muff... whatever, the gaps always bother me. TM and Scootch, RS everybody said dont worry, gaps are screen accurate... Blah, I'm Particular when it comes to Star Wars... I like clean smooth lines and no gaps...lol. i will post up some pics of the padded ears.
-
Ok, so i got on the painting, man, the anticipation was the worst part, i had no clue as to how easy it was... well not easy, but not as hard as i thought it would be. i started on the RS because it being "wonky" i thought if i hade any mistakes, it would be as it was in the 70's... lol, just kidding, i know they did not sweat the fine details though is what i am referring to. One trick was to pencil in the outlines, once i had those marks, i felt much more comfortable with the paint brush. Put on some music, and let the paint flow...Actually pleased with the initial result. any feedback will be appreciated.
-
No turning back now, bashing out the face plate. Bashed out the eye, and part of the lens. that should be the only area you see the Zombie in, i will use a contact lens and a little Black make up. The hose with the wires hanging with mic tip is just taped in to mock up the details. Thinking of adding some type of outer hose as well as some foam insulation. Any Feedback?
-
That's good looking armor right there. Good luck...
-
Pretty darn cool Steve.
-
Dude that is sweet....
-
Elleerre's ATA build
Cantina Security replied to elleerre's topic in Build Threads Requireing Maintenance
You can do either shape. Some of us prefer the straighter, sharper teeth, ( more menacing ) others prefer the softer curved ( Twinkie ) shaped teeth, all a matter of preference. -
Ericia's AP ANH TK Build
Cantina Security replied to aicire's topic in Build Threads Requireing Maintenance
I always wondered why the "cheeks" weren't better protected...lol, my derrière is exposed to the elements as well, it's just the cut of the armour, also if it was covered anymore , it may pinch I between the thighs. Keep up the good work. -
Yeah man, I had a fella send me frown mesh, for free... Nice people out there...
-
The spinning will not affect performance .