toybiz
-
Posts
361 -
Joined
-
Last visited
-
Days Won
2
Content Type
Profiles
Forums
Gallery
Articles
Everything posted by toybiz
-
Thanks Jaren for the pictures! Helps with the problem solving. Mine had the same fold/bunch up of ABS on the same area. What I ended up doing was like you, sanded down the side bump but not all the way so as to not cause it to split. I did not trim the cap and back under the ears until I had set the brow height where I wanted it. Since I wanted a low brow, this shifted the area of the cap and back overlap rearward since it had to tilt forward slightly. Given this, it moved the lower rounded part rearward, thus exposing more of that split area. After I was satisfied with where my brow sat, then I trimmed the cap and back area under the ears allowing for more coverage over this side bump. The ears on my helmet are not symmetrical, as probably the same as everyone else. But you can tilt them slightly forward or rearward to make sure you have the two halves overlap covered. Judging from your pictures, my suggestions would be the following: 1) Make up some ABS paste. 2) Since you already have a shim behind the split, fill the crack and the holes for the ears. 3) Then trim the ears to where you are satisfied and make sure to allow a slight forward angle of the ears to cover the split before remounting the ears. Good luck you can do it! Like everyone else said, for basic 501st approval, I don't think you will have a problem. Adam
-
Can you provide a closer image of the split you are referring to? I don't see it on the post with the front view of your helmet. Thanks
-
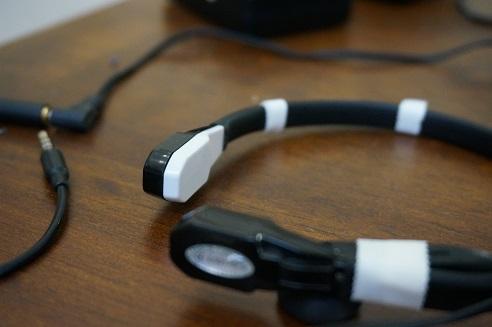
 I found one more throat mic in my airsoft load out and this one has a PTT type 2 where it runs inline with the mic wire not separate like the one that comes with the iComm sound generator. Verdict? Works also like a charm so when going in PTT mode with or without the iComm, there is total silence in between transmissions. However, I'm still not so sold on running a wire down my arm. I may run the button somewhere behind the ammo belt but that would force me to have to put my hand in that spot to activate. Maybe two micro magnetic switches running parallel could do the trick. One near the belt and another under the ab plate on the opposite side. This way, I will only need to put the magnets on the finger tip of both gloves. We'll see.
 -
Looking good. Yes you are on the right track to build the fronts of the thighs and shins first. Fit with your under suit, mark the cut line and fit one more time with the help of another then cut. I would remove the return edge on the bottom of the shins. No need for them plus it will allow for a tighter fit around the ankle. There is an odor with E6000 but only when it is first applied and curing. I would say only for about an hour. But with any glue it is a good idea to have some ventilation.
-
TK-10466 Requesting ANH Stunt EIB Status [MTK][414]
toybiz replied to starsaber25's topic in Request Expert Infantry Status
Congratulations on your EIB! Knew you would make it! -
Thanks this is worth doing by giving all the snaps a once over.
-
Great to hear Jaren. Now show us some pics! Boiling water is much more forgiving than a heat gun. I tried using a heat gun for about 30 seconds and didn't like the results. Hot spots and quick to get to melting point then shrinking point from which there is no recovery. (I found this out on one end of my ammo belt and after that resorted to heat sealing iron and boiling water for everything else!) You will get there, I know it! Adam
-
Keep up great work John! With each cut you gain valuable experience and confidence. Everyone who has completed a set will tell you how much easier a second set would come together and things they would do differently. Have you decided on the strapping system yet? Every choice has its pro's and con's. I went with elastics and snaps so that my armor can be broken down into it sections for more compact travel. Good luck and keep researching, remember to wear your under suit when fitting and take your time.
-
Hi Jaren, What browser are you using? I run into problems with IE and FISD, especially a newer version. I switch to Firefox and everything works like normal. Good to see your helmet. Keep in mind everyone is a little wonky. Plus no one is really ever done with their armor, even after gaining EIB or Centurion. Always something to tweek after a troop or two.
-
I have used the same spec back up battery to power my dual helmet fans for several troops and they powered up fine. The longest was for 4 hours and still running. I couldn't tell you for certain how long 2,300 MAh will last but if you are not taking a break after four hours...we have other things to worry about. http://www.whitearmor.net/forum/topic/26919-my-first-esb-tk-build-mtk/?p=348185 Adam
-
Thank you all for the props! I KNOW TK armor is wonky, but I feel there should be a difference between wonky and sloppy. Maybe because I'm structured by nature and enjoy order (that's an Empire trait) but simple things make all the difference in appearance to our fans. I plan to integrate this to my TD to Kidney plate for added security from prying little hands. Maybe this would work for shin rear closures and mounting hand plates to gloves too! I wouldn't risk it for anything more.
-
Hi everyone, Like many of us, even though we are "finished" with building our armor, there are always something that comes up after a troop or two. For me two things have come up. 1) a little bit of armor bite at the back of the knees when walking, especically up any incline. 2) since I built my armor to ESB CRL, it typically doesn't use that small elastic band on the rear of the plastic shoulder strap over the back armor like in ANH builds. So even after I moved my shoulder strap to better center it over the back armor, it will sometimes slip under the back armor, sometimes from the rear neck opening. How embarassing... I didn't want to use velcro, that could be visible if I don't get it centered when suiting up. Challenging if suiting up solo. Rivets are out of the question as those are visible and permanent. So I thought what about magnets? These would be hidden and completely discrete. Plus the added benefit, they center automatically! I used small round 1/2" x 1/8" rare earth magnets but I'm sure you could use any shape really. You can find them for less than $5 shipped from various online vendors. What I did was suit up with just the chest and back armor (wearing your under suit or nothing bulky) Have someone pencil mark where the end of the straps normally lie over the back armor. This will give you an idea of where to center the magnets. Using some E6000 I glued the one magnet disk to the end of the shoulder strap. Then once that set, hold the chest and back armor in the same relation as marked earlier and with the strap magnet in place put a corresponding magnet from the inside of the back armor and glue in place. Keep in mind the polarity of the magnets, otherwise you will have a shoulder strap wanting to jump off your back! Now when you suit up, the shoulder straps will snap onto the same spot every time! Note: I wouldn't recommend magnets too much thicker than 1/8" as the thicker the rare earth magnet, the more powerful the pull strength is. There wasn't any pull strength noted from the vendor but after assembled, I would say about .5-1 lbs of force through the back armor plastic and velcro in my case. If your build needs more strength just pop on a second magnet (no glue needed) to the one inside the back armor and the magnet strength instantly get's stronger!
-
Welcome John from the other side of the equator! I too choose MTK as my first set and honestly how a set of armor appears in the end depends on the diligence of the builder. Buying a set of the most expensive armor vs. the least doesn't guarantee how it will look in the end. As StarSabre shared, research, measure, research, measure then cut. Fit ( with your under suit), trim if necessary then fit again before gluing. Which glue are you planning to use? I would recommend E6000 and maybe something more permanent only on areas that you know you won't be readjusting like the front of your thighs or shins. This is after you fitted them right? We are here for support but remember skills you learn will earn you memories that will be yours to keep. Enjoy the journey my friend! Adam
-
Alright... The weekend has passed and so has my two troops. One indoors for Star Wars Reads Day at my local main library and outdoors for United Airlines Family Day out on the San Francisco airport air field. So on to my throat mic findings First troop: Indoors Acker 1506 During the 3 hours of the troop with my Acker set to about 50% on the volume dial,I did not experience any feedback unless I tried to tilt my helmet as far as I could to look down. Nothing to report otherwise. Second troop: Outdoors Acker 1506 Icomm During this 4 hour outdoor troop at the airport maintenance hanger area with a live band playing and airplanes taking off in the background, it was challenging to hear one another with helmets on even with amps. However all the guests were able to hear me just fine. The Acker was set to about 80% on the volume dial. Again feedback was only ocurred when I tried to bend over and pointed my neck towards my chest. Nothing to report problem wise. Overall: No problem with fitment or needing to reposition my throat mic during the entire time on either troop. Plus my voice level stayed consistent and I never gave my mic position a second thought which allowed me to focus on the reason I was there, people who love Star Wars and the kids who have just became fans. Now nothing against anyone using a headset or an in helmet mounted mic, this review is for my set up that proved convenient, simple to set up and worked for me. Hopefully it will provide an alternative solution for those who invested in an amp and/or sound effect adapter. For me, if/when this throat mic wears out or breaks, I'll probably get one from above as that will eliminate the need for an adapter.
-
Great start especially jumping feet first! Welcome to FISD and keep us in the loop! Adam
-
Hi Jaren, For basic 501st as long as the ears cover the cap/back and the face plate seam, there are the 3 screws mounting the ears and painted white (stunt), the ear "mics" are painted grey with a black stripe around it in addition to the black rank bars... You will earn your 501st. Ear gap isn't too critical. Check out some of the EIB and Centurion builds and even some have ear gap. However, I KNOW you are aiming for more than basic 501st and I believe you can and will overcome the ear shaping beast! Keep the faith brother.
-
OK, I normally work behind the camera at work so please excuse the unflattering single camera angle. To answer Dizzy's question about feedback. I don't get any unless the speaker is turned and faced directly at my throat. However with normal positioning of the throat mic and with my Acker / iComm mounted behind my chest armor, I had the amp at 100% (this was off camera) with only a tiny hint of feedback. So I would say this works well in terms of controlling feedback. Plus it does NOT pick up any breathing. I just wish the iComm squelch effect level was user adjustable, but that is a different story. Personally, I like the sound quality from the headset mic better but after having to fumble with the mic position relative to my mouth by grabbing the end of the headset with my lips and twisting it into position inside the helmet and then not sure if it is correct or not was kind of frustrating while trooping. I couldn't make the youtube embedding code work here so here is the link instead to the video. So without further delay... http://youtu.be/KWtsmFSF0Xg I am scheduled for two troops this weekend and I will provide an update of my results. Of course while filming the video, I received in the mail, a promising self-contained battery powered, 2.4ghz wireless point to point set up that would work for those who are still interested in using a headset mic and perhaps not satisfied with the Memorex wireless solution. The transmitter/receiver units are about the size of two match stick boxes side by side each and accept a normal 3.5mm stereo male plug for input/output. Range is up to 20 feet. I'm thinking this may work for someone to remotely control sound pumped through the Acker's line in port or two way scripted or adlib conversation Stay tuned for my testing of this unit.
-
I will post up a video later today with partial armor suited up.
-
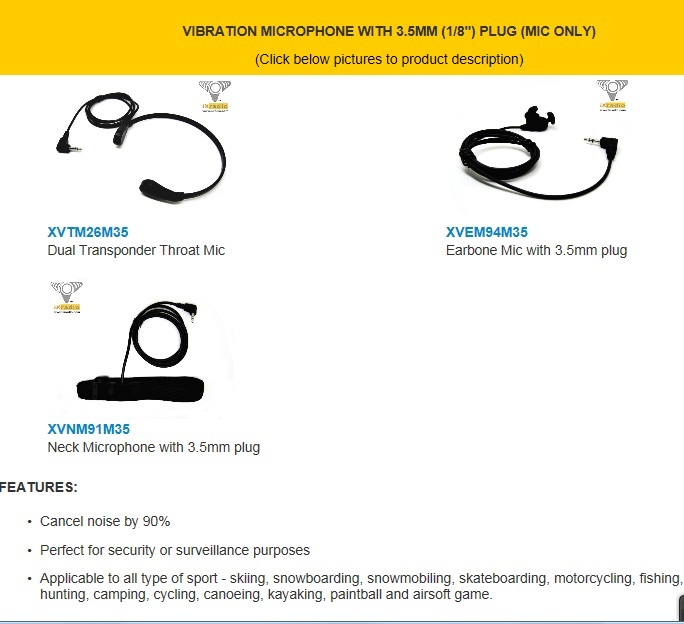
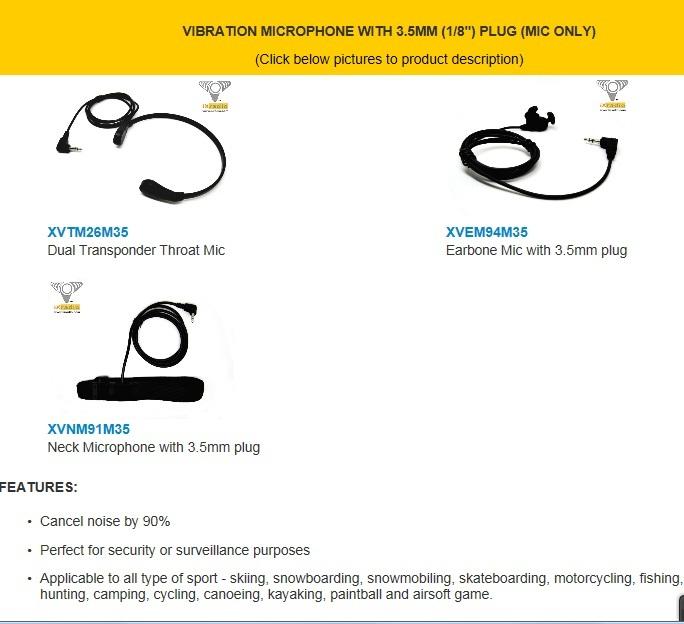
Everyone, There appears to be some interest in finding alternative microphones for use with our armor amp systems. The few users who stated they have used a throat mic did not give too much feedback as to their success, impressions of said microphones or what did they do to make it work. There is a thread on how to rewire a throat mic so it would work with a personal amplifier like an Acker. (thank you for that) I too was one of these people looking for another solution as fitting the unidirectional headset mic that comes the Acker amp worked great for me if the following conditions are met: 1) it actually fits the user's head shape AND inside the helmet comfortably. (I had to rebend the right side of my headset metal holder because the Acker one is TOO big and when I put on my helmet it pushes the mic forward off my ears.) 2) the directional mic doesn't move around or is of the correct proximity to one's mouth. (I used a bandaid to hold the mic to my cheek) 3) when using an iComm, the sound effect level is not user adjustable so if the mic signal to noise ratio is low or inconsistent the squelch noise can be quite a bit louder than the user's voice. Solution? I had a few throat mics that I used with FRS walkie talkies when I used to play airsoft and thought why not try to make them work. Problem was they were all 2.5mm 3 conductor male pin type. Digging through my box of miscellaneous electronics junk and I found a female 2.5mm to 3.5mm adapter I used to use for a wired cell headset back in the day before speakerphones or Bluetooth. I plugged in my 2.5mm pin throat mic into this adapter and then into the Acker and I was in business! I didn't need to wire in a 1.5v power source as mentioned in the other post but that could be beause the Acker supplies power through the mic input port. Of course in this application the ear piece of the throat mic was useless but at least the mic worked. I thought why doesn't someone make a throat mic without the earphone? There would be plenty of other applications for a mic only use right? Since I still had the packaging of the maker of my throat mic, there was the URL of their company and punched up the web browser. Check out the different ones that they offer here at http://www.ixradio.com/shop/computer-accessory/ This vendor seems to change their website every so often. If the above link goes dead just go to their home page http://www.ixradio.com/ and look for the mic only tab. Since it is the same company that makes the one I have and I emailed them about Aker compatibility, they responded shouldn't be any problems. I think we have a viable solution for those looking for an alternative to using an acustic mic. With these no adapters are required since they are 3.5mm male pin. Note that they also carry a few personal amplifiers (albeit pricy) as well, but I could not tell you if they are iComm compatible since the iComm draws some of its power from the Acker. My observations: Using the throat mic with the Acker directly was great. There wasn't any background noise (not that there were any previously using the headset) But the sound level was consistent and I can take off and put on my helmet without any interference or visible wires coming down from my head. The sound quality was a tiny bit hollow sounding so this added some electronic muffled effect to my speech. Not bad and I was pleased. But I'm a Stormtrooper and there should be a squelch click at the beginning and end of my transmission right? Since I also owned the iComm, I plugged it in and gave it another try. Again, I had to experiment a little with the optimum volume level where the squelch effect kind of matched my spoken voice. Here the solution was placement of the mic on my throat as that greatly affected my voice volume. Once I found the sweet spot, I knew I was in business. Now everyone's mileage will vary but for me, I think I found my microphone solution and will try it this weekend at two local Golden Gate Garrison troops and provide additional information. Thanks for your interest.
-
This would be a good resource too. Be sure to check the tutorial link on the top left of the home page for other aspects of armor building. -----------
-
Is it me or the Disney version of the TK in Rebels look familiar?
-
Hi Tony, Sent you a PM for the contact on MTK armor.
-
Interesting use of tech meant for other use and through creativity and perseverance with some trial and error our members come up with some really creative solutions. Thank you for sharing but I would love to see the inside of your helmet! I'm curious as to how you are comfortably fitting all that in there. I have trouble wearing a headset mic and just two fans powered by a 5v USB "lipstick" back up battery. I found some of the less expensive back up battery packs (under $10 ones) don't have any load logic only charging protection. Now if I can find a 9 volt solution in the same USB "lipstick" configuration for those really warm days....
-
In the spirit of Darh Aloha's headset mic's thread.
toybiz replied to Tolo's topic in Build Threads Requireing Maintenance
For those wanting to DYI here is the wiring pin out http://shure.custhelp.com/app/answers/detail/a_id/7/related/1/session/L2F2LzEvdGltZS8xNDExMzYyMzc2L3NpZC9PbjdqTF8ybQ%3D%3D Or use a very expensive adapter... http://audio-video-supply.markertek.com/search?p=R&srid=S2-USWSD01&lbc=markertek&w=Ta4f%20Mini%20Xlr&url=http%3a%2f%2fwww.markertek.com%2fCables%2fAudio-Cables%2fMini-to-XLR-Cables%2fTecNec%2fTA4F-MPS-1-5.xhtml%3fTA4F-MPS-1.5&rk=2&uid=635353111&sid=2&ts=custom&rsc=KvE8EnvgocRhRd9F&method=and&isort=score&view=list&ourl=http%3a%2f%2fwww.markertek.com%2fCables%2fAudio-Cables%2fMini-to-XLR-Cables%2fTecNec%2fTA4F-MPS-1-5.xhtml&rurl=yes -
Congrats Joey on your EIB!