

toybiz
-
Posts
361 -
Joined
-
Last visited
-
Days Won
2
Content Type
Profiles
Forums
Gallery
Articles
Everything posted by toybiz
-
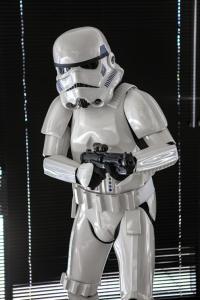
Update - I submitted for my 501st and local garrison approval. (Golden Gate Garrison) and passed phase 1 with my local garrison GML, John Blackshear aka TK3619. If you read this, thanks John for a fast approval of less than 24 hours! Now waiting for TK approval from the 501st so that I can apply for EI here and perhaps Centurion. We'll see how far I take this. I wore the armor at work for Star Wars Day and my inventory photographer helped me take the pics I used for my submission. Here were a few from that afternoon. Co-workers and customers were surprised for sure.... Recruit them when they are young to serve the Empire... Co-workers get into the action... Even a hard working TK deserves a coffee break... Might as well change the oil while I'm here right?
-
MTK Stormtrooper Sandtrooper Armor Star Wars Costume Prop
toybiz replied to Haribon72's topic in eBay Armor
The two areas that I believe needs attention on the MTK are the left bicep and the right forearm. I wish the helmet opening had a bit more material on the left side so be very conservative when trimming there if you can. The back of the thighs don't have the ridge and material has been extended so to allow more leeway when fitting. Also the sides of the AB plate has been extended so no shimming will be needed for most builders up to 36" waist or so. Just keep reading other builds and ask for their body specs to compare. I posted all my measurements on my build thread in the post above. -
MTK Stormtrooper Sandtrooper Armor Star Wars Costume Prop
toybiz replied to Haribon72's topic in eBay Armor
I completed my set of MTK armor and since it was my first set really don't have a personal point of reference to compare with other makers. Everything I learned is base loosely on other builds. Keep this in mind...every make of armor HAS to be fitted. So whether its from MTK or any other, you still need to trim, sand, and shape to fit your body. I had to do some heat shaping on my kit because I read the recommendations about so many others finished MTK sets. Better to show than to keep yacking right? Here's my build www.whitearmor.net/forum/topic/26919-my-first-esb-tk-build-mtk/ -
Any good trooper needs a place to store and tote their armor right? Well, this is what I found and will be using. 24 gallon capacity. 30.7" wide x 19" x 19" sized should fit all the armor along with the boots Wheels seem sturdy enough but may not be durable because they are fairly hard plastic and may get brittle with age. The padded steel tote handle slides fully hidden and away from any snagging. Tuck the arms and legs inside the torso, the boots in the corners and everything fits just right. I found it here at Lowes... http://www.lowes.com/pd_336429-1156-9124SR_4294707881__?productId=3355634&Ntt=tool+box&pl=1¤tURL=%3FNtt%3Dtool%2Bbox&facetInfo=
-
I say a combination of Dritz snap pliers and appropriate sized anvil / punch. Just be aware that the pliers are size specific when buying. Look for deals as they are kind of pricy. I found mine @ Joann fabric, it was an open package return, so they sold it to me at 75% off! Make sure you get the one that fits 5/8" snaps (size 24) The anvil and punch comes with some snap packages I found at Walmart. Pliers work great when making your snap plates for sure but you could do it with the anvil and punch. Then when you build butt plate to cod male snaps and belt snaps, using the anvil and punch work wonders. (because without them, you will wonder how you would have done it )
-
I have that one too, nice find! The #9 Black Series TK - hard to find. Already on eBay for $35+ If anyone knows of a good lead to find some #9 TK, let me know!
-
I found E6000 at Walmart for less than $4 a tube. Depending on your store its not kept with school supply glue or in hardware. I found it on the sewing section. Plus 1 for lexan scissors. I tried other scissors which didn't give as much control or clean edge. If I build another set of armor probably could do it on half the time using lexan scissors instead of tin snips (fat/wide) that I had to cut leaving a lot of material to only sand or cut again for final fit. Keep on learning, I know I still do.
-
Thank you Matt. Its true how it feels to finish. But there is always something to tweek...
-
Hero Frown and Bicep Question [AP]
toybiz replied to usaeatt2's topic in Assembly, Mods, and Painting
Hi Aaron, Must say you are definitely handy with the hobby iron and fabrication skills. I understand about the whole more work for same carrot. We loose teammates and if you are not in commissioned sales, the work of the missing simply gets divided up to those who are left. Our company leaders even built a campaign around this to try and make it sound positive. Better, Faster, Leaner.... The air doesn't change up at the crystal castle, only in the mine shafts... But I digress... Find a way to earn a living at what you love to do... You know the rest. Keep up the great work and I look forward to the rest of your build. -
It's made and shipped from China. I've been there and the term copyright is almost non existent. These are most likely factory back door copies of Rubies since the bulk of their products are manufactured in China. Plus this set is fiberglass! Chances are the quality is sub par and the details will be no better than than a Rubies. However for the price it may be worth it for a teenish Halloween costume. If I could make it fit my 10 year old son, I'd consider it.
-
If you have a hobby store that sells RC cars you'll find the lexan scissors there. Also a hobby iron if you plan on doing return edges. Highly recommend the lexan scissors. Will save you a whole lot of sanding edges. 60 grit is good for taking down the initial edge but get some 220, 400, 1200 for the final polish on tricky / sensitive areas like the inside of the forearms and thighs.
-
Good to finally meet the Lady in White in person! Thanks for all the info at WonderCon.
-
Thank you Germain for your constructive insights, compliments on the arms is all you my friend. I have followed your crusade on "arm gap" for some time. You are welcome usaeatt2. If you need any close up pics of anything let me know. I should have my full photo shoot up next week. Still need to get my 501st approval. Got to get through WonderCon this weekend though
-
OK, here was my first complete fitting. I still have some areas that need some tweeking like the right shoulder bell and the thighs need some adjusting but I was able to climb my stairs. However, I wouldn't do it without hand rails. I couldn't see a thing coming back down wearing the helmet! Sitting? Forget about it. Reclining maybe, but then getting back up? Yeah right.... If the Rebels wanted to defeat the Empire, just knock over the TKs and you would be at a tactical advantage for sure! I'm sure there is room for improvement but I guess I need to add more photos for everyone to take a closer look. So stay tuned for those once I get my photographer buddy to give me a hand. A very big thank you to all the others that gone before me, your documentation of your journey was invaluable and gave me insight into the future. Those of your who think you cannot, give yourself a chance to learn and try. My build started in the beginning of January and I am still tweeking today. Almost 3 months. Remember, every journey begins with a step ... and being here on FISD is your first. You CAN and will DO it!
-
The shins still needed some fitting so I taped and measured then walked around. Waited to the next day, taped and measured then walked around before I made my marks. I decided to go with velcro over the strap and hooks for reason of ease of putting on / off. However if I simply put the velcro on half of the cover strip and the other side on the overlap, it would have about 3/16" worth of gap due to the thickness of the industrial velcro. So I added a 1 1/2" wide backing strip where about 1/2 inch (12mm) wide strip of scratchy (hook) part of the velcro was attached facing towards the opening. The fuzzy side is attached to the opposite inside of the shin and about an inch (25mm) wide. This allowed a bit more adjustablity when closing and the close gap to be slightly thinner. The 25mm cover strip is shown here clamped and just there to cover the joint.
-
Here is the belt. The drop boxes are fitted to line up with the edge of the belt and the last ammo box edge. It doesn't look like it from this angle dangling on the floor. The arms are strapped connecting the forearms too. I found that the forearms kept falling and pinching when moving. Figured the 2" elastic from the bicep to the forearms may provide some pinch protection by locking in a consistent space between them so the inside edge of the forearms will actually cross over inside tops of the biceps when bending. Thanks Germain for the persistance on everyone's build on this very important detail of the build. I am now an advocate for strapping the forearms to the biceps.
-
Well onto the Ab and Kidney connection. After taping and trying and taping and trying the Ab and Kidney several times, then getting my son to help make some marks on the sides, I found I had about 1 1/2" overlap on the sides. First I thought do like most builds and find the relative center, draw my line and cut away. Then I read some recommendations that having some overlap is OK, in case I decide to go to town on stack of bacon or too many holiday dinners, to have some "growing" room is a good idea. After looking at Meander's ATA build ( http://www.whitearmor.net/forum/topic/19692-meanders-tk-build-ata ) it gave me an idea of how I was going to approach this. I understood his reason for the locking plates so the sides of the Ab or Kidney did not pop out. Looking at some screen captures, I realize the popping out sides is screen accurate, but then again those costumes are not subject to up close scrutiny that ours can in public, so the following is what I came up with. This is where I decided to commit my left side Ab and Kidney split. It may not be apparent, but the Kidney is overlapped by the Ab here as I left the extra Kidney side material and trimmed it slightly as to fit behind the Ab. I made a snap plate and secured it with split rivets and E6000 to the Ab. The Kidney elastic straps were secured with the split rivets. You can see the extra side material that I left to sit inside the Ab with the overlap. This is the view from the outside of the left side Kidney. The pencil line is where the Ab overlaps to. The cut outs is about where the male snaps line up to. This is kind of how the right Ab and Kidney overlap comes together. Close up of the right Ab with the overlap tabs that I cut out. Added a "bridge" over the tabs that fit in between the extra side shims. This is what holds in the right side overlap. View of the slots from the front. You can see where the Ab overlap slides into. I allowed some vertical space so the Ab and Kidney could slide up/down and in/out. Followed by the view of the Kidney plate. I have since added a total of 3 elastic straps for both left and right sides.
-
Thank you Ian, only the left bicep needs to be reshaped. Highly recommended for any MTK builders out there. If you don't have a PVC coupler, I'm sure a softball bat or glass jar would work just as well. Plus if you use a softball bat you have the added benefit of a handle and dont have to put your hands in the water!
-
After trimming the eyes and teeth, I decided to paint the inside semi-gloss black using Krylon Fusion for plastic paint. Like so many others, the black interior just adds a bit more realism, not accuracy mind you, but when was the last time anyone saw a white interior in a motorcycle helmet? Tried to mask off the MTK sticker logo but didn't do that great of a job at it. Used Testors paint. Semi-gloss black, #138 Grey on the helmet/ab buttons and French Blue Testors Masters paint for the ab buttons. I have used Quik Steel / epoxy putty on many automotive repairs and saw that some builders put cotton cloth soaked with CA glue or plastic body filter (Bondo) on the area right behind the mic tip mounts, so thought that Quik Steel would be a great alternative. Just cut off about 1/2" worth and kneaded it together then spread it out behind the mic tip mounts to reinforce this area. It cures in less than an hour to a rock hard surface the can be sanded, drilled, and even tapped. Here are the mic tips mounted through the Quik Steel using a rubber fender washer, metal fender washer, and faucet washer seal for a neat finished appearance. Tooth cut out and painted with semi-gloss black. This angle doesn't quite show it but the end of the frown goes slightly further to a sharp point. Trimmed, fitted, sanded and painted the ears, mounted the lens, painted the vocorder and frown then added the decals. It's true that the ears take a long time. Mine took about 4 hours to fit them.
-
Following with great interest. Anything that would be self contained in the helmet and blows air? Wow! Sign me up now! What if we have an Echo fan kit as a base since his bracket could neatly hold all the components? Thank you Skyone for your focus and ingenuity!
-
Not a whole lot to report on building the helmet. There are so many threads on the subject. The only thing I did differently was use magnets and a pair of long nose ratcheting clamp pliers to hold the sides in/down to get a better seating of the cap / back to the face before drilling the side rivet holes. I wanted a low brow for my ESB and read some builds where the brow changed once the side rivets finally went in, that was probably the cap / back shifted up once the tension was removed this is why I used the long nose clamps and then added a side rivet just on the center/top of the helmet "tubes" where it connected to the face. There low brow ready for action. The teeth were more or less where I wanted them. The final teeth were cleaned up slightly but not that noticeable on the final because of the black frown kind of blends with the teeth vents. Whereas ANH grey actually contrasts with the frown vents.
-
Now onto the ammo belt. I have read many builds and most don't document if they curved the ammo belt. Personally I think the ABS is thin enough to not make much of a difference, but I thought it couldn't hurt and it would hopefully sit a bit more closer to the curve of the ab plate. Again, I had access to a heat gun but I invested in a hobby heat sealing iron and figured why not try using it to reshape the ammo belt? I just set the heat to about 2 and a half and let the iron warm up the armor while moving it around and round on the flat spots between the ammo blocks and pulled back in on the far end of the ammo belt. This gave the ammo belt a gentle curve and it did not bend at the corners like some have experienced using a heat gun unless you followed Panda Trooper's wonderful paint stick method. I thought this netted a similar outcome without the need for paint sticks. What do you all think?
-
I have also read that some people had challenges with the knee ammo pack, so I thought why not use the 3 inch PVC coupler to reshape the knee pack? The clamps were an almost a perfect fit in between each block. So I simply wrapped the pack around the coupler and secured it with a clamp on every flat spot between the blocks before the hot water bath. After about 15 minutes soaking, this was the final outcome. I had access to a heat gun but found that it was too easy to stretch or warp the armor if you are not careful, plus soaking the parts is fairly passive method for a great outcome. Double win!
-
After following some recent MTK builds, I noticed there was a common recommendation for every build. 1) The left bicep looked larger than the right. 2) The right forearm looked larger than the left. So with that in mind, I set out a plan to even things up before moving further. This took me about 6 hours over a course of 3 days not including overnight drying of E6000 gluing since I used a backing strip on every butt joint. I was fortunate enough to score a 32"x48", 1mm sheet of white polyethylene that I used for every backing strip and snap plate. Note the left bicep appears much wider than the right. In reality the shape of the left is oval and the right is round shape. This gives the illusion from the front that the left bicep is wider. MTK (Mike) if you read this, please consider reshaping the left bicep so this modification could be avoided for future MTK builds. I used 15mm cover strips and built/glued the side visible from the outside on the left bicep before moving onto the next step. I measured my biceps and found at my local Home Depot that a 3 inch PVC drain coupler was close in outside diameter, so picked one up for a couple of bucks. I wrapped left bicep around the PVC coupler with some rubber bands and some nylon string. Not too tight, not too loose so as not to wrinkle the armor while it was relaxing in the bucket of boiling water. Getting ready for its hot tube bath. I let it soak for about 15 minutes or until cool enough that I could put my hand in the water. ABS will only stay pliable at boiling temps and starts to harden not too long after the water had a chance to cool. What a difference a bath makes. Now all I needed to do was to a final fitting of the left bicep before removing the ridge and butt joining the inside seam. Not much to report on the right forearm, I just removed the inside butt join ridge and fitted the right forearm until it was closer in size to the left.
-
Thanks Joey for the support! Not much to report here. Some rough trimming of the shoulder bells. My final trim left about 3-5mm of return edge on the bottoms of the bells. Next the rough trim of the shins top and bottom. Plenty of sanding and trimming was needed after the initial fitting. This is a very individual part of any armor build as everyone is built different. I left about 3-6mm return edge on the tops of the shins. Next post I will cover some of the reshaping I did with the biceps.
